How to Fix System Issues on Samsung Phones?
There are many systematic errors that can arise within a Samsung device, causing problems that can be irritating. You need a good platform that can repair Android system issues. This guide recognizes the ability of Dr.Fone - System Repair (Android) that helps in executing a proper Android repair.
Manage Your Phone Wherever You Go
Index
Part 1: When Do You Need Dr.Fone - System Repair (Android)?
The essential need for an Android system repair tool can arise for many reasons. Dr.Fone - System Repair (Android) provides comprehensive support to many major system issues that can occur in an Android device. From fundamental issues like "Play Store Not Working" to complex problems like the black screen of death, Dr.Fone can resolve it all.
Along with these aforementioned issues, it can also resolve problems of crashing apps, Android stuck in a boot loop, and bricked devices. This makes the tool diverse and effective in resolving Android system errors.
Part 2: How to Fix Samsung Android System Issues and Restore It to Normal?
We will now shift to discussing the steps of performing an Android repair on a problematic Samsung device. Keep in mind that the repairing process will erase all data in the device; thus, you should keep a proper backup of your Android.
Open Wondershare Dr.Fone on your computer and enter the Toolbox section from the left panel. Connect the Samsung phone or tablet that requires repair, and proceed by choosing System Repair from the available options.

* Dr.Fone Mac version still has the old interface, but it does not affect the use of Dr.Fone function, we will update it as soon as possible.
As you progress to the next screen, select Android to continue repairing the particular device type.

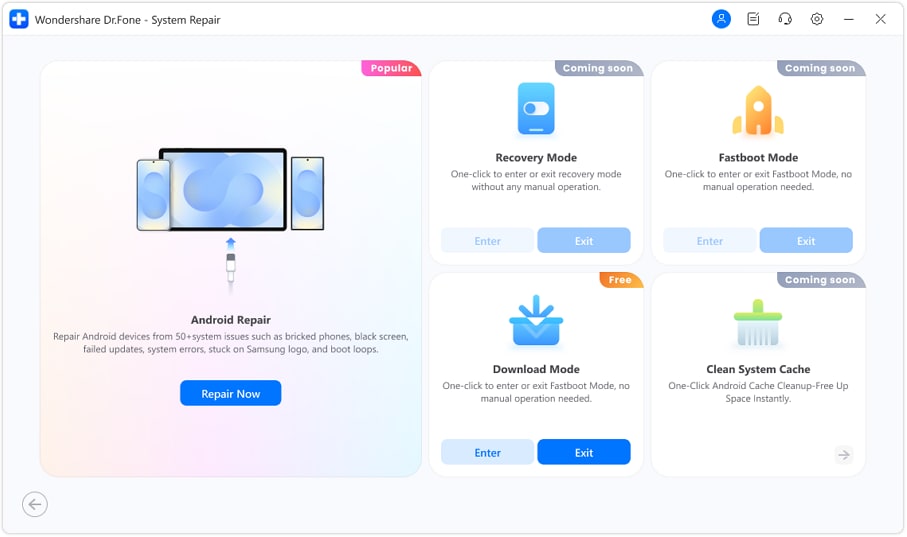
Choose the Android Repair option and click Repair Now to begin the repair process for your Samsung phone or tablet.
When prompted, select Samsung as the device brand, then click Start. Choosing the correct brand ensures the tool scans for the appropriate firmware packages and Samsung-specific repair options.
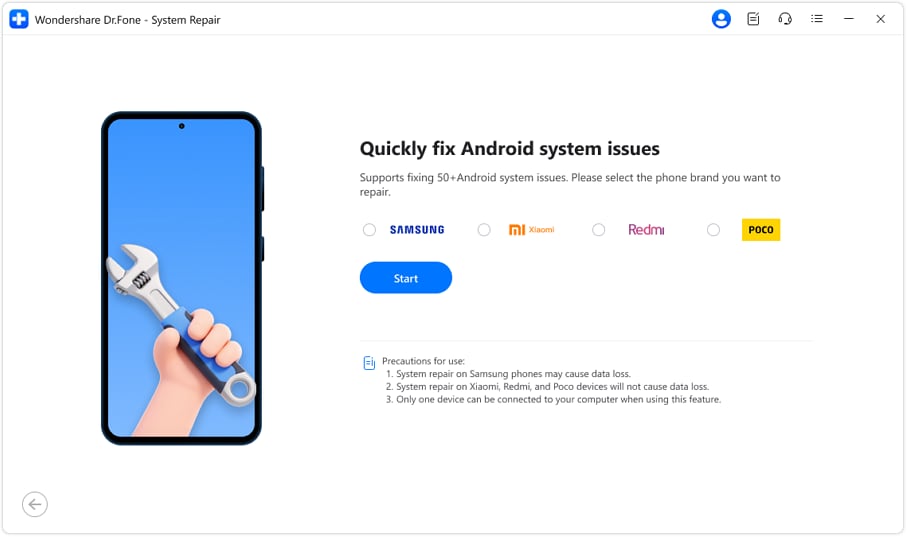
You will be directed to a new screen where you have to click Start to initiate the repairing process. Give a read of the available list of Samsung problems that can be resolved with this process.

While you propagate onto the next window, the platform will automatically detect the brand of the Android device being repaired. Following this, select the Name, Model, Country, and Carrier according to the available list.
You can select OPEN in the Carrier section if the device is already unlocked. Following this, checkmark the warning displaying I agree with the warning and I am ready to proceed. Click Next to continue repairing your Android device.

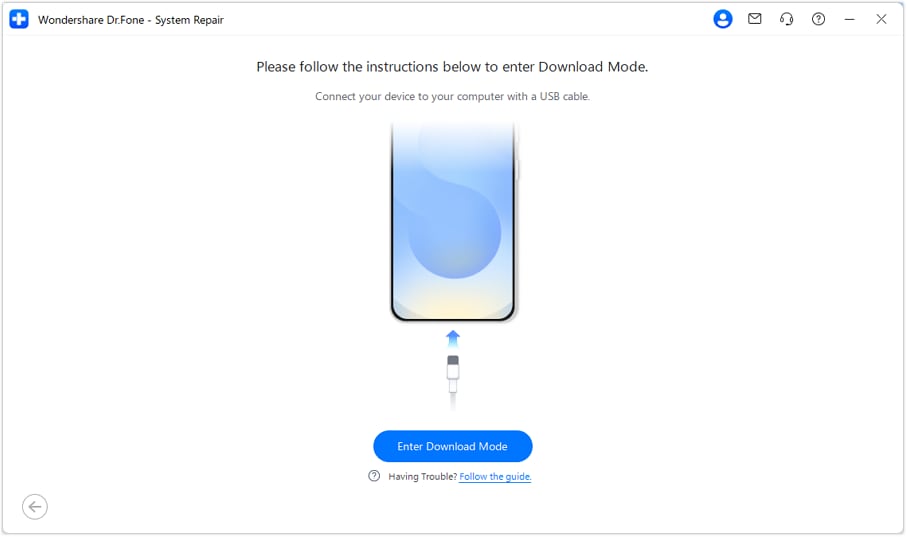
Method 1. Enter Download Mode with One-click
Make sure the device is connected to the computer and already unlocked. Then click "Enter Download Mode" to start putting the Samsung device into Download Mode.
Method 2. Enter Download Mode With Home Button
Once you are directed to the next screen, you will have to put your Samsung device in Download Mode. For a device that is a Phone with a Home button, follow the on-screen instructions by powering off the phone. Continue to press and hold the Volume Down, Home, and Power buttons simultaneously. After that, press the Volume Up button to enter the Download Mode.

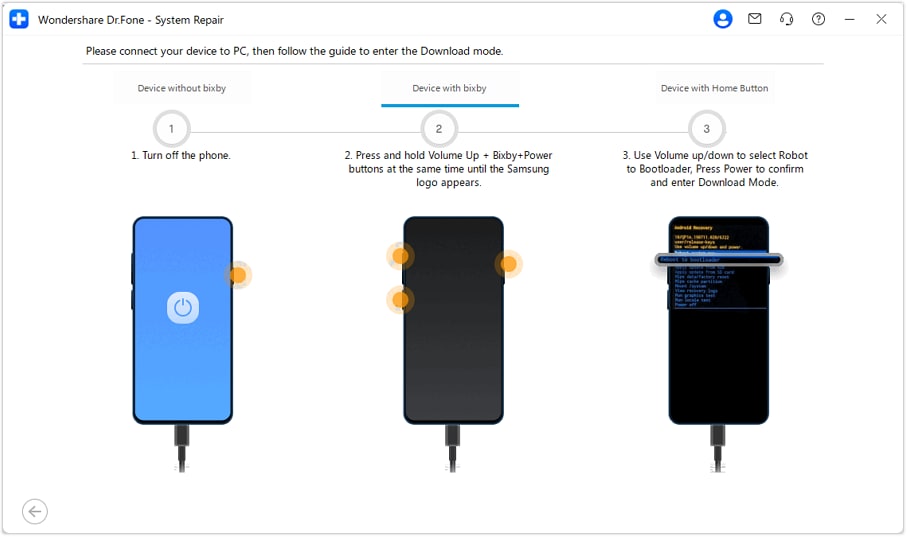
Method 3. Enter Download Mode With Bixby Button
For a device that is a Phone with a Bixby button, follow the on-screen instructions by powering off the phone. Continue to press and hold the Volume Up, Bixby, and Power buttons simultaneously. After that, press the Volume Up/Down button to select Robot to Bootloader, press Power button to enter the Download Mode.
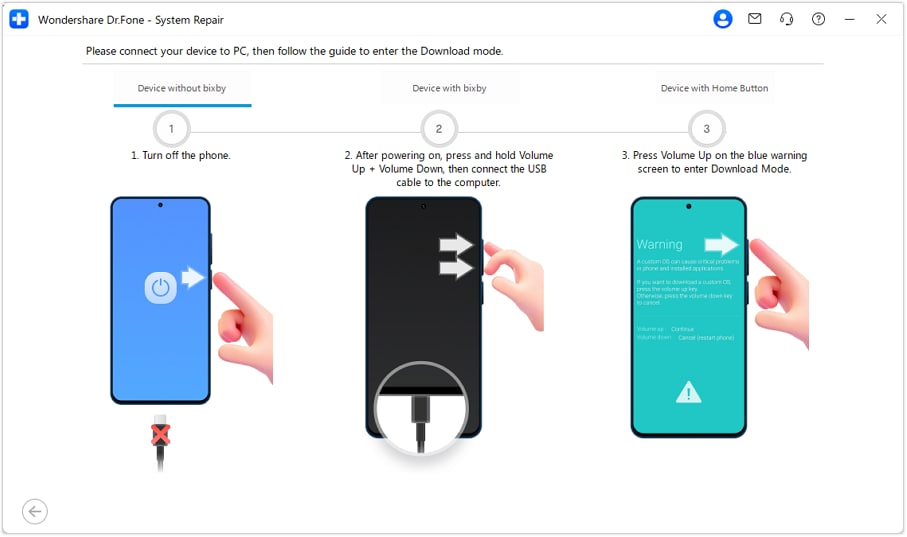
Method 4. Enter Download Mode With Volumn Buttons
For a device that is a Phone without a Bixby button, follow the on-screen instructions by powering off the phone and disconnecting from the PC.After powering on, press and hold the Volume Up, and Volumn Down button, then connect the USB to the computer. After that, press the Volume Up button on the blue warning screen to enter the Download Mode.
Once the Samsung device enters Download Mode, the firmware automatically starts to download on the platform. You can click Stop at any instance to abort the process.

As it downloads, the platform verifies and puts its details on display. By choosing Fix Now, you can install the firmware on your Samsung device.

The Android repair may erase all data on your device. Type in "000000" to Confirm and proceed.

This will initiate the system repairing process, which can be assessed with the progress bar displayed on the screen.

Once the process concludes, the prompt window appears with a proper completion message. Click Done to close the tool if the Samsung device starts properly. If the device doesn't start, tap on Try Again to repeat the process.

WHAT YOU'LL NEED

Dr.Fone provides a complete set of tools for solving all iOS/Android phone problems.
Need help?
You might find the answer to your question in the FAQ or additional information below: