4 Ways to Backup iPhone/iPad to Computer
iPhone Backup
- iPhone Data Backup
- 1. Back up iPhone in Recovery Mode
- 2. Back Up iPhone With/Without iTunes
- 3. Back up iPhone to Mac
- 4. Back up iPhone/iPad to Computer
- 5. Back up iPhone to Mac Catalina
- 6. Back up Jailbreak Apps And Restore
- 7. iPhone Backup Software
- 8. Back up iPhone/iPad Easily
- 9. Back up iPhone/iPad in DFU Mode
- 10. Back up iPhone Apps and App Data
- 11. Back up Notes on iPhone and iPad
- 12. Back up iOS to External Hard Drive
- 13. Export Notes from iPhone to PC/Mac
- 14.Back up iPhone Photos to Google Photos
- 15. Back Up Your iPhone Voicemails
- 16. Back Up to External Drive
- 17.How to Back Up to NAS
- 18.Back Up iPhone With Broken Screen
- 19.Back Up iPhone to Google Drive
- 20.Buy Used iPhones
- 21.Sell Used Phone for Cash
- 22.Sell Used iPhone for Dollar
- 23.How Much is My iPhone Worth
- iPhone Data Recovery
- 1. Recover iPhone Data Without Backup
- 2. Restore Calendar on iPhone
- 3. Recover Call History on iPhone
- 4. Recover iPhone Lost Data
- 5. Restore iPhone in Recovery Mode
- 6. Undelete iPhone Backup Files
- 7. Recover Deleted iPhone Messages
- iPhone Data Restore
- 1. Restore iPhone from iTunes Backup
- 2. Restore iPhone after Downgrade
- 3. Restore iPhone from Backup
- 4. Restore iPhone from iPad Backup
- 5. Restore iPhone from DFU Mode
- 6. Restore iPhone Deleted Text Message
- iPhone Backup Problems
- 1. Find iPhone Backup Location on Mac
- 2. iPhone Backup Password Never Set
- 3. iPhone Backup Password Forget
- 4. iCloud Backup Taking Forever
- 5. iPhone Won't Backup to iCloud
- 6. iTunes Won't Backup iPhone
- iPhone Restore Problems
- 1. iTunes Stuck on Verifying iPhone
- 2. Not Space to Restore iPhone Backup
- 3. iTunes Backup Not Restoring
- 4. iPhone Won't Restore
- WhatsApp Backup & Restore
- 1. WhatsApp from Google Drive to iOS
- 2. Restore Old WhatsApp Backup
- 3. Restore WhatsApp Chat on iPhone
- 4. Retrieve WhatsApp Chat History
- 5. See Deleted Messages on WhatsApp
- 6. Restore WhatsApp Stuck on iPhone
- 7. iPhone WhatsApp to Google Drive
- 8. Back Up WhatsApp on iPhone
- 9. Backup WhatsApp Data before Changing Number
- iPhone Backup Tips
- 1. Extract Data From iPhone
- 2. Encrypt iPhone Backup
- 3. Reset iPhone Backup Password
- 4. Extract iPhone Backup in Win 10
- 5. How Long take iPhone to Backup
- 6. Find iPhone Backup Location
- 7. iPhone Backup Password
- 8. View iPhone Backup on Computer
- 9. iPhone Backup with iTunes/iCloud
- 10.Check Last Backup on iPhone
- 11.How To Encrypt iPhone Backup
- 12. Best Backup Chargers for iPhone
- 13. Speed Up Your iPhone Backups
- 14. Save Data When iPhone Disabled
- ● Manage/transfer/recover data
- ● Unlock screen/activate/FRP lock
- ● Fix most iOS and Android issues
- Back up Now Back up Now Back up Now
Oct 24, 2025 • Filed to: Backup & Restore Solutions • Proven solutions
Dr.Fone Basic:
Better Control for Your Phone
Manage, transfer, back up, restore, and mirror your device
Nothing can kill the joy of an iPhone/iPad owner faster than realizing that you’ve lost your data or those wonderful Apps because you forgot to back up your iPhone/iPad to your computer, isn’t it?. Sometimes, you might lose important documents on your iPhone/iPad or it could be your favorite songs you purchased from iTunes, phone numbers of your friends, colleagues, important photos, etc. That’s why backing up your data to your PC/Mac is essential. It ensures that everything is taken care of in case of any accidental damage to your device, or loss due to software upgrades, factory settings of your device, etc.
You can safeguard your iPhone information by regularly backing up files to your computer using iTunes or other alternative means which are far better choices. So, follow the guide below to explore how to backup iPhone/iPad to a computer or a Mac.
Part 1: How to backup iPhone/iPad to computer using iTunes Backup?
Backing up your files to your PC/Mac with iTunes enables you to backup the most important data on your iPhone/iPad, including contacts, photos, calendars, notes, messages, etc. It gives you the ability to encrypt your iPhone Backup and save your backup files to your computer. You can also restore the iTunes backup to your iPhone/iPad on your computer.
Note: Before you make a backup of your documents, make sure you have installed the latest iTunes on your computer.
Here are how to backup iPhone/iPad to PC with iTunes:
Step 1: Connect your iPhone/iPad to the computer
Once you have installed the latest iTunes on your computer, connect your iPhone/iPad to your computer via a recommended lightning USB cord which is in perfect working condition.
Step 2: Launch iTunes to setup backup
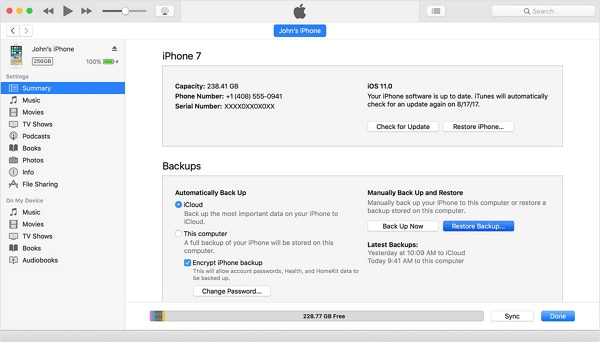
Open iTunes and on the home page, click on the Device icon next to the category drop-down menu on the left side of the iTunes window. Select Summary on the right bar of the program and then select “This computer” under “Automatically Back up”. To ensure that your passwords and other data are backed up as well, check the “Encrypt” box. You will be prompted to create a password to protect your encrypted backups which will be automatically stored in a Keychain.
Note that this password will be requested when you want to access your backup files.

Step 3: Backup your files with iTunes
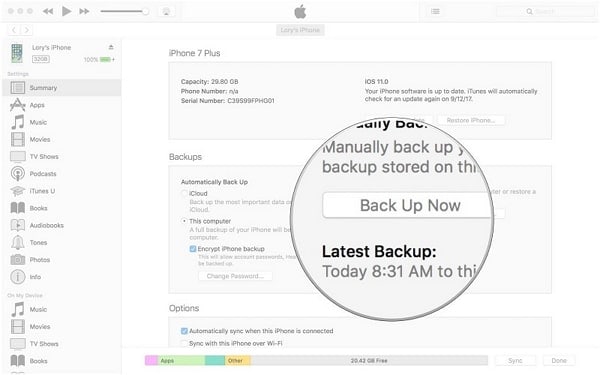
After all necessary settings have been put in place, you can now select “Back Up Now” under Manually Back Up. Immediately your backup process would begin but it might take some time to complete a backup depending on the number of files. Simply Click Done when the backup has been completed.

Part 2: How to backup iPhone/iPad to the computer using iTunes Sync
With iTunes set on your computer, you can sync a lot of files such as Songs, Films, Books, etc. you might already have them handy on your iPhone/iPad but backing them up is the best thing to do. You can also back up your photos and music by syncing them from your iPhone/iPad to a folder on your computer.
Note that when you sync your iPhone/iPad with iTunes, the photos or music on your iOS device automatically updates itself to match the album on your computer.
There are several file types that can be easily synced with your computer using iTunes. These files include media files such as songs, albums, playlists, movies, podcasts, audiobooks, TV shows, and even books. It can also sync photos and video files.
The required steps to sync iPhone/iPad using iTunes are as follows:
Steps 1: Connect Your Device and Launch iTunes
Connect your iPhone/iPad to your computer via a functional lightning USB Cord, input your Apple password so that the Computer can gain access to your files. Open iTunes on your Windows PC/Mac and then click on the Device icon in iTunes windows which is at the top left side of the screen.

Step 2: Select What to Sync
On the left sidebar of the iTunes window, select Music or any other category that you wish to sync with your PC. At the top of that particular window, select the checkbox next to Sync.

Step 3: Apply the Sync
Click the Sync button under the right bottom corner of this window. If it doesn't start automatically, click the Sync button manually
Once it is successful, you can view your synced data on the folder you’ve created for the backup on your computer.
Part 3: How to back up your iPhone/iPad your PC/Mac without iTunes?
Backup iPhone to Mac (Mac os Catalina and Big Sur)
Apple has ditched iTunes from Mac since Mac os Catalina. How Mac users back up iPhone without iTunes? Learn from following steps:
Step 1. Connect iPhone to your Mac with cable or Wi-Fi.
Step 2. Open Finder, select your iPhone in the Finder sidebar.

Step 3.Select General.

Step 4. Do the following options and click Backup Up Now.

Backup iPhone to a PC/Mac using Dr.Fone - Phone Backup
You can back up your files from your device to your computer without using iTunes. Obviously, iTunes is not the best option as files backed up in it cannot be accessed or previewed. Alternatively, you can use Dr.Fone - Phone Backup (iOS) to back up your iPhone/iPad to your computer. This is a more effective and simple method to backup and restores your iPhone/iPad.

Dr.Fone - Phone Backup (iOS)
Dedicated Tool to Backup Your iPhone/iPad to a Computer Selectively.
- One-click to backup all or some iOS data to your computer.
- You can preview and restore any data from the backup to a device.
- Export any data from the backup to your computer.
- No data loss occurs during the restoration.
- Selectively backup and restore any data of iPhone or iPad.
Follow the steps below to back up your iPhone to the computer.
Step 1: Connect your iPhone device to the computer
First of all, install and launch Dr.Fone on your computer. It will display a lot of different options, simply Choose “Phone Backup”. Now, use a USB cable to connect your iPhone/iPad to your computer. Dr.Fone will automatically recognize your device (if the cable is in perfect working condition and your device is unlocked).
On the next screen select the “Phone Backup” option to proceed to the next stage.

Step 2: Select the File types to Backup
You will find a list of files that can be accessed by Dr.Fone on your iPhone. Simply check the boxes next to each file type name of the files you will like to back up to your personal computer and click on the “Backup” button.

Step 3: View Backed up files
Once the download has been completed, you should see a confirmation page that your backup has been completed. Simply click on “View Backup History” to view the list of the files that have been backed up to your computer. You might also select “Open Backup Location” to be taken to the location of the backup on your computer.

Part 4: How to transfer iPhone/iPad data to computer without iTunes?
If you want to complete an iPhone transfer without iTunes for backup purposes, then you must have the right iPhone/iPad transfer tools. The right tool is important because it will make your transfer much easier when you want to transfer from iPhone/iPad to your personal computer selectively.
The best tool to use is Dr.Fone - Phone Manager (iOS). Dr.Fone is an excellent all-in-one software package design to make the transfer of files from your iOS Device smooth. Be its important documents, multimedia, you can transfer files with Dr.Fone for free. Using Dr.Fone - Phone Manager (iOS) is an easier way to transfer data from iPhone/iPad to your Computer/Mac without difficulties. Using this tool, you can virtually transfer any files of your choice before.

Dr.Fone - Phone Manager (iOS)
Transfer iPhone/iPad Data to Computer for Backup Without iTunes
- Transfer, manage, sync, and export/import your music, photos, videos, contacts, SMS, etc.
- Backup your music, photos, videos, contacts, SMS, etc. to PC/Mac and restore them easily.
- Transfer the music, photos, videos, contacts, messages, etc from device to device.
- Transfer media files between iOS devices and iTunes.
Step 1: Get your iOS device connected to PC/Mac
First, install and launch Dr.Fone on your computer. Now connect your iPhone/iPad to your computer via a USB Cable in which options will be displayed. Dr.Fone will recognize your device instantly after which you can select the “Phone Manager” option from the home screen.
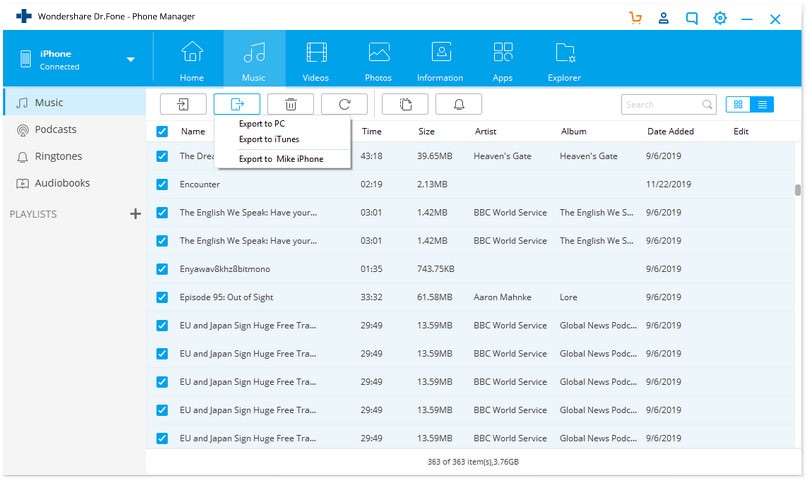
Select one of the options available at the top of the interface (Music, Videos, Photos, Information, or Apps). Let’s take the example of Music files.

Step 2: Select files and choose to Export
On Selecting Music, it will reflect all the music files available on your device. So, make a selection of all the files that you would like to have a backup to the PC and then press the “Export” button after that choose “Export to PC”.

Step 3: Define the final output folder and start exporting
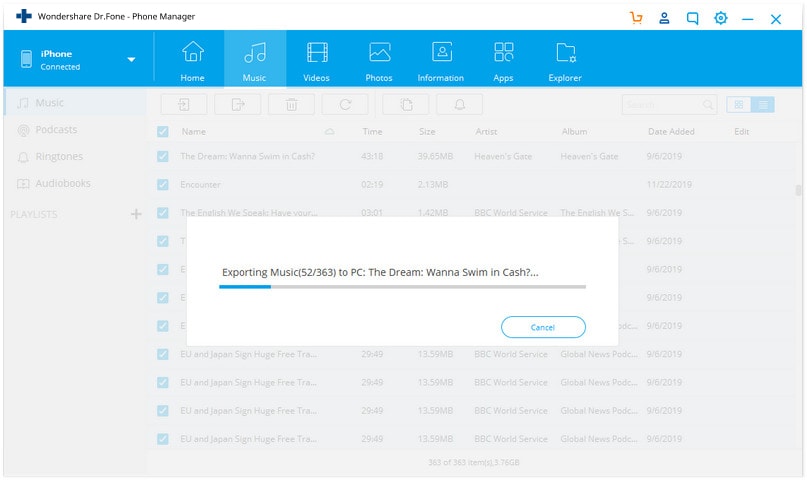
Select the output folder on your PC to save the files and press OK. Your files would now be exported to your PC in no time, all in a hassle-free manner. Now you know how to backup iPhone to computer by using Dr.Fone - Phone Manager (iOS).

Through the article, you have been informed how to backup iPhone to computer with various methods. Simply follow the guide and use Dr.Fone toolkits while dealing with data backup of your iPhone and ensure safety against any loss.
Dr.Fone Basic:
Better Control for Your Phone
Manage, transfer, back up, restore, and mirror your device


James Davis
staff Editor