Resolve common problems and system crashes on both iPhone and Android devices.


 100% Security Verified | No Subscription Required | No Malware

 :

 ChatGPT
 Perplexity
 Gemini
 Claude
 Grok
If Google Play services won't update, first open its official update settings, then check your connection and free storage before clearing caches. Google Play services is not the Play Store, and clearing its storage is not the same as clearing its cache. This guide helps you choose the next step for a failed install, a missing Update button, or an app that keeps asking you to update.
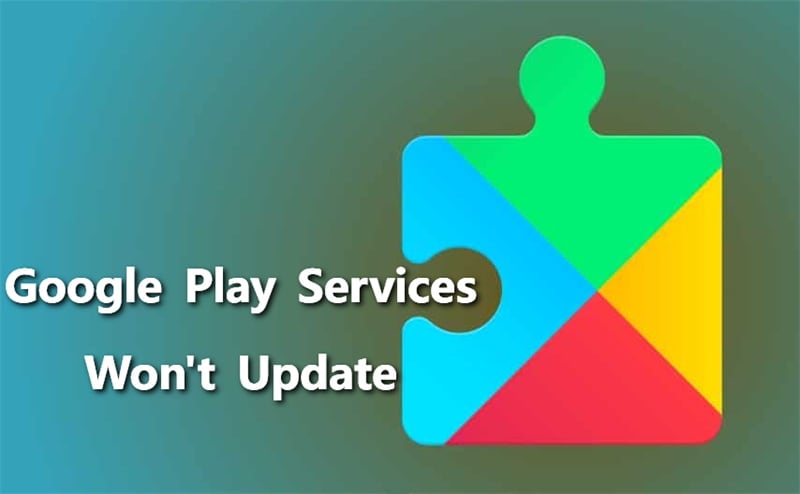

Help! My Android phone keeps saying 'Google Play services won't run unless you update google play services,' but every time I try, the update fails. How do I fix this?
Android User Forum Community 2026
After each change, retry the Google Play services update and reopen the affected app. Stop when it works. Do not start with a factory reset, a random APK download, or firmware repair for a routine update problem.
Start here: match the symptom to the next step
| What you see | Try first | What decides the next step |
|---|---|---|
| Update fails, downloads forever, or stays pending | Connection and restart, then free storage | Retry the official update after each change. If it still fails, clear caches. |
| No Update button, or only Deactivate / Open | Check the official Services page | No offered update is not proof of corruption; check OS and certification if the warning persists. |
| "Won't run unless you update Google Play services" | Update Services, then reopen the affected app | Check whether one app or several Google-dependent apps fail. If just one remains broken, update that app in the Play Store and contact its developer rather than resetting the whole phone. |
| The Play Store cannot open or update apps | Repair the Store's update path | Work on the Store separately; it is not the Services app. |
| Old Android, custom ROM, or device not certified | Check eligibility | Use the manufacturer's supported software or support path; cleaning cache cannot add Google certification. |
| All low-risk checks failed | Choose a later troubleshooting step | Compare account/data/reset risks before proceeding; use firmware repair only if the device and problem fit. |
In this article
Part 1. Why Your Google Play Services Won’t Update: Common Causes
If you can't update Google Play services, several different conditions can produce the same message. These are checks, not a diagnosis of your phone:
- Compatibility or modified software: an unsupported Android release, an uncertified device, or altered system software may prevent Google features or updates from working correctly.
- Unstable connectivity: an interrupted Wi-Fi or mobile-data connection can stall the download.
- Low internal storage: the phone needs room for downloads and installation; an almost-full device can block updates.
- App cache or Store state: temporary files or a problem in the Play Store may interfere with the update path.
- Wider system trouble: failed system updates, repeated crashes, or a boot loop require a different assessment from a single app requesting a newer Services version.
Check Android version and device certification first
Google Play services currently supports Android 7.0 (API level 24) and later. In Settings, search for Android version, or open About phone > Android version. If your device is below that minimum, check for an official manufacturer OS update. If none is available, a cache clear, factory reset, or repair app cannot make that old OS eligible for current Services support.
In the Play Store > profile picture > Settings > About, look for Play Protect certification. If it says the device is not certified, follow Google's device-specific guidance or contact the manufacturer. Turning off Play Protect scanning does not fix certification. For a rooted device, custom ROM, or unlocked bootloader, ask the manufacturer about returning to supported original software; do not blindly relock or flash it.
These are separate components: Google Play services connects apps to capabilities such as Google Sign-In and Maps; the Google Play Store distributes apps; a Google Play system update updates Android system components. A similarly named error does not mean they share one update button.
Part 2. Optional System Repair for Supported Android Devices
Dr.Fone - System Repair (Android) provides a guided firmware-repair workflow for supported Samsung, Xiaomi, Redmi, and POCO devices, helping with software problems such as boot loops, failed system updates, and repeated crashes. It can be useful when the update issue accompanies wider system trouble and manual troubleshooting has not helped.
Explore Dr.Fone - System Repair (Android) if you have a supported device and a Windows PC. This Android repair feature is Windows-only, not a macOS or on-phone repair tool. Confirm that your exact model is offered in the program before proceeding. It does not repair physical damage or bypass Google's OS and certification requirements.
 Guided firmware selection for supported Android devices.
- Address software-related boot loops, black screens, and failed system updates.
- Choose the supported Samsung, Xiaomi, Redmi, or POCO workflow.
- Follow device-specific prompts instead of selecting firmware blindly.
How to use Dr.Fone for a supported Samsung system problem
This compact walkthrough follows the official Samsung repair guide. Use a Windows PC, a reliable USB cable, a supported Samsung model, and a backup. Screens may differ by program version.
-
Step 1 Connect the phone and open System Repair
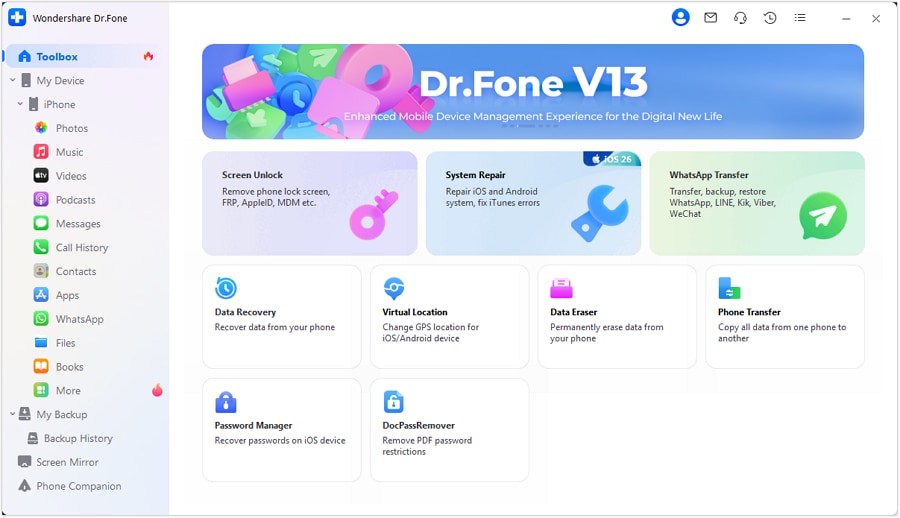
Open Dr.Fone, connect the Samsung device by USB, and select Toolbox > System Repair. Choose Android, then Android Repair > Repair Now.
-
Step 2 Choose the Samsung repair workflow
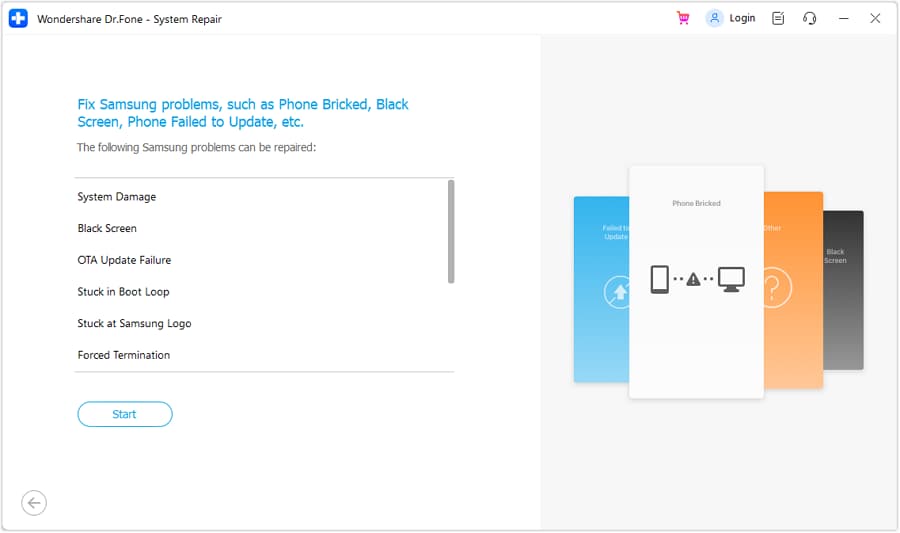
Select Samsung and Start. Read the issue list and the on-screen preparation instructions, then continue with Start only if your device and software problem fit.
-
Step 3 Confirm the device and firmware, then authorize erasure
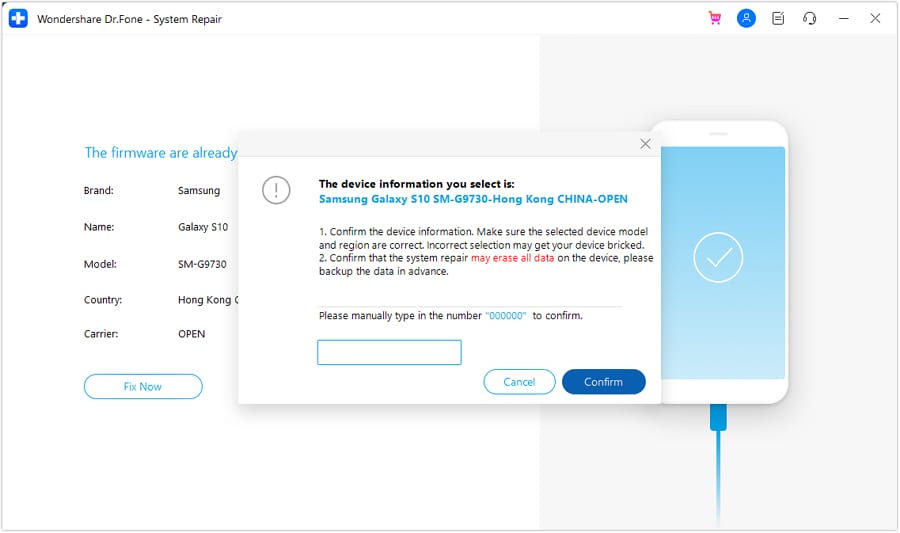
Select the exact device name, model, country/region, and carrier; the guide uses OPEN for an unlocked carrier. Review the data-erasure warning, confirm the details, and select Next.
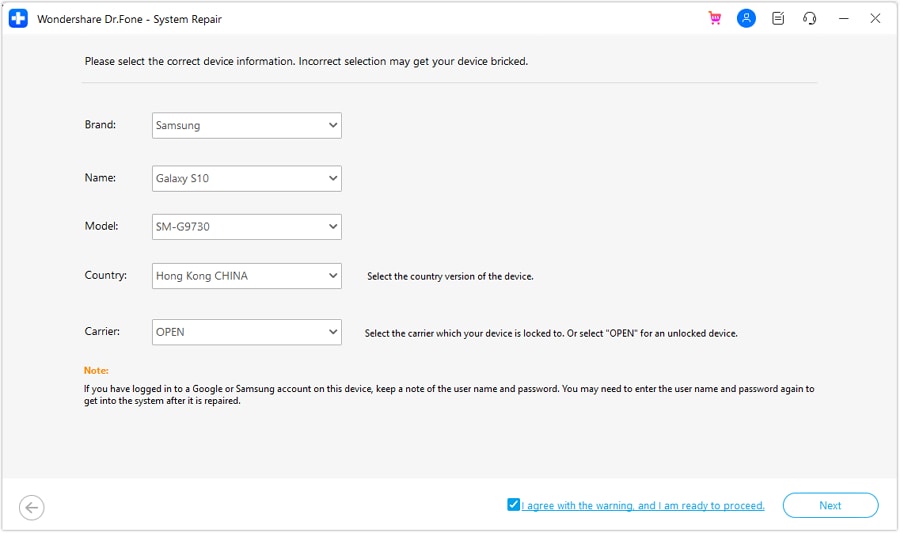
Follow the program's Download Mode instructions for that exact model. The guide offers a one-click option for a connected, unlocked device and separate hardware-button paths; do not substitute a generic button combination. Let the firmware download and verify. Review the matched information, select Fix Now, and enter 000000 only when you are ready to confirm the destructive repair.
-
Step 4 Keep the device connected and verify the result
Keep the USB cable connected and do not operate the phone while firmware installation runs. When the program reports completion, select Done and let the phone restart. Complete setup, connect to the internet, then retry the official Services update and reopen the affected app. Completion of firmware repair is not proof that a separate Google compatibility or account problem is fixed.
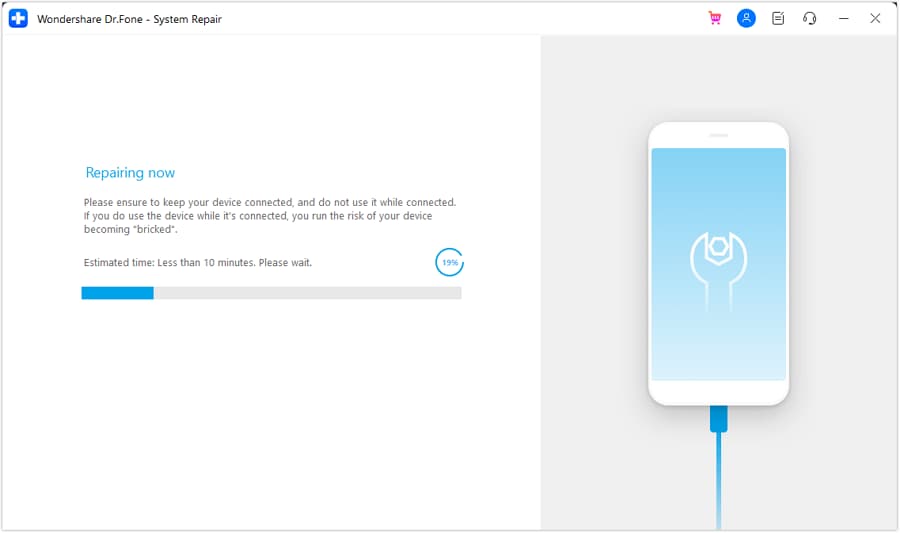
For Xiaomi, Redmi, or POCO, select that brand instead. The workflow offers detected firmware packages: review the match, Download, then Fix Now after preparation; keep the phone connected until it restarts. Use the Xiaomi/Redmi/POCO guide for that separate branch rather than the Samsung model and mode-entry screens above.
Part 3. Manual Troubleshooting: 11 Checks and Later Options
For a Google Play services update problem, work through the low-risk checks first: official update, connection and restart, free storage, caches, Store update, system update, and correct time. Test after each change. Account removal and data-clearing options belong later; a recovery operation or reset is not required just because an Update button is missing.
3-1. Basic Restarts, Official Updates, and Cache Clears
Method 1. Restart and check the connection. Connect to a stable Wi-Fi network or mobile data, and confirm a webpage loads. If one connection stalls, try another trusted connection; be mindful of mobile-data charges. Close and reopen the Play Store. Restart the phone using its power menu, then retry the update. A restart can clear a temporary glitch; it does not prove that the system was corrupted.
Open the official Google Play services update route
- On a supported phone, open Settings > your profile picture > All services.
- Under Privacy & Security, open System services > Google Play services.
- Tap Update or Install if offered. On devices with a different Settings layout, open the official Google Play services Store listing on the phone and use the offered action.
- After installation, reopen the app that requested the update. If it still fails, restart once, check the app's own update in the Play Store, and note the exact error.
No Update button? Do not force an installation
If the official listing offers no Update action, there may be no newer version available to install on that device at that moment. This alone does not establish a fault. Check Android version and Play Protect certification, install available manufacturer updates, and retry later. If several Google-dependent apps still request an unavailable update, contact the manufacturer or Google Play support with the model, Android version, Services version, certification result, and exact message. On a work-managed device, ask the administrator before changing accounts or system settings.
Method 2. Clear the right cache first. Open Settings > Apps > See all apps > Google Play services > Storage & cache > Clear cache. If needed, use Show system apps to find it. Repeat the cache-only action for Google Play Store, reopen the Store, and retry.

Earlier Android interface shown. Choose Clear cache, not Clear storage; menu names vary.
| Action | What changes | When to use it |
|---|---|---|
| Clear Play Store cache | Removes temporary Store files, not a factory reset. | Early troubleshooting |
| Clear Services cache | Removes temporary Services files; this is not Clear all data. | Early troubleshooting |
| Clear Play Store storage/data | Can reset parental controls and purchase/password-protection settings; you may need to accept the Store terms again. | After cache-only checks; restore those settings afterward. |
| Clear Services storage/all data | May remove saved passwords, transit/COVID cards, or virtual payment cards, and require payment reauthentication and Google Account sign-in. | Only after other troubleshooting; prepare first. |
Method 3. Repair the Play Store's update state, not the whole Services app. If Store cache clearing did not help, open Settings > Apps > Google Play Store > Storage & cache > Clear storage and confirm. Reopen the Store, retry, and restore parental controls and password protection if they were reset.
If the Store still fails, touch and hold its icon > App info > More (three dots) > Uninstall updates, review the message, and tap OK if offered. Reopen the Store, then use Settings > About > Update Play Store to reinstall its updates. Skip the rollback if your device does not offer it.
Services is different: uninstalling Google Play services updates is not the same as uninstalling the app, and it is not a universal first-line fix. That menu may be absent, and rolling back can disrupt dependent apps. Use a Services rollback only with device-specific support instructions; do not disable device protection or remove the Services app to make the menu appear.
3-2. Managing Accounts and Storage
Method 4. Update the Store and check system updates. Open Play Store > profile picture > Settings > About > Update Play Store. If it is already current, continue rather than repeatedly pressing the button.
For Android itself, open Settings > System > Software updates, or search Settings for Software update, and install an available manufacturer update. If Settings offers a separate Google Play system update, check it there too and restart when prompted. These updates are separate from updating Google Play services; one being current does not prove the others are current.
Method 5. Remove and re-add the Google Account only after simpler checks. First confirm your important information has synced or is backed up, and that you know the account password and can complete sign-in verification. Removal takes account-associated email, contacts, and settings off this device; it is not a way to erase the Google Account itself.
- Open Settings > Passwords & accounts. Depending on the phone, this can be Users & accounts, Manage accounts, or Passwords, passkeys & autofill.
- Select the Google Account > Remove account, confirm, and enter the device PIN/password if requested.
- Restart, return to that accounts screen, choose Add account > Google, and sign in. Let sync finish, then retry the Services update.
If the account is managed by work or school, contact its administrator before removing it.
Method 6. Check actual free internal storage. Open Settings > Storage. Google flags less than 1 GB available as a sign of low space that may prevent app downloads or installs. It is not a guaranteed size requirement for every Services update. Remove unneeded downloads or move backed-up media off the device, then retry. Do not delete the only copy of a file to reach a number.
Method 7. Uninstall unused apps if you need more space. Review Settings > Apps, select an app you no longer need, and choose Uninstall. First save local files or app data you want to keep. Removing an unused app can free storage; having many apps is not by itself proof of a Services conflict, and there is no six-month rule.

3-3. Conditional Recovery Checks and Last-Resort Resets
Use later options only when the earlier checks and compatibility checks did not resolve the problem. Correct time and a temporary power-saving check are reversible. Account removal changes local synced information; Services storage clearing affects credentials and cards; factory reset erases local data. Choose the smallest applicable action, not all of them at once.
Method 8. Wipe a cache partition only on a device that supports it. This is different from clearing an app cache and is not available on every Android phone. If your manufacturer's model-specific recovery instructions include Wipe cache partition, use that route; if the option is missing, skip it. Never substitute Wipe data/factory reset.
For the Samsung models covered by Samsung's cache-partition guide, power the phone off. The guide gives Volume Up + Home + Power for a physical Home-button model, Volume Up + Bixby + Power for a separate Bixby/Power model, or Volume Up + Side for the listed Side-button models. Use only the combination that matches your model and its current instructions, not a combination chosen by trial and error.
- Enter the supported recovery menu using that model's instructions.
- If Wipe cache partition is present, use the volume buttons to highlight that exact option and Power to select it.
- Confirm Yes, then choose the reboot option when it finishes.
- After boot, retry the Services update. If you see only data-wipe/reset options, exit by rebooting without selecting them.
Method 9. Use automatic date, time, and time zone. Open Settings > System > Date & time, or search Settings for Date and time. Enable Automatic date and time and Automatic time zone. If the displayed time was wrong, allow it to correct and retry after a few minutes. If it was already right, do not assume clock settings caused the update failure.

Example Android settings; look for Date & time on your device.
Method 10. Test once with Battery Saver off. If a power-saving mode is active, turn it off temporarily in Settings > Battery and retry the update while connected to a stable network. This is a reversible diagnostic, not a proven cure or a reason to disable protection permanently. If it makes no difference, restore your previous battery setting.
Later option: clear Services storage only after other troubleshooting
Google advises against clearing Google Play services data until other troubleshooting options have been tried. Before proceeding, make sure you can sign back into your Google Account and reauthenticate payment methods. Saved passwords, transit cards, COVID cards, and virtual payment cards may be removed from the device. Check how to restore any card you rely on before doing this.
If you accept those consequences, open Settings > Apps > See all apps > Google Play services > Storage & cache > Clear storage > Clear all data, then confirm. Reopen the Store, retry the update, and restore sign-in, payment access, and Store protection settings as needed. This is not the cache-only action in Method 2.
Method 11. Factory-reset only as a last resort. This erases local data, including downloaded apps and their local data; it is not a harmless refresh or an Android downgrade. It will not make an unsupported OS or uncertified device eligible. If important files are not backed up, stop and resolve the backup first or contact support.
- Verify the backup completed, and check which photos, files, messages, and app-specific data are actually included.
- Know the device PIN/password and verify your Google Account username/password on another device. If you recently changed the Google password, Google says to wait 24 hours before resetting.
- Charge to at least 70% and have a working internet connection for setup and sign-in afterward.
- Use the manufacturer's Settings reset route. On phones with the standard Android menu, open Settings > System > Reset options > Erase all data (factory reset). If the names differ, search Settings for Factory data reset and read that screen carefully; do not choose a recovery data wipe merely to match a screenshot.
- Review what will be erased, enter the PIN/password when requested, and confirm the erase only when ready.
- After the phone restarts, complete setup, connect to the internet, sign in with the previously used Google Account if asked, and restore the backup. Install offered official updates and test Services before reinstalling every optional app.
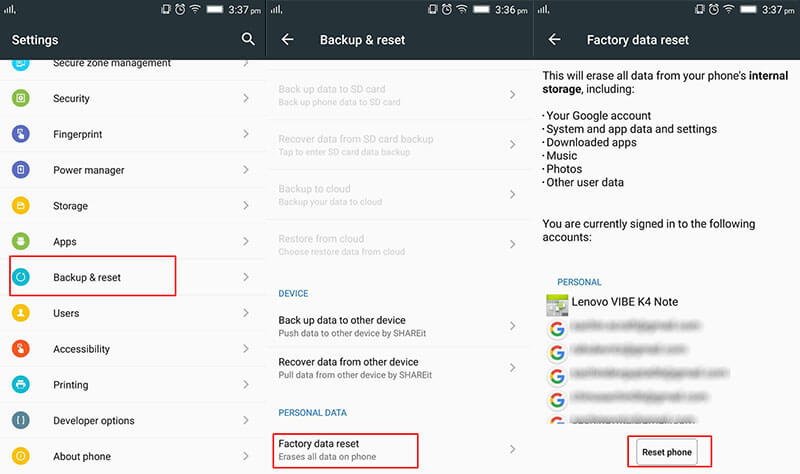
Earlier Android interface shown. A factory data reset erases local data; back up before proceeding.
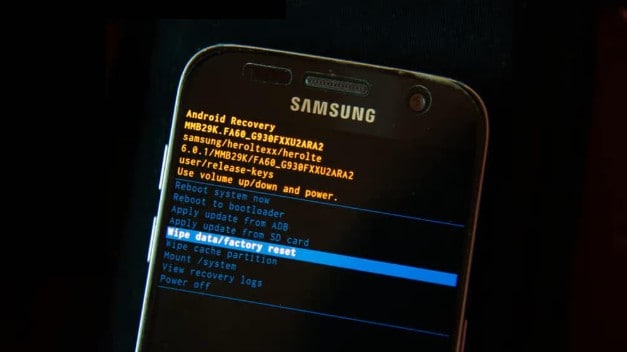
Warning: this image highlights Wipe data/factory reset. It is NOT Wipe cache partition and must not be used to clear cache.
Check Google's factory-reset prerequisites and recovery guidance before erasing. If setup, verification, or updates still fail afterward, contact the manufacturer rather than repeatedly resetting or flashing the phone.
Conclusion
When Google Play services cannot update, start with the official update route, then connection, storage, and cache checks. A successful result means the update completes and the affected app opens without repeating the warning. If it does not, keep the exact message and your model, Android version, and certification result for Google Play support or the manufacturer. For a supported device with wider firmware trouble, Dr.Fone - System Repair (Android) offers a guided optional route; it is not a compatibility bypass or a guaranteed fix for every update error.


Frequently asked questions
1. Why does my phone say Google Play services can't be installed?
Check free internal storage, network access, Android version, and Play Protect certification first. The message alone does not prove an APK architecture mismatch or damaged firmware. Use the official update route, note the exact error, and follow the matching troubleshooting branch.
2. Can I use an Android phone without Google Play services?
Some Android functions and apps work without it. Apps that depend on Google features such as Sign-In or Maps may fail or lose those features. That does not mean every phone function stops; if a particular app requires Services, use a supported, certified device and resolve its update requirement.
3. Does clearing the cache delete my photos, messages, or account?
Clear cache removes temporary app files; it is not a factory reset and does not intentionally erase your photos or messages. Do not confuse it with Clear storage or Clear all data. The comparison table explains the distinct Store and Services data consequences.
4. How much free space do I need for the update?
There is no single guaranteed amount for every Services update. Google identifies less than 1 GB free as a low-storage warning sign. Check Settings > Storage, free space without deleting your only copies, and retry; 1 GB is not a promise that an update will succeed.
5. Can I update Google Play services without using the Play Store?
Try the Services update route in Settings if it is available. If the Store itself is broken, use the Store repair steps rather than downloading a random APK. A phone without supported Google services or certification needs manufacturer guidance; sideloading does not establish compatibility or certification.
6. Why does Samsung Wallet or Digital Key ask me to update Google Play services?
A feature may require a newer Services version. Try the official update first, then reopen Wallet. Do not clear Services storage casually: saved transit or virtual payment cards may be removed and need reauthentication. If the warning persists, ask Samsung about the exact phone, Wallet feature, and error; a Services update alone does not establish Digital Key eligibility.
 Add Wondershare Dr.Fone as a preferred source on Google