
How To Turn Off Restrictions on iPad (With and Without Passcode)
Oct 13, 2025 • Filed to: Screen Lock Removal • Proven solutions
Restrictions on iPads are designed to limit specific functionalities or control content access on their devices. By activating it, you can restrict certain content and functionalities or block in-app purchases on your iPad.
While this mode can be quite useful for your iPad's safety, it may not be suitable for all users or situations. If you need to disable it, learn how to turn off restrictions on your iPad in the article below.
Quick Summary: This guide shows you how to disable restrictions (also known as Screen Time or parental controls) on your iPad.
- Have the passcode? Go to Settings > Screen Time > Turn Off Screen Time Passcode.
- No passcode? Use your Apple ID to reset it, or use a tool like Dr.Fone - Screen Unlock for a quick solution without data loss.
Part 1. What Does Restriction Mode on an iPad Do?
Restriction mode on an iPad lets you control what your device can do. You can decide what content your iPad can access, what apps it can use, and what purchases it can make. This feature is particularly useful for parents wanting to keep an eye on their children's activities.
Through restriction mode, users can safeguard the usage of their devices, particularly for minors and children, by implementing various restrictions on iPad. This includes blocking access to adult websites, restricting mature content such as movies and music, and exercising discretion over which built-in apps are available for use.

Where to find restrictions on iPad:
To access restrictions on an iPad, you can open your iPad settings and select the "Screen Time" option. Once there, you can customize the restrictions based on your child's age and what parts of the iPad you want them to use.
Here's a breakdown of some key settings and their functions:
- iTunes & App Store Purchases: Block app installations, deletions, and in-app purchases without the passcode.
- Allowed Apps: Hide specific apps from the Home Screen, making them inaccessible.
- Content Restrictions: Filter media like movies, music, and books based on their official age ratings (e.g., PG, R).

Part 2. Turning Off Restrictions if You Know the Passcode
While these restrictions are often implemented with good intentions, turning off restrictions on iPads is also necessary when users want to restore full access to the device's functionalities. After all, these restrictions might block certain websites or apps, which can prevent you from accessing important resources needed for work or study.
If you know the passcode you used for activating restrictions, turning off iPad restrictions is pretty simple and easy to do. But it might be slightly different depending on which iOS version you use.
How to Disable Restrictions on Older iPads (iPadOS 11 & Earlier):
Step 1: Open your iPad Settings > General.
Step 2: Locate and tap the Restrictions feature, then select the option to disable it.

Step 3: Input the Restrictions passcode to deactivate this feature on your iPad.
How to Take Restrictions Off on iPad (iPadOS 12 and Later):
Step 1: Open your iPad Settings > "Screen Time" > "Content & Privacy Restrictions."
Step 2: Enter the passcode you've set up previously. Please note that this passcode is separate from your device passcode.
Step 3: Next, you'll see the toggle switch for "Content & Privacy Restrictions." Simply toggle this switch off to disable all restrictions.

Step 4: A message will pop up saying that turning off restrictions will let you use all apps and features. Tap "Turn Off" to confirm and disable iPad restrictions.
If you ever wish to re-enable restrictions, simply follow the same steps and toggle the switch for "Content & Privacy Restrictions" back on.
Part 3. How to Turn Off Restrictions on iPad Without a Passcode?
If you've forgotten your passcode, another solution to turn off restrictions on your iPad without a passcode is to reset the passcode and log in with Apple ID. Or, you can use a more comprehensive solution such as Wondershare Dr.Fone – Screen Unlock to bypass the iPad restrictions passcode.
Which 'No Passcode' Method is Right for You?
| Method | Requirements | Pros | Cons |
| Using Apple ID | Know Apple ID & Password | Free, Official method | Doesn't work if you forgot Apple ID |
| Dr.Fone - Screen Unlock | Computer (Win/Mac) | Works without any passcode or Apple ID, No data loss | Requires software installation |
Solution 1. Log in with Apple ID
If you have access to the Apple ID associated with your iPad, you can attempt to reset the Restrictions passcode and disable it. Here's a guide on how to turn off restrictions on iPad using Apple ID:
Step 1: Open the iPad Settings and select “Screen Time” > "Change Screen Time."
Step 2: Tap on "Turn Off Screen Time Passcode." Enter your Screen Time passcode when prompted, then select "Forgot Passcode?"

Step 3: Input your Apple ID and passcode to verify ownership of the iPad. This action will then disable the Restrictions on your iPad.
Solution 2. Use Dr.Fone Screen Unlock (iOS) without data loss
When you forget either your restrictions passcode or Apple ID, you can still bypass it with Dr.Fone - Screen Unlock (iOS). This tool is very effective in handling forgotten restriction passcodes without data loss.
Dr.Fone – Screen Unlock is a reputable software solution renowned for its ability to assist users in bypassing various types of locks on their devices. Its user-friendly interface makes it our best choice for addressing forgotten restriction passcodes or Apple IDs. Dr.Fone fully supports compatibility with the latest iOS 17 or iPadOS 17

Dr.Fone - Screen Unlock (iOS)
Turn Off Restrictions on iPad Without Passcode
- Simple, click-through, process.
- Unlock screen passwords from all iPhone and iPad.
- No tech knowledge is required, everybody can handle it.
- Supports the latest iOS version fully!

How to turn off restrictions on iPad without a passcode:
Step 1: Initiate Dr.Fone – Screen Unlock Tool
Start by launching Wondershare Dr.Fone on your computer. Navigate to Toolbox > Screen Unlock > iOS to access the Screen Time unlock tool.

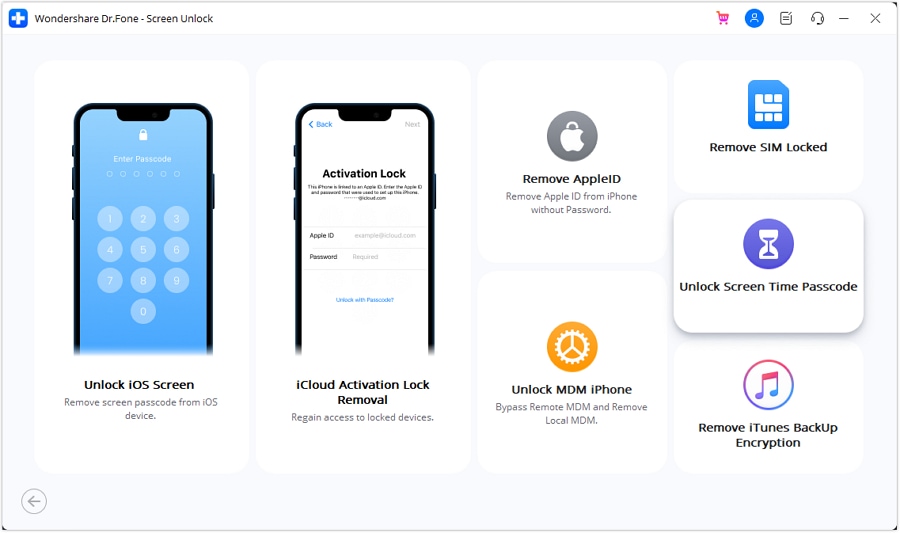
Step 2: Select Unlock Screen Time Passcode
From the list of options, choose Unlock Screen Time Passcode and connect your iPad device to the computer. Upon connection, the platform will detect your device and show its status on the screen.
Step 3: Proceed with iPad Unlock
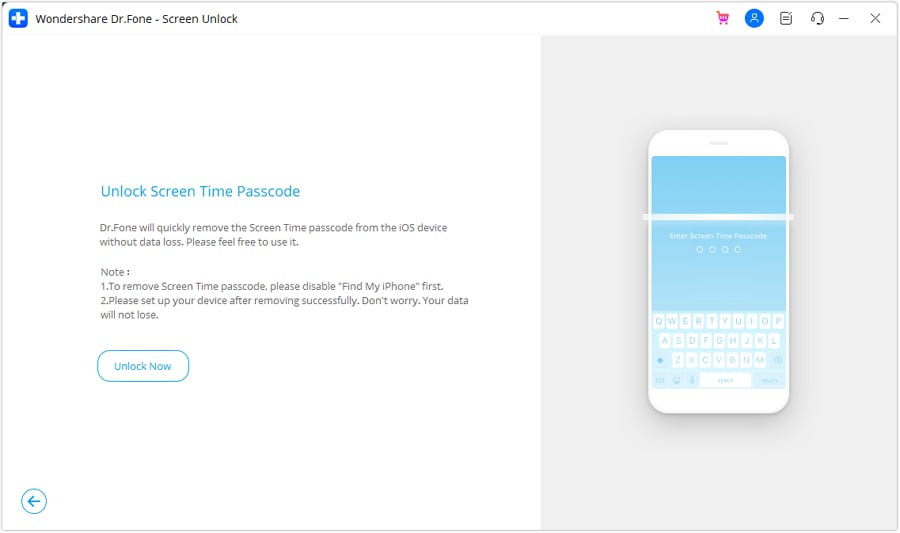
Once your iPad is successfully connected, proceed by clicking the Unlock Now button.
Step 4: Turn off the Find My feature
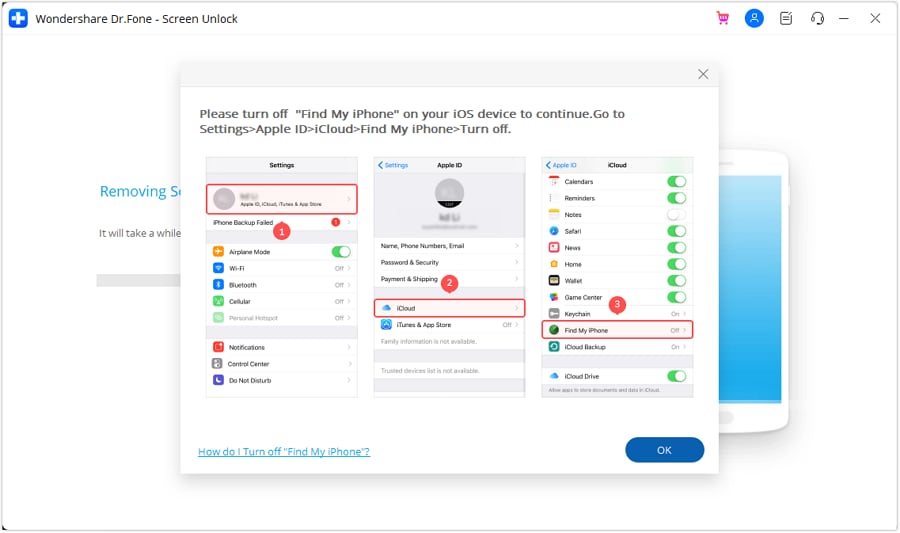
Follow the prompt to deactivate the Find My service. Then, access your iPad Settings and tap on your name. Select Find My, and toggle off the Find My feature. After completing this step, click OK on the computer screen.
Step 5: Monitor the progress of unlocking the Screen Time Passcode
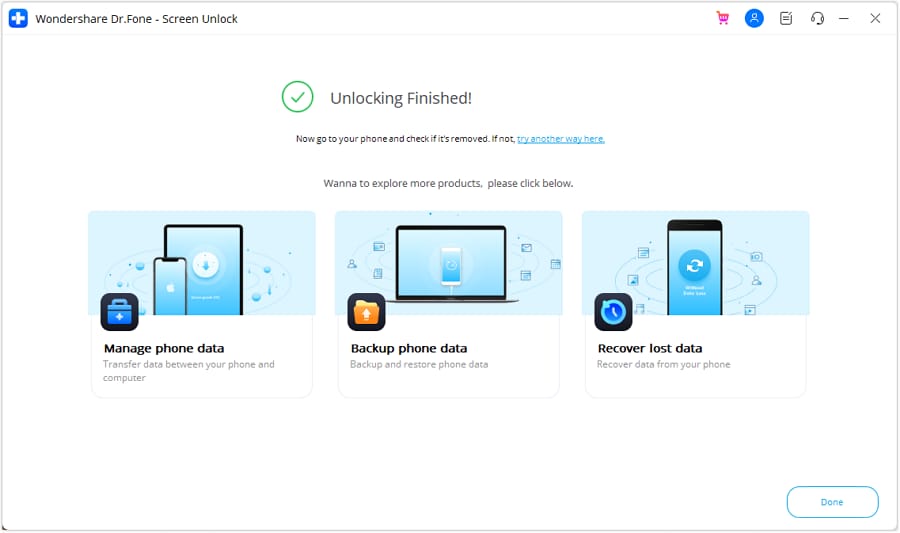
Observe the progress bar to track the screen time passcode unlocking process. After successful completion, the platform will display a confirmation message. Click Done to finalize the entire procedure. See the detailed guide here.
Conclusion
With iPad restrictions, users can manage content, apps, and purchases and ensure a safer experience, especially for children. These restrictions include blocking adult websites and controlling access to built-in apps.
Should you need to restore the original settings, we have outlined how to turn restrictions off on an iPad. And if you forget the passcode, you can use Wondershare Dr.Fone - Screen Unlock (iOS)> to remove restrictions without requiring the iPad restrictions passcode or Apple ID.
FAQs
iPad Unlock
- Activation Lock Unlock
- 1. Bypass Activation Lock on iPad
- 2. Bypass iPad iCloud Activation Lock
- 3. Unlock an iCloud Locked iPad
- 4. Bypass iPad iCloud Activation Lock
- 5. iPad Stuck On Activation Lock
- 6. Reactivate iPad after iOS Upgrade
- 7. Remove iPad Activation Lock
- Apple ID Remove
- iPad MDM Unlock
- 1. iPad MDM
- 2. Bypass iPad MDM on iOS 16
- 3. MDM Bypass Tools for iPad
- 4. MDM VS. MAM
- 5. Jailbreak Remove MDM
- 6. Apple MDM
- 7. MDM Bypass on iOS 15/14
- 8. Remove MDM without Data Loss
- 9. Best MDM Bypass Tools
- 10. 10 Best MDM Solutions for You
- 11. Remove MDM from iPad
- iPad Screen Unlock
- 1. Unlock iPad without iPad Password
- 2. Unlock Disabled iPad without iTunes
- 3. Unlock Disabled iPad
- 4. Unlock iPad without Passcode
- 5. Fix locked iPad
- 6. unlock Passcode without Restore
- 7. Unlock iPad Without Passcode
- 8. Unlock iPad and Recover Data on it
- 9. Reset iPad Password
- 10. Reset iPad without Password
- Screen Time Lock
- ● Manage/transfer/recover data
- ● Unlock screen/activate/FRP lock
- ● Fix most iOS and Android issues
- Unlock Now Unlock Now Unlock Now




Daisy Raines
staff Editor