iPhone Cannot Be Synced? Top Solution to Fix iPhone Error 69!

Jul 12, 2024 • Filed to: Mobile Repair Solutions • Proven solutions
You can access and play all your computer's music and videos with the help of iTunes. It also allows you to sync your computer's media collection with your iOS device (iPhone, iPad, or iPod). However, issues arise when iTunes starts acting weirdly, for example, by failing to recognize your device or giving you trouble throughout the syncing process.
Some iPhone users have faced an unusual error 69 while connecting their device to iTunes. Moreover, if you're one of those, you must wonder what error 69 is and how to fix it. To help you, we came up with the finest methods to fix iPhone Error 69 in this article. Let's get started!

- Part 1. What Is iPhone (iTunes) Error 69?
- Part 2. Why is iTunes saying error 69 when syncing?
- Part 3. How to fix Error 69 when trying to sync iPhone/iPad/iPod Touch?
- Method 1. Update the iTunes to the Latest
- Method 2. Update the Software on Your Mac or PC
- Method 3. Temporarily Disable Your Anti-Virus, Anti-Malware, and Firewall Programs
- Method 4. Relocate Your Library Completely to the iTunes Folder
- Method 5. Delete the iTunes Cache
- Method 6. Run Disk Cleanup
- Method 7. Reset Your iPhone
- Method 8. Remove All External Devices
- Method 9. Quick Method to Repair iTunes Error 69 When Trying to Sync
- Part 4. Bonus Tip: How to Transfer Music From iPhone to Android?
Part 1. What Is iPhone (iTunes) Error 69?
iTunes error 69 usually occurs when you try to sync a file from your computer to your iPhone. Most of the time, it happens when you are syncing a corrupt file from your computer to your iPhone. When this error 69 occurs, you get one of the two following pop-ups:
- Error -69 when trying to sync on iPhone/iPad/iPod Touch
- Error 69: iTunes has encountered a problem and needs to close. We are sorry for the inconvenience
Part 2. Why is iTunes saying error 69 when syncing?
The possible reasons behind the iPhone could not be restored error 69 are:
- You are syncing a corrupt file to your iPhone
- Your iTunes version is not the latest
- The computer's firewall or security software is blocking iTunes
- Your device needs to update
- Your device driver can also be incompatible
Part 3. How to fix Error 69 when trying to sync iPhone/iPad/iPod Touch?
Now that you know what iPhone restore error 69 is, you must wonder how to fix this issue. And this is what you'll find out in this section. The following are the finest methods to fix iPhone error 69:
Method 1. Update the iTunes to the Latest
Upgrade iTunes to the newest version to see if it fixes the iPhone could not be restored error 69 issue since this problem often happens when trying to restore or update an iOS device using iTunes. This might be due to using an outdated version of iTunes. To that end, if you haven't already, you may want to update the iTunes application.
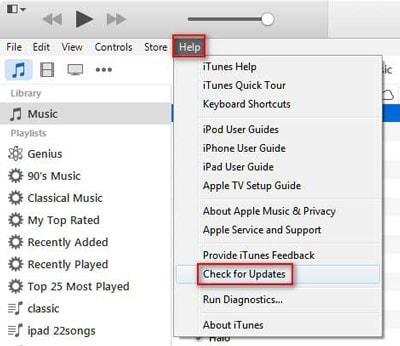
To update your iTunes to fix iPhone error 69, follow the steps below:
Step 1: Launch the iTunes application on your Mac or Windows PC.
Step 2: Click on Help and select Check for Updates from the drop-down menu.
Step 3: If the update is available, click on Update or Upgrade to update your iTunes to the newest version.
Method 2. Update the Software on Your Mac or PC
The next thing you can try to fix the "iPhone cannot be synced an unknown error occurred 69" issue is updating the software on your Mac or PC. The OS on your computer may be outdated, causing iTunes problems. So updating your computer's software might end up fixing iTunes error 69.
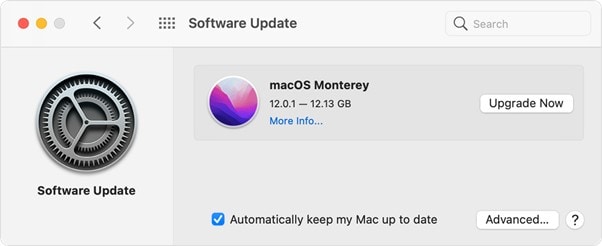
On Mac
Step 1: Click on the Apple icon on the top left and select System Preferences from the drop-down.
Step 2: Now, click on Software Update on the next screen
Step 3: If the update is available, click on Upgrade Now to update your Mac
On Windows
Step 1: Launch Settings on your PC, and click on Windows Update
Step 2: If the update is available, click on Download and Install to update the system.
Step 3: You can also check for updates by clicking on Check for Updates button.
Method 3. Temporarily Disable Your Anti-Virus, Anti-Malware, and Firewall Programs
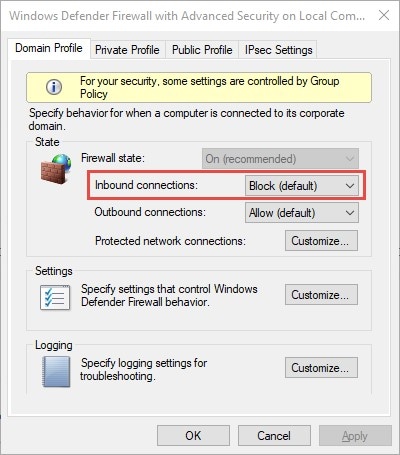
The next approach to resolving iPhone error 69 involves temporarily turning off all security software, such as anti-virus, anti-malware, and a firewall. Your computer's anti-virus software may prevent your iTunes application from opening and working normally. As such, you should either allow iTunes access via your security program's exceptions list or disable the app entirely.
In addition to anti-virus protection, it is important to ensure that iTunes is included in the Windows Defender Firewall exceptions list. If it isn't, then you won't be able to use iTunes to sync your files since the firewall will prevent it from doing so. You can try upgrading, disabling, or removing the security software temporarily. Windows Defender Firewall cannot be removed; however, it can be customized and updated.
Method 4. Relocate Your Library Completely to the iTunes Folder
If you still have the iPhone Error 69 after trying the above methods, you need to relocate your library to the iTunes folder. To relocate your library completely in the iTunes folder, follow the steps down below:
Step 1: Go to This PC on your computer and open your drive, which has the iTunes library.
Step 2: Navigate to the iTunes folder and right-click on it. Select Copy from the drop-down menu.
Step 3: Now, you can relocate it wherever you want it on your computer.
Method 5. Delete the iTunes Cache
Still, have the iPhone could not be restored with error 69 issues? Don't worry. Now, you need to delete your iTunes cache to try and fix this error. Sometimes your cache files contain enough junk that restricts your iTunes application from working properly.
To delete the iTunes cache files on your computer, follow the steps below:
On Mac
Step 1: Go to ~/Library/Caches/com.apple.itunes on your Mac.
Step 2: Select the following two subfolders:
- fsCachedData
- SubscriptionPlayCache
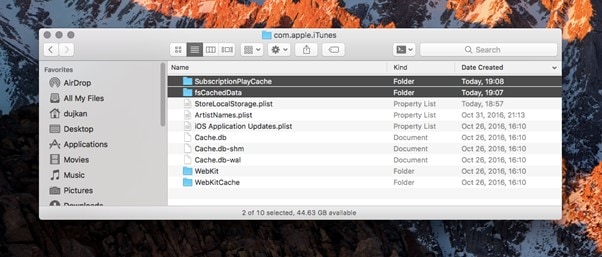
Step 3: Now, delete the selected subfolder to remove the iTunes cache
On Windows
Step 1: Launch iTunes on your computer.
Step 2: Select Preferences from the menu when you click Edit at the top of the iTunes window.
Step 3: Choose the Advanced tab at the top of the window to access the advanced settings. Select Reset cache and then confirm with OK.
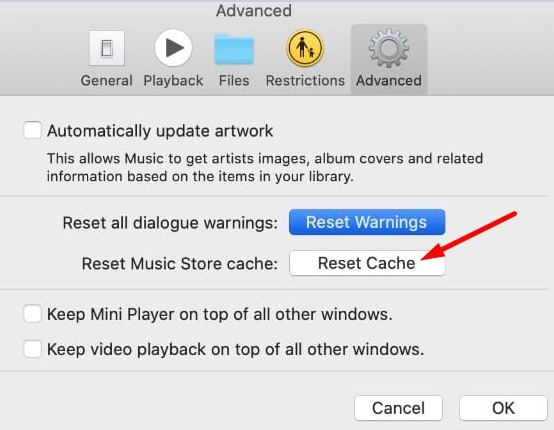
Note: This method also works for Mac.
Method 6. Run Disk Cleanup
The next step to fix iPhone error 69 is running the disk cleanup. By disk cleanup, we mean deleting the iTunes itdb files. The itbd stand for "iTunes Database". Apple's iTunes Media Player uses the ITDB file format to catalog audio, video, and other media assets. These files are databases that keep track of metadata for a user's iTunes music collection.
To run the disk cleanup for fixing iPhone error 69, follow the steps below:
Step 1: Since these files are in the iTunes folder, locate the iTunes folder on your computer.
Step 2: Select the following three files in your iTunes folder:
- iTunes Library.itl
- iTunes Library Genius.itdb
- iTunes Library Extras.itdb
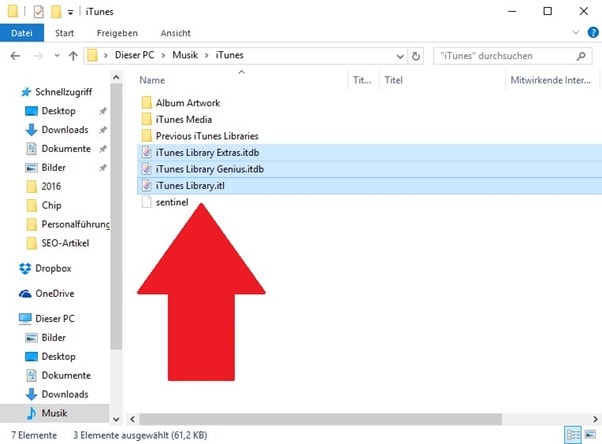
Step 3: Right-click on the selected files and select Delete from the drop-down menu to delete the iTunes database files from your computer.
Now, go and try to sync iTunes media to your iPhone.
Method 7. Reset Your iPhone
The next approach you can adopt to fix iPhone error 69 is resetting your iPhone. Something may be wrong with your iOS restricting iTunes from syncing with your iPhone. However, this method will wipe all your previous data, so make sure that your data is backed up.
To reset your iPhone for fix iPhone could not restore error 69, follow the steps below:
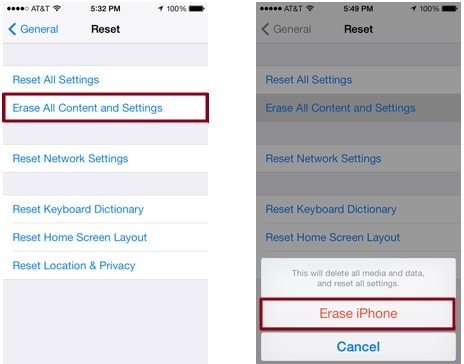
Step 1: Go to iPhone settings and tap on General
Step 2: Navigate to Transfer or Reset iPhone, and tap on it
Step 3: Now, tap on Erase All Contents and Settings, and enter the password when asked. After that, tap on Erase iPhone in the pop-up.
Method 8. Remove All External Devices
The iPhone error 69 can also occur if you try to sync your device when an external disc is connected. These devices can hinder the process of synchronization between your iTunes and iPhone. So, If your iPhone won't sync with iTunes, try disconnecting all of the external devices except your iPhone.
Method 9. Quick Method to Repair iTunes Error 69 When Trying to Sync
Is your iPhone error 69 still not solved? If yes, you need a third-party tool to fix this iTunes error. Since iTunes is essential for restoring and backing up your iPhone, you wouldn't want to use an unreliable tool to fix this issue, so if you need an excellent and reliable tool for the task, Dr.Fone - iTunes Repair (iOS).
You can fix over a hundred different issues with iTunes by yourself quickly and easily with Dr.Fone - iTunes Repair (iOS). This iTunes repair tool provides a remedy for every iTunes problem, whether it be an issue with the iTunes connection, iTunes sync, or any other. In addition, it's a simple program that even inexperienced users may use to fix their iTunes problem.
Key Features
- When repairing iTunes, you can keep all your data intact.
- It gives you the best chance of restoring iTunes to normal.
- You can repair over a hundred different iTunes bugs and problems.
- It takes just a single click to speed up iTunes significantly.
Usage Scenario
- When iTunes behaves weirdly
- If you cannot restore your iPhone, you need to use this tool to fix iTunes
- When iTunes is having syncing issues
- When iTunes cannot connect to your phone or computer
To repair iTunes error 69 When trying to sync via Dr.Fone, follow the steps below:
Step 1: Download and install Dr.Fone - iTunes Repair (iOS) on your computer. Start Dr.Fone - iTunes Repair (iOS) and choose Repair from the main menu. After that, use the USB cable with your iOS device to connect it to your computer.

Step 2: Once Dr.Fone has detected the iOS device, it will provide you with three options. To go on, you will need to click the Repair iTunes Syncing Error option.

Step 3: Then click on the Start button to begin the process. Fixing the error will need a few minutes of your time. Once the process is completed, it will display Repair Completed, click on Ok and sync your iPhone with iTunes.

Part 4. Bonus Tip: How to Transfer Music From iPhone to Android?
Wish to transfer your iPhone music to Android? You need a third-party tool since there's no built-in method to transfer data from iPhone to Android. However, the market is flooded with phone transfer tools, so finding a good one is different. To help you, we've reviewed the finest phone transfer tool, i.e., Dr.Fone - Phone Transfer (iOS).
Transferring apps and other file types from one device to another is as simple as clicking a button with Dr.Fone - Phone Transfer (iOS). You can quickly move your data from one phone to another by selecting the appropriate file formats. It's a point-and-click interface that even newbies can use with no trouble.
Key Features
- A phone transfer takes less than three minutes to complete.
- It enables the transfer of 12 different file kinds, including media, music, contacts, and more.
- Transferring data from an iOS to an Android device is possible and straightforward.
- Supports both Android 13 and Apple's newest iOS 16 versions.
Usage Scenario
- If you need to transfer data from your Android/iOS device to a PC
- If you need to transfer data from Android to Android
- If you need to transfer data from an iOS to an iOS device
- If you need to transfer data from iOS to Android
To transfer music from iPhone to Android via Dr.Fone - Phone Transfer, follow the steps below:
Step 1: Get Dr.Fone - Phone Transfer (iOS) on your computer and launch it. After that, click on Phone Transfer.
Note: Ensure that your Android and iPhone are connected to your PC through USB cables.
Step 2: You can see the Source and Destination phone in the next window. Verify that they're in the right order, i.e., iPhone should be the source, and Android should be the destination. If the order is wrong, you can click on Flip to reverse the order.

Step 3: Select Music from the middle menu and click on Start Transfer to transfer your iPhone music to Android.

Conclusion
With iTunes, you can easily sync the files on your computer to your iPhone. However, some people have complained that they get iPhone could not be restored error 69 iPhone 11 error when they try to sync their iPhones to iTunes, which is annoying. But with the methods discussed in this section, you can solve iPhone Error 69. Moreover, Dr.Fone - iTunes Repair (iOS) is our top recommendation for fixing issues related to iTunes. Besides that, if your iPhone is not syncing with iTunes, we recommend using Dr.Fone - Phone Transfer (iOS) for the job.


iPhone Errors
- Errors 0 ... 100
- 1. iPhone Error 6
- 2. iPhone/iTunes Error 9
- 3. iPhone Error 10
- 4. iPhone/iTunes Error 21
- 5. iPhone Error 35
- 6. iTunes Error 40 on iPhone/iPad
- 7. iPhone Error 47
- 8. iPhone Error 69
- 9. iPhone Error 75
- 10. iPhone Error 78
- Errors 1xxx
- 1. iPhone Error 1009
- 2. iPhone Error 1015
- 3. iPhone/iTunes Error 1100
- 4. iPhone Error 1110
- 5. iPhone Error 1667
- Errors 2xxx
- Errors 3xxx
- 1. iTunes Error 3004
- 2. iTunes Error 3014
- 3. iTunes/iPhone Error 3194
- 4. iPhone Error 3503
- 5. iPhone/iTunes Error 3600
- Errors 4xxx
- Other iPhone Errors
- 1. iPhone Error 7005
- 2. iPhone/iTunes Error 9006
- 3. iPhone Error 0xe8000015
- 4. iPhone Cellular Update Failed Error
- 5. iPhone Activation Error
- 6. iPhone SSL Error
- Other iPhone Issues
- ● Manage/transfer/recover data
- ● Unlock screen/activate/FRP lock
- ● Fix most iOS and Android issues
- Repair Now Repair Now Repair Now
James Davis
staff Editor
Generally rated4.5(105participated)