How Can I Resolve Restoring iPhone Error 4010 in iTunes? A Guide

May 22, 2026 • Filed to: Phone Repair Solutions • Proven solutions
 TL;DR:
To resolve iPhone Error 4010 during an iTunes restore, update your iTunes software, disable conflicting Windows security settings, or repair the system using Dr.Fone - System Repair (iOS) to prevent data loss.
● Disconnecting your Apple ID from the View My Account section in iTunes and temporarily disabling Windows Defender Firewall are essential prerequisites to prevent software from blocking the connection.
● Forcing a reset via DFU Mode serves as a native workaround when standard restores fail, but this method will permanently wipe all local iPhone data.
● Users seeking to bypass iTunes completely can utilize Dr.Fone - Phone Backup (iOS) to selectively restore files from existing iCloud or iTunes backups on devices running up to iOS 16.
Ask AI for a summary
 ChatGPT
 Perplexity
 Gemini
 Claude
 Grok
Grok
There are different kinds of glitches that can occur on your iPhone. To resolve them, you consider an immediate remedy that can help you make your iPhone look brand new. Most users look to iTunes to assist them in fixing such errors. However, what if you get stuck on iTunes while restoring your iPhone? While this can have implications, it can damage your iPhone.
As you try restoring your iPhone, you observe an error emerging on your computer's screen, showing failure. While the message represents the iPhone Error 4010, the particular error remains at large and needs to be looked at. This article is about reviewing Error 4010 and finding the right solutions that suit the user.
- Part 1: About iPhone (iTunes) Error 4010
- Part 2: Repair iTunes Error 4010 with Professional iTunes Repair Tool
- Part 3: Common Tips to Fix iTunes Error 4010
- Method 1: Disconnect Your Apple Account on iTunes and Try Again
- Method 2: Check Your USB Connection
- Method 3: Troubleshooting Your Security Software
- Method 4: Update or Install Latest iTunes on Computer
- Method 5: Restart iPhone & Computer
- Method 6: Restore from Another Computer
- Method 7: Put Your iPhone into Recovery Mode
- Method 8: Reset Your iPhone in DFU Mode
- Method 9: Contact Apple Support
- Part 4: Extra Tip to Restore iPhone Without iTunes
Part 1: About iPhone (iTunes) Error 4010
Before starting with the fixes of the iTunes Error 4010, we shall put the definition and reasons for this error in review. As it is unknown to the users with no display of the reason in the error message, this part holds importance.
1. An Unknown Error Occurred (4010)
Whenever you try to restore your iPhone using iTunes, you may encounter a particular error or failure in the process. On the assessment of the error, it was evident that the iPhone Error 4010 occurred on the failure of the restoration. As the process is quite delicate, you must understand how to eliminate all concerns. Due to particular interferences, you usually have to face such problems on your iPhone.

2. Reasons Behind Error Code 4010
Want to know why the iPhone Error 4010 occurs when you try restoring your device using iTunes? There are some potential reasons behind this error, as there can be multiple parties involved in the process. Let's look into these reasons that will eventually help you in assessing the right solution for your iPhone according to the cause:
- One of the major causes and problems involving iTunes Error 4010 is the outdated iTunes software installed on your computer. If it is not updated, there are multiple functions that will malfunction on iTunes, thus leading to such errors during the restoration of the iPhone.
- Anti-virus software or firewall settings might be conflicting with iTunes, leading to errors such as the 4010, which occurs while restoring your iPhone.
- Internet connectivity issues and device issues are some common and major reasons that can be a direct perpetrator to the problem of iPhone Error 4010.
- Multiple glitches in the iPhone can also lead to such problems when restoring the device through iTunes. Be observant of what is happening during the process, which will help you assess the conditions in a better way.
Part 2: Repair iTunes Error 4010 with Professional iTunes Repair Tool
Starting from the best, we will look into how you can recover your device from the iPhone restore Error 4010. This particular error can cause multiple issues with the device if you mishandle it without any knowledge. Since this article is basing its discussion on providing proper solutions to repair this iTunes error, look into this efficient, professional, and intuitive repairing solution in the shape of Dr.Fone - System Repair (iOS) (iOS).
This tool offers the ability to manage more than 100 iTunes errors on the device. As it resolves and manages all forms of errors for you, this tool ensures that your iPhone is functional during such iTunes procedures.
Great Details of iTunes Repair Tool That Makes it Great
To know more about what makes this tool special in the market for repairing iTunes errors, you should review the key features of this tool provided below:
- With no data loss, you can ensure proper recovery of data from all kinds of iTunes errors common among users.
- It is entirely compatible with all iTunes versions, thus providing good support to devices in all conditions and situations.
- The process is straightforward, requiring no prior knowledge of using the platform for repairing the iOS device.
- The success rate of the iTunes Repair tool is high, making it one of the best options in the market for resolving errors such as the iTunes Error 4010.
Overview of the Steps of How to Repair iTunes Error 4010 with Dr.Fone
With an overview of how good the iTunes Repair tool is, we will now look into how you can repair the iTunes Error 4010 with the help of the tool:
Step 1: Select System Repair
You have to first download and install the latest version of Dr.Fone's mobile toolkit on your computer. On launching it, select "System Repair" from the available options and proceed further.

Step 2: Define the Mode of Repairing
Next, you will have to define the device by selecting "iOS" on the next screen. Following this, select "iTunes Repair" from the list of repairing options to define the purpose.

Step 3: Proceed to Repair iTunes Error
The next window that opens will show a set of options. You will have to select "Repair iTunes Errors" to proceed with repairing the iPhone Error 4010 in the device. Dr.Fone will begin repairing the device for you and will scan all components for errors.

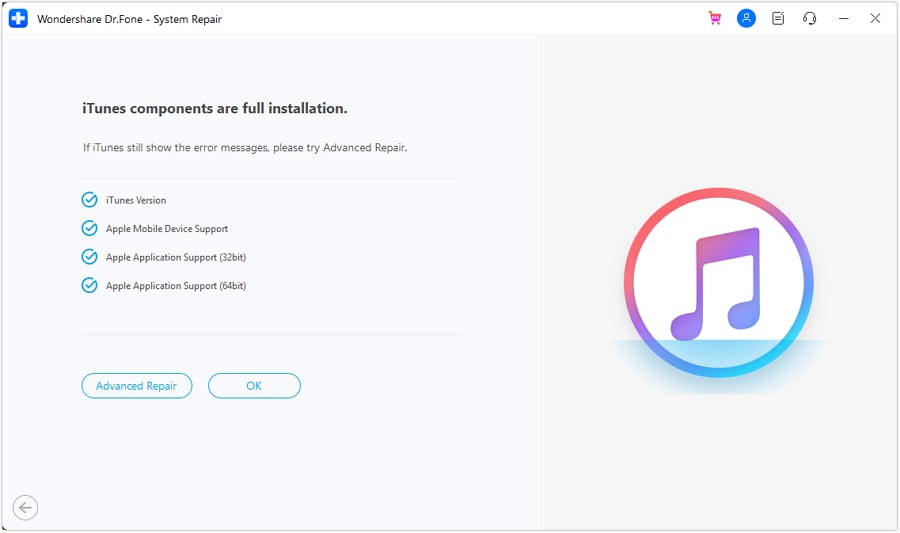
Step 4: Try Resolving with Advanced Repair
Upon scanning, it will resolve the problem and will display the results. If the problem does not resolve, try using the "Advanced Repair" option and let the repairing process automatically fix the iTunes error for you.
Part 3: Common Tips to Fix iTunes Error 4010
With an overview of the perfect repair facility for the iPhone Error 4010, we will also shed light on some common resolutions that can be tried if you are not comfortable using any third-party service for your iPhone.
Method 1: Disconnect Your Apple Account on iTunes and Try Again
For starters, the first thing that can be done to resolve the problem of restoration of the iPhone using iTunes is to disconnect the Apple account on iTunes. To do this, you must follow the steps featured below for a better understanding of the process:
Step 1: Open iTunes on your computer and proceed to the "Account" tab from the left panel. You must select the option of "View My Account" to navigate into the sign-in option.

Step 2: Sign in with your Apple ID and observe the devices connected to iTunes using the Apple ID on the screen.

Step 3: Click the "Remove" button adjacent to the device to disconnect it from iTunes. Try restoring the iPhone using the generic approach of restoring the iPhone with iTunes.

Method 2: Check Your USB Connection
As the process involves a USB connection for restoring iPhone using iTunes, a significant problem that can cause the iPhone Error 4010 is a faulty wire. You should keep an eye on the quality of the wire and ensure that the connection established through it is solid and not problematic. Change the wire, if required, for a smooth transition of the process.
Method 3: Troubleshooting Your Security Software
Firewall settings and anti-virus software are used to protect the computer from external threats. At times, these procedures malfunction and contradict the basic processes of the computer. To avoid them from hindering the process of restoration on iTunes, you should consider disabling the firewall settings, for which you must follow the steps as defined next:
Step 1: Open the "Control Panel" of your computer using the "Windows + R" combination key for running the Run program. Use the command "control.exe" to open it on a new window.

Step 2: Access the "System and Security" option from the list of options and redirect to the "Windows Defender Firewall."

Step 3: Next, proceed to select "Turn Windows Defender Firewall on or off" from the left panel to access the advanced options. Ensure that you check the option of "Turn off Windows Defender Firewall" for both options on the next screen.

Step 4: You must also access the anti-virus software installed on the computer and disable its settings to avoid contradicting the restoration of the iPhone.
Method 4: Update or Install Latest iTunes on Computer
With issues like outdated iTunes, you will never restore your iPhone properly. This is only possible by updating the platform or re-installing the software on your computer. To update iTunes on your computer, you must work through the process with the following steps:
Step 1: Open iTunes and access the "Help" tab from the taskbar on the top.
Step 2: Select the option of "Check for updates" to proceed towards updating the software and allow you to perform all procedures with ease.

Step 3: You can also uninstall iTunes from your computer by accessing the "Control Panel" of your computer. Open "Program and Features" from the Programs tab, which opens the list of applications installed on the computer. Uninstall iTunes and redirect to install the latest version from the internet.

Method 5: Restart iPhone & Computer
Temporary glitches can be a menace, which can be resolved by restarting your devices. As you are using iPhone and computer in this method, you should try restarting them to fix any glitch causing Error 4010 when restoring iPhone.
For Restarting iPhone
Use the "Settings" of your iPhone and access its "General" settings. Look for the "Shut Down" option in the list and turn off your iPhone. To relaunch your iPhone, use the "Power" button to start it again.

For Restarting Computer
Select the start-up option on the bottom taskbar of the computer and proceed to the "Power Options" in the menu. You must find "Restart" from the list and proceed with the particular option.

Method 6: Restore from Another Computer
There are some issues in the computer that cannot be resolved easily and require a complete session. In such cases, if you are not able to get hold of the issue within the computer, you should consider shifting to another computer. Connect your iPhone to the particular device and open iTunes on the respective device to restore the device there.
Method 7: Put Your iPhone into Recovery Mode
Putting the iPhone in Recovery Mode is the right approach if your iPhone is continually malfunctioning while being restored through iTunes. Recovery Mode is the go-to solution for cases where the device is not functioning properly and needs to be resolved immediately. Thus, using the Recovery Mode to restore your iPhone using iTunes is the best direction you can take in such a case. For that, you must follow the steps defined next:
Step 1: You must open iTunes on the computer and connect your iPhone with a lightning cable, ensuring the cabled connection is proper.
Step 2: Next, you will have to put your iPhone in Recovery Mode, for which you must follow the steps explained next, according to the device model you are using:
iPhone 8 and Later Models
For such iPhones, you must press the "Volume Up" button and proceed with pressing the "Volume Down" button. As you complete this, press and keep hold of the "Power" button until you find the Recovery Mode screen displaying on your iPhone's screen.
iPhone 7 and 7 Plus Only
For this specific range of iPhones, you had to hold the "Volume Down" and "Power" buttons simultaneously until you observed the Recovery Mode screen on the iPhone.
iPhone 6 and Earlier Models
In such devices, you must use the "Home" and "Power" buttons to put the device in Recovery Mode. Press and hold these buttons simultaneously until you find the Recovery Mode screen.

Step 3: As the iPhone goes into Recovery Mode, you will observe a pop-up message on your computer screen. Select the option of "Restore" out of the two available options for restoring your iPhone with iTunes.

Method 8: Reset Your iPhone in DFU Mode
Another approach that you can consider to resolve the error 4010 problems on your iPhone is to reset it using the DFU Mode. As this approach deletes all the data from your device, you must keep a backup of all your data. To perform this, look into the steps featured next:
Step 1: Connect the iPhone to the computer using a USB connection and launch iTunes on your computer.
Step 2: For putting the iPhone in DFU Mode, use the following approach:
For iPhone 6 and Earlier Models: Press and hold the "Power" button and "Home" button for ten straight seconds. Next, hold the "Home" button after releasing the "Power" button.
For iPhone 7 and 7 Plus: Press and hold the "Power" and "Volume Down" for 10 seconds until you leave the "Power" button. However, keep holding the "Volume Down" button.
For iPhone 8 and Later Models: Tap the "Volume Up" button, following the "Volume Down" button. Hold the "Power" for 10 seconds and as the screen goes black, hold the "Power" and "Volume Down" buttons for 5 seconds. Release the "Power" button; however, keep hold of the "Volume Down" button.
Step 3: A message of iPhone detection will be displayed on the screen where you have to click the option of "Restore iPhone" to reset it in DFU Mode.

Method 9: Contact Apple Support
If you have tried out every solution yet failed to find a solution for the iPhone Error 4010, you must contact Apple Support for a permanent remedy. Although this process is time-taking and can prove expensive for your pocket, it is the only solution for your device if it does not restore on iTunes. You must focus on contacting Apple Support and explaining the issue properly to discover the right solution.

Part 4: Extra Tip to Restore iPhone Without iTunes
Most of the methods we have discussed above compromise the data of the iPhone, which needs to be backed up. The more backups, the better the chance of protecting your data from loss. To ensure that you keep the best backups of your iPhone, you should consider working with Dr.Fone - Phone Backup (iOS) for perfect results.
While it is a flexible option for keeping backups, it allows a wireless and automatic process of backing up iPhones. Along with backing up content, you can easily preview and restore selective data.
Key Features of Dr.Fone - Phone Backup (iOS)
Dr.Fone - Phone Backup (iOS) is a perfect option for backing up content, which will be ratified with the help of the features explained next:
- You can easily restore your iCloud and iTunes backup with a selective selection of data to your iPhone.
- There is no data loss during the transfer, backup, or restoration of data using the tool.
- It supports all major iOS versions, including the latest iOS 16, which makes it a cohesive option for iPhones.
Steps to Restore iPhone Without iTunes Using Phone Backup (iOS)
To know how you can restore your data using this tool without needing iTunes, let's find out the details using the provided steps:
Step 1: Select the Phone Backup Tool
You must open Dr.Fone on your computer and look for the "Phone Backup" option in the list. Connect your iPhone to the computer and select "Restore" to proceed to the next screen.
Step 2: Select Backup File
For the next window, select the backup file you wish to use for restoration. Click the "View" button adjacent to the backup file to lead next for observing all files in categories.

Step 3: View and Restore Data to iPhone
Select the data you want to restore and select the "Restore to Device" option to initiate the process.

Conclusion
This article proves to be helpful in resolving issues with the iPhone when trying to restore it through iTunes. As you are facing iPhone Error 4010 while trying to execute this process, use the provided solutions to help you fix the error. With the help of tools like Dr.Fone, the result of the process is quite definite and progressive. You can easily resolve Error 4010 when restoring your iPhone with the tools and other solutions provided for your help.


iPhone Errors
- Errors 0 ... 100
- 1. iPhone Error 6
- 2. iPhone/iTunes Error 9
- 3. iPhone Error 10
- 4. iPhone/iTunes Error 21
- 5. iPhone Error 35
- 6. iTunes Error 40 on iPhone/iPad
- 7. iPhone Error 47
- 8. iPhone Error 69
- 9. iPhone Error 75
- 10. iPhone Error 78
- Errors 1xxx
- 1. iPhone Error 1009
- 2. iPhone Error 1015
- 3. iPhone/iTunes Error 1100
- 4. iPhone Error 1110
- 5. iPhone Error 1667
- Errors 2xxx
- Errors 3xxx
- 1. iTunes Error 3004
- 2. iTunes Error 3014
- 3. iTunes/iPhone Error 3194
- 4. iPhone Error 3503
- 5. iPhone/iTunes Error 3600
- Errors 4xxx
- Other iPhone Errors
- 1. iPhone Error 7005
- 2. iPhone/iTunes Error 9006
- 3. iPhone Error 0xe8000015
- 4. iPhone Cellular Update Failed Error
- 5. iPhone Activation Error
- 6. iPhone SSL Error
- Other iPhone Issues
- ● Manage/transfer/recover data
- ● Unlock screen/activate/FRP lock
- ● Fix most iOS and Android issues
- Free Download Free Download Free Download


James Davis
staff Editor
Generally rated4.5(105participated)