How to Fix Unknown iTunes Error 40 on iPhone/iPad?

May 22, 2026 • Filed to: Phone Repair Solutions • Proven solutions
 TL;DR:
iTunes Error 40 is a hardware-related issue that occurs during an iPhone restore, which can be resolved by addressing physical hardware conflicts, modifying computer firewall settings, or using a dedicated system repair application.
● Resolve immediate hardware conflicts by attempting the iTunes restore without a SIM card inserted, resetting the iPhone's network settings, or replacing the device's battery if software fixes fail.
● Temporarily disable third-party security software and Windows Defender Firewall on your computer, as these active security programs frequently block the required connections for a standard or IPSW file restore.
● Bypass manual troubleshooting by utilizing the Repair iTunes Errors or Advanced Repair functions within Dr.Fone - System Repair (iOS) to automatically fix corrupted components without risking device data loss.
Ask AI for a summary
 ChatGPT
 Perplexity
 Gemini
 Claude
 Grok
Grok
If you have an old phone and want to restore your iPhone, only two things can happen when you do. It can go ahead successfully, or you will encounter an error on your iPhone. You are probably one of those who encountered this issue and are currently reading this article on fixing the iTunes Error 40 that appeared after trying to restore your iPhone. We will discuss with you the possible causes of receiving this error and how you can take some simple steps to fix this issue.

Part 1. What is iTunes for?
Before we move on and talk about what error 40 is, let us take a step back first to understand what iTunes is. What is iTunes? iTunes is software that can be found on MacBooks and is used and known by iPhone users. Multiple things can do in iTunes, such as purchasing songs, movies, and applications. Another thing that you can do with iTunes is being able to update your iOS devices via iTunes.
Part 2: What is iPhone (iTunes) Error 40?
Now you are aware of the basics of iTunes, which is used for downloading music, apps, and movies and updating or restoring your device. When you tried restoring your phone, or maybe you're phone just suddenly blacked out, so you tried restoring it as well, you connected your device via iTunes. Then you received that pop-up message saying, "The iPhone could not be restored. An unknown error occurred, Error 40". I understand that this could be worrisome when you read this error. Fret not, and we will share with you as well the other causes of this error and how you can solve it with numerous solutions.
Part 3: Why Does Error 40 Occur?
You are reading this article because upon attempting to restore your phone, and you received a message mentioning Error 40. Now you are probably curious about what causes or instances this error will appear. It has been said that when you receive this error 40 in your iTunes, it means that there is a hardware issue in your iPhone device. However, this error can be solved, and we will share different solutions you can try if you have encountered this error after restoring your iPhone.
Part 4: Official Ways to Fix iTunes Error 40
You now know the cause of iTunes Error 40, which is due to a hardware issue in your iPhone. We have scoured the world wide web for possible causes as to why you will receive this error 40. So you can try the tested solutions that we will share and get that error 40 fixed and be able to use your phone as normal.
1. Things To Check
There are simple solutions that you can do when you receive error 40 that only require a few simple steps. We will share simple solutions you can follow before moving on to the more complex solutions for Error 40.
Option #1: Restore your phone without a SIM card.
This simple fix consists of removing the sim card from your iPhone and restarting the device. Then connect to "iTunes". After, you can select "Restore" to start the process.

Option #2: Restart your iPhone device.
One of the easiest solutions to almost any error or issue out there is by doing the basic troubleshooting of restarting your iPhone device. You can hold press the "Power" button until the screen shows the Apple logo sign.
Option #3: Resetting your iPhone's network settings.
Resetting your iPhone's network settings can also be the fix to fix the error 40 on your iPhone.
Step #1: Go to "Settings" on your phone and choose "General".
Step #2: From there, scroll to the bottom of the page until you see the word "Reset", then tap on it.
Step #3: Then you can click on "Reset Network Settings" from among the options.
Step #4: A pop-up will appear asking for you to confirm the changes you will make. Tap on "Reset Network Settings" once again to confirm.

Option #4: Clearing your iPhone's history, cookies, and caches.
This is another simple solution or fix that you can do to remove the error 40 in your iPhone. Follow the steps below to clear your phone of any cookies, history, or caches.
Step #1: Go to "Settings", scroll down to "Safari" and tap on it.
Step #2: Scroll down the list of options and choose "Clear History and Website Data". This process will clear all of your history, caches, and cookies.

Option #5: Replacing your iPhone's battery.
This is another solution that you can do in case all of the simple methods we have shared do not work for you. As error 40 is a possible hardware issue, replacing your iPhone's battery can greatly help fix this issue.
2. Resolve iTunes issues from Apple Support
Earlier, we shared with you solutions that you can do on your own, which can only be done in a few simple steps. Now, we will share with you the solutions that Apple support has shared with its users when encountering iTunes Error 40. Below are the steps that you can choose from.
Option #1: Checking your iPhone's hardware.
The first solution that Apple Support has shared with its users is for them to check their device's hardware, and they can do that by following the steps below.
Step #1: Open your iTunes and check if your third-party security software is enabled. If it is enabled, you can disable it temporarily to just check your hardware.
Step #2: Double-check that you have a WiFi connection, your USB cord is working well, and that computer is reliable. Once done, you can retry storing your mobile phone again.
Step #3: Check if your mobile phone or iTunes is updated to the latest version before restoring your phone once again.
Option #2: You have your third-party security software or firewall enabled.
The third-party security that you have installed on your computer is hindering your phone from restoring. The only way that you can do this is to temporarily disable this before restoring your device once again. You can follow the steps below to disable your firewall.
Step #1: Go to "Settings" on your PC. Then click on "Update & Settings" and choose "Windows Security". From there, you can choose "Firewall & Network Protection".
Step #2: You can then choose your profile and select "Windows Defender Firewall".
Step #3: Choose and select the settings to "Off".

Option #3: Restoring with the use of IPSW files.
Among all of the options that we have shared, this is the most complicated one. However, you can use this as your very last resort if you do not want to change your iPhone's battery just yet. Follow the steps below to fix error 40 in your iPhone device.
Step #1: Make sure that you do not have any application running in the background of your computer. This way we can prevent any delays.
Step #2: Disable your computer's third-party security software, as this could hinder and remove access to the necessary files that you will need for this fix.
Step #3: Go to any directory and click "Organize Folder", then look for "Options" and choose "Reveal All Invisible Drives and Folders". Check the "Show Hidden Files and Drive Options, and You can open "Notepad" and click "Run as Administrator" from the options. In Notepad, click "Open" so you can check the files.
Step #4: Type in "C:WindowsSystem32driversetc" in Notepad, and from there, you will see an empty folder. Then change the options from Text Documents to All File options.
Step #5: You can choose the hosts from here, and the Notepad will appear. You can delete everything you see in the Notepad aside from the texts shown below.

Step #6: You can then go ahead and save this and close Notepad. You can now relaunch iTunes and connect your iPhone via a USB cable to your computer.
Step #7: Lastly, you can then press the Shift key and click on Restore. You can now restore your device using IPSW files, as shown in the steps above. Your error 40 on iTunes should be fixed by now.
Part 5: One-Click to Fix iTunes Error 40
If you have Error 40 on your iTunes, you can simply get that fix done with one of the best iTunes repair tools called Dr.Fone - System Repair (iOS) (iOS). Dr.Fone - System Repair (iOS) (iOS) is also known to be able to repair around 100+ iTunes errors and issues with iPhones. You can fix your iTunes to normal, no data loss at all.
Step #1: Open the WonderShare Dr.Fone program.
Once you have downloaded the latest version of the WonderShare Dr.Fone program, you can open the program. Then you can click on the "System Repair" option from the homepage. From here, you will need to choose "iOS" and then click next.

Step #2: Repair iTunes Error
After choosing "System Repair", a new window will open with several options to choose from. From all the options, you can choose "Repair iTunes Errors". Then the tool will start checking your iTunes components which should take just a few minutes.

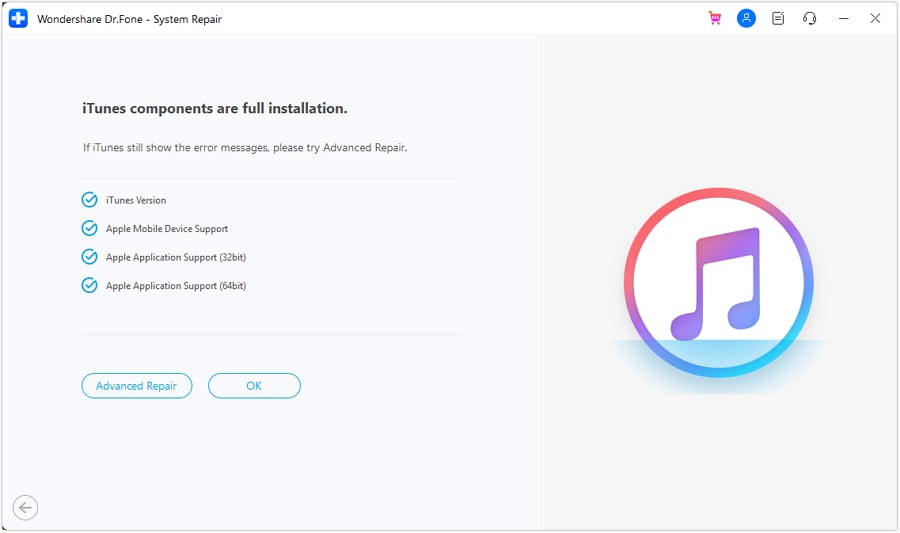
Step #3: Selecting Advanced Repair if iTunes has errors.
After the tool checks your iTunes components and is fully installed, you can just go ahead and click on "OK". However, if it shows errors, you will need to try Advanced Repair.
Step #4: Finishing the iTunes installation repair.
After clicking on Advanced Repair, it can take a few minutes to finish the process. You will then see a message saying "iTunes Repair completed" once the process is finished. You can then check your device to see if the error still occurs.

Part 6: Selectively Restore iPhone/iPad without iTunes
When restoring your iPhone device, there is a possibility that all of your phone data will be lost. You can prepare yourself and prevent that from happening with one of the best backup tools for any phone out there, Dr.Fone - Phone Backup (iOS).
Dr.Fone - Phone Backup (iOS) is a great tool to store your phone's data on your computer, and you can also transfer those data back to your phone. You only need to wait a few minutes for the process to finish with just a few simple clicks. You can follow the steps below to restore your phone's data.
Step #1: Open the Dr.Fone program on your computer. You can select "Phone Backup" from the list and connect your phone to your computer with a USB cord.
Step #2: Select the "Backup" button from the opened window.

Step #3: They will show you the files you want to back up. Once you have selected the files, you can click "Backup". This process can take a few minutes, depending on how many files you have.
Step #4: Once the files have been backed up, you will see a new window saying that the backup has been finished.
Conclusion
We hope that you feel more confident now that you know why you received error 40 after attempting to restore your phone. The error is known to be a hardware issue, and if you follow the multiple solutions we have shared in this article, you can get that error fixed in no time. If you want an easy and simple solution to this iTunes error 40, you can use Dr.Fone - System Repair (iOS) (iOS) and get that iTunes issue fixed in just a few minutes. For future situations in which you want to update your phone, ensure that you have already backed up your phone's data using Dr.Fone - Phone Backup (iOS), which will also help you transfer those files back to your phone.


iPhone Errors
- Errors 0 ... 100
- 1. iPhone Error 6
- 2. iPhone/iTunes Error 9
- 3. iPhone Error 10
- 4. iPhone/iTunes Error 21
- 5. iPhone Error 35
- 6. iTunes Error 40 on iPhone/iPad
- 7. iPhone Error 47
- 8. iPhone Error 69
- 9. iPhone Error 75
- 10. iPhone Error 78
- Errors 1xxx
- 1. iPhone Error 1009
- 2. iPhone Error 1015
- 3. iPhone/iTunes Error 1100
- 4. iPhone Error 1110
- 5. iPhone Error 1667
- Errors 2xxx
- Errors 3xxx
- 1. iTunes Error 3004
- 2. iTunes Error 3014
- 3. iTunes/iPhone Error 3194
- 4. iPhone Error 3503
- 5. iPhone/iTunes Error 3600
- Errors 4xxx
- Other iPhone Errors
- 1. iPhone Error 7005
- 2. iPhone/iTunes Error 9006
- 3. iPhone Error 0xe8000015
- 4. iPhone Cellular Update Failed Error
- 5. iPhone Activation Error
- 6. iPhone SSL Error
- Other iPhone Issues
- ● Manage/transfer/recover data
- ● Unlock screen/activate/FRP lock
- ● Fix most iOS and Android issues
- Free Download Free Download Free Download


James Davis
staff Editor
Generally rated4.5(105participated)