11 Fixes for iPhone 13 & 14 Series Camera Black or Not Working!
Feb 11, 2026 • Filed to: Phone Repair Solutions • Proven solutions
"My camera was working until I updated my 13pro to iOS 17.2.1. I have tried every fix suggested multiple times, including closing camera app, restarting my iPhone, resetting my iPhone, flipping back and forth from the back camera to the front camera and back again (front camera is working fine), turning live on and off, changing other camera settings, and turning voiceover off. I have literally tried them all more than once but nothing works. Is there anything else I can do?"
--- from discussions.apple.com
Now are days, iPhone is a widely used mobile phone. Many people prefer using iPhone instead of using Android devices. iPhone has its class and beauty. Every new version of the iPhone has some stunning feature that instantly catches your attention. Many people use iPhone, and they love it because of its features.
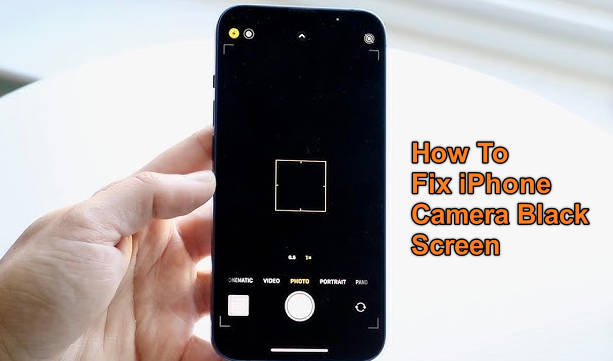
Among its many stunning features, one thing that always impresses you is its camera result. The resolution of the iPhone camera is brilliant. You can get clear and beautiful pictures with it. The most annoying thing that could happen is when your iPhone 13 camera is not working or black screen. The problem is commonly faced, but people don’t know much about it. Stay with us if you plan to learn more about it.
- Part 1: Is your iPhone Camera Broken?
- Part 2: How to Fix iPhone Camera Black Screen Issue?
- Check Phone Case
- Forcefully Quit Camera App
- Restart your iPhone 13/iPhone 14
- Shift between Front and Back Camera
- Update your iPhone
- Disable Voiceover
- Clean Off Camera Lens
- Reset iPhone 13/iPhone 14 Settings
- Adjust Camera Settings
- Camera Not Restricted in Screen
- Use a Tool to Repair iPhone 13 & 14 Series Camera Black or Not Working

- Concluding Words
Don't Miss: iPhone 13/iPhone 13 Pro Camera Tricks -Master Camera App on Your iPhone Like a Pro
Part 1: Is your iPhone Camera Broken?
Most of the time, you face a problem, and you don't know what to do. For the iPhone 13 camera black problem, you may think “Is my iPhone camera broken?” But, actually, this is highly unlikely. This article shall be focusing on all the possible reasons that make your iphone 13 or iPhone 14 camera black or not working and you can also find solutions to troubleshoot iPhone camera black screen after iOS 17 update. Following the reasons, we shall also assert our focus on the solutions that would effectively solve this problem.
If your iPhone 13 camera app shows a black screen, read this section of the article to get some help. We are going to highlight the reasons that result in this problem.
- Glitchy Camera App: Sometimes the camera app is not working because of glitches. There is a fairly high chance that your camera app has glitches. It is also possible that the iOS version on your device has a bug, and all these factors on iPhone 13 cause the camera app to have a black screen .
- Dirty Camera Lens: Another common cause of this problem is a dirty camera lens. You hold your iPhone in your hand all day, put it in various random places, and whatnot. This all causes the phone to get dirty, especially the lens, and that causes iPhone 13 camera not to work the black screen.
- iOS Not Updated: Incompatibility can also aid in problems like the camera app not working. For iPhone users, staying up to date is very important; otherwise, you face problems. You should always keep an eye on iOS updates, and you should update your iOS regularly.
Part 2: How to Fix iPhone Camera Black Screen Issue?
Now that you know a little about the causes of this problem, you would try to avoid it, but what if you get stuck with a black screen? Do you know any possible way to resolve this problem? Don’t worry if your answer was ‘No’ because this section of the article is all about the fixes and solutions.
Fix 1: Check Phone Case
A fundamental way to fix the problem is checking the phone case. This is a common problem that people generally ignore. Most of the time, the black screen occurs because of the phone case that is covering the camera. If your iPhone 13 camera is not working and showing a black screen, then the first thing you should do is check the phone case.
Fix 2: Forcefully Quit Camera App
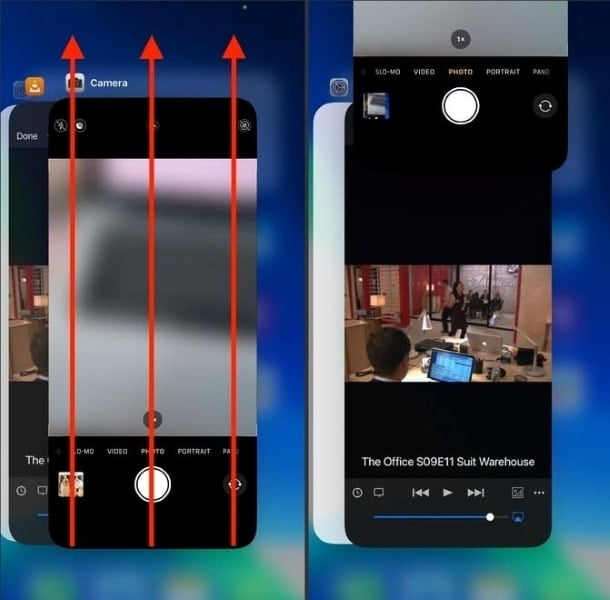
Another solution that could be adopted in case your camera app is not working on iPhone 13 or iPhone 14 is to quit the camera app forcefully. Sometimes forcefully quitting the application and then reopening it again does the job of resolving the problem. By following the steps below, this same thing could be applied to the iPhone 13 camera app with a black screen.
- Step 1: To forcefully close the ‘Camera’ app, you need to swipe up from the bottom of the screen and then hold. All the recently used apps appear; among them, drag the ‘Camera’ app card upward, and this will forcefully close it.
- Step 2: Wait for a few seconds and then open the ‘Camera’ app again. Hopefully, this time it will be working perfectly.
Fix 3: Restart your iPhone 13 or iPhone 14
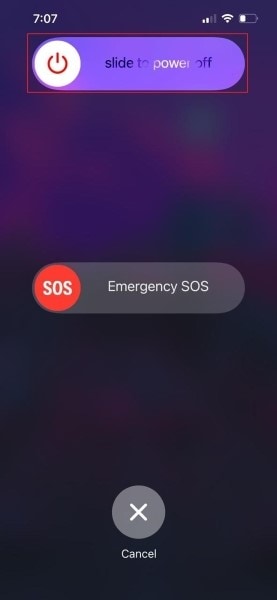
This happens very normally when the camera app fails to work properly. A few things could be done to start the camera app again. Among the list of solutions, one possible way is to restart your iPhone 13 or iPhone 14. Easy guiding steps have been added below for your help to restart iPhone.
- Step 1: Whereas, press and hold the ‘Side’ button with either one of the ‘Volume’ buttons simultaneously if you have an iPhone 13 or iPhone 14. This will display a slider of 'Slide to Power off'.
- Step 2: Upon seeing the slider, drag it from left to right side to shut down your iPhone. Wait for a few moments after shutting down your iPhone and then restart it.
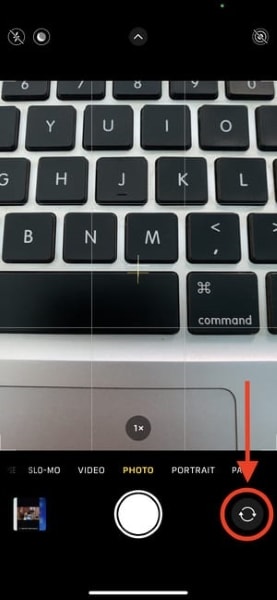
Fix 4: Shift between Front and Back Camera
Suppose you are working with the camera app on your iPhone, and suddenly, the camera app is showing a black screen due to some glitch. If something like this happens with your camera app and it does not work properly, a black screen shows up. Then it is suggested that you should switch between the front and back camera. Sometimes switching between rare and selfie cameras can easily do the job.
Fix 5: Update your iPhone
It has been mentioned above that sometimes compatibility issues also result in such problems. To avoid such situations, it is highly suggested to stay updated. Always keep your iPhone updated. In case you don’t know how that could be done, just go with the flow and follow the steps below.
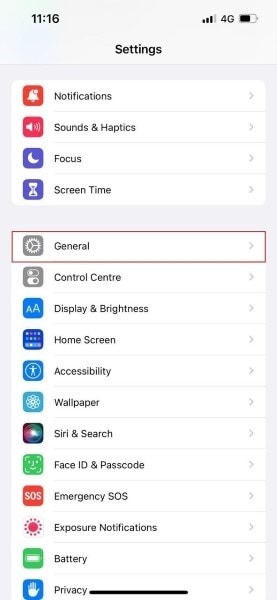
- Step 1: If you want to update your iPhone, then firstly open the 'Settings' app. From 'Settings,' locate the option of ‘General’ and open it.
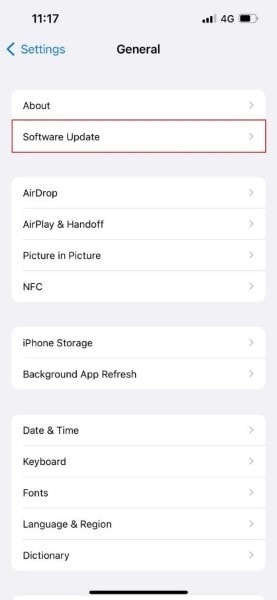
- Step 2: Now, click on the 'Software Update' option from the General tab. If any update is available, it will show on the screen, and you just have to hit the ‘Download and Install’ option.
Tips: Looking for an all-in-one mobile management software? Look no further than Dr.Fone App - the ultimate choice for all your needs:
- For iOS Users: Free up space with Smart Clean, remove any restriction including screen lock, iCloud activation lock, MDM, or Apple ID, and transfer data easily between devices with our all-in-one iOS solution.
- For Android Users: Bypass screen locks and FRP with our Android unlocker, change your location with one click, and repair damaged Samsung devices with ease.
Discover more possibilities for mobile management solutions with Dr.Fone App (iOS) and Dr.Fone App (Android). Don't miss out, try it now and revolutionize your smartphone experience.
Fix 6: Disable Voiceover
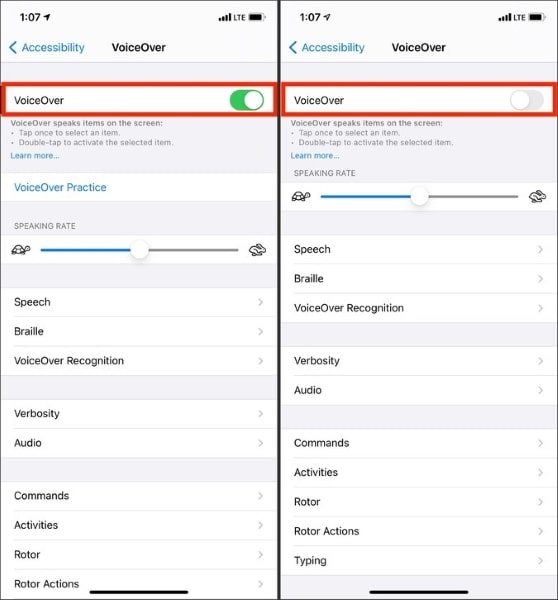
It has been observed that in iPhone 13 camera app shows a black screen, and this is because of the voiceover feature. If your camera app is also causing a problem, then make sure you check and disable the Voiceover feature. The guiding steps to disable voiceover are added below.
- Step 1: To disable the 'Voiceover' feature, first of all, head to the ‘Settings’ app. There, look for the ‘Accessibility’ option and click on it.
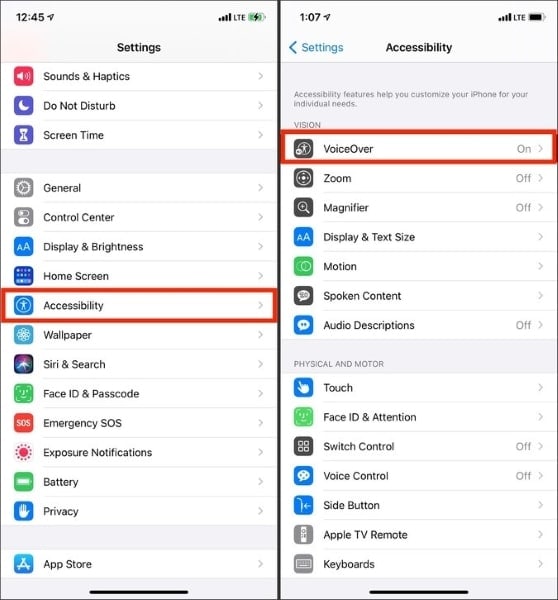
- Step 2: In the ‘Accessibility’ section, check if 'Voiceover' is turned on. If yes, then turn it off so that the camera app works properly.
Fix 7: Clean Off Camera Lens
Another common solution that could be adopted to fix the problem of black screen cameras is cleaning the lens. Just because mobile devices have great exposure to dirt and the outside world so most likely it's the dirt that blocks the camera. You should regularly clean off the lens to avoid camera issues.
Fix 8: Reset iPhone 13 or iPhone 14 Settings
If your camera app is causing problems on iPhone 13 or 14, then you should try resetting the settings. If you reset your iPhone 13, then you can surely get rid of the problem of the black screen. Resetting your iPhone is not a difficult task but if you don't know about it, then let us share its steps with you.
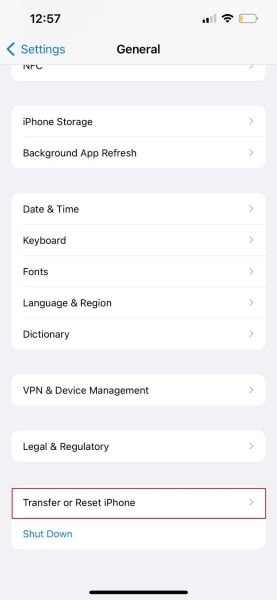
- Step 1: To reset your iPhone, firstly head over to the 'Settings' app. Then from there, look for the option of ‘General.' Now, from the ‘General’ tab, select and open the 'Transfer or Reset iPhone' option.
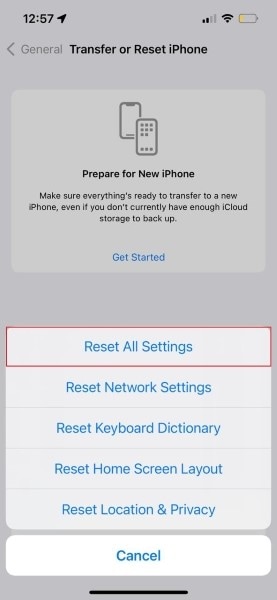
- Step 2: A new screen will show up in front of you. From this screen, just select the option 'Reset All Settings.' You will be asked to enter your iPhone passcode to confirm the reset process.
Fix 9: Adjust Camera Settings
If your iPhone 14 or iPhone 13 camera is not working and showing a black screen, then another solution to resolve this problem could be adjusting the camera settings. Allow us to guide you regarding the camera setting adjustments.
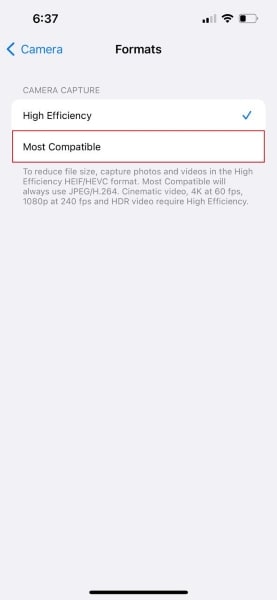
- Step 1: For camera setting adjustments, firstly open the 'Settings' app and then look for 'Camera'.
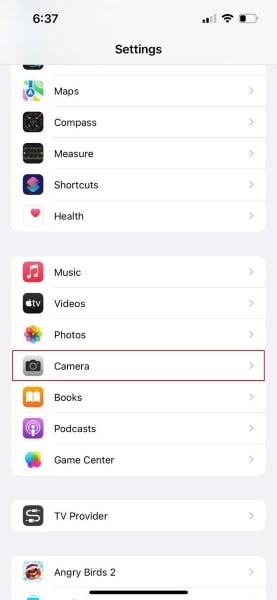
- Step 2: After opening the ‘Camera’ section, hit the ‘Formats’ tab on the top. From the ‘Formats’ screen, make sure you select the ‘Most Compatible’ option.
Fix 10: Camera Not Restricted in Screen
Another adoptable fix to resolve the black screen camera app is to check that the camera is not restricted in the screen. Let us add its steps in case this solution scares you.
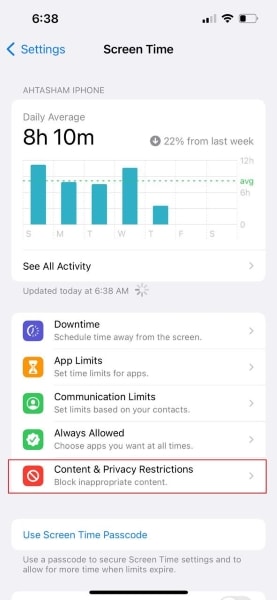
- Step 1: The process starts by opening the 'Settings' app and looking for ‘Screen Time.' Now, from the Screen Time section, select the ‘Content & Privacy Restrictions’ option.
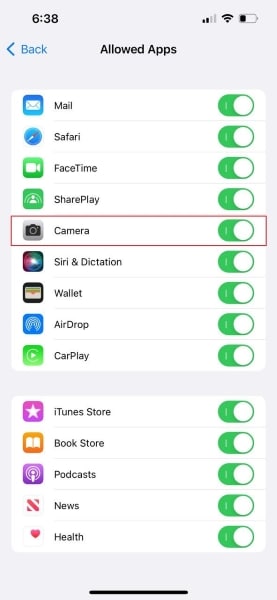
- Step 2: Here, move to the ‘Allowed Apps’ and check that the switch for ‘Camera’ is green.
Fix 11: Use a Repair Tool to Fix iPhone 13 & 14 Series Camera Black or Not Working
The last and the most fantastic solution to fix the issue of black screen on the camera is using Dr.Fone – System Repair (iOS). The tool is brilliant to use. It is very easy to understand. Dr.Fone is the doctor of all iOS problems ranging from iPhone frozen, stuck in recovery mode, and many others.
Dr.Fone - System Repair
Repair iOS System Errors Without data loss.
- Only fix your iOS to normal, no data loss at all.
- Fix various iOS system issues stuck in recovery mode, white Apple logo, black screen, looping on start, etc.
- Downgrade iOS without iTunes at all.
- Works for all models of iPhone, iPad, and iPod touch.
- Fully compatible with the latest iOS version.

As mentioned that Dr.Fone is easy to use and understand. So now, let us share its guiding steps with you. You simply have to follow the steps and get the job done.
- Step 1: Select "System Repair"
First of all, download and install Dr.Fone. Once done, launch the program from its main screen and select 'System Repair' > 'iPhone' > 'iOS Repair'.

- Step 2: Connect your iOS device
Now, it's time to connect your iPhone to your computer using a lightning cable. As soon as Dr.Fone detects your iOS device, it will ask for two options, select the 'Standard Repair'.

- Step 3: Confirm your iPhone Details
Put your iPhone into recovery mode. Here, the tool will spontaneously detect the device's model type and display the available iOS version. You just have to confirm your iOS version and hit the ‘Download’ button to start the repair process.

- Step 4: Firmware Download and Verification
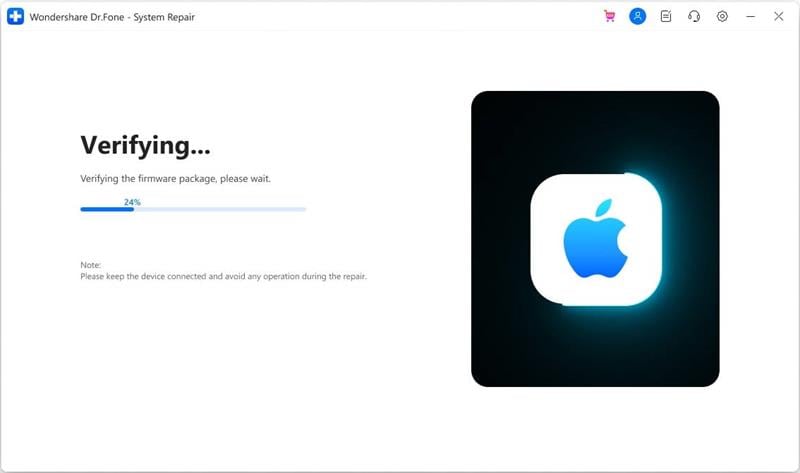
At this point, the iOS firmware is downloaded. The firmware takes some time to download because of its large size. Once the download is completed, the tool starts verifying the downloaded iOS firmware.
- Step 5: Start Repairing
After the verification, a new screen will appear. You will see a ‘Repair Now’ button on the left side of the screen; hit it to start repairing your iOS device. It will take a few minutes to repair your damaged iOS device completely.

4,624,541 people have downloaded it
iPhone Errors
- Errors 0 ... 100
- 1. iPhone Error 6
- 2. iPhone/iTunes Error 9
- 3. iPhone Error 10
- 4. iPhone/iTunes Error 21
- 5. iPhone Error 35
- 6. iTunes Error 40 on iPhone/iPad
- 7. iPhone Error 47
- 8. iPhone Error 69
- 9. iPhone Error 75
- 10. iPhone Error 78
- Errors 1xxx
- 1. iPhone Error 1009
- 2. iPhone Error 1015
- 3. iPhone/iTunes Error 1100
- 4. iPhone Error 1110
- 5. iPhone Error 1667
- Errors 2xxx
- Errors 3xxx
- 1. iTunes Error 3004
- 2. iTunes Error 3014
- 3. iTunes/iPhone Error 3194
- 4. iPhone Error 3503
- 5. iPhone/iTunes Error 3600
- Errors 4xxx
- Other iPhone Errors
- 1. iPhone Error 7005
- 2. iPhone/iTunes Error 9006
- 3. iPhone Error 0xe8000015
- 4. iPhone Cellular Update Failed Error
- 5. iPhone Activation Error
- 6. iPhone SSL Error
- Other iPhone Issues
- ● Manage/transfer/recover data
- ● Unlock screen/activate/FRP lock
- ● Fix most iOS and Android issues
- Repair Now Repair Now Repair Now





Daisy Raines
staff Editor
Generally rated4.5(105participated)