iPhone Error 4013: 8 Proven Ways to Fix Restore & Update Issues (2026)

Sep 30, 2026 • Filed to: Phone Repair Solutions • Proven solutions
 TL;DR:
- Try the Apple-first checklist first: update macOS/iTunes or Apple Devices, use a direct USB connection, and choose Update before Restore.
- If the cable, port, and computer checks do not help, move to Recovery Mode, then DFU only as the last resort.
- If you want a guided repair path, Dr.Fone - System Repair (iOS) includes a verified 4013 Error Repair flow and an Enter/Exit Recovery Mode workflow.
- Repeated failures on multiple cables and computers point toward hardware or a deeper board-level issue, so stop repeating risky restores.
Ask AI for a summary
 ChatGPT
 Perplexity
 Gemini
 Claude
 Grok
Grok
"The iPhone [Device Name] could not be restored. An unknown error occurred (4013)."
iPhone error 4013 usually appears when your iPhone or iPad loses a stable connection during an update or restore. In plain terms, it is a restore/update communication failure, most often caused by a cable, USB port, computer-side block, outdated Apple software, or deeper device corruption.
Fast diagnosis in 60 seconds
- 4013 error iPhone restore starts immediately: cable, USB port, or computer is the top suspect.
- Error appears mid-way: connection instability, security software, or iTunes/Finder components are more likely.
- Device is stuck on Apple logo or in a boot loop: try Recovery Mode first; DFU is the last resort.
- Erreur 4013 iPad: the same fixes apply, with extra attention to USB-C port debris and adapters.
Quick decision map
| What you see | Best next step | Risk |
|---|---|---|
| Fails instantly | Check cable / port / USB path | Low |
| Fails after starting | Check computer / firewall / software | Low |
| Stuck on Apple logo or recovery loop | Try Recovery Mode | Medium to high |
| Nothing else works | Use DFU Mode | High |
Below you will find an Apple-first checklist and then eight fixes ranked by speed, risk, and practicality so you can choose the safest path without guessing.
 safe & secure
- Part 1. What is the iPhone Error 4013?
- Part 2. How to Fix iPhone/iTunes Error 4013?
- Method 1: Use Dr.Fone - System Repair (iOS)
- Method 2: Check Your Computer's Firewall and Internet Connection
- Method 3: Inspect Your USB Cable and Port for Damage
- Method 4: Repair iTunes Components Using an iTunes Repair Tool
- Method 5: Reset All Settings on Your iPhone
- Method 6: Free Up Storage Space on Your iPhone
- Method 7: Enter Recovery Mode and Try Again
- Method 8: Enter DFU Mode for a Complete Restore (Advanced & High Risk)
- Part 3. Fixing Error 4013 on Specific iPhone and iPad Model
- Part 4. How to Avoid iTunes Error 4013 in the Future?
- Bonus Tips: How to restore iPhone from backups without iTunes?
- Frequently Asked Questions about iPhone/iTunes Error 4013
What is the iPhone Error 4013?
iPhone error 4013 is an update or restore failure that happens when your iPhone or iPad cannot maintain a stable connection with iTunes, Finder, or Apple Devices while firmware is being installed. Most cases are connection-related, but repeated failures can also point to hardware damage or a deeper system fault.
What you usually notice
- The restore or update stops with "An unknown error occurred (4013)".
- The device may reboot repeatedly or get stuck on the Apple logo.
- The failure often happens at a repeatable percentage, which can help with diagnosis.
Common causes of Error 4013
- Unstable USB connection: worn cable, loose port, USB hub, keyboard passthrough, or debris in the port.
- Computer-side blocks: firewall or security software interrupting device communication.
- iTunes / Finder / Apple Devices components: outdated software or corrupted drivers and services.
- Low storage or firmware issues: not enough free space, failed firmware download, or a corrupted update path.
- Potential hardware damage: if multiple cables and computers fail consistently, service diagnostics become the next step.
If you already tried another cable, another USB port, and another computer and still get 4013 error iPhone restore, stop repeating full restores and move to safer repair or service options.
How to Fix iPhone/iTunes Error 4013
Start with the Apple-first checklist: update your Mac or PC, use a direct USB connection, and choose Update before Restore when the computer offers both options. That approach keeps data loss to a minimum and solves the most common connection issues first.
Apple-first checklist
- Update your computer software: latest macOS, latest iTunes, or Apple Devices on Windows.
- Force restart your iPhone or iPad, then reconnect it.
- Connect directly to the computer's USB port and avoid hubs or keyboard ports.
- Choose Update first to reinstall iOS without erasing data when possible.
- Try another cable and another computer if the first pass fails.
Why this matters: It avoids unnecessary erases and tackles the most common causes of 4013 iTunes error before you move to riskier fixes.
Quick solutions overview
| Method | Estimated time | Data loss risk | Best for |
|---|---|---|---|
| 1. Dr.Fone - System Repair | ~10 mins | Low | Guided repair for users who want a simpler path |
| 2. Check Firewall & Internet | ~5 mins | None | Rule out computer-side blocks |
| 3. Check USB Cable & Port | ~3 mins | None | Rule out a damaged or unstable connection |
| 4. Repair iTunes Components | ~10 mins | None | Fix software or driver issues on the computer |
| 5. Reset All Settings | ~10 mins | Medium | Clear configuration conflicts on the device |
| 6. Free Up Storage | ~15 mins | None | Make room for the update to complete |
| 7. Recovery Mode | ~30 mins | High if you restore | Standard Apple path if Update works or you have a backup |
| 8. DFU Mode | ~45 mins | High | Last resort for severe corruption |
Method 1: Use Dr.Fone - System Repair (iOS)
If you want a guided repair path instead of testing each repair step manually, Dr.Fone - System Repair (iOS) includes a verified 4013 Error Repair flow. It is also useful when you want a built-in Enter/Exit Recovery Mode helper before moving to a full restore.
Dr.Fone - System Repair (iOS)
A guided way to repair common iOS system issues.
- Works for update / restore failures, recovery loops, and other common iOS system problems.
- Includes a verified 4013 Error Repair path.
- Includes a verified Enter/Exit Recovery Mode workflow.
- Supports Windows and Mac.
How to use Dr.Fone to fix error 4013
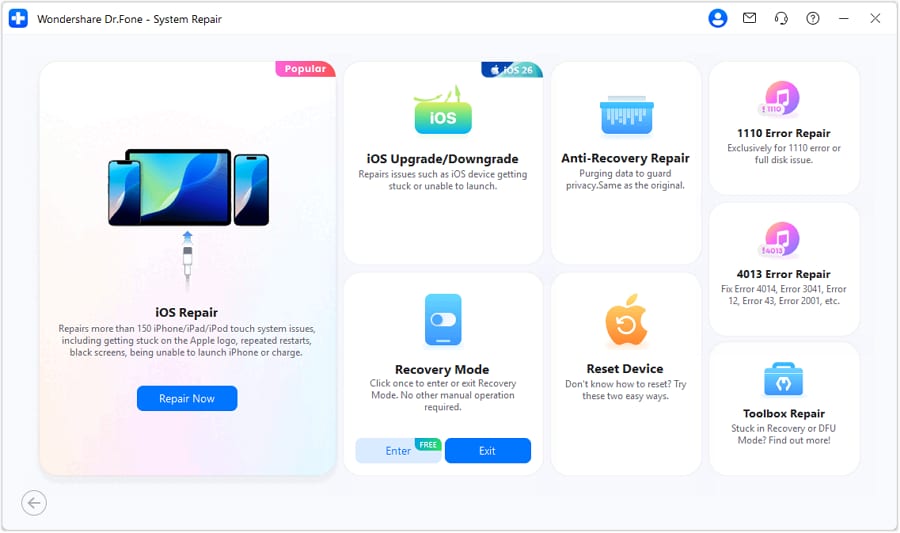
- Step 1. Open Dr.Fone and choose System Repair > iPhone.
- Step 2. Connect the iPhone with an Apple-certified USB cable.
- Step 3. Choose 4013 Error Repair when the mode selection screen appears.
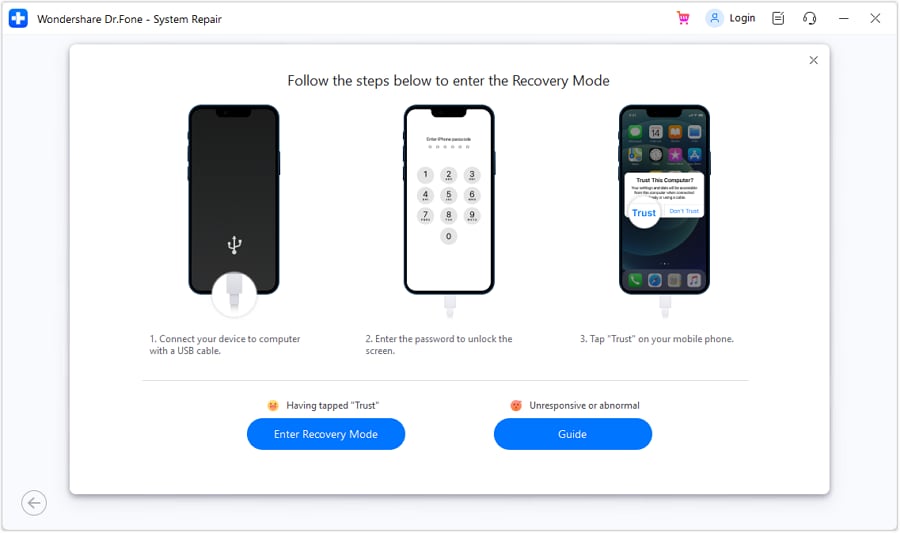
- Step 4. Follow the prompt to enter Recovery Mode, download the firmware, and let the repair finish.

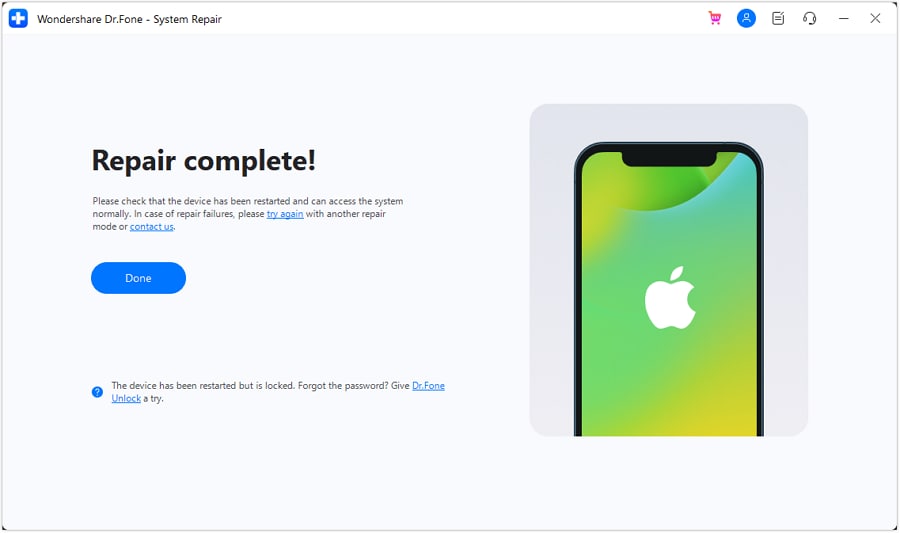
If the error still appears after the guided repair, move on to the cable, port, and software checks below.
safe & secureMethod 2: Check Your Computer's Firewall and Internet Connection
When iPhone error 4013 occurs, the problem can live on the computer side. If the internet drops, a VPN interferes, or security software blocks Apple services, the restore can fail before the device finishes communicating with the computer.
- Step 1. Confirm the computer has a stable internet connection.
- Step 2. Pause third-party security software or temporarily disable the firewall.
- Step 3. Update the Mac or PC before trying again.
- Step 4. Try a second computer if the restore still fails.
If this step fixes the problem, reconnect and try Update again before moving to a full restore.
Method 3: Inspect Your USB Cable and Port for Damage
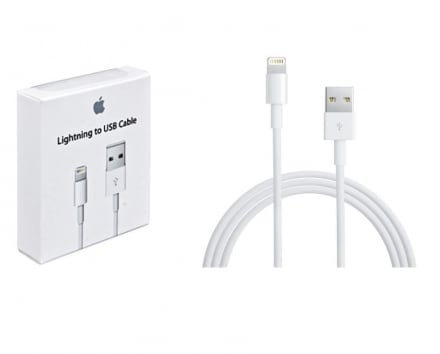
A weak cable, a loose port, a USB hub, or debris inside the connector is one of the most common causes of iTunes error 4013. Start with the physical connection before you erase anything.
- Step 1. Use an Apple-certified cable if possible.
- Step 2. Plug directly into the computer, not into a hub or monitor.
- Step 3. Try another USB port on the same computer.
- Step 4. Swap the cable and test again.
- Step 5. Test on another computer to rule out the current machine.
If the cable and port checks do not help, continue with the software fixes below.
Method 4: Repair iTunes Components Using an iTunes Repair Tool
If the cable looks fine and the error keeps returning, the next suspect is the computer software stack. On Windows that may include iTunes or Apple Devices components, drivers, and related services.
- Update or reinstall iTunes / Apple Devices.
- Check for driver or service errors in Windows Device Manager.
- Restart the computer after the repair.
- Try the restore again from the same Apple account and cable setup.
If the software components are damaged, reconnecting the device usually will not fix the problem until the computer stack is repaired.
Method 5: Reset All Settings on Your iPhone
A settings conflict can sometimes interfere with an update or restore. Resetting all settings keeps your data but clears network, layout, and other device settings.
- Open Settings.
- Go to General > Transfer or Reset iPhone > Reset.
- Choose Reset All Settings.
- Reconnect the phone and try the restore again.
This does not erase photos or apps, but it does clear saved preferences and network settings.
Method 6: Free Up Storage Space on Your iPhone
If the firmware update cannot unpack because the device is too full, the restore path can fail with 4013 or a related update error. Free a little room, then retry the update before choosing a full erase.
- Delete large videos, unused apps, and offline downloads.
- Clear cached data from apps that store large files locally.
- Try to leave several gigabytes free before the retry.
- Use iCloud or a computer backup before any risky restore.
Storage cleanup is not always the root cause, but it is fast and low risk.
Method 7: Enter Recovery Mode and Try Again
Recovery Mode is the standard Apple path when a device still talks to the computer but cannot finish the restore. Choose Update first if the option appears; use Restore only when you already have a backup or you accept the data-loss risk.
For users who do not want to perform the manual button sequence, Dr.Fone - System Repair (iOS) also includes a verified Enter/Exit Recovery Mode workflow. It is a convenience helper for entering or leaving the mode, not a replacement for Apple's Update/Restore decision.
- Step 1. Connect the device to the computer.
- Step 2. Put the iPhone into Recovery Mode using the correct button sequence for the model.
- Step 3. When the computer asks, choose Update first.
- Step 4. If Update fails and the device still needs recovery, choose Restore only with a backup in hand.
See the Recovery Mode guide for more device-specific context and related workflow notes.
Method 8: Enter DFU Mode for a Complete Restore (Advanced & High Risk)
Use DFU only when the earlier fixes fail and you are prepared for a full restore. DFU can repair severe system corruption, but it will erase the device if you complete the restore path.
- Step 1. Connect the iPhone to the computer and open iTunes or Finder.
- Step 2. Put the device into DFU Mode using the correct button sequence for your model.
- Step 3. Wait for the computer to detect the device in recovery mode.
- Step 4. Restore the device only if you are ready to erase it.


Apple Support is the right next stop if DFU still does not resolve the error or the device fails on multiple computers and cables.
Part 3. Fixing Error 4013 on Specific iPhone and iPad Models
iPhone 6 / 7 / 8 Error 4013
Older models are more likely to have battery wear, connector wear, or logic-board-level faults. Start with a different certified cable and direct USB port before moving to DFU.
iPhone 12 / 13 / 14 / 15 Error 4013
On newer devices, the failure is often tied to software, Apple Devices / Finder, or a connection issue. The Apple-first checklist and Recovery Mode usually make the most sense here.
iPad Error 4013
iPad users should follow the same steps, but USB-C port debris, adapters, and hub-based connections deserve extra attention.
Part 4. How to Avoid iTunes Error 4013 in the Future?
- Use high-quality, Apple-certified cables and direct USB ports.
- Keep macOS, iTunes, or Apple Devices updated.
- Leave enough storage free before large iOS updates.
- Back up the device regularly so Recovery or DFU does not become a disaster.
- Keep the iPhone software current to reduce update conflicts.
Bonus Tips: How to restore iPhone from backups without iTunes?
If error 4013 blocks an iTunes restore, Wondershare Dr.Fone can also help you restore an iTunes backup to the device without using iTunes directly. It lets you preview and restore selected data instead of overwriting everything at once.
See Restore iTunes backup to iPhone selectively for the workflow.
Wondershare Dr.Fone
Restore iTunes backup when iTunes is not usable.
- Preview and selectively restore data.
- Export what you need from the backup to your computer.
- Supports Windows and Mac.
Frequently Asked Questions about iPhone/iTunes Error 4013
1. What is iPhone/iTunes Error 4013?
It is a restore or update failure that happens when the computer and iPhone cannot complete the communication needed to reinstall the system.
2. What causes iPhone Error 4013?
The most common causes are USB cable or port problems, firewall or security software interference, outdated Apple software, and deeper system or hardware faults.
3. How can I fix iPhone Error 4013 without technical skills?
Start with the Apple-first checklist, then try Dr.Fone - System Repair (iOS) if you want a guided repair path before moving to Recovery Mode or DFU.
4. Does DFU mode fix iPhone error 4013?
It can, but only as a last resort. DFU is more aggressive than Recovery Mode and usually erases data when you restore.
5. Are the fixes different on iPad?
No. The same checks usually apply, but USB-C port cleanliness and adapter quality matter more on newer iPads.
6. When should I contact Apple Support?
Contact Apple Support or an authorized service provider if the error remains after multiple cables, multiple computers, Recovery Mode, and DFU.
Conclusion
The safest path for iPhone error 4013 is to start with the Apple-first checklist, then move through the cable, computer, and Recovery Mode checks before using DFU. If you want a guided repair path or an easier way to enter or exit Recovery Mode, Dr.Fone - System Repair (iOS) is the optional product path that fits this problem most naturally.
safe & secure


iPhone Errors
- Errors 0 ... 100
- 1. iPhone Error 6
- 2. iPhone/iTunes Error 9
- 3. iPhone Error 10
- 4. iPhone/iTunes Error 21
- 5. iPhone Error 35
- 6. iTunes Error 40 on iPhone/iPad
- 7. iPhone Error 47
- 8. iPhone Error 69
- 9. iPhone Error 75
- 10. iPhone Error 78
- Errors 1xxx
- 1. iPhone Error 1009
- 2. iPhone Error 1015
- 3. iPhone/iTunes Error 1100
- 4. iPhone Error 1110
- 5. iPhone Error 1667
- Errors 2xxx
- Errors 3xxx
- 1. iTunes Error 3004
- 2. iTunes Error 3014
- 3. iTunes/iPhone Error 3194
- 4. iPhone Error 3503
- 5. iPhone/iTunes Error 3600
- Errors 4xxx
- Other iPhone Errors
- 1. iPhone Error 7005
- 2. iPhone/iTunes Error 9006
- 3. iPhone Error 0xe8000015
- 4. iPhone Cellular Update Failed Error
- 5. iPhone Activation Error
- 6. iPhone SSL Error
- Other iPhone Issues
- ● Manage/transfer/recover data
- ● Unlock screen/activate/FRP lock
- ● Fix most iOS and Android issues
- Free Download Free Download Free Download

 > How-to > Phone Repair Solutions > iPhone Error 4013: 8 Proven Ways to Fix Restore & Update Issues (2026)
Alice MJ
staff Editor
Generally rated4.5(105participated)