Error 4000 iPhone – Resolve iTunes Problems of Updating iPhone

Jul 12, 2024 • Filed to: Mobile Repair Solutions • Proven solutions
Updating to the latest iOS version is everyone's demand when using iPhone. As this mobile device is one of the most renowned devices in the world, every upcoming update in its features and systems is awaited and welcomed by the users. However, while trying to update your iPhone, you might get into an inconvenient condition.
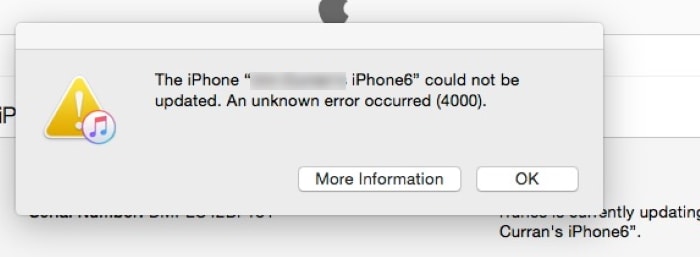
This particular, known as the Error 4000 iPhone, occurs when iTunes fails to update your iPhone. The article will discuss the iPhone Update Error 4000 and provide convenient directions to help you fix your iOS device's issue.
Part 1: What Does Error 4000 Mean?
We shall first look into what the Error 4000 iPhone is. As stated, this error emerges on the iTunes screen if the connected device is not updated properly; this is an undocumented yet important error in iOS devices. The interruption caused by the multiple elements involved in the process leads to such a case in the market. There are many reasons for this error, in particular, as it involves issues with the networking elements of the computer. While iTunes fails to install the iOS update on the iPhone, this error is what you will find on your device's screen.
Part 2: What Causes This Unknown Error 4000?
To understand more about this unknown Error 4000 iPhone, you should know the reasons for this problem. We have outlined the causes of this error below, which will bring you a better understanding of how you should proceed with updating your iPhone when you are using iTunes:
- The iTunes that you are using on your computer is not updated properly. Outdated software will cause multiple malfunctions and glitches, leading to errors such as the iPhone Update Error 4000.
- If you are trying to update a locked iPhone on iTunes, it won't execute properly and will display potential errors such as the Error 4000 iPhone.
- To install iOS firmware on your iPhone, you will need some space for it. If your device is out of storage, it won't allow the installation of the iOS that is updated through iTunes. The only solution to this case is to free up space on your iPhone.
- The iPhone device you are trying to update has a battery level of less than 50%. In such circumstances, it won't update the iOS for you, as this is believed to be one of the main propositions while updating iPhones.
- Devices might have some temporary malfunctioning and glitches, which can cause different interruptions in the process.
Part 3: How to Fix iPhone Could Not Be Updated Error 4000
We will now be shifting our focus to how to resolve the iPhone Update Error 4000. As you know how this error is occurring on your iPhone, it is time to find a proper solution to this prevalent error. We have presented some important fixes that will help you understand how this Error 4000 iPhone can be avoided at all costs.
1. Official Ways from Apple to Solve iTunes Error 4000
To remedy this problem, Apple has presented some comprehensive solutions that address the different causes presented above. While you realize the problem causing the iPhone Unknown Error 4000, these official techniques from Apple will help you get out of this problem. Let's find out which methods have been included in the list of immediate actions to take:
Method 1: Temporarily Disable Antivirus, Malware, and Firewall
As we have already discussed, the iPhone Error 4000 involves different networking bugs and glitches. To protect a computer, you install different anti-virus software to avoid malware and virus attacks. Along with that, you may have activated your firewalls for safely browsing on the internet. Although they fulfill their purpose, there are times when they do not respond properly and malfunction, causing issues like the Error 4000 iPhone.
The best thing to resolve such a case is to temporarily disable your anti-virus and firewall systems to install the iOS system on the iPhone through iTunes. Open the anti-virus software on your computer and disable its operations, so it gets disabled from the computer permanently. To turn off firewall settings, you will have to look into the following steps in detail:
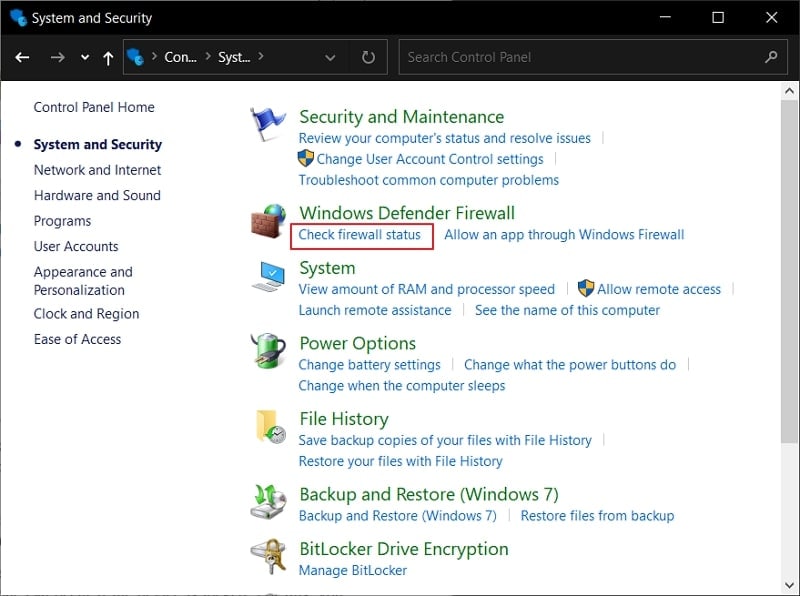
Step 1: You must turn on the "Control Panel" by searching it on the "Search" bar on the taskbar. As it opens, click on the "System and Security" tab to proceed into the security settings.

Step 2: As you are led to the security settings of your computer, lead to select the "Check Firewall status" button to proceed to the firewall settings of your Windows.
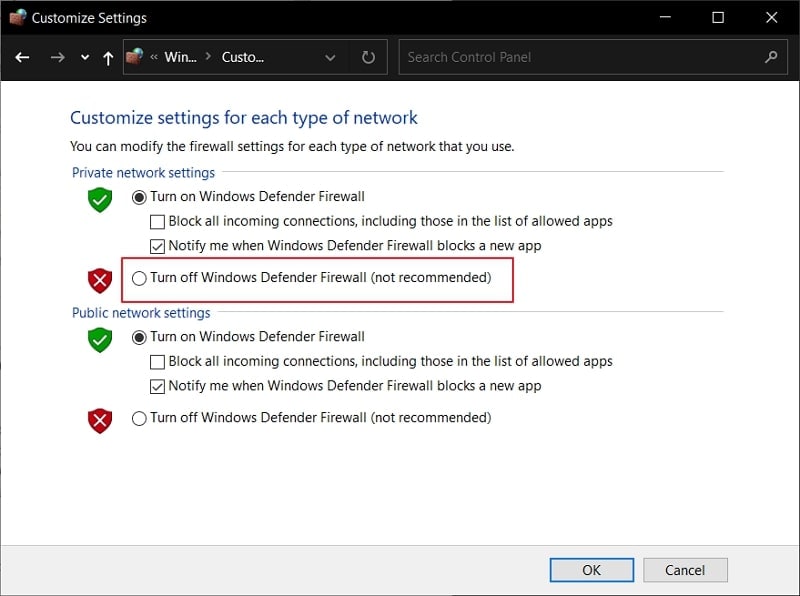
Step 3: On the next screen, select the "Turn Windows Firewall on or off" option to lead to the next set of options. You must enable the bubble against the option "Turn off Windows Firewall (not recommended)." Save your changes to disable the firewall from your computer.
Method 2: Temporarily Disable the Screen Lock on the iPhone
It has been stated that the issue with updating the iPhone can occur if the device is locked. For this, you will have to remove the screen lock from your device, which can be efficiently executed from the iPhone's settings. The passcode and other security measures you have taken on your iPhone should be temporarily disabled, so your iPhone does not get locked. For this, you will have to work through the following steps in detail:
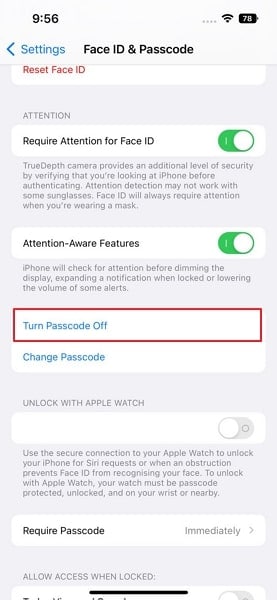
Step 1: Open the "Settings" of your iPhone and lead through the options to find the "Face ID & Passcode" settings.
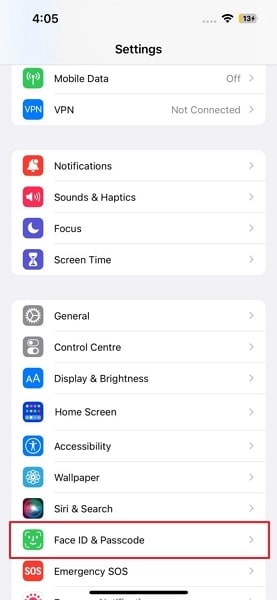
Step 2: This will help you access the iPhone's security settings, where you have to scroll down to select the option of "Turn Passcode Off" to disable the screen lock from the iPhone. You should also turn off the toggle of "iPhone Unlock" against Face ID if it is enabled on your device.
Method 3: Update the Software on the iPhone
Rather than updating your iPhone from iTunes, you can also try the direct approach of updating the device's software. If you wish to update your iPhone to iOS 16, you can efficiently perform this action if you have an iPhone 8 or any of the latest iPhone models. To execute this process, you will have to follow the steps as displayed below:
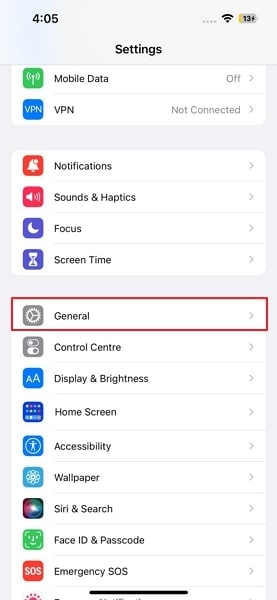
Step 1: Rest yourselves in the "Settings" of your iPhone, where you can find the "General" settings by scrolling down the list.
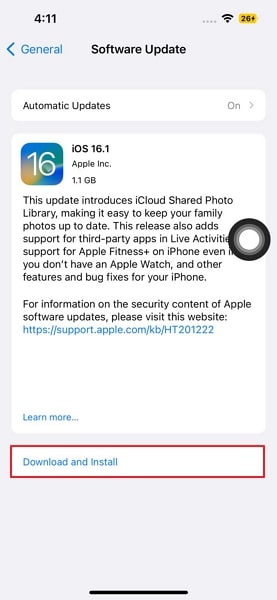
Step 2: Next, find the "Software Update" option on the screen that opens, which will redirect you to the screen where you can command updating the iPhone. Your iPhone will search for updates and will display them if any. Click on the "Download and Install" button to successfully install the iOS update on your device.
Method 4: Update iTunes to the Latest Version
It has also been stated that the iTunes you are using on your computer might not work properly as it is outdated. With outdated software, there are multiple chances of glitches and issues, such as the Error 4000 iPhone. Thus, you should look into updating your iTunes by using the following steps as your guideline:
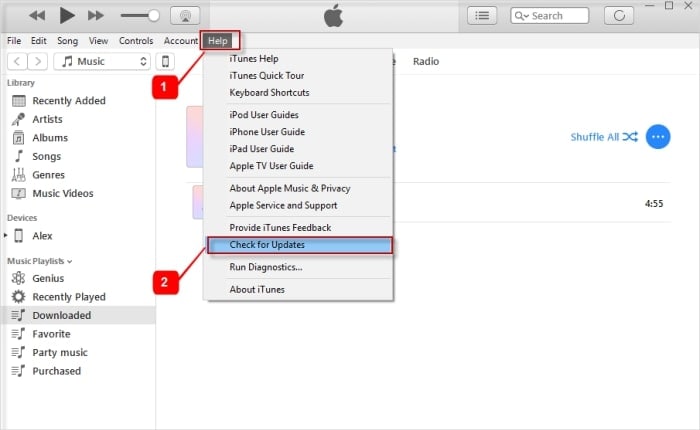
Step 1: Open iTunes on your computer and proceed to the "Help" tab on the top menu.
Step 2: Find the option of "Check for Updates" in the list and wait for iTunes to be updated to the latest version.
Method 5: Restart iPhone and Computer
Temporary glitches with your iPhone and computer can also be a significant reason for issues such as the iPhone Update Error 4000. If you have repeatedly been trying to update your iPhone to the latest version, it might not successfully execute for issues in your devices. For that, it is advised that you should try restarting your iPhone and computer to resolve any temporary problems in the devices.
2. Quick Method to Repair Error 4000 with a iTunes Repair Tool
If you are not getting the right set of solutions for the iTunes error for your device from the above details, you will have to look for more grounds. There are many third-party tools providing repair services; however, they lack in many aspects, which takes them out of the question. While searching for the best option, it has been observed that Dr.Fone - iTunes Repair (iOS) provides one of the best systems for repairing the iTunes errors associated with the iPhone.
With support for resolving more than 100+ iTunes errors, the flow of the operations is very smooth, and it executes the process without putting the iPhone at risk. There are some notable features that make Dr.Fone - iTunes Repair a great tool to work with.
Key Features of Dr.Fone - iTunes Repair (iOS)
- There is no data loss associated with the process, where the tool protects all the data in the device.
- The platform is compatible with all iTunes versions, making it an excellent option for resolving such errors in the market.
- From basic issues to connection issues, this platform also addresses the syncing problems in iTunes.
- It features one of the best success rates in the market, with a one-click fix technology, making it an excellent recommendation.
Steps to Use Dr.Fone - iTunes Repair (iOS)
We shall now see how you can use Dr.Fone - iTunes Repair (iOS) to resolve the problems with iTunes in updating the iPhone. You will surely get rid of the Error 4000 iPhone after trying out this solution:
Step 1: Open iTunes Repair
Open Dr.Fone on your computer after installing it successfully. Proceed to select "System Repair" from the list of options on the homepage. Next, select "iOS" as the device type and then proceed with the "iTunes Repair" option.

Step 2: Select the Error Type
Next, you must define the type of error you are working on. Select "Repair iTunes Errors" and let the platform start the process.

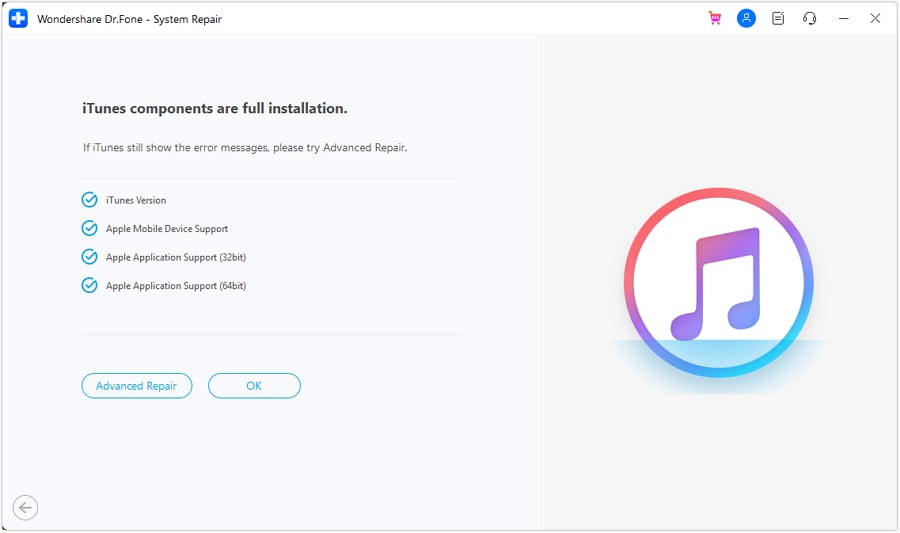
Step 3: Try Advanced Repair If Failed
If the problem is resolved, you must click "OK" as the completion screen appears. On finding issues that are not being resolved, select the "Advanced Repair" option and wait for some time to let the platform execute the process in depth.
Part 4: How to Update iPhone Without iTunes?
Dr.Fone provides a set of multiple solutions that can be used to manage different device issues. For stronger system issues of iPhones, Dr.Fone provides a dedicated System Repair (iOS) tool that can be used to manage the system problems of the device. With the ability to repair 150+ system errors on your iPhone, this is a great tool to try.
It can also be used to update the iPhone without needing iTunes. You can find Dr.Fone - System Repair (iOS) to be very helpful in managing iOS devices. For a better understanding, we have provided some features that highlight this tool, among others.
Key Features of System Repair (iOS)
- The platform provides three different modes of system recovery, which makes it a diverse option.
- It supports all iPhone models, including the latest iOS 16 and iPhone 14. The high compatibility system of Dr.Fone - System Repair (iOS) makes it a great option.
- You can easily upgrade or downgrade your iOS without needing iTunes with the help of System Repair (iOS).
Steps to Update iPhone with System Repair (iOS)
We will now see how you can update your iPhone with the help of System Repair (iOS) with ease:
Step 1: Open the System Repair Tool
As you launch Dr.Fone, select "System Repair" from the list of options and lead defining the nature of the device by choosing "iOS."

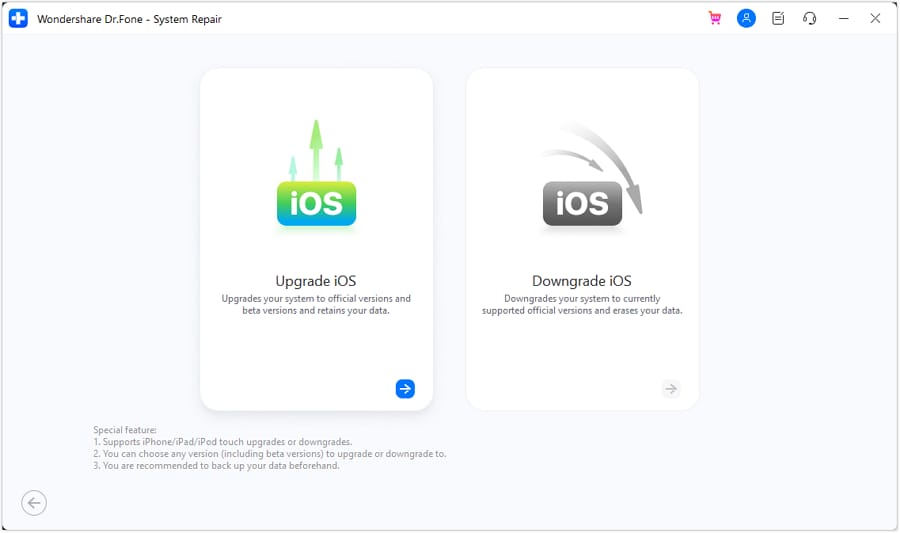
Step 2: Proceed to Upgrade the iOS
On the next screen, you will have to select "iOS Upgrade/Downgrade" from the options to lead to the next option. To upgrade your iOS, you will have to select "Upgrade iOS" from the options.
Step 3: Connect Device and Select iOS Firmware
Connect your iPhone with a USB cable to the computer and let it connect successfully. The platform will redirect to a window showing all options of iOS firmware that you can install. Select the one you want by clicking on the "Download" button.

Step 4: Download and Install Firmware
The iOS firmware is downloaded and verified by the platform before it is installed on the iPhone. Before installation, you have to click on "Repair Now" to execute the process successfully.

Conclusion
This article has helped out users in assessing the Error 4000 iPhone. Along with the assessment of its causes, this article has guided some basic solutions that can be used to avoid the error. Following this, if you are not satisfied with the solutions provided by Apple, you can look into Dr.Fone, an excellent option for resolving all prevailing system issues with your iPhone. Look through the guide to learn more about Dr.Fone - iTunes Repair (iOS) and Dr.Fone - System Repair (iOS) as the go-to solutions for iOS system issues.


iPhone Errors
- Errors 0 ... 100
- 1. iPhone Error 6
- 2. iPhone/iTunes Error 9
- 3. iPhone Error 10
- 4. iPhone/iTunes Error 21
- 5. iPhone Error 35
- 6. iTunes Error 40 on iPhone/iPad
- 7. iPhone Error 47
- 8. iPhone Error 69
- 9. iPhone Error 75
- 10. iPhone Error 78
- Errors 1xxx
- 1. iPhone Error 1009
- 2. iPhone Error 1015
- 3. iPhone/iTunes Error 1100
- 4. iPhone Error 1110
- 5. iPhone Error 1667
- Errors 2xxx
- Errors 3xxx
- 1. iTunes Error 3004
- 2. iTunes Error 3014
- 3. iTunes/iPhone Error 3194
- 4. iPhone Error 3503
- 5. iPhone/iTunes Error 3600
- Errors 4xxx
- Other iPhone Errors
- 1. iPhone Error 7005
- 2. iPhone/iTunes Error 9006
- 3. iPhone Error 0xe8000015
- 4. iPhone Cellular Update Failed Error
- 5. iPhone Activation Error
- 6. iPhone SSL Error
- Other iPhone Issues
- ● Manage/transfer/recover data
- ● Unlock screen/activate/FRP lock
- ● Fix most iOS and Android issues
- Repair Now Repair Now Repair Now
James Davis
staff Editor
Generally rated4.5(105participated)