100% Security Verified | No Subscription Required | No Malware

 :
: 
 ChatGPT
 Perplexity
 Gemini
 Claude
 Grok
Grok
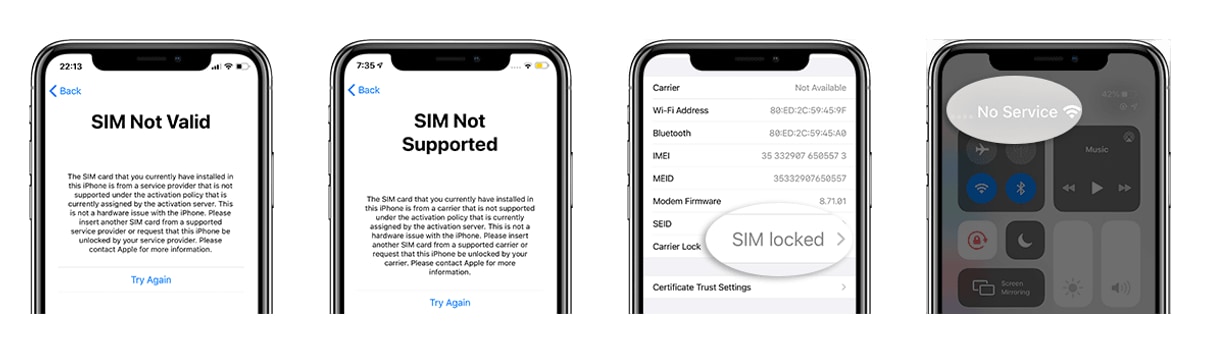
The "SIM Not Supported" error is a common yet frustrating issue for many iPhone users. It typically appears during device activation or after inserting a new SIM card, effectively preventing you from making calls, sending texts, or using mobile data. This problem can affect any model, from an iPhone 6 to the latest iPhone 14, and often leaves users wondering what to do next.
This error usually points to one of two things: either your iPhone is locked to a specific carrier's network, or there's a software glitch preventing it from recognizing the SIM card. In this guide, we'll walk you through five proven methods to diagnose and resolve the issue, from simple checks to advanced software solutions.
In this article
- Part 1. Why Does My iPhone Say 'SIM Not Supported'?
- Part 2. Essential First Steps to Fix the SIM Error
- Part 3. The Definitive Solution for Carrier-Locked iPhones: Dr.Fone - Screen Unlock
- Part 4. An Unconventional Trick: The Emergency Call Method
- Part 5. Fixing Deeper System Glitches with Dr.Fone - System Repair
Part 1. Why Does My iPhone Say 'SIM Not Supported'?
Before diving into solutions, it's helpful to understand the root causes. The "SIM Not Supported" message on your iPhone typically arises for the following reasons:
- Carrier Lock: This is the most common reason. If you purchased your iPhone from a carrier like AT&T, Verizon, or T-Mobile, it's likely "locked" to their network. This means it will only accept SIM cards from that specific carrier. Trying to use a SIM from a different provider will trigger the error.
- Software Glitches: Sometimes, a minor bug in iOS can interfere with the phone's ability to communicate with the SIM card. This can happen after an update or just randomly.
- Outdated iOS or Carrier Settings: Your iPhone needs up-to-date software and carrier settings to work correctly. If either is outdated, it may fail to recognize a valid SIM card.
- Damaged or Poorly Seated SIM Card: Physical issues, like a damaged SIM card or one that isn't inserted correctly into the tray, can also cause this error.
Part 2. Essential First Steps to Fix the SIM Error
Always start with the simplest solutions. These quick checks can often resolve the issue without needing advanced tools. Let's go through the fundamental troubleshooting steps.
2.1: Check if Your iPhone is Carrier-Locked
Your first step should be to determine if your iPhone is locked to a specific carrier. This information will guide your next actions. You can easily check this in your settings.
Navigate to Settings > General > About. Scroll down until you find the "Network Provider Lock" or "Carrier Lock" field. If it says "No SIM restrictions," your iPhone is unlocked, and the problem is likely software-related. If it shows a carrier's name, your phone is locked.

2.2: Perform a Simple Restart
A restart is a classic troubleshooting step that can clear up temporary software bugs causing the SIM recognition issue. The process varies slightly depending on your iPhone model.
- For iPhone X, 11, 12, 13, and newer: Press and hold the Side button and either Volume button until the power-off slider appears. Drag the slider to turn off your device. Wait 30 seconds, then press and hold the Side button again until you see the Apple logo.

- For iPhone 6, 7, 8, or SE (2nd/3rd gen): Press and hold the Side button until the power-off slider appears. Drag it, wait, and then press and hold the Side button to turn it back on.

- For iPhone 5, SE (1st gen), or earlier: Press and hold the Top button until the slider appears. Drag it to power off, then press and hold the Top button to restart.

2.3: Update to the Latest iOS Version
An outdated iOS version can lead to compatibility issues with your carrier's network. Apple frequently releases updates that include bug fixes and improved carrier settings, which can resolve the "SIM Not Supported" error.
-
Step 1 Connect and Go to Settings
Ensure your iPhone is connected to Wi-Fi and plugged into a power source. Go to Settings > General > Software Update.

-
Step 2 Download and Install
If an update is available, you will see an option to "Download and Install." Tap it and enter your passcode to begin the process. Let the update complete, and your iPhone will restart.

2.4: Reset Network Settings
If the error persists, resetting your network settings can help. This action clears all current cellular, Wi-Fi, Bluetooth, and VPN settings, returning them to factory defaults. It's a safe way to eliminate any misconfigurations that might be causing the SIM issue.
To do this, go to Settings > General > Transfer or Reset iPhone > Reset. From the menu, select "Reset Network Settings". You will need to enter your passcode to confirm. Your iPhone will restart with its network settings refreshed.

Part 3. The Definitive Solution for Carrier-Locked iPhones: Dr.Fone - Screen Unlock
If you've confirmed your iPhone is locked to a carrier and you want to use a SIM from a different network, you'll need a SIM unlocking solution. While contacting the original carrier is an option, it can be a slow and complicated process. For a faster and more straightforward approach, Dr.Fone - Screen Unlock (iOS) provides a reliable way to remove the SIM lock.
 Unlock iPhone/iPad passcode in minutes.
- Remove Face ID, Touch ID, and screen lock.
- Bypass iCloud Activation Lock easily.
- Support all iOS versions and devices.
- Simple steps, no technical skills needed.

Follow these steps to remove the SIM lock from your iPhone:
-
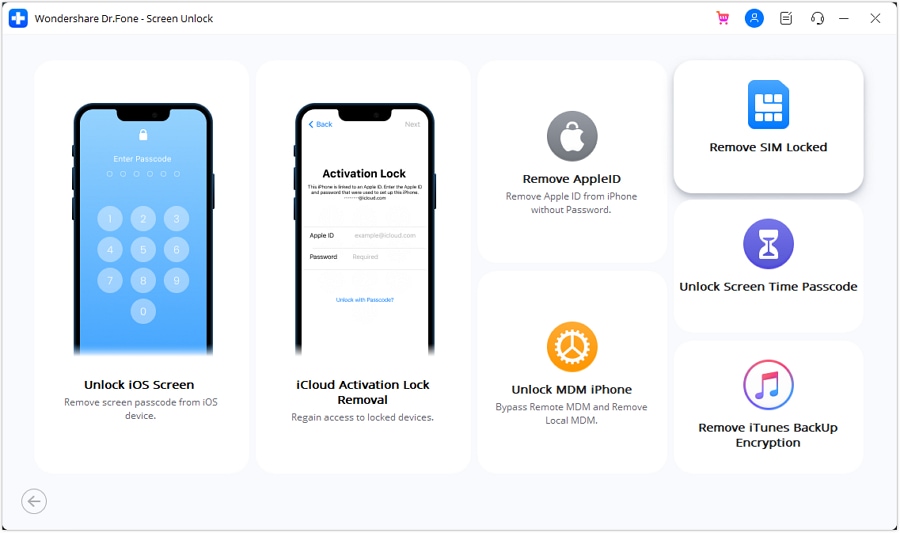
Step 1 Launch Dr.Fone and Select Mode
Download and open Dr.Fone on your computer. From the main toolbox, select "Screen Unlock," and then choose the "Remove SIM Locked" option.
-
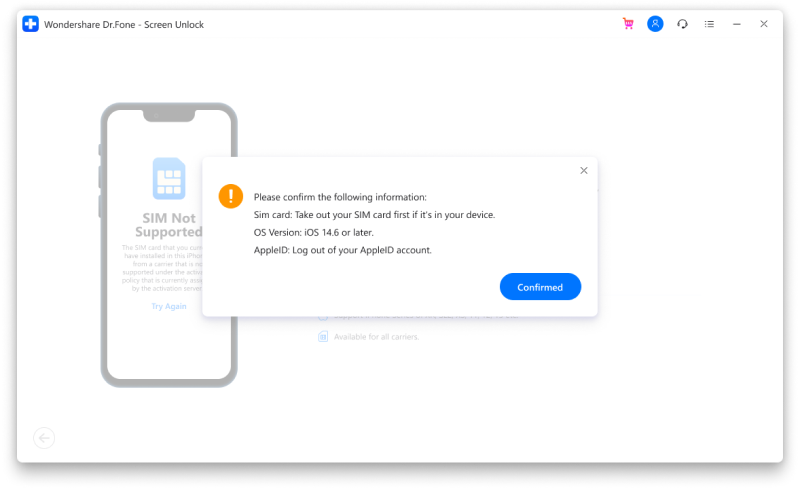
Step 2 Connect Your iPhone and Authorize
Connect your iPhone to the computer with a USB cable. Click "Start" in the software and then "Confirmed" on the subsequent screen to begin the authorization process.
-
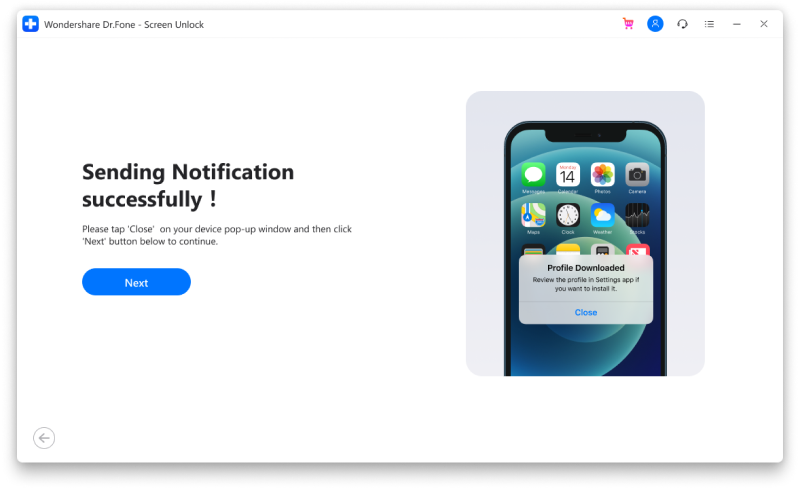
Step 3 Follow On-Screen Instructions
Dr.Fone will send a configuration profile to your device. Follow the on-screen instructions carefully to proceed with the screen unlock and click "Next" in the software.
-
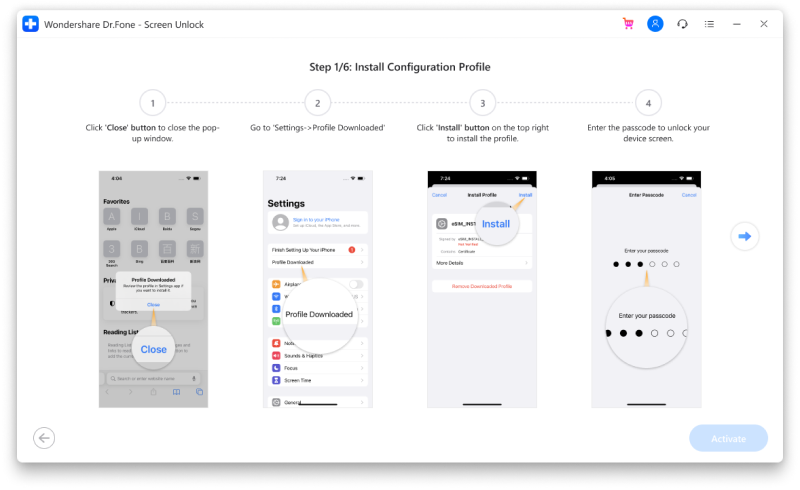
Step 4 Install the Configuration Profile
On your iPhone, go to Settings > Profile Downloaded. Tap "Install" in the top right corner and enter your screen passcode to confirm.
-
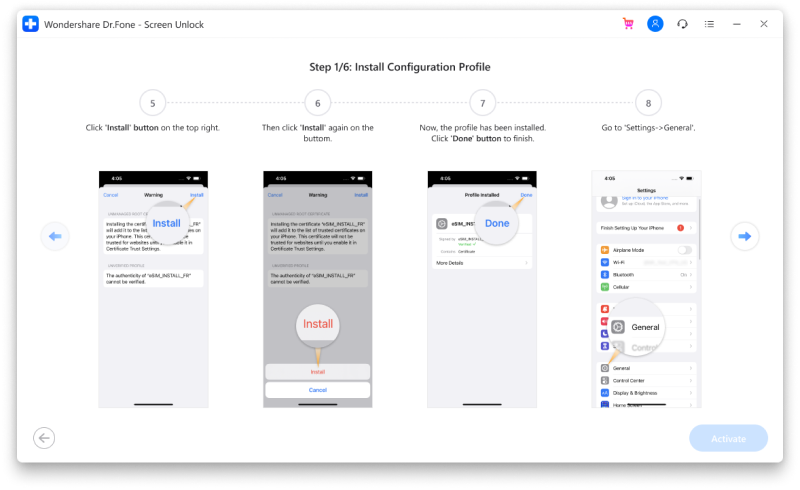
Step 5 Complete the Unlock Process
Tap "Install" again at the bottom of the screen. After installation, the software will guide you through the final steps to remove the SIM lock. For more details, you can consult the full iPhone SIM Unlock guide.
Part 4. An Unconventional Trick: The Emergency Call Method
This is an older, trickier method that has worked for some users, particularly with older iPhone models and iOS versions. It attempts to bypass the activation screen where the "SIM Not Supported" error appears. It is not a guaranteed fix, but it's worth a try if other methods have failed.
-
Step 1 Access the Emergency Call Screen
From the iPhone activation screen, press the Home button (or swipe up on newer models) and tap on "Emergency Call" when the option appears.

-
Step 2 Dial and Disconnect
Dial an emergency number like 911 or 112. As soon as the call connects, immediately press the Power button to end the call and turn off the screen. This quick action can sometimes bypass the SIM lock check and force the phone to accept the SIM card.
Part 5. Fixing Deeper System Glitches with Dr.Fone - System Repair
If your iPhone is unlocked but still shows the "SIM Not Supported" error after trying the basic fixes, the problem might be a deeper iOS system issue. While iTunes can restore your device, it erases all your data. A safer and more effective alternative is Dr.Fone - System Repair (iOS).
This tool is designed to fix over 150 iOS system problems—including the SIM not supported issue, white screen of death, or being stuck in recovery mode—all without causing any data loss in its Standard Mode. It works by repairing the core system files and updating your device to a stable, functioning version of iOS.
- Fix iOS issues, no data loss.
- One-click repair for all iOS problems.
- Solve recovery mode, Apple logo, black screen, etc.
- Upgrade or downgrade iOS without iTunes

-
Step 1 Launch Dr.Fone and Connect Your iPhone
Start Dr.Fone on your computer and choose "System Repair." Connect your iPhone via a lightning cable. Select "Standard Mode" for a repair process that preserves your data.

-
Step 2 Download the Correct Firmware
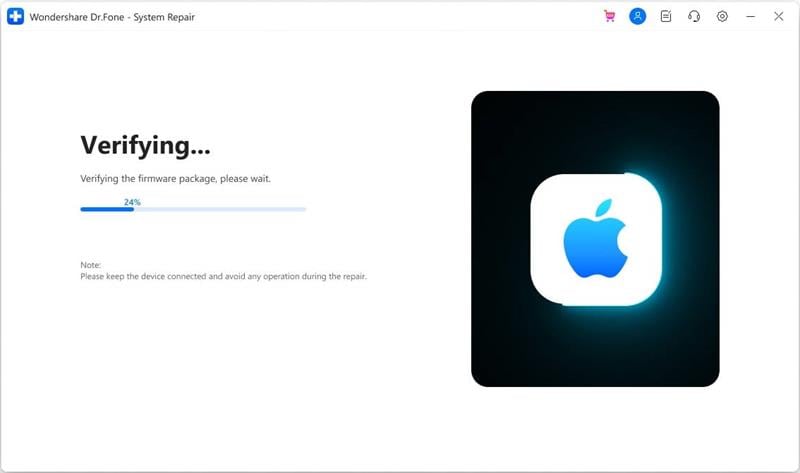
Dr.Fone will automatically detect your iPhone model and show the available iOS firmware versions. Choose the appropriate version and click "Start" to begin downloading.

Once downloaded, the tool will verify the firmware package to ensure its integrity.
-
Step 3 Initiate the Repair
After verification, click "Fix Now" to start the system repair process. This will take a few minutes. Keep your iPhone connected throughout.

When the repair is complete, your iPhone will restart, and the SIM not supported issue should be resolved.

Conclusion
Encountering the "SIM Not Supported" error on an iPhone can be disruptive, but it's usually fixable. Start by determining if your phone is carrier-locked. If it's unlocked, simple solutions like restarting, updating iOS, or resetting network settings often work. For carrier-locked devices, a tool like Dr.Fone - Screen Unlock offers a reliable way to gain network freedom. For persistent software glitches, Dr.Fone - System Repair can fix the underlying iOS issues without data loss. If none of these solutions work, the problem might be with the SIM card itself or, in rare cases, a hardware fault that requires professional service.
FAQ
-
1. What does 'SIM Not Supported' mean on an iPhone?
This error message almost always means your iPhone is locked to a specific cellular carrier. When you insert a SIM card from a different carrier, the phone's software prevents it from connecting to the new network, displaying the error. Less commonly, it can be caused by a software bug or a damaged SIM card. -
2. Can I fix the 'SIM Not Supported' issue for free?
Yes, several fixes are free. You can try restarting your iPhone, updating your iOS, and resetting network settings at no cost. If your phone is carrier-locked, you can contact the original carrier to request an unlock, which is usually free if you've met their requirements (e.g., the contract is paid off). -
3. How do I know for sure if my iPhone is locked to a carrier?
The most reliable way is to check in your iPhone's settings. Go to Settings > General > About. Scroll down to the "Network Provider Lock" (or "Carrier Lock") section. If it says "No SIM restrictions," your iPhone is unlocked. If it lists a carrier name or says "SIM locked," it is locked to that carrier. -
4. Will a factory reset fix the 'SIM Not Supported' error?
A factory reset will not remove a carrier lock. A carrier lock is tied to the phone's IMEI number in Apple's activation servers and is not affected by resetting the device. While a factory reset might fix a severe software glitch causing the error on an unlocked phone, it should be a last resort as it erases all your data. It's better to first try a system repair tool that doesn't cause data loss.
 Add Wondershare Dr.Fone as a preferred source on Google