Everything You Need to Know About the iPhone Error 9 and How to Solve It

May 22, 2026 • Filed to: Phone Repair Solutions • Proven solutions
 TL;DR:
iPhone error 9 is a software-level connectivity failure between your device and Apple's servers during a restore or update, requiring you to secure your physical USB link, configure network permissions, or repair the iOS firmware.
● Establish a stable physical connection by plugging an Apple MFi-certified cable directly into a computer's built-in USB port, completely avoiding unpowered USB hubs and disconnecting all other USB peripherals to prevent bandwidth conflicts.
● Verify that your computer runs the latest OS and iTunes version, or switch to Finder if using macOS Catalina (10.15) and later, while temporarily disabling VPNs and permitting iTunes through Windows Defender Firewall to ensure activation server access.
● When utilizing third-party recovery software like Wondershare Dr.Fone to bypass persistent firmware corruption, exclusively select the Standard Repair mode to preserve your personal data, as the Advanced Repair option forces a full factory erasure.
Ask AI for a summary
 ChatGPT
 Perplexity
 Gemini
 Claude
 Grok
Grok
If you're dealing with iPhone error 9 — also called iTunes error 9 or Apple error code 9 — you're facing one of the most common iPhone restore and update failures. This error appears across all iPhone models, including the iPhone 13, iPhone 13 Pro Max, iPhone 14, and iPhone 15 Pro, and it means your device lost its connection to Apple's servers during a restore or update operation. The result: the process fails, and iTunes or Finder throws the dreaded error 9 message.
The good news is that iPhone error 9 is almost always fixable without visiting an Apple Store. Whether you're encountering this on iTunes on Windows, Finder on Mac, or have been stuck in recovery mode after a failed restore, this guide walks you through every proven iphone error 9 solution — from a one-click system repair to USB troubleshooting and firewall configuration. Read on to identify the root cause of your specific situation and resolve it quickly.
What Is the iPhone Error 9?
iPhone error 9 is an Apple error code that appears when your device cannot complete a restore or update because the connection between your iPhone and Apple's servers was interrupted. It is not a hardware defect — it is a connectivity and software-level failure that any iPhone or iPad model can encounter, regardless of age or iOS version.
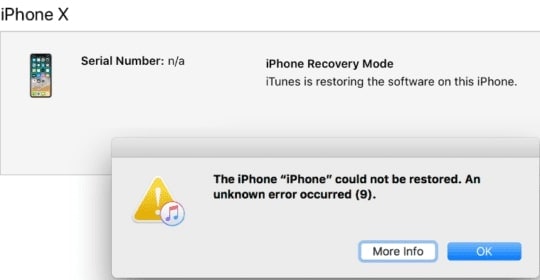
When you restore or update an iPhone through iTunes (Windows) or Finder (macOS), the process requires a continuous, stable USB connection to your computer and an uninterrupted internet connection to Apple's activation servers. If either connection is dropped — even for a second — the operation fails and you receive the message: "The iPhone could not be restored. An unknown error occurred (9)."
iPhone error 9 is closely related to error codes 4014, 4013, and 4005. All of these point to the same underlying problem: a failed or unstable device-to-server connection. If you see any of these codes alongside or instead of error 9, the same set of solutions applies.
This error affects all Apple devices — from older models like the iPhone 8 and iPhone X to newer ones including the iPhone 13, iPhone 13 Pro Max, iPhone 14, and iPhone 15 Pro. Importantly, in most cases your iPhone's data and hardware remain intact; the device simply could not complete the firmware operation. This means recovery is very much possible, and your data is generally not at risk.
Understanding this distinction — a connection failure, not a hardware failure — is critical because it directly informs which solution you should try first.
Symptoms of the iPhone Error 9
The defining symptom of iPhone error 9 is an explicit error dialog in iTunes or Finder that says your device "could not be restored" with error code 9. However, a set of secondary warning signs often precede or accompany this message. Recognizing them early allows you to take corrective action before a restore completely fails.
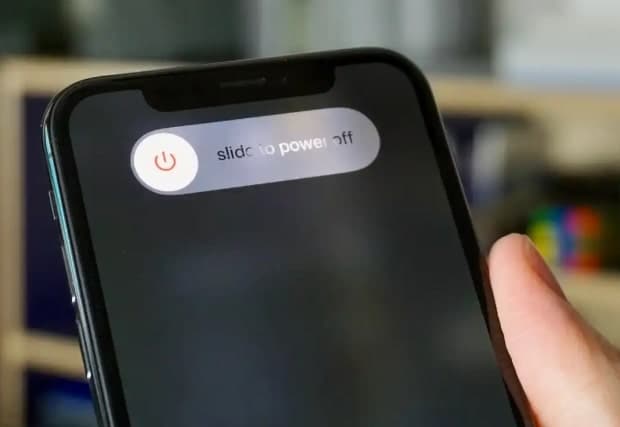
- Error code 9 in iTunes or Finder: A dialog box reads "The iPhone could not be restored. An unknown error occurred (9)." This is the primary and most definitive symptom.
- Related error codes appearing instead: You may see error 4014, 4013, or 4005 as substitutes or in combination — these all indicate the same root connection failure as the unknown error 9 iphone restore.
- Slower syncing or charging on certain USB ports: Your device charges or transfers data noticeably slower through one specific USB port, suggesting the port is damaged, underpowered, or incompatible.
- Improved performance on a different USB port: Switching to another port on the same computer resolves the speed issue, confirming the original port is faulty.
- Device not charging through USB: The iPhone reports "Not Charging" or charges at an unusually slow rate, indicating a damaged or non-certified cable.
- Unknown error prompt during restore or update: iTunes or Finder displays a vague "unknown error" without a specific code — this is often a precursor to the full error 9 message on the next attempt.
- iTunes sync timeout: A sync or restore process hangs indefinitely and eventually times out, indicating an unstable USB or network connection.
- iPhone stuck in recovery mode or DFU mode: After a failed restore attempt due to error 9, your device may become locked in recovery or DFU mode and appear as a black screen.
If two or more of these symptoms appear together, there is a high probability that iPhone error 9 — or a closely related restore error — is present. The solutions in the next sections will address each underlying cause systematically.
Common Triggers for the iPhone Error 9
iPhone error 9 is triggered by any factor that disrupts the connection between your iPhone and Apple's restore servers during a restore or update. While Apple Support officially identifies a faulty USB connection as the primary cause, the full picture is more nuanced. Triggers span hardware issues, software conflicts, and network/security configurations — and knowing which category applies to you will help you find the fastest fix.
Hardware-Related Causes
- Damaged or non-certified USB cable: A frayed, bent, or non-MFi-certified Lightning or USB-C cable is the single most common hardware cause. Always use an Apple-certified cable when restoring your iPhone.
- Underpowered or faulty USB port: USB hubs, extension cables, and older USB 2.0 ports may not deliver sufficient power or bandwidth, causing the connection to drop mid-restore.
- Multiple USB peripherals connected simultaneously: When several devices share your computer's USB controller, the connection to your iPhone can become unstable, triggering error 9 during the restore process.
Software and Firmware Causes
- Outdated iTunes version: An outdated iTunes build may be incompatible with the firmware of newer iPhones (iPhone 13, 14, 15) and fail to communicate correctly with Apple's servers during restore.
- Outdated iOS or macOS: System-level incompatibilities between your iPhone's iOS version and your computer's operating system can interrupt the restore handshake.
- Residual jailbreak software: If your iPhone was previously jailbroken, modified boot files or system patches may interfere with the standard iTunes restore protocol, consistently triggering apple error 9.
- Corrupted system host files: Malware or unauthorized modifications to your computer's hosts file can redirect or block iTunes' connection to Apple's servers, causing error 9 iphone restore to fail.
Network and Security Causes
- Firewall blocking iTunes: Windows Defender Firewall or a third-party antivirus firewall can prevent iTunes from reaching Apple's activation and restore servers, a particularly common cause on Windows PCs.
- VPN or proxy interference: An active VPN connection or proxy configuration can misroute traffic away from Apple's servers or introduce latency that breaks the restore session.
- Corrupted or modified network settings: Incorrect DNS configuration, corrupted TCP/IP settings, or network databases damaged by a hacking attack can block the server handshake required for a successful restore.
- Internet connection loss during restore: Any interruption to your Wi-Fi or Ethernet connection mid-restore will cause the operation to fail with error 9.
- Apple server downtime: Although rare, Apple's restore and update servers can experience temporary outages. Always verify Apple's service health at the Apple System Status page before attempting multiple restores.
Once you have identified which category most likely applies to your situation, proceed to the solutions below in order — starting with the most comprehensive fix first.
iPhone Error 9 Best Fix – Repair Your System
The most reliable and data-safe solution for iPhone error 9 is a dedicated iOS system repair. Unlike a standard iTunes factory restore — which erases all your personal data — a system repair reinstalls and repairs your device's firmware at the software level while keeping your photos, contacts, messages, and apps completely intact.
This method is especially effective for iphone error 9 restore failures caused by firmware corruption, residual jailbreak files, or software-level damage that a standard iTunes restore cannot bypass. It is also the recommended first step when your device is stuck in recovery or DFU mode after a failed restore attempt on any iPhone model, including iPhone 13 error 9, iPhone 14 error 9, and iPhone 15 Pro error 9 cases.
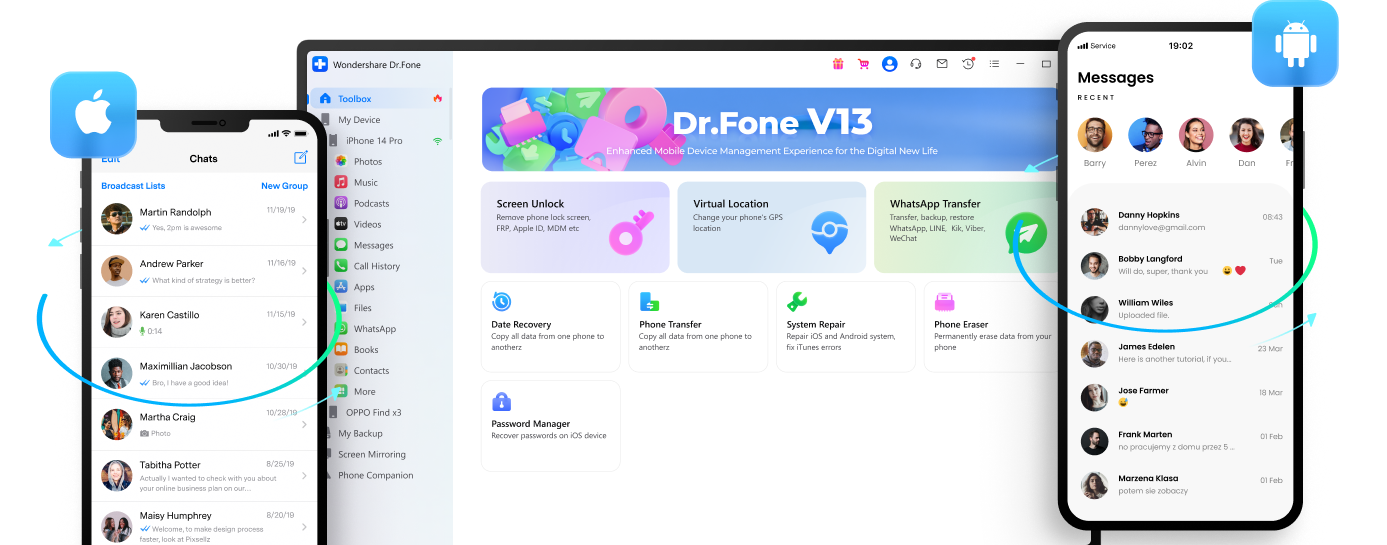
The tool best suited for this is Wondershare Dr.Fone — a professional iOS repair platform trusted by millions of users globally. It supports all iPhone and iPad models, resolves error 9 alongside a broad range of iOS system issues (boot loops, black screens, frozen updates), and does not require technical expertise to use. Download and install it on your Mac or Windows PC, then follow these steps:
- Step 1: After connecting your computer and the iPhone with a USB cable, start Wondershare Dr.Fone and click System Repair within the Toolbox option on the left.

- Step 2: Click iOS Repair.

- Step 3: Select Standard Repair to prevent losing data. Only choose Advanced Repair if Standard Repair fails, as Advanced Repair performs a full firmware reinstall.

- Step 4: Activate the recovery mode on your phone, download the correct firmware for your device, and click Repair Now.

- Step 5: Click Done when you see the "Repair Complete" message.

After the repair completes, your iPhone will restart automatically. In the vast majority of cases, iPhone error 9 will be fully resolved at this point. If the error reappears, continue with the manual solutions in the next section to address any hardware or network-side causes that may be contributing to the problem.
Other Error 9 Solutions to Try
If the iOS system repair above did not fully resolve your iPhone error 9, the remaining cause is likely hardware- or network-related. Work through the following solutions one by one, testing a restore after each step to identify which fix resolves your specific situation.
How to Update iTunes to Fix Error 9
An outdated version of iTunes is a frequently overlooked but common trigger for itunes error 9 and itune error 9, especially when restoring newer iPhone models (iPhone 13, 14, or 15) that require a recent iTunes build to communicate properly with Apple's servers. Updating iTunes takes less than two minutes and should always be one of your first steps.
Updating iTunes on Mac:
- Step 1: Start iTunes.
- Step 2: Go to the Apple menu > iTunes > Check For Updates.
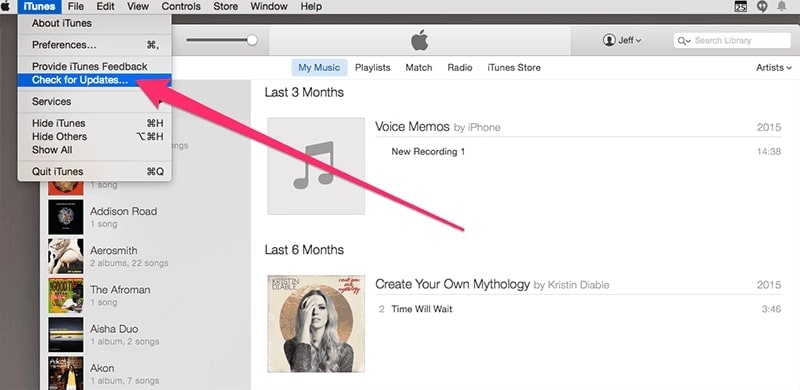
- Step 3: Follow all the on-screen instructions and wait until the update is complete, then retry the restore.
Updating iTunes on Windows:
- Step 1: Start iTunes.
- Step 2: Click Help and then Check For Updates.

- Step 3: Follow all the steps and wait until the update is complete. If iTunes was downloaded from the Microsoft Store, update it there instead.
How to Restart or Force Restart Your iPhone to Clear Error 9
A simple restart can resolve temporary software glitches that trigger error 9 iphone by clearing the device's memory state and resetting active processes. If your iPhone is stuck mid-restore or frozen after an error 9 occurrence, perform a force restart first before attempting the restore again.
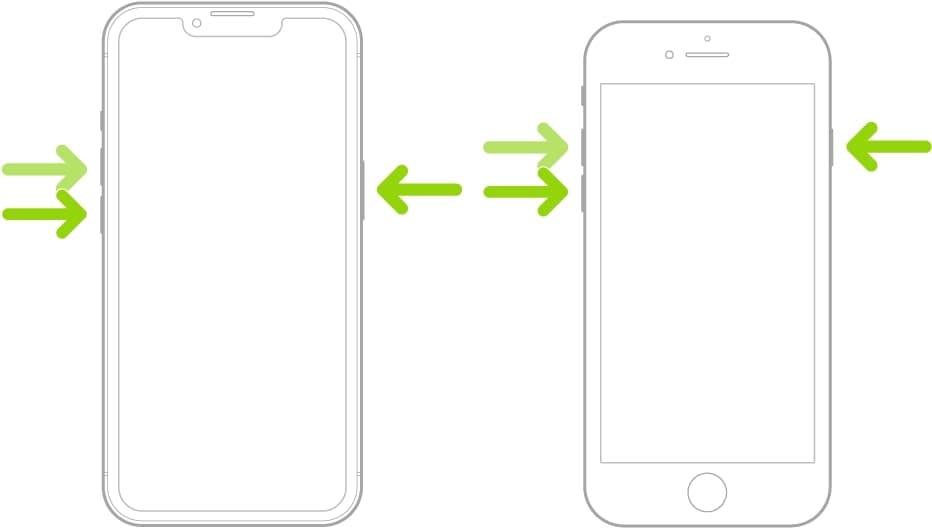
How to Restart iPhone 11 or Later
- Step 1: Press and hold one of the Volume buttons along with the Power button.
- Step 2: Release them once the power-off slider appears and drag it to shut down the device.
- Step 3: Hold the Power button to turn on your iPhone, then reconnect to iTunes and retry.
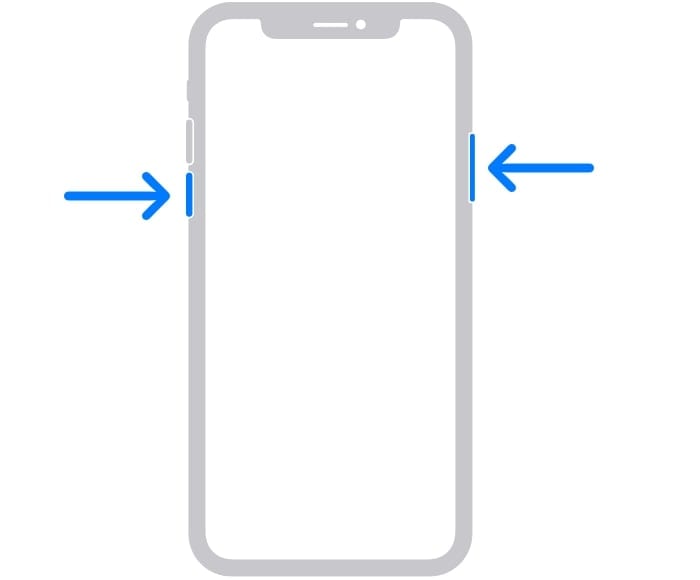
How to Force Restart iPhone 11 or Later
- Step 1: Quickly press and release the Volume Up button.
- Step 2: Quickly press and release the Volume Down button.
- Step 3: Hold the Power button until the Apple logo appears, then release.
How to Check USB Ports and Cables to Resolve iPhone Error 9

Since apple support error 9 iphone restore documentation consistently cites a faulty USB connection as the primary cause, physically inspecting your cable and ports is a critical troubleshooting step. A damaged cable or weak USB port can cause the connection to drop mid-restore — producing error 9 reliably, regardless of any software fix you attempt.
Work through this USB checklist before attempting another restore:
- Check for cable looseness: Gently wiggle the cable at both ends while connected. If it disconnects or flickers, the cable has physical damage and must be replaced.
- Verify cable certification: Only use an Apple MFi-certified Lightning or USB-C cable. Third-party uncertified cables frequently cause error 9 iphone restore failures even when they appear undamaged.
- Switch USB ports: Unplug from your current port and connect directly to a different USB port on your computer — preferably a USB 3.0 port on the back of a desktop, which provides more stable power delivery.
- Test on a different computer: Plug your iPhone into another Mac or PC and attempt the restore. If it succeeds, the issue is with your original computer's USB configuration.
- Clean the connector: Remove the cable, blow gently into both the cable connector and the port to clear any dust or debris, and reconnect firmly.
- Avoid USB hubs: Do not use a USB hub or extension cable during restores — connect your iPhone directly to a port on the computer itself.
How to Update iOS and macOS to Fix Apple Error 9
System software updates often include fixes for communication bugs between your iPhone, iTunes/Finder, and Apple's servers. Keeping both devices up to date is essential for avoiding apple error 9 during restores and updates. If you're restoring an iPhone 14 error 9 or iPhone 15 Pro error 9, ensure your Mac or PC is running the latest compatible OS version.
How to Update iPhone iOS
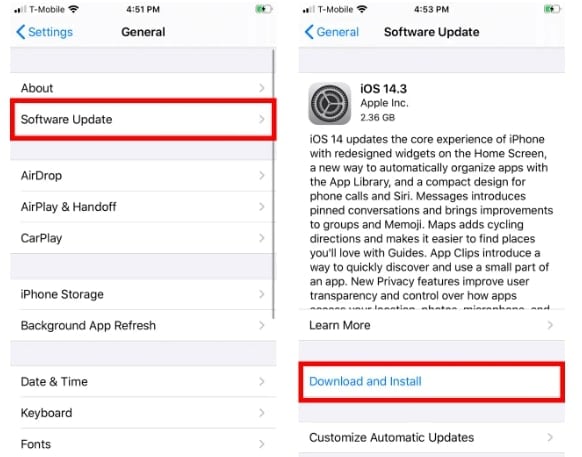
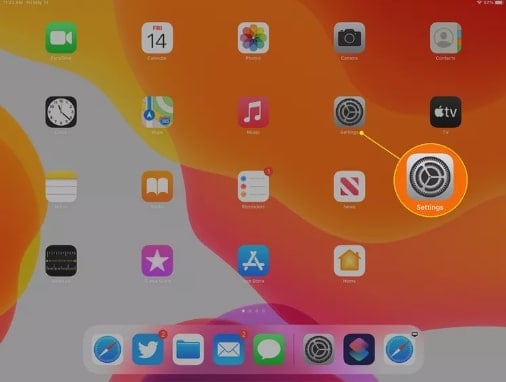
- Step 1: Open the Settings app.
- Step 2: Tap General.
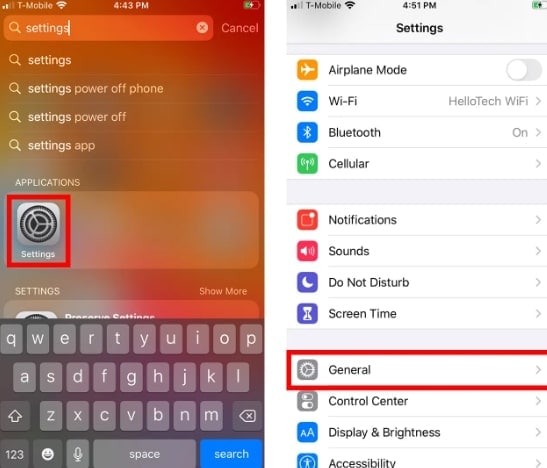
- Step 3: Tap Software Update and wait while the device checks for available updates.
- Step 4: If an update is available, tap Download and Install and wait for the process to finish.
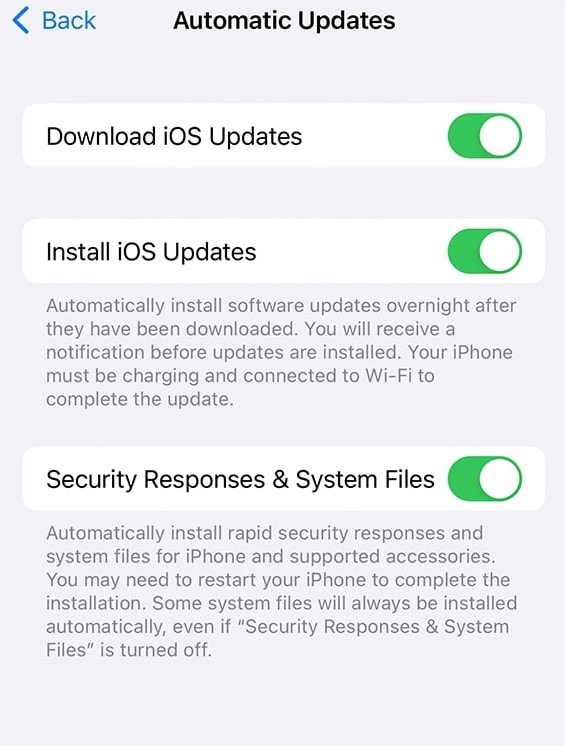
How to Enable Automatic Updates on Your iPhone
Enable automatic updates to ensure your device is always current and reduce the risk of encountering unknown error 9 iphone restore due to outdated firmware:
- Step 1: Tap Settings.
- Step 2: Go to General > Software Update.

- Step 3: Toggle on both Download iOS Updates and Install iOS Updates.
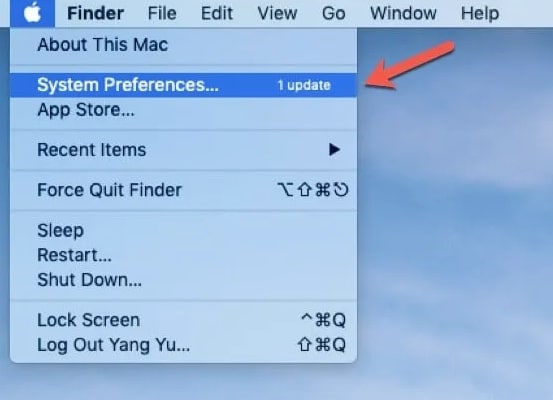
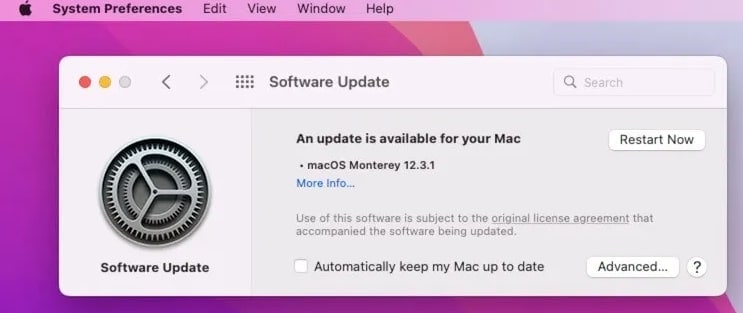
How to Update macOS
- Step 1: Open the Apple menu and click System Preferences (or System Settings on macOS Ventura and later).
- Step 2: In the System Preferences window, click Software Update.
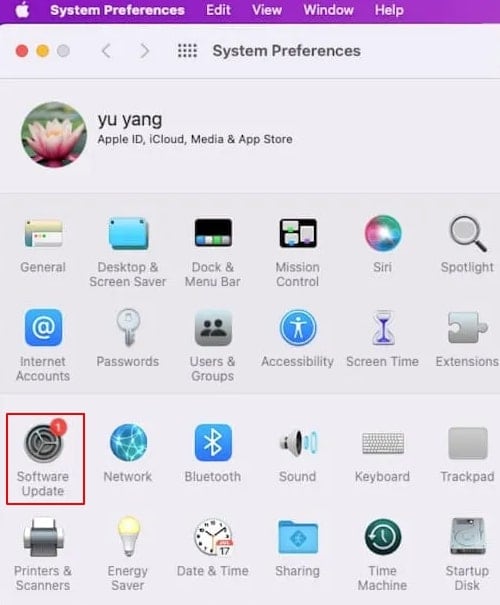
- Step 3: If an update is available, click Update Now or Restart Now to install it.
How to Disconnect Other USB Devices to Fix Error 9 on iPhone

When multiple USB peripherals — external drives, keyboards, printers, webcams — are connected simultaneously, they compete for bandwidth and power on your computer's USB controller. This can create an unstable environment for the iPhone restore process and trigger error 9 iphone restore failures that appear intermittent and hard to diagnose.
Before retrying a restore, disconnect all USB devices from your computer except the cable connecting your iPhone. Then connect your iPhone directly to one of the computer's built-in USB ports (not a hub). This ensures your iPhone gets the full USB bandwidth and power allocation it needs for a clean restore operation. If the error 9 disappears after doing this, a USB device conflict was the cause.
How to Turn Off the Firewall to Allow iTunes Through
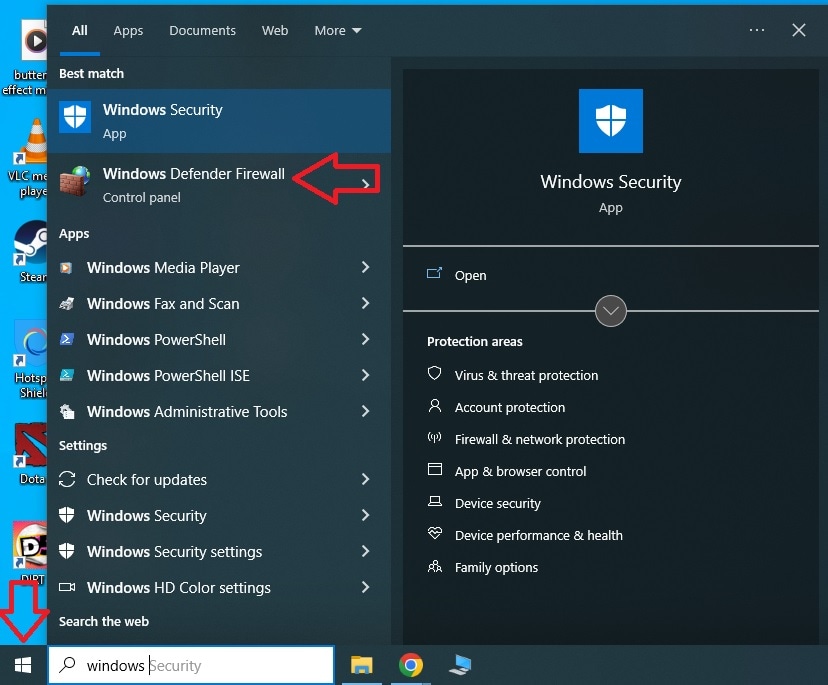
Your firewall may be identifying iTunes' outgoing connections as suspicious and blocking them — a common cause of apple error code 9 on Windows machines. Since iTunes needs to reach Apple's activation servers on specific ports, firewall interference can silently break the restore without any visible network warning. Here's how to allow iTunes through Windows Defender Firewall:
- Step 1: Go to Start and search for Windows Defender Firewall.
- Step 2: Click Allow an app or feature through Windows Defender Firewall.
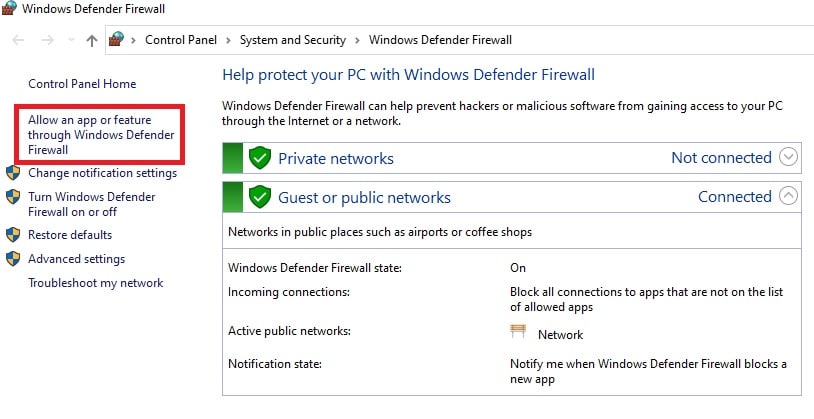
- Step 3: Click Change Settings.
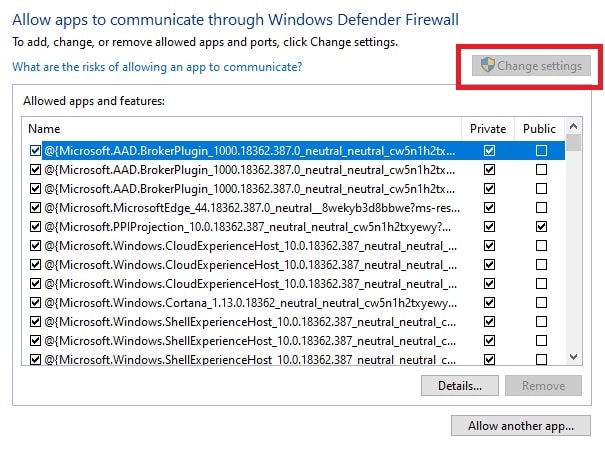
- Step 4: Locate iTunes (or Apple Mobile Device Service) in the list, check both the Private and Public checkboxes, and click OK.
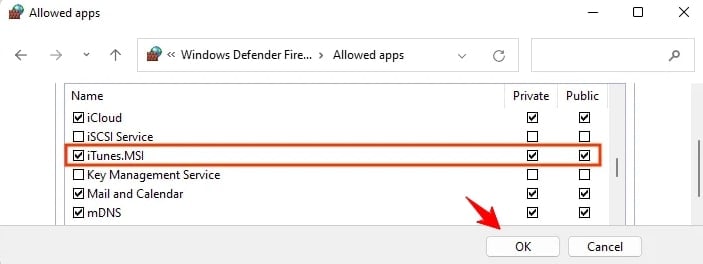
If you have a third-party antivirus or security suite installed, temporarily disable its firewall or real-time protection as well, then retry the restore. Re-enable it once the restore is complete.
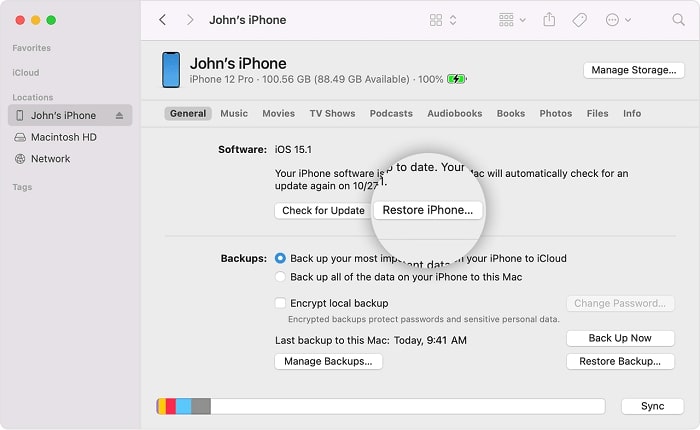
How to Restore Your iPhone Without iTunes Using Finder on Mac
On macOS Catalina (10.15) and later, Apple removed iTunes and replaced it with Finder for iPhone management. If you've been experiencing iphone restore error 9 specifically in iTunes, switching to Finder provides an alternative restore pathway that may succeed where iTunes fails. This is also the correct approach for Mac users who don't have iTunes installed.
- Step 1: Connect your iPhone to the Mac using a USB cable.
- Step 2: Click the desktop and then go to File > New Finder Window to open a Finder window.
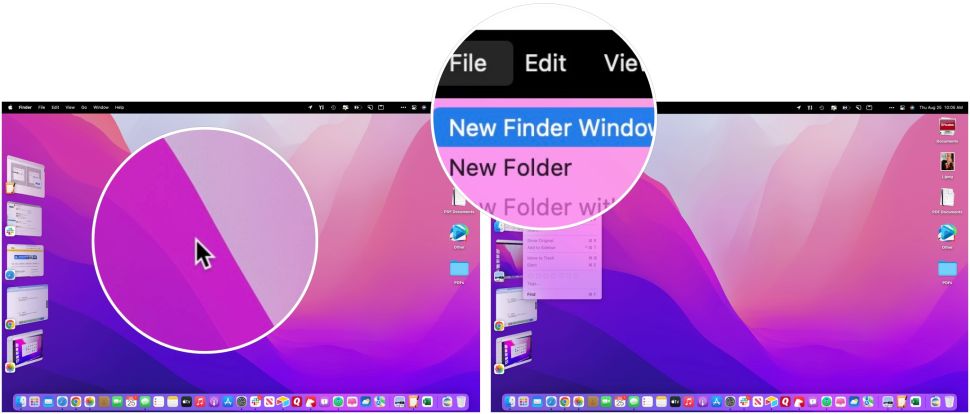
- Step 3: Select your iPhone in the left sidebar under "Locations."
- Step 4: In the General tab, click Restore iPhone and wait until the process is complete. Keep your iPhone connected throughout.
How to Reset Network Settings to Fix Error 9 on iPhone
If corrupted network settings are causing your iPhone to fail its connection to Apple's restore servers, resetting them can resolve the issue. This is especially relevant if your iPhone has experienced unauthorized configuration changes or if you are encountering unknown error 9 iphone restore on multiple computers. Note: resetting network settings removes all saved Wi-Fi passwords, VPN settings, and Bluetooth pairings.
- Step 1: Open Settings on your iPhone.
- Step 2: Tap General > Transfer or Reset iPhone > Reset.
- Step 3: Tap Reset Network Settings and confirm. Your iPhone will restart with clean network configurations.
After the restart, reconnect to your Wi-Fi network and retry the restore via iTunes or Finder. This step resolves error 9 cases caused by DNS misconfiguration, corrupted proxy settings, or network-level software interference.
Conclusion
iPhone error 9 — also known as iTunes error 9 or Apple error code 9 — is a solvable problem for every iPhone model, from the iPhone 13 and iPhone 13 Pro Max to the iPhone 14 and iPhone 15 Pro. The error is caused by a failed connection between your device and Apple's restore servers, and the solutions range from a one-click iOS system repair to straightforward USB and firewall adjustments.
For the fastest and most reliable result, start with the Wondershare Dr.Fone system repair — it resolves firmware-level issues while preserving all your data and has the highest success rate among all available methods. If the error persists after the system repair, work through the manual solutions in order: update iTunes, restart your iPhone, inspect your USB hardware, update iOS and macOS, disconnect competing USB devices, allow iTunes through your firewall, and try restoring via Finder on Mac. Resetting your iPhone's network settings is an effective last resort for network-related causes.
With this complete iphone error 9 solution guide, you have everything needed to diagnose and eliminate the error permanently — no Apple Store visit required.
FAQs


iPhone Errors
- Errors 0 ... 100
- 1. iPhone Error 6
- 2. iPhone/iTunes Error 9
- 3. iPhone Error 10
- 4. iPhone/iTunes Error 21
- 5. iPhone Error 35
- 6. iTunes Error 40 on iPhone/iPad
- 7. iPhone Error 47
- 8. iPhone Error 69
- 9. iPhone Error 75
- 10. iPhone Error 78
- Errors 1xxx
- 1. iPhone Error 1009
- 2. iPhone Error 1015
- 3. iPhone/iTunes Error 1100
- 4. iPhone Error 1110
- 5. iPhone Error 1667
- Errors 2xxx
- Errors 3xxx
- 1. iTunes Error 3004
- 2. iTunes Error 3014
- 3. iTunes/iPhone Error 3194
- 4. iPhone Error 3503
- 5. iPhone/iTunes Error 3600
- Errors 4xxx
- Other iPhone Errors
- 1. iPhone Error 7005
- 2. iPhone/iTunes Error 9006
- 3. iPhone Error 0xe8000015
- 4. iPhone Cellular Update Failed Error
- 5. iPhone Activation Error
- 6. iPhone SSL Error
- Other iPhone Issues
- ● Manage/transfer/recover data
- ● Unlock screen/activate/FRP lock
- ● Fix most iOS and Android issues
- Free Download Free Download Free Download


Alice MJ
staff Editor
Generally rated4.5(105participated)