
How to Fix iPhone Error 75 with 10 Proven Methods [iPhone 17 Supported]

Jun 16, 2026 • Filed to: Phone Repair Solutions • Proven solutions
 TL;DR:
iPhone Error 75 indicates a blocked connection or software interruption during an iOS update or restore via iTunes or 3uTools, which can be resolved by clearing software barriers, updating system tools, or applying dedicated recovery methods.
● Basic troubleshooting requires verifying your USB connection, freeing up iPhone storage, updating iTunes or macOS, and temporarily disabling computer firewalls or security software that may block Apple update servers.
● To resolve the system issue without losing personal data, you can use the Standard Mode in Dr.Fone - System Repair (iOS) to bypass iTunes and install the necessary iOS firmware directly to the device.
● Forcing the update by removing a device jailbreak or putting the iPhone into DFU or Recovery Mode via Finder or iTunes will result in complete data loss.
Ask AI for a summary
 ChatGPT
 Perplexity
 Gemini
 Claude
 Grok
Grok
Apple’s recent iOS update no longer supports iPhone 7 Plus and earlier models, leaving many users looking for alternative methods to upgrade their devices. However, during these unconventional updates, issues like iPhone error 75 often appear. This error is commonly linked to connectivity problems while restoring or updating. Users trying with tools like 3uTools also face messages such as error unable to restore idevice(-75), indicating restore or update failures.
With the iPhone preventing itself from getting updated, you will constantly receive this error message on your computer's screen. To answer the prevailing issue, we have developed a guide explaining the Error 75 iPhone and the solutions that can be tested to resolve connectivity issues between the device and iTunes.
- Part 1: What Does iPhone Error 75 Mean and Why Does it Occur on iPhone?
- Part 2: How to Fix Error 75 on iPhone?
- Method 1: Make Sure Your iPhone Has Enough Storage Space to Update
- Method 2: Check Your USB and Internet Connection
- Method 3: Update iTunes and macOS
- Method 4: Close All Background Apps
- Method 5: Restart Your iPhone Again
- Method 6: Check Firewall or Security Software on the Computer
- Method 7: Check and Remove Jailbreak
- Method 8: Use a Third-Party Tool to Fix the iPhone Error 75 (100% Repair without Data Loss)
- Method 9: Enter DFU Mode/Recovery Mode (Data Loss)
- Method 10: Connect to Apple Support Center
- Part 3: FAQs about Update iPhone
Part 1: What Does iPhone Error 75 Mean and Why Does it Occur on iPhone?
In this section, we’ll explain what iPhone error 75 means and why it occurs on your device. Understanding the causes behind this issue—often linked to update or restore failures like error unable to restore idevice(-75)—will help you identify the right steps to fix the problem and prevent it from happening again.
1. What is Error 75 iPhone?
The stakeholders involved in the Error 75 iPhone are mentioned above. Potentially, this error code is faced by iPhone users in situations while they are using iTunes to install the latest version of iOS on their device. In other cases, this can also happen when iTunes is trying to restore the device. Such an error halts the complete process and makes the device look useless. This is what Error 75 on iPhone is.

2. The Causes of Error 75 iPhone?
There are many potential causes of the iPhone Error 75. Whenever there is an issue that needs to be resolved, it is essential to be aware of what is causing it. Thus, when you look to resolve this problem, you cast out the problem from its root, which prevents it from happening again. Let's look into the causes of this iPhone error, which will help you lead to the fixes of the respective problem:
- Storage Issues: The first problem that one can think of is the low storage capacity of the device. If the device does not have enough space, it won't record the iOS on it. You will always find errors such as this emerging against this cause.
- Issues with Apple Update Server: Issues like the Error 75 iPhone can lead to direct problems with the server. If the server is not operating properly on iTunes, it is clear that the user won't be able to make changes to their device in terms of iOS. Server issues can be tiring and will automatically resolve in a while.
- Network Connectivity Concerns: The internet is essential for updating the iOS across your iPhone. However, with no or problematic internet, it is impossible to execute this scenario, which is why the error is displayed on your screen.
- Other Connectivity Issues: Apart from issues with the internet, there can be issues with the lightning cable and the current iOS software installed on the iPhone. They might cause some slight hindrances while updating the iPhone to iOS 16.
Part 2: How to Fix Error 75 on iPhone?
We have outlined a vast list of methods that can be used to fix iPhone errors. As we have seen what the iPhone Error 75 is, we will now see what we can do as a user to fix the problems on the device. Let's dive right into the solutions:
Method 1: Make Sure Your iPhone Has Enough Storage Space to Update
Out of the issues that we have discussed regarding the iPhone Error 75, storage problems can become a significant directive to this error. As every iOS requires a dedicated space to update itself on the iPhone, having no storage space would leave behind the error for the user. There is no chance that the user can update your iOS with insufficient storage space. To resolve this problem, they will have to look into the options to free up some space, as this will allow them to install the latest iOS update with ease. If there is no space available on the iPhone, it is useless to try installing the iOS updates on it.

Method 2: Check Your USB and Internet Connection
One common reason behind error 75 iPhone is faulty USB cables or unstable connections during the update or restore process. A damaged wire or loose connection can interrupt the update, leading to issues like error 75 3uTools. Similarly, poor internet connectivity can also trigger this error, so ensuring both stable connections and reliable cables is essential to avoid interruptions.

Method 3: Update iTunes and macOS
Another common cause of iPhone error 75 is using outdated software during the update process. Even if you’re upgrading to the latest iOS, tools like iTunes or Finder must also be updated to avoid issues such as error unable to restore idevice(-75). Keeping these programs up to date ensures smoother restores and reduces the chances of facing such errors.
How to Update iTunes?
Step 1: You must open iTunes on your computer and proceed to the "Help" tab at the top of the menu bar.
Step 2: From the available options that appear on the screen, select "Check for Updates" and open a prompt window. You must confirm the prompt options to install the latest version of iTunes.

How to Update macOS?
Step 1: To update your macOS, select the "Apple" icon on the top-left of the screen. As the menu opens, select "About This Mac" from the options.

Step 2: A window opens on your device where you have to select the option of "Software Update…" to lead to the next screen.

Step 3: On the next screen, if you have any prevailing updates to be installed on your Mac, you will find the "Update Now" button on it. Select and confirm the macOS update for your device.

Method 4: Close All Background Apps
Why would iTunes or Finder fail to provide you with the best results for updating the iOS of your iPhone? Have you received Error 75 on your iPhone for no particular reason? The issue lying behind such a case is the problem with the background applications running on your Windows or Mac. To get out of this problem, you will have to close down all the background applications and let the process conclude properly. To make sure of that, you must look into the steps provided below:
For Windows
You must search for "Task Manager" in the search bar to open it up. Go through the "Processes" tab and find all the unnecessary background apps running on your Windows. Select one and click on "End Task" to close it down.

For Mac
To close the background applications, click on the "Apple" icon and select "Force Quit" from the available options. On the next window, select any unnecessary application and click on "Force Quit" to close it down. Confirm the option that appears on the pop-up to close it successfully.

Method 5: Restart Your iPhone Again
Problems caused by the Error 75 iPhone update can be quite tedious, which needs to be resolved immediately. To prevent your iPhone to get malfunctioned for something like this can be pretty frustrating. Thus, it is best to restart your iPhone immediately after this happens. The software of your device will restart, and all the glitches that remain in it will be removed. To restart your iPhone, you will have to work on the following steps:
Step 1: You have to find the "Settings" of your iPhone and open them. Scroll down to see the option of the "General" section to lead to the next screen.

Step 2: Search for the "Shut Down" iPhone option in the list of the next screen and select it to turn off your device.

Step 3: To turn it back on, wait for a few seconds and hold the "Power" button to relaunch your iPhone.
Method 6: Check Firewall or Security Software on the Computer
If you’re struggling to connect your iPhone to your computer and encountering error 75 iPhone, security settings might be the cause. Firewalls or antivirus software on Windows or Mac can block the update or restore process, leading to issues like unable to restore idevice (-75) 3uTools. To prevent this, review and adjust your firewall or security software settings before attempting the update again.
Check the Firewall Settings of the Windows
Step 1: To turn off Firewall settings on Windows, you have to open the "Control Panel." As you open it, lead to the "System and Security" settings from the available options and proceed next.

Step 2: On the next screen, you must select the "Windows Defender Firewall" option to lead to the next step.

Step 3: As you open up the firewall settings, find the "Turn Windows Defender Firewall on or off" option from the left panel. You will be directed to the firewall settings window.

Step 4: You must check the options of "Turn off Windows Defender Firewall" and click "OK" to turn it off successfully.

Check the Firewall Settings of the Mac
Step 1: To turn off the Firewall settings on your Mac, select the 'Apple' icon and click on the "System Preferences" option in the list. As you are directed to a new window, select "Security & Privacy" from the list of options.

Step 2: Once you are directed to the next screen, click on the "Firewall" tab at the top of the window. To change the settings, you have to click on the "Lock" icon and provide the credentials to the Mac to change the settings. Afterward, hit the "Turn Off Firewall" button to turn it off.

Method 7: Check and Remove Jailbreak
A jailbroken iPhone can often trigger issues like error 75 3uTools or block the installation of the latest iOS updates. If your device is jailbroken, you’ll need to remove the jailbreak to fix iPhone error 75 and restore normal functionality. Once the jailbreak is removed, apps like Cydia will disappear, allowing you to update your device without interruption.
Step 1: Connect your iPhone with the Mac using a USB cable and unlock your iPhone to lead to its "Settings." As you open them up, proceed to the "iCloud" settings and tap on the "Find My" option. You have to turn off the settings on your device.

Step 2: To confirm turning off the settings, provide the Apple ID credentials and proceed next. You have to direct to the Finder window on your Mac or launch iTunes on your Windows device.
Step 3: With the iPhone connected, you must select it from the left panel. Under the "Backups" section, select "This Computer." Proceed to tap on the "Back Up Now" option and select the backup applications from the window that opens.

Step 4: Once done, click on the "Restore iPhone" button to lead to a prompt pop-up. Select "Restore iPhone" and let the iPhone revert to the original iOS state. After that, you can easily install the latest iOS version on your device.

Method 8: Use a Third-Party Tool to Fix the iPhone Error 75 (100% Repair without Data Loss)
What to do if the problem persists in your iPhone? Since you have to update your iOS, you will have to make a decision about the solution that you want to try. For this, the use of Dr.Fone - System Repair (iOS) turns out to be the most appropriate case for resolving the Error 75 iPhone. While this software easily fixes all iPhone errors, it protects the iPhone from getting damaged and ensures that the complete process is adequately covered. While using System Repair (iOS), you will find some features that stand to be important:
Other Features of Dr.Fone - System Repair (iOS)
- The list of errors that are supported by this platform is immense. You can resolve all kinds of iPhone errors, including iPhone Error 9, iPhone Error 14, iPhone Error 2009, etc.
- You can easily upgrade or downgrade your iOS without using iTunes.
- It provides a diverse set of modes that can be practiced to resolve iOS system issues.
Dr.Fone - System Repair (iOS)
Repair iOS System Errors Without data loss.
- Only fix your iOS to normal, no data loss at all.
- Fix various iOS system issues stuck in recovery mode, white Apple logo, black screen, looping on start, etc.
- Downgrade iOS without iTunes at all.
- Work for all iPhone/iPad/iPod Touch, running on all iOS versions


Steps To Repair System Issues With iPhone Using System Repair (iOS)
We shall now look into the steps that can be used to repair the problem of iPhone Error 75 with the help of Dr.Fone - System Repair (iOS).
Step 1: Open Dr.Fone System Repair
You have to launch Dr.Fone on your computer and proceed to select "System Repair" from the options. Next, select "iOS" to specify the nature of the repair you are performing. On the next screen, choose "iOS Repair" from the options available.

Step 2: Select the Nature of the Error
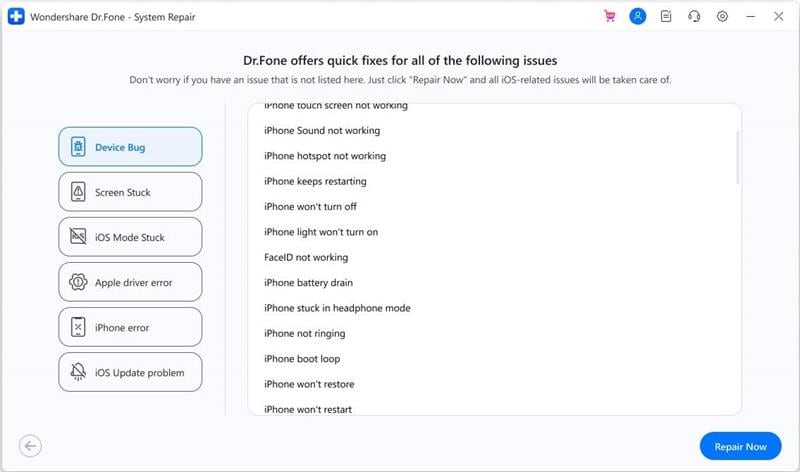
Dr.Fone will display a list of iPhone issues on the next screen. You must lead to the "iPhone Error" from the left section and look for the iPhone Error 75 in the list. On selecting it, click "Repair Now" and lead to the next window.
Step 3: Select the Right Mode
Out of the options presented, select "Standard Mode," as it will not remove the data from your iPhone. You will have to put your iPhone in the Recovery Mode.

Step 4: Enable the Recovery Mode
As you connect the iPhone to the computer and trust the device, follow through the steps of Recovery Mode and select "Enter Recovery Mode." For glitches, you will have to go for the "Guide to Recovery Mode" option. With the provided instructions, put the device in Recovery Mode.

Step 5: Download iOS Firmware
The platform detects the device and displays the list of iOS firmware on the next window. You must select one and click on "Download" to start the process.

Step 6: Repair your iPhone with Downloaded Firmware
The firmware downloads on the computer and is verified by the software. As it is verified, you must click on "Repair Now" to successfully install the iOS firmware on your iPhone. Once it is done, tap "Done" to conclude the process.

Method 9: Enter DFU Mode/Recovery Mode (Data Loss)
Another appropriate way to install the latest iOS update on your iPhone forcedly is by putting it in the DFU or Recovery Mode. The use of these modes is to perform actions that are not appropriately covered in the normal state. Since you are facing the issues of Apple iPhone Error Code 75, you can try using any of these modes, which are provided in detail as follows. However, it would help if you kept in mind that performing such an action would lead to data loss on your device.
Using the Recovery Mode
Step 1: To put your device in Recovery Mode, you must connect it to your Mac using Finder or Windows if you are using iTunes. As it is connected, you will now have to put the iPhone in Recovery Mode.
Step 2: You have to perform the steps until the Recovery Mode screen appears on the device:
- For iPhone 8 or Later Models: Press and release the "Volume Up" button. Follow through by pressing and releasing the "Volume Down" button. Lead next by pressing and holding the "Power" button until the Recovery Mode screen appears.
- For iPhone 7 or 7 Plus: You must press and hold the "Volume Down" and "Power" buttons on your iPhone. Keep holding them until the Recovery Mode screen appears on your device.
- For iPhone 6 and Earlier Models: Press and hold the "Power" and "Home" button of your iPhone until the Recovery Mode screen appears on the device.

Step 3: As the device is detected, a prompt will appear on your computer or Mac. You will have to select the option of "Restore" from the available options and reinstall the software.

Using the DFU Mode
Step 1: You've to connect your iPhone to the computer or Mac with the help of a USB cable. As it is done, launch iTunes if you have a Windows or Finder if you have a Mac.
Step 2: To put your device in DFU Mode, you have to work according to the following guidelines as per your iPhone model:
- For iPhone 8 or Later Models: Press and release the "Volume Up" button, followed by quickly pressing and releasing the "Volume Down" button. Hold the "Power" button for 10 seconds until the iPhone screen goes black. Hold the "Power" button and the "Volume Down" button simultaneously for 5 seconds. Release the "Power" button and hold the "Volume Down" button.
- For iPhone 7 and 7 Plus: You must press and hold the "Power" and "Volume Down" buttons for 10 seconds. Stop holding the "Power" button and continue holding the "Volume Down" button.
- For iPhone 6 and Earlier Models: You have to press and hold the "Power" button and "Home" button for 10 seconds. Continue holding the "Home" button after releasing the "Power" button.
Step 3: A screen showing the message of detecting an iPhone in Recovery Mode will be shown. Tap the "Restore iPhone" option to install the new iOS on the iPhone.

Method 10: Connect to Apple Support Center
If you still fail to find a solution related to the iPhone Error 75, you will have to go for the option of connecting to the Apple Support Center. They will help you find the software solution or resolve the problem themselves and make your iPhone proper again.
Part 3: FAQs about Update iPhone
1. How much storage do you need to update your iPhone?
The storage requirements for updating the iPhone are different for every iOS update. No particular number can be set for the update; however, you need to have proper storage space for it.
2. What will happen when you update iOS?
If you are facing issues updating your iOS, you must consider the appropriate solutions. You should follow this link to find out the best-case scenario.
3. How to downgrade iOS & Return to the Previous iPhone Software?
Since you want to downgrade your iOS and return to a previous version for no particular reason, you should look into this for downgrading your iOS successfully without facing any problems.
Conclusion
Was this guide useful in helping you fix iPhone error 75? Throughout the article, we’ve explained the main causes and practical solutions to resolve problems like error unable to restore idevice(-75) that often occur during updates or restores. These issues can be frustrating, but with the right steps, they’re easy to overcome.


iPhone Errors
- Errors 0 ... 100
- 1. iPhone Error 6
- 2. iPhone/iTunes Error 9
- 3. iPhone Error 10
- 4. iPhone/iTunes Error 21
- 5. iPhone Error 35
- 6. iTunes Error 40 on iPhone/iPad
- 7. iPhone Error 47
- 8. iPhone Error 69
- 9. iPhone Error 75
- 10. iPhone Error 78
- Errors 1xxx
- 1. iPhone Error 1009
- 2. iPhone Error 1015
- 3. iPhone/iTunes Error 1100
- 4. iPhone Error 1110
- 5. iPhone Error 1667
- Errors 2xxx
- Errors 3xxx
- 1. iTunes Error 3004
- 2. iTunes Error 3014
- 3. iTunes/iPhone Error 3194
- 4. iPhone Error 3503
- 5. iPhone/iTunes Error 3600
- Errors 4xxx
- Other iPhone Errors
- 1. iPhone Error 7005
- 2. iPhone/iTunes Error 9006
- 3. iPhone Error 0xe8000015
- 4. iPhone Cellular Update Failed Error
- 5. iPhone Activation Error
- 6. iPhone SSL Error
- Other iPhone Issues
- ● Manage/transfer/recover data
- ● Unlock screen/activate/FRP lock
- ● Fix most iOS and Android issues
- Free Download Free Download Free Download


James Davis
staff Editor
Generally rated4.5(105participated)