100% Security Verified | No Subscription Required | No Malware
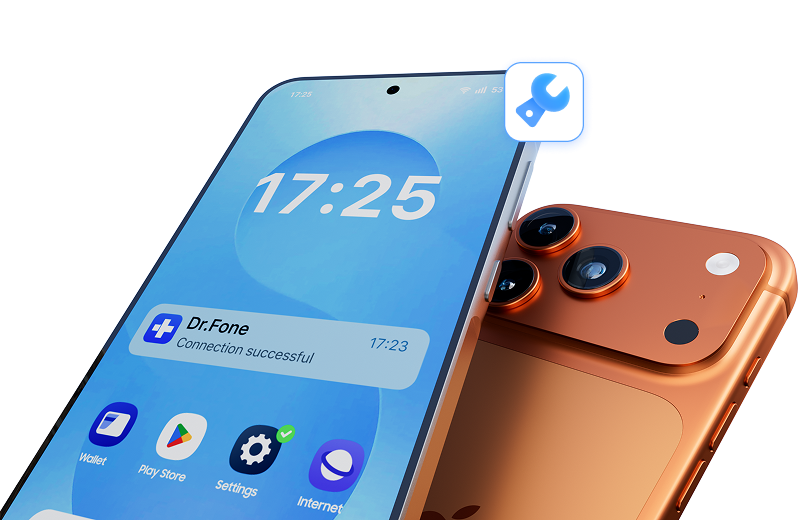

 :
: 
 ChatGPT
 Perplexity
 Gemini
 Claude
 Grok
Grok
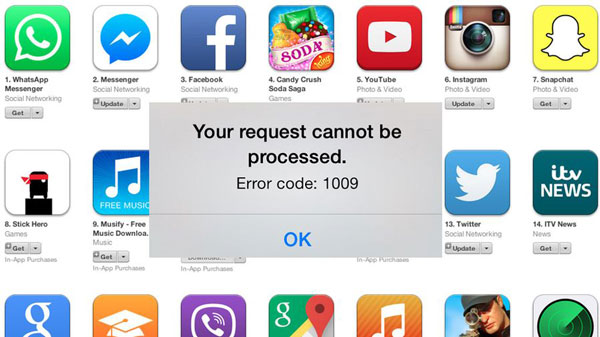
It’s a common frustration for iPhone and iPad users: you find the perfect app, tap to download, and are immediately blocked by an alert that says “Cannot process the request, error code 1009.” This message, also known as iPhone Error 1009, effectively stops you from accessing the App Store and can be a major roadblock.
This error isn't random; it's a specific flag raised by Apple's servers, often related to your location or network settings. Fortunately, fixing it is usually straightforward. In this guide, we'll walk you through seven proven methods to resolve Error 1009 and get you back to downloading your favorite apps without any hassle.

In this article
- Part 1. What Causes iPhone Error 1009?
- Part 2. Fix iPhone Error 1009 with a System Repair Tool (Fast & Simple)
- Part 3. Resolve Error 1009 by Repairing iTunes Components
- Part 4. Fix iPhone Error 1009 by Adjusting Proxy Settings
- Part 5. Bypass Error 1009 Using a VPN Service
- Part 6. Resolve Error 1009 When Upgrading Firmware
- Part 7. Check if the Issue is App-Specific
Part 1. What Causes iPhone Error 1009?
When your iPhone or iPad displays the error code 1009, it’s signaling a communication problem between your device and the App Store. Before rushing to an Apple service center, it's helpful to understand the common culprits behind this issue.
The error typically arises when Apple's servers detect a mismatch between your device's location and your App Store account's registered country. This is often due to:
- IP Address Mismatch: Your device's IP address is flagged by Apple as originating from a country that is different from your App Store account's region. This is common when traveling abroad.
- Incorrect Proxy Settings: Your iPhone's default settings are configured for your home country. If you are using a manual proxy or if the automatic settings are corrupted, it can prevent a successful connection to the App Store.
- Regional Restrictions: Some apps and firmware updates are not available in all countries. If you try to download something that isn't permitted in your current location, Error 1009 can appear.
Essentially, your device’s digital footprint (IP address and network settings) must align with your account details. When they don't, Apple blocks the request as a security measure. Understanding this helps in choosing the right solution, whether it's adjusting your settings or using a tool to fix underlying system glitches.
Part 2. Fix iPhone Error 1009 with a System Repair Tool (Fast & Simple)
While network settings are a common cause, sometimes iPhone Error 1009 stems from deeper iOS system glitches. If manual fixes don't work, a dedicated system repair tool is the most reliable solution. Dr.Fone - System Repair (iOS) is designed to resolve hundreds of iOS issues, including download errors, without causing any data loss.
This powerful software can fix problems like being stuck in recovery mode, on the white Apple logo, or experiencing a black screen. It addresses various iTunes and iPhone errors, including Error 1009, 4005, 14, and 3194, by repairing the core system files safely and efficiently. Best of all, it's a simple, click-through process that requires no technical expertise.
 Fix iOS issues, no data loss.
- One-click repair for all iOS problems.
- Solve recovery mode, Apple logo, black screen, etc.
- Upgrade or downgrade iOS without iTunes

Steps to fix iPhone Error 1009 with Dr.Fone
-
Step 1 Launch Dr.Fone and Select "System Repair"
Download and install Dr.Fone on your computer. Launch the program and connect your iPhone. From the main toolbox, choose the "System Repair" module.

-
Step 2 Choose a Repair Mode
On the next screen, select "Standard Mode" for most common issues like Error 1009. This mode ensures all your data remains safe during the repair process. "Advanced Mode" is available for more severe problems.

-
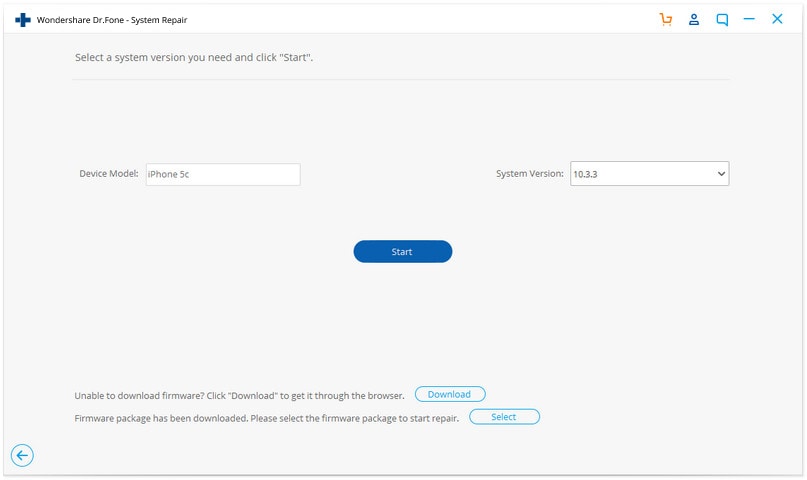
Step 3 Download the Correct Firmware
Dr.Fone will automatically detect your iPhone model and the appropriate iOS firmware version needed for the repair. Verify the details are correct and click "Start" to begin the download.
-
Step 4 Initiate the System Repair
Once the firmware download is complete, Dr.Fone will verify the package. After verification, click "Fix Now" to let the software automatically repair your iOS system and resolve the Error 1009.

-
Step 5 Repair Completed
The repair process will take a few minutes. Once it's finished, your iPhone will restart, and a notification will confirm that the repair was successful. The Error 1009 should now be gone.


Part 3. Resolve Error 1009 by Repairing iTunes Components
Sometimes, the problem isn't with your iPhone but with a faulty iTunes installation on your computer. Corrupted components, connection issues, or syncing errors can all trigger Error 1009 when you try to update or restore your device. For these cases, Dr.Fone - iTunes Repair offers a targeted solution.
This tool is specifically designed to diagnose and fix over 100 iTunes-related errors without affecting your device or iTunes data. It can repair connection failures, syncing problems, and other exceptions that cause errors like 1009, 4013, and 3194.
-
Step 1 Open Dr.Fone and Go to iTunes Repair
Launch the Dr.Fone toolkit and connect your iPhone. Select "System Repair" and then navigate to the "iTunes Repair" tab. You will see several repair options.

-
Step 2 Run Diagnostic Checks
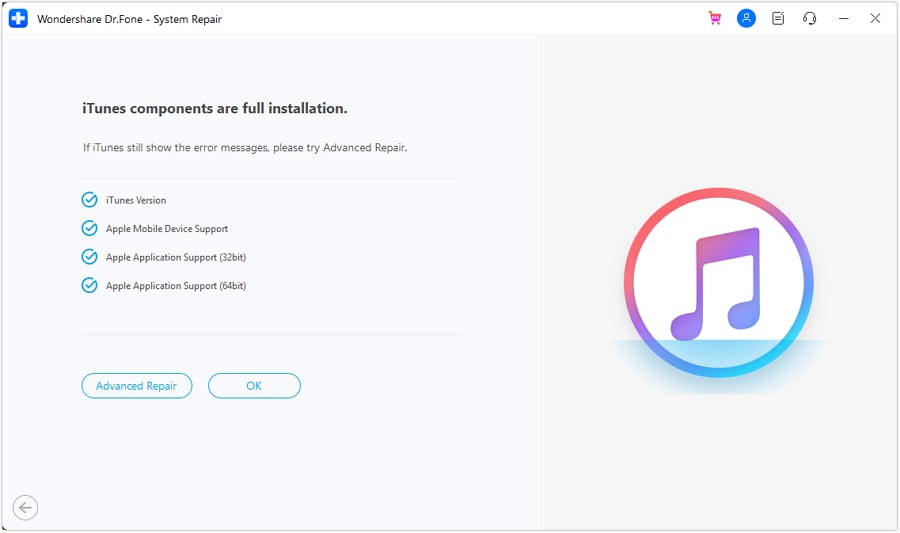
Start by clicking "Repair iTunes Connection Issues" to check for and fix any problems preventing your device from communicating with iTunes. Next, click "Repair iTunes Syncing Errors" to resolve any data syncing conflicts. Finally, use "Repair iTunes Errors" to verify and fix the core components of your iTunes installation.
-
Step 3 Use Advanced Repair if Needed
If the error 1009 persists after the initial checks, there might be a more complex issue. Click on "Advanced Repair" to perform a deep-level fix of all iTunes components. This comprehensive repair should resolve even the most stubborn errors.
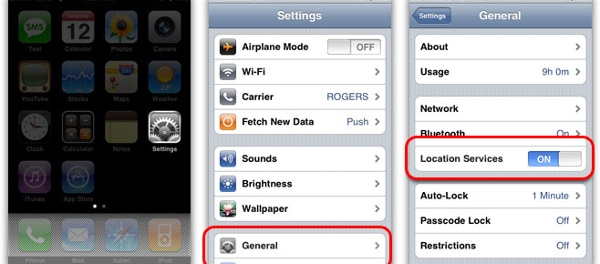
Part 4. Fix iPhone Error 1009 by Adjusting Proxy Settings
A misconfigured proxy is one of the most common reasons for Error 1009. iOS devices often have auto-proxy settings, but these can sometimes fail or be manually overridden, causing a connection block. Resetting these settings can often provide an instant fix.
-
Step 1 Open Settings
From your iPhone or iPad's home screen, navigate to the Settings app.
-
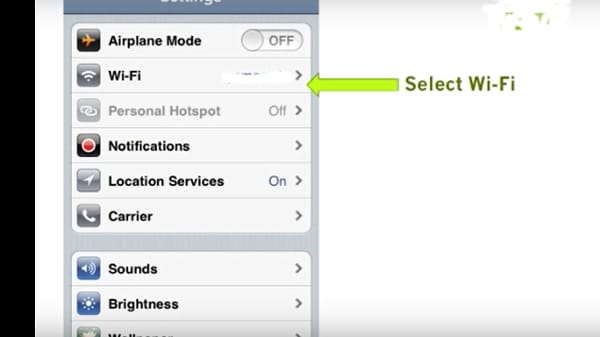
Step 2 Go to Wi-Fi Settings
Tap on Wi-Fi to see the list of available networks. Find the network you are currently connected to.
-
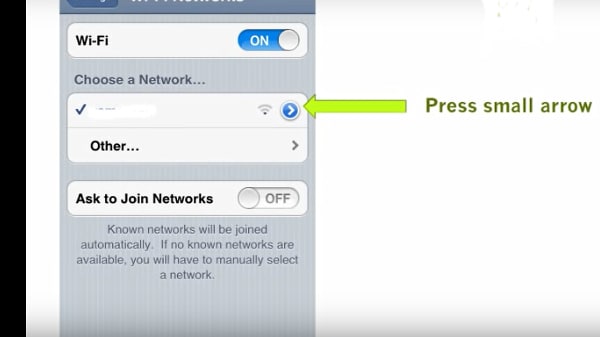
Step 3 Access Network Details
Tap the small 'i' (information) icon next to your active Wi-Fi network's name to open its detailed settings.
-
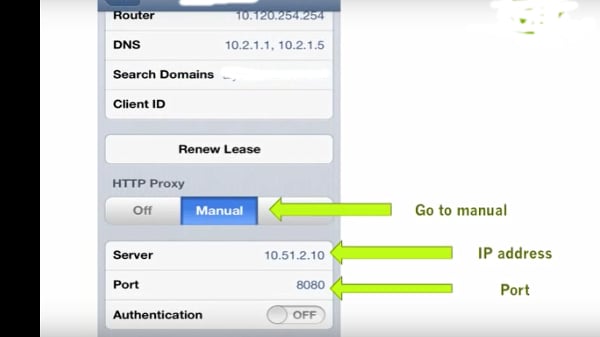
Step 4 Configure HTTP Proxy
Scroll down to the bottom of the screen to find the HTTP Proxy section. It's likely set to 'Off' or 'Manual'. The simplest fix is to select Off. If you need a proxy for your network, select Manual and ensure the Server and Port details provided by your network administrator are entered correctly. Once done, try downloading an app again to see if the error is resolved.
Part 5. Bypass Error 1009 Using a VPN Service
If the error is due to a geographical restriction, a Virtual Private Network (VPN) is an excellent solution. A VPN masks your real IP address and makes it appear as if you are browsing from a different location. By setting your VPN to the same country as your App Store account, you can often bypass Error 1009.
-
Step 1 Install a VPN App
Download and install a reputable VPN app from the App Store. There are many reliable free and paid options available. Once installed, create an account and log in.
-
Step 2 Connect to a Server
Open the VPN app and connect to a server located in the same country as your Apple ID or App Store account. For instance, if your account is US-based, connect to a server in the United States.
-
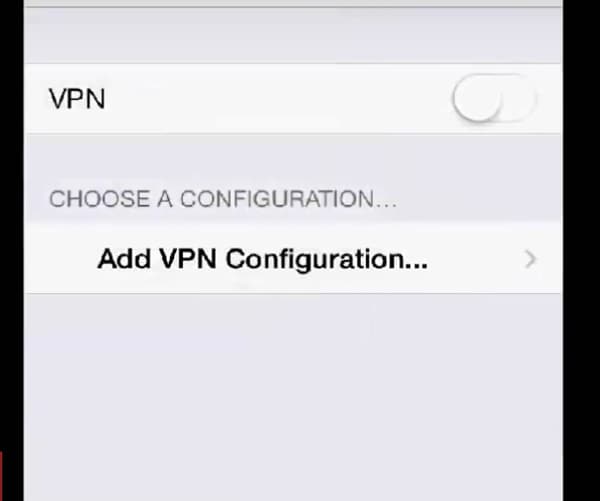
Step 3 Configure VPN on iPhone
Most modern VPN apps configure themselves automatically. However, you can manually check this by going to Settings > General > VPN & Device Management. Tap on VPN and ensure your VPN service is listed and the status is 'Connected'.
-
Step 4 Retry the Download
With the VPN active, go back to the App Store and try downloading the app again. The error should no longer appear as your location now matches your account's region.
Part 6. Resolve Error 1009 When Upgrading Firmware
Error 1009 can also appear when you are trying to update your iPhone's firmware. This happens because some iOS updates are rolled out regionally, and if you attempt to download an update that isn't officially available in your current location, Apple's servers will block it.
For example, if your iPhone was originally purchased and set up in the United States, but you are currently in a country where the update hasn't been released, you may encounter this error.
The solution here is to use the methods described previously to align your digital location with your device's origin country:
- Use a VPN: Connect to a VPN server in the country where your device was originally purchased before starting the firmware update.
- Adjust Proxy Settings: If applicable, configure your proxy settings to match your home country's network.
Once your apparent location matches the required region for the firmware update, the download should proceed without encountering Error 1009.
Part 7. Check if the Issue is App-Specific
In some rare cases, the problem might not be with your device or network at all, but with the specific app you are trying to download. The developer may have misconfigured something on their end, causing the download to fail for users in certain regions.
Here’s a quick way to check if this is the case:
-
Step 1 Try Downloading Another App
Go to the App Store and try to download a different, popular app (like Instagram or a simple game). If other apps download without any issues, the problem is likely isolated to the original app.
-
Step 2 Contact the Developer
If only one app is causing the error, the best course of action is to contact the app's developer. You can usually find their contact information or a support link on the app's App Store page. Explain the issue and the error code you are receiving. They may be able to provide a specific solution or fix the issue on their end.
By isolating the problem, you can save yourself the trouble of performing unnecessary fixes on your device.
Conclusion
iPhone Error 1009 can be a frustrating obstacle, but it is almost always fixable. The root of the problem typically lies in a mismatch between your device's perceived location and your App Store account's region. By methodically working through the solutions in this guide—from simple checks like trying another app to adjusting network settings, using a VPN, or employing a powerful tool like Dr.Fone - System Repair (iOS)—you can effectively resolve this issue.
Start with the simplest fixes first, such as checking your proxy settings. If the problem persists, a reliable system repair tool can address any underlying software glitches without compromising your data. With these methods, you'll be able to get past Error 1009 and back to enjoying all the apps the App Store has to offer.
FAQ
-
1. What is the main cause of Error 1009 on an iPhone?
The primary cause of Error 1009 is a geographical mismatch. Apple's servers detect that your device's IP address is in a different country than the one registered to your App Store or Apple ID account. This can also be triggered by misconfigured proxy or VPN settings. -
2. Can using a VPN really fix App Store Error 1009?
Yes, a VPN is a very effective solution. By connecting to a server in the same country as your App Store account, a VPN makes your device appear to be in the correct location, bypassing the regional block that causes Error 1009. -
3. Is it safe to use a system repair tool to fix Error 1009?
Absolutely. Reputable tools like Dr.Fone - System Repair (iOS) are designed to fix system-level glitches safely. The Standard Repair mode, in particular, resolves issues like Error 1009 without deleting any of your personal data, making it a secure and reliable option. -
4. Will changing my proxy settings affect my regular internet browsing?
It can. If you manually enter incorrect proxy server details, it may prevent you from accessing the internet. The safest option is to set the HTTP Proxy to "Off" unless your network (like a school or corporate Wi-Fi) specifically requires a proxy. If you do make changes, remember to revert them if you experience other connectivity issues.
 Add Wondershare Dr.Fone as a preferred source on Google