5 Ways to Sync Email on iPhone & Fix When It's Not Syncing [iPhone 17 Supported]

Jun 30, 2026 • Filed to: Device Data Management • Proven solutions
 TL;DR:
To sync emails on an iPhone, including the iPhone 17, configure your account credentials through the built-in Mail app, iCloud settings, or the Microsoft Outlook app, and resolve any syncing delays by adjusting your device's Push/Fetch data settings.
● To fix emails that are not updating, navigate to Settings > Mail > Accounts > Fetch New Data to enable the "Push" frequency, verify you have sufficient local device storage space, or delete and re-add the problematic email account.
● Protect your synchronized inbox by enabling two-factor authentication directly with your email service provider and utilizing iCloud Keychain instead of a web browser to store your passwords securely.
● For granular control over email application files, Windows and Mac users can connect their device to Wondershare Dr.Fone - Phone Manager (iOS) to manually access, export, or delete specific app documents and media from clients like Gmail and Outlook.
Ask AI for a summary
 ChatGPT
 Perplexity
 Gemini
 Claude
 Grok
Grok
Dr.Fone Basic:
Better Control for Your Phone
Manage, transfer, back up, restore, and mirror your device
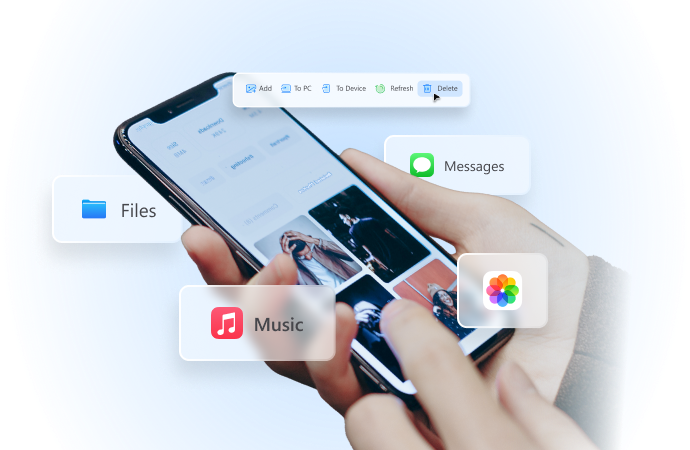
Are you tired of waiting for important business emails that never show up on your phone? This can be frustrating if you rely on your phone for business or work emails. Don't worry! There is a simple solution to this problem: email sync on iPhone.
Syncing emails ensures all important messages arrive on your iPhone instantly, so you’ll never miss updates or face delays. This step‑by‑step guide will show you how to sync mail on iPhone, including the latest iPhone 17, using methods like the built‑in Mail app, iCloud Mail, and Microsoft Outlook. You’ll also learn how to fix common iPhone sync email issues and discover an advanced iPhone management solution for complete control of your data.

Part 1. Common Methods for Email Sync on iPhone
Keeping your emails updated in real time is essential for productivity, and knowing how to sync mail on iPhone ensures you never miss important messages. In this guide, we’ll walk you through the most basic iPhone sync email setup method, fully compatible with the latest iPhone 17, so you can manage your email seamlessly across all accounts.
Method 1. Using the Built-in Mail App
The built‑in Mail app on your iPhone offers one of the simplest ways to manage and organize your emails in real time. It supports major providers such as Gmail, Yahoo, and Outlook, ensuring seamless integration across accounts. If you’re wondering how to sync mail on iPhone, especially on the latest iPhone 17, the Mail app makes iPhone sync email effortless by automatically keeping all your messages up to date on one device.
Follow the steps below to sync email on iPad and iphone.
Step 1. Open the “Settings” app on your iPhone. Scroll down and tap on "Mail".
Step 2. Tap on "Accounts" and then "Add Account."

Step 3. Select your email provider from the list (e.g., Google, Yahoo, Outlook).
Step 4. Enter your email credentials, and follow the prompts to complete the setup.

Step 5. After adding the account, click on the name and Choose what you want to sync, like Mail, Contacts, and Calendars.

Your emails will now sync to your iPhone; you can access them through the Mail app. Let’s now learn to use iCloud to sync emails.
Method 2. Using iCloud Mail
If you use iCloud Mail, syncing it to your iPhone is simple and ensures all your messages are always up to date. Knowing how to sync mail on iPhone with iCloud only takes a few quick steps. By setting up your iCloud account directly on the device, you can enable iPhone sync email seamlessly, keeping your inbox, contacts, and calendars perfectly synchronized across all Apple devices.
Step 1. Open “Settings” and tap your name to open Apple ID settings.
Step 2. Tap on “iCloud” and then “iCloud Mail”.

Step 3. Toggle ON the switch for iCloud Mail and tap “Create” if you don’t have an account.
Step 4. Create a new iCloud email if you don’t have one linked to your iPhone.

Your iCloud emails will now sync to your iPhone. You can access your iCloud mail using the built-in Mail app.
You can also use the Microsoft Outlook app if you use Hotmail.
Method 3. Using Microsoft Outlook App
Microsoft Outlook app offers a clear interface and is a great option for managing email on an iPhone. Follow the steps below to sync your iPhone email with Outlook.
Step 1. Go to the App Store and download the “Microsoft Outlook app.”
Step 2. Launch the Outlook app and add your account credentials.

Step 3. Follow the prompts to set up your account. You can also customize notification settings and sync preferences.

Now, let’s move on to the next part and see which issues may occur during email sync and how to resolve them.
Part 2. Troubleshooting Email Sync Issues on iPhone
Sometimes, the email accounts are already set up on the iPhone, but the email won’t sync. This might disrupt your day. Let’s review some common reasons that cause email not syncing on iphone and their solutions.
Internet Connection: If your internet connection is not working, you might miss important emails. Ensure a stable internet connection for seamless email sync.
Random issues and glitches: Random glitches or minor issues may be causing email sync problems. Restarting your iPhone can fix many issues.
Low storage space: Low storage space can also affect email sync. Go to Settings, then “General”, and tap on “iPhone Storage”. Make sure you have enough free space on our device.
Push and Fetch Settings: Push and fetch settings decide how often your iPhone checks for new emails. To check this, follow these steps: Step 1. Go to Settings>Mail>Accounts>Fetch New Data; Step 2. Turn on "Push" if not already enabled; Step 3. Choose how often you want your iPhone to fetch new data.
Remove and Re-add Email Account: Sometimes, syncing issues are due to some setting with the email account or random glitches related to the email provider. You can delete your email account from your iPhone email sync settings and add that again to resolve syncing issues.
Update iOS: Updating iOS often resolves many issues, including email sync issues.
Don’t forget to take security measures for your data safety while managing your phone. Let’s check which measures we should take while syncing email to iPhone.
Part 3. Security and Privacy Considerations
Many personal and work emails have sensitive information. It is crucial to maintain privacy while syncing email on an iPhone. By following some key practices, you can improve the security of your email account and safeguard your personal data.
- Email Encryption and iPhone
Some email services support encryption. Encryption scrambles up the information so that only the recipient can read it. Check your email settings and turn ON encryption if possible.
- Two-factor authentication for Email
Always turn ON two-factor authentication from email settings. It provides an extra layer of security. If someone cracks your password, they must input a code sent to a verified phone number to ensure the right person is logging in.
- Protecting Your Data During Sync
Ensure your phone is protected with a strong password or fingerprint lock to prevent unauthorized access to your email data.
- Using iCloud Keychain for Passwords
Don’t use a browser to remember passwords for your emails. Instead, use iCloud Keychain, as it stores your email passwords securely.
Now that you know how to troubleshoot common issues related to syncing email on iphone and ipad and the privacy and security considerations. We have a bonus tip for you. Wondershare Dr. Fone offers endless features for iPhone management. Let’s get into the details.
Part 4. Bonus Tip - Managing iPhone with Dr. Fone
Looking to keep your iPhone more organized and running smoothly? Wondershare Dr.Fone - Phone Manager (iOS) can help. As a comprehensive iOS management toolkit, it provides a one‑stop solution for many common iPhone problems—from file transfer and data backup to app and email management. Whether you’re learning how to sync mail on iPhone or troubleshooting iPhone sync email issues, Dr.Fone offers the tools you need to simplify device management and keep everything in sync effortlessly.
You can manage your iPhone from your computer, and arrange files and folders, your emails, and other data. It also has an app data management feature that helps keep things tidy. You can click on an app to see its data, like videos or photos. Using this, you can clear up space and manage data efficiently.
Dr.Fone - Phone Manager (iOS)
Managing iPhone with Dr. Fone
- Transfer, manage, export/import your music, photos, videos, contacts, SMS, Apps, etc.
- Back up your music, photos, videos, contacts, SMS, Apps, etc., to the computer and restore them easily.
- Transfer music, photos, videos, contacts, messages, etc., from one smartphone to another.
- Transfer media files between iOS devices and iTunes.
- Fully compatible with the newest iOS system.


Let’s learn how to use Dr. Fone for iOS data management!
Step 1. Download and install the latest version of Dr.Fone.
Step 2. Launch Dr. Fone and follow the instructions to connect with your iOS device. You can connect your iOS device through both wireless and USB-wired connections.
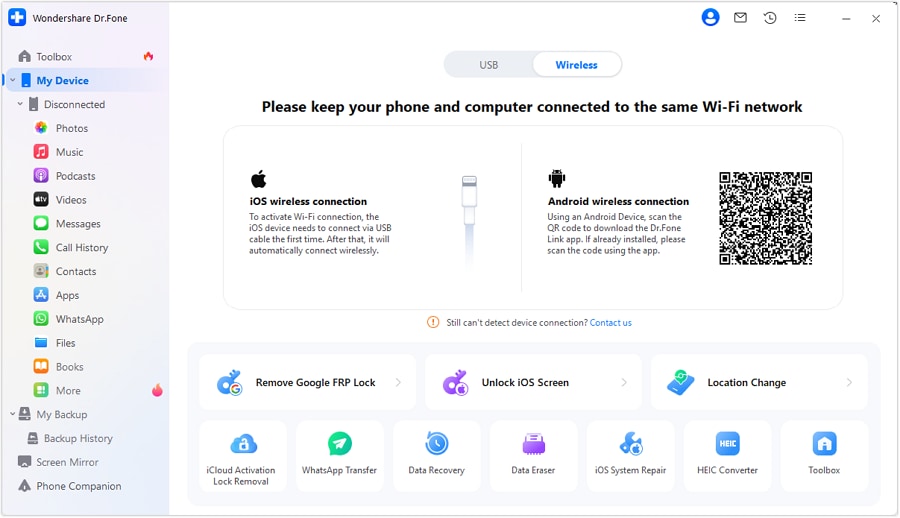
Step 3. Once connected, the iPhone/iPad data will be displayed in the “My Device” section of Dr. Fone.

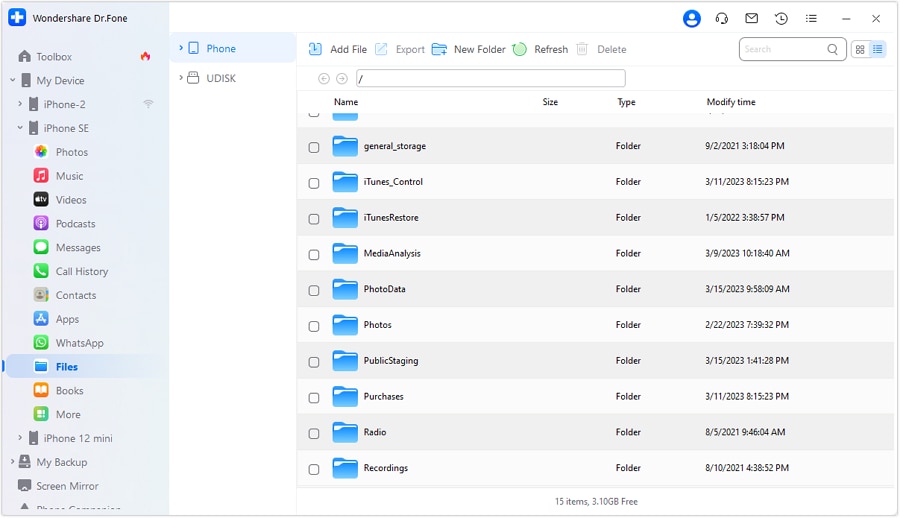
Step 4. You can navigate into your device’s data by clicking on the “Files” tab. Tap on “Phone,” and now you can manage files on your iOS device within Dr. Fone. You can also search for specific files from the “Search Bar”.
Step 5. You can access apps installed on your iOS device. Click “Apps” from Dr. Fone’s interface, and it will open a list of applications installed on your iPhone.
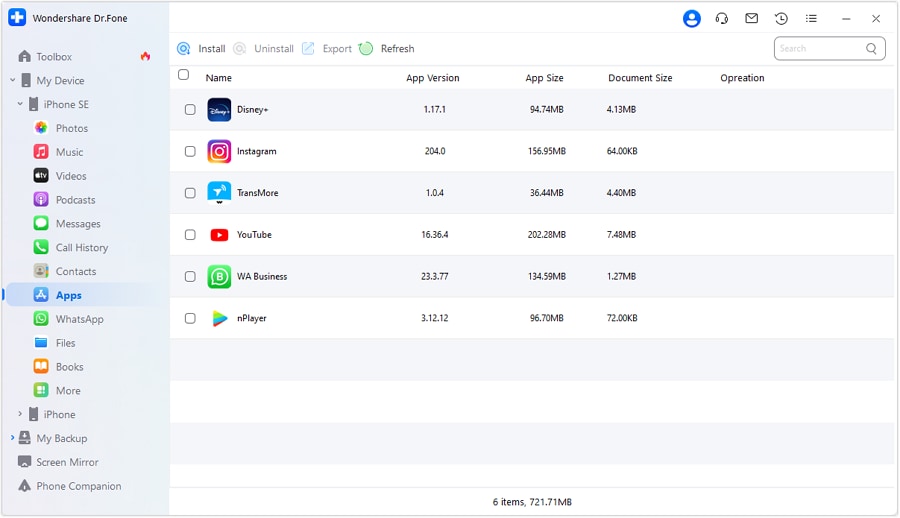
Step 6. If you have installed Outlook or Gmail app on your iPhone, you can easily manage those apps, uninstall or export them.
Step 7. To manage specific app data, click on the “More tab.” You can now access specific App photos, App videos, or App documents and manage them.

Using these features of Dr.Fone you can effortlessly manage your iPhone from your computer. We will now discuss some frequently asked questions. You might have some questions in your mind, too. Let’s check out if this part can help you out.
Conclusion
This guide has explained different ways on how to sync mail on iPhone, ensuring you always stay up‑to‑date with important messages. Whether you prefer the built‑in Mail app, iCloud, or Outlook, setting up iPhone sync email is quick and seamless—even on the latest iPhone 17. If you encounter issues, our troubleshooting tips will get you back on track. Always remember to keep security and privacy a priority when syncing your emails.
Use Dr. Fone to manage emails and other iPhone management needs. Wondershare Dr. Fone has a diverse range of features. With our tips and tools, you can ensure your emails sync smoothly on your iPhone and manage your device efficiently.
Dr.Fone Basic:
Better Control for Your Phone
Manage, transfer, back up, restore, and mirror your device


iPhone Data & Files
- iPhone File Managers
- 1. iPhone File Browsers
- 2. iPhone File Explorers
- 3. iPhone File Managers
- 4. Apps to Transfer File Wirelessly
- Transfer iPhone Files
- 1. Send Large Files For Free
- 2. Transfer File from iPhone to Laptop
- 3. Transfer Files from iPhone to Mac
- 4. Transfer Files from iPhone to PC
- 5. Transfer Files from Mac to iPhone
- 6. Transfer Files from PC to iPhone
- 7. Print Text Messages from iPhone
- 8. Transfer Files Over WiFi
- 9. iPhone File Transfer Without iTunes
- 10. Access iPhone Files Using a PC
- 11. Export Notes from iPhone to PC/Mac
- 12. Save iPhone Text Messages to Computer
- iPhone Manage Tools
- 1. iPhone Transfer Tools
- 2. Manage Apps On iPhone
- 3. Security Apps for iPhone
- 4. Call Forwarding Apps
- 5. iPhone Tracking Apps
- Manage iPhone Apps
- 1. Change Viber Number
- 2. iPhone Calls Apps
- 3. Block People in Facebook
- 4. Monitor Snapchat on iPhone
- 5. Snapchat Saver Apps
- Sync iPhone Data
- 1. Sync Notes from iPhone to Mac
- 2. Ford Sync iPhone
- 3. Sync iCal with iPhone
- 4. iPhone Calendar Not Syncing
- 5. Sync iTunes Library to iPhone
- 6. Unsync iPhone from Computer
- 7. Sync iPhone with Multiple Computers
- More iPhone File Tips
- ● Manage/transfer/recover data
- ● Unlock screen/activate/FRP lock
- ● Fix most iOS and Android issues
- Free Download Free Download Free Download


James Davis
staff Editor