How to Transfer Data to iPhone 12: A Complete Guide
Jul 12, 2024 • Filed to: Data Transfer Solutions • Proven solutions
Apple announced a line-up of iPhones with four new devices in 2020. The series is called the iPhone 12 series that has four handsets of different sizes and price ranges. The iPhone 12 series include iPhone 12, iPhone 12 Mini, iPhone 12 Pro, and iPhone 12 Pro Max. These are the company's first-ever 5G devices. They surely took a step into the future of technology with the 12 series.
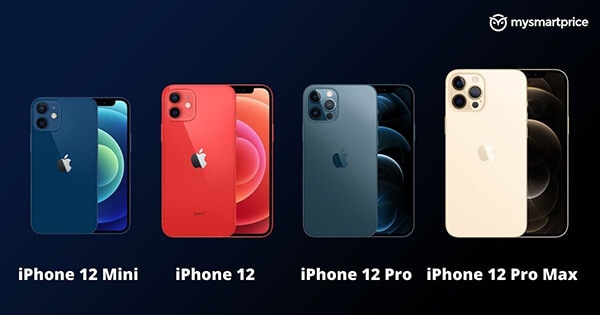
The device is considered lighter than the iPhone SE launched in 2020. iPhone 12 Pro Max holds an outstanding camera system for high-quality image processing. Besides, the introduction of A14 SoC has encouraged the exceptional performance of all four models. Each of the series models is secured with suitable features and new capabilities. Let's take a glance at the relevant specifications and iPhone 12 price.
Part 1: Apple iPhone 12 Series Specifications
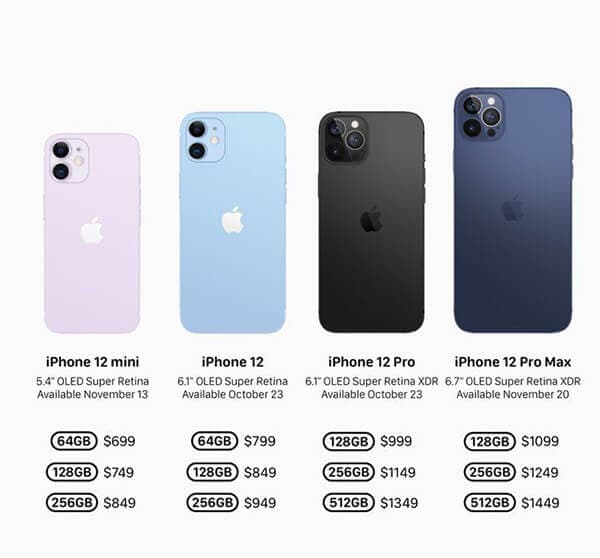
To mention the iPhone 12 series specifications, these models are secured with an SoC of Apple A14 Bionic. All 4 of them consist of DRAM. The displays of these smartphones are quite satisfactory.
Display: The iPhone 12 Mini and iPhone12 have a display of 5.42" OLED (2340 x 1080) and 6.06" OLED (2532 x 1170). On the other hand, the magnificent iPhone 12 Pro has a display of 6.06" OLED (2532 x 1170) and 6.68" OLED (2778x1284).
Size & Weights: The size concerning height, width, and depth of both iPhone 12 and iPhone 12 pro are the same at 146.7 mm, 71.5 mm, 7.4 mm. Besides, the iPhone Mini stands at a height width and depth of 131.5 mm, 64.2 mm, and 7.4 mm. The iPhone 13 Pro max has a height of 160.8 mm, a width of 78.1 mm, and a depth of 7.4 mm. While the iPhone Mini weighs the lightest with 135g, iPhone 12 max weighs the heaviest (228 g). Both iPhone 12 and iPhone 12 Pro remain at 164g and 189g, respectively.
Wireless Charging: Each of the iPhone 12 series models supports MagSafe Wireless Charging up to 15 W. They are also Qi Compatible (7.5 W). Now, coming to the camera quality, all four models are secured with a front camera of 12 MP f/2.2.In rear camera setup, iPhone 12 Mini, iPhone 12, and iPhone 12 Pro have a main camera of 12 MP 1.4µm, 26mm eq. f/1.6, Optic OIS. iPhone 12 Pro Max comes with the main camera of 12 MP 1.7µm, 26mm eq. f/1.6.
Camera: The high-quality telephoto camera of the iPhone 12 Pro is 12 MP, 52mm eq. f/2.0 OIS. For iPhone 12 Pro Max is 12 MP, 65mm eq. f/2.2 OIS. The entire iPhone series model has an ultra-wide camera of 12 MP 13mm eq. f/2.4. The splash, water, and dust resistance feature with IP68 for up to 6m and 30 minutes keeps the phone durable.
iPhone Series devices hold dual-SIM support with nano-SIM and eSIM. Both iPhone 12 Mini and iPhone 12 come in distinct storage capacities like 64 GB, 128 GB, and 256 FB. The iPhone 12 Pro and Pro Max are available in the storage of 128 GB, 256 GB, and 512 GB.
Part 2: Transfer old iPhone data to iPhone 12
We know that the excitement of buying a new iPhone is real. However, it's important to do one thing before jumping into the camera quality. And that's data transfer. You do not want your old phone data to be gone with the old device, do you? We hope not. Here are some of the tactics by which you can transfer the old iPhone data to the new iPhone 12
2.1 Through iCloud
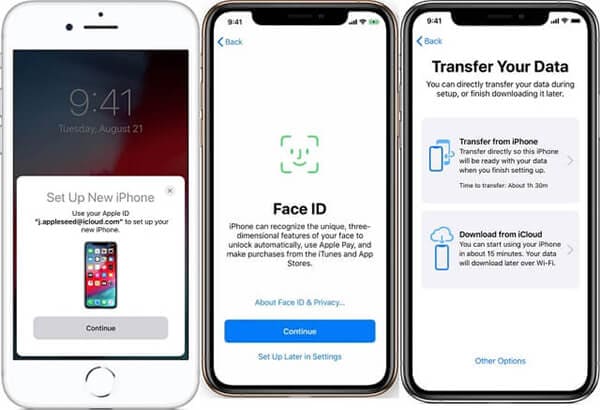
Before transferring, make sure your data is backed up. For that, connect the old iPhone with the WiFi and then go to "Settings." Next, tap your name and then on "iCloud." Next, select the "Backup Now" option and wait for the process to get completed. After completing the backup, follow the steps given below.
Step 1: First, turn on the new device to see the "Hello" screen. Now, follow the instructions appearing on the screen. Once you notice the WiFi screen, tap a WiFi network to join. Keep following the steps till the "Apps & Data" screen shows up. Tap on "Restore from iCloud."
Step 2: Sign in to your iCloud with relevant credentials like Apple ID and password. Choose a backup but make sure to check the date and size.
If you have bought iTunes or App store content with multiple IDs, sign in with those accounts too.
Step 3: The restore process will be initiated. Make sure to be connected and wait till the process gets completed successfully. Once done, continue with the other steps to complete the setup process successfully.
2.2 Through iTunes or Finder
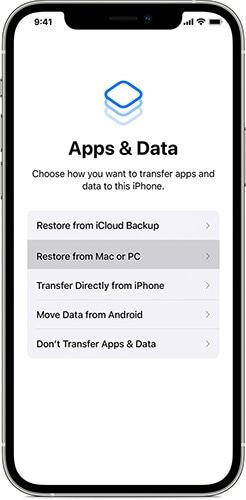
Start with the backup process by opening iTunes. Now, connect your iPhone with the PC. After it gets connected, choose your iPhone on the top toolbar. To transfer the data related to Health and Activity/saved passwords, choose the "Encrypt backup" option. Next, input a password and click "Back Up Now."
To transfer the data through iTunes or Finder, launch your new device. Once the "Hello" screen appears, follow the instructions appearing on the screen. As soon as you note the "Apps & Data Screen," tap on "Restore from Mac or PC." Connect the new device to PC/Mac and open the iTunes/Finder window. Once your device name is visible on the screen, tap it.
Select "Restore Backup" to choose a "Backup." Ensure that the size and data are accurate. To restore from an encrypted backup, input the password. The restoration process will start. Now, wait for the entire process to get completed and then move on to the remaining setup steps.
Part 3: Transfer Android Data to iPhone 12
The methods mentioned above can be time-consuming. In that case, it's best to opt for a simple process that does not require too much work. For example, Dr.Fone - Phone Transfer all is an efficient and easy-to-use phone switch app.
As the name signifies, this App can help you with iPhone 12 transfer data in a few minutes. Experienced developers develop it for both iOS and Android users. So, you can transfer data from any of the devices to the new iPhone 12.
With Dr. Fone, you can migrate 13 files of distinct size to the new iPhone 12. Here's a glimpse of the files below
Contact, photo, videos, voicemail, wallpaper, calendar, and many more
To transfer data through Dr. Fone, follow the easy steps mentioned below.
Step 1: First, connect both the old device and new iPhone 12 to your PC/Mac with USB.
Step 2: Now, launch the Dr. Fone - Phone Transfer and select the app
Step 3: Once the app starts, you will note a device detected as a source. Similarly, there will be other devices detected as destinations. Then, you will be given the option to flip the source and destination. For that, click on the "Flip" option.
Step 4: After selecting the device status, mark the checkboxes beside the files for transferring. Once done, tap on the "Start Transfer" button appearing on the screen.
You can select "Clear data before copy" to delete the data from the destination device before transferring. It will speed up the entire process.
Conclusion
Hopefully, you got a clear idea of how to transfer data to iPhone 12. Dr. Fone - Phone Transfer is one of the finest names for data recovery and data transfer between devices. They have distinct outstanding products that are efficient and useful for the users. One of the best things about the application is that you can transfer the data regardless of the mobile operating system. Be it an iOS or Android device, follow the steps provided above, and that's it. The iPhone 12 data transfer process is quick, easy, and requires less effort.
Other Popular Articles From Wondershare
iPhone 12 Series
- iPhone 12 Infos
- iPhone 12 Tips
- 1. Create a Custom iPhone 12 Ringtone
- 2. Reset iPhone 11/12 Without Password
- 3. Manage Subscriptions on iPhone 12
- 4. Mirror iPhone/iPad to Windows PC
- 5. Remote Control iPhone from PC
- 6. Tools for iPhone to Enter DFU Mode
- iPhone 12 Recover
- 1. Free iPhone Data Recovery Software
- 2. Recover Data from Broken iPhone
- 3. Recover from iPhone in Recover Mode
- 4. Recover Contacts without Backup
- 5. Recover from iPhone in DFU Mode
- iPhone 12 Transfer
- 1. Transfer Data to iPhone 12
- 2. Import Photo from iPhone to Windows
- 3. Browse iPhone Files on PC/Mac
- 4. Transfer Videos from PC to iPhone
- iPhone 12 Unlock
- 1. Unlock iPhone 11/12
- 2. Unlock iPhone 11 Without Passcode
- 3. Bypass iPhone 11/12 Activate Lock
- 4. Remove MDM iPhone
- iPhone 12 Problems
- 1. iPhone 11/12/13 Won't Turn On
- 2. Unstick iPhone 12/13 Hotspot
- 3. iPhone 8 or 12 Frozen
- 4. iPhone 11/12 Keeps Restarting
- 5. iPhone 11/12 No Sound
- 6. iPhone 11/12 Battery Draining Fast
- 7. iPhone 11/12 Black Screen
- 8. Phone 11/12 Not Charging
- 9. iPhone 11/12 Speaker Not Working
- 10. iPhone XR/11/12 Won't Turn Off
- 11. iPhone Stuck on Apple Logo
- iPhone 12 Alternatives


Selena Lee
chief Editor