How to Transfer Photos from iPhone to iPhone without iCloud [iPhone 15 Included]

Aug 27, 2025 • Filed to: Data Transfer Solutions • Proven solutions
This article's content focuses on the importance of photos, and the techniques and tools you require to transfer photos from iPhone to another iPhone without iCloud including iPhone 15.
Photos are important because they reflect our memories, we have so many memories in our brain and it is not easy to pull them all up when required, but photos can help a lot to remember. Photos invoke emotions, sometimes photos are important to remember details, for example, “What did I wear on my last Christmas?”.
- Method 1: Transfer Photos from iPhone to iPhone without iCloud (All in One Click) [iPhone 15 Included]
- Method 2: Transfer Photos from iPhone to iPhone without iCloud (Selective Transfer) [iPhone 15 Included]
- Method 3: Transfer Photos from iPhone to iPhone without iCloud via iTunes [iPhone 15 Included]
- Method 4: Transfer Photos from iPhone to iPhone without iCloud via AirDrop [iPhone 15 Included]
- Tip: How to Transfer Photos from iPhone to iPhone using iCloud
Method 1: How to Transfer Photos from iPhone to iPhone without iCloud (All in One Click) [iPhone 15 Included]
The top method to transfer photos from iPhone to iPhone without iCloud is to transfer all the photos in one click. With this method, you can complete the photo transfer even within seconds without any photo loss. All you need are two lightning cables to connect both iPhones to your PC or Mac, and the Dr.Fone - Phone Transfer (iOS & Android) software.
Dr.Fone - Phone Transfer
Easiest Way to Transfer Photos from iPhone to iPhone without iCloud
- Transfer photos from an old iPhone to a new iPhone within seconds.
- Support the transfer of more data like contacts, messages, files, videos, etc. from phone to phone.
- Transfer everything from iPhone to new iPhone, from Android to Android, from iPhone to Android, and from Android to iPhone.
- Supports iPhone, iPad, iPod touch, and the latest iOS version.
- Fully compatible with the latest Windows or Mac version.


Here are the simple steps to transfer photos from iPhone to iPhone without iCloud:
Step 1: Download the Dr.Fone software, open it, and you can see the following interface.

Step 2: Connect both iPhones to your PC and click "Phone Transfer".

Note: Confirm which iPhone is your destination device and which one is the source. Click "Flip" to swap their positions if necessary.
Step 3: Select the "Photos" option and click "Start Transfer". Then you can find all photos are transferred from iPhone to iPhone without iCloud.

Video Guide: Transfer photos from iPhone to iPhone without iCloud


Method 2: Transfer Photos from iPhone to iPhone without iCloud (Selective Transfer) [iPhone 15 Included]
When you want to transfer your photos separately without transferring the other iDevice data, there is a perfect tool for you: Wondershare Dr.Fone. This action takes no time at all, and you can transfer the images within a matter of a few seconds. You can also use this phone manager app to transfer data from iPhone to Android and iTunes or vice versa.
In addition, Wondershare Dr.Fone works efficiently without losing data while transferring media files between iOS devices. It can also transfer videos, contacts, messages, etc., from iPhone to iPhone. Here is how to selectively transfer photos from iPhone to iPhone without transferring the complete iPhone data via Wondershare Dr.Fone:
Step 1: Proceed With the Phone Manager feature
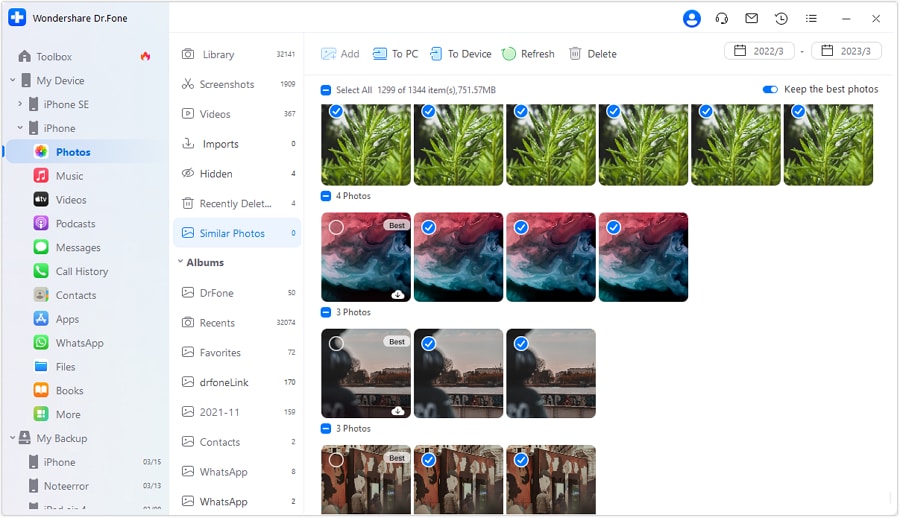
First, you need to install Wondershare Dr.Fone on your computer and connect both your iDevices to the computer using the Apple-certified USB cables. Next, locate the iPhone from which you want to transfer the images and expand it. Choose the “Photos” tab and let Wondershare Dr.Fone load all the pictures.

Step 2: Perform the Selective Photos Transfer
Once Dr.Fone detects all the photos in your iPhone, it will categorize them in the albums like they are in your iDevice. Choose the pictures you want to transfer and tap the “To Device” option. Then, click on the iPhone on which you want to send all the selected images and complete the photo transfer process.
Method 3: Transfer Photos from iPhone to iPhone without iCloud via iTunes [iPhone 15 Included]
Using iCloud for transferring data is convenient, but it is not always practical due to the limitation of maximum data. In that case, iTunes can be a good option, which is another functional software from Apple. Following are the step-by-step instructions to transfer pictures from iPhone to iPhone via iTunes to avoid data storage limitations:
Step 1: To begin with, launch iTunes on your computer and connect your source iPhone. Select the "Phone" icon near the top left corner of iTunes and move to the "Summary" tab. Then, navigate to the "Backups" section and check the "This Computer" option. Then, hit the "Back Up Now" button on the right side to start the backup process of your iDevice.

Step 2: Once the backup process is complete, disconnect the old iDevice. Next, you need to connect your new iPhone and proceed to the "Backups" section in the "Summary" tab. Here, tap "Restore Backup" and go on to choose the most recent backup. To complete the photo transfer process, tap "Restore" and wait for the backup to be restored.

Method 4: Transfer Photos from iPhone to iPhone without iCloud via AirDrop [iPhone 15 Included]
AirDrop gives its users the wireless facility to transfer iPhone photos in a quick manner. Unlike iCloud or iTunes, it does not need to sync all the photos. You just have to select the photos from one of your iPhones and AirDrop them to another. However, the other iPhone should be within the Bluetooth and Wi-Fi range of the host iDevice. Here are the instructions you need to follow to AirDrop photos from old iPhone to new iPhone efficiently:
Step 1: On your old iPhone, you need to open the "Photos" app and hop into the desired folder. Next, pick the photos you want to share by tapping the "Select" button in the upper right corner.
Step 2: Following this, you will have to tap the “Share” icon, followed by selecting the targeted “AirDrop” recipient iPhone. Then, on the target iPhone, you have to choose “Accept” to receive them.

Tip: How to Transfer Photos from iPhone to iPhone using iCloud
Step 1. To transfer the photos from your iPhone to another iPhone you must make sure that you make a backup through iCloud.
Step 2. On the home screen tap Settings. Once entered in settings tap iCloud.

Step 3. In the iCloud menu, you need to click on photos. Once entered in photos turn on the iCloud Photo Library option along with upload my photostream.
Step 4. When you are done your photos will be uploaded to iCloud and you can restore them by simply adding the iCloud id to the new iPhone device.
Editor's Picks:
- 5 Ways to Transfer Everything from Old iPhone to your new iPhone
- 5 Ways to Transfer Photos from iPhone to PC with/without iTunes
If you do not want to use iCloud for data transfer, run Dr.Fone - Phone Transfer on your computer and transfer data in one click quickly.


iPhone Photos
- Convert HEIC to JPG
- 1. Convert HEIC to JPG on Linux
- 2. Convert HEIC to JPG Windows
- 3. Best HEIC Converter Online
- 4. Convert HEIC to JPG High Quality
- Export iPhone Photos
- 1. Upload iPhone Photos to Google Drive
- 2. Transfer Photo from iPhone to PC
- 3. Transfer Photo from iPhone to iPhone
- 4. Transfer from iPhone to iPhone
- 5. Transfer from iPhone to iPad
- 6. Move iPhone Photo to External Drive
- 7. Transfer from iPhone to Flash Drive
- 8. Extract Photos from iPhone
- 9. Download Photo from iPhone
- Import Photos to iPhone
- 1. Transfer from Laptop to iPhone
- 2. Transfer Photo from Camera to iPhone
- 3. Transfer Photo from Mac to iPhone
- 4. Transfer Photos from PC to iPhone
- 5. Transfer from iPhone to PC
- 6. Transfer from Android to iPhone
- 7. Transfer from Samsung to iPhone
- Manage iPhone Photos
- 1. Back up iPhone Photos
- 2. Get Photos off iPhone
- 3. Send Large Size Photos from iPhone
- 4. Photo/Video Compressor Apps
- 5. Delete Photos from iPhone/iPad
- 6. iPhone Photos Disappeared Suddenly
- 7. iPhone Photoshop Alternatives
- Recover iPhone Photos
- 1. Restore Deleted Photos from iPhone
- 2. Recover Photos from iPod Touch
- 3. Recover Deleted Picture from iPhone
- Transfer iPhone Photos to Mac
- Transfer iPhone Photos to PC
- 1. Transfer Data from iPhone to PC
- 2. Transfer Photo to Computer
- 3. Transfer Photo to PC without iTunes
- 4. Transfer Library to Computer
- 5. Send Photo from iPhone to Computer
- 6. Import Photo from iPhone to Windows
- 7. Transfer Photo to Windows
- Transfer Photos from Google Drive
- 1. Download from Google Drive to iPhone
- 2. Transfer from Google Photo to iPhone
- 3. Download from iCloud to iPhone
- Transfer Photos to Google Drive
- Image Convert Tips
- ● Manage/transfer/recover data
- ● Unlock screen/activate/FRP lock
- ● Fix most iOS and Android issues
- Learn More Learn More

Selena Lee
chief Editor