What Can We Do for iPhone 11/12/13 that Won't Turn On?

May 22, 2026 • Filed to: Phone Repair Solutions • Proven solutions
 TL;DR:
To restore an unresponsive iPhone 11, 12, or 13, charge the device for at least 30 minutes and perform a force restart by sequentially pressing Volume Up, Volume Down, and holding the Side button to clear potential firmware loops.
● If the phone powers on using a wireless charging pad but fails via cable, the charging port needs replacement, whereas a black screen after a drop might only require a free display cable reconnection at the Apple Store.
● Restoring the system through Recovery Mode using Finder or the iTunes app will erase your data, while attempting a DFU mode restore risks bricking the iPhone if the button sequence is improperly executed.
● Dr.Fone - System Repair fixes iOS crashes without data loss via its Standard Repair mode, under the condition that it will automatically update the device to the most recent, non-jailbroken iOS version.
Ask AI for a summary
 ChatGPT
 Perplexity
 Gemini
 Claude
 Grok
Grok
Do you have an iPhone 11, 12, or 13 that won't turn on? This problem could be caused by a drained battery, a disabled Power/Side button, a non-responsive display, and more. You can do some DIY troubleshooting before submitting it to the Apple Repair Store, regardless of the cause.
You can learn several reasons why your iPhone won't turn on. We can only determine a portion of the actual causes of that error. So, in this regard, we will cover various aspects and provide you with the best and easiest methods, complete with detailed steps, to quickly resolve the issue.

Part 1: Three Reasons Cause Your iPhone 11/12/13 Won't Turn On
As mentioned above, there are several reasons why your iPhone 11/12/13 won't turn on. Below, we'll dig deeper into these causes to better grasp what may have caused your iPhone to be dead.

Power Problems
Three possible power problems might cause your iPhone not to turn on. Check them out below.
- Battery Discharged
Check if your iPhone has been completely discharged. When the battery is too low to power on, the iPhone usually displays a screen prompting you to plug it in. But if the battery is extremely low, there may not be enough energy to power the display. Before ruling out battery discharge, plug your phone into a known functional charging setup for 10 minutes.
- Bad Battery
Smartphone batteries degrade over time, allowing them to hold less and less charge. If you've been charging your iPhone many times, your battery may have degraded to the disabled point.
Furthermore, lithium-ion batteries, such as the one in your iPhone, dislike being fully charged or fully discharged . If you've kept your iPhone at one of these extremes for several weeks or months, the battery life may have suffered significantly, even if your charge cycle count is low.
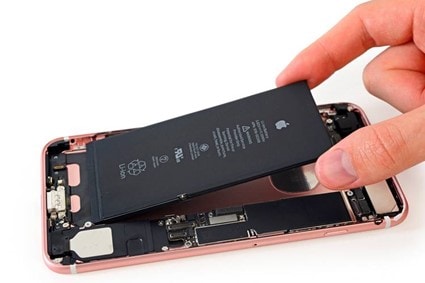
- Damaged Charging Port
Many iPhones' charging ports can become damaged due to wear from plugging and unplugging charging cables, especially if you aren't gentle with the port. If the port is damaged to the point where the contacts break, the phone cannot be charged via cable. In this case, your phone will no longer turn on because it has been discharged.
If your phone has wireless charging capabilities, try using a wireless charging pad to see if it will power up. If your phone turns on, you'll need to replace the charging port, which is usually located on the device's daughterboard. Find the daughterboard guide on the page for your specific iPhone and follow it to replace the charging port.
Physical or Liquid Damage
When your iPhone is dropped on the ground or in water, several things can go wrong, the most annoying of which is that the device does not turn on. You may still get a black screen, no matter how hard you press and hold the sleep/wake button. Although your iPhone is designed with fall-proof and water-proof materials to protect it, the materials cannot guarantee 100% security.
Another reason might be a damaged motherboard. Typically, the motherboard fails only after a significant impact, exposure to water, extreme temperatures, or changes to the BIOS settings (like when a jailbreak attempt is unsuccessful). If you suspect any of the above have damaged your motherboard, you may need to replace it to restore your phone's functionality.

Software Crashes
If your iPhone stops working for no apparent reason, i.e., you haven't exposed it to water, dropped it, or sustained other damage since the last time you turned it on, the most likely cause is a firmware crash. Force restart on your iPhone can get out of a bad firmware loop.
Part 2: 6 Ways to Fix iPhone 11/12/13 Won't Turn On
Below are some diagnostic ways and tips you can do to help you fix your iPhone 11/12/13 that won't turn on.
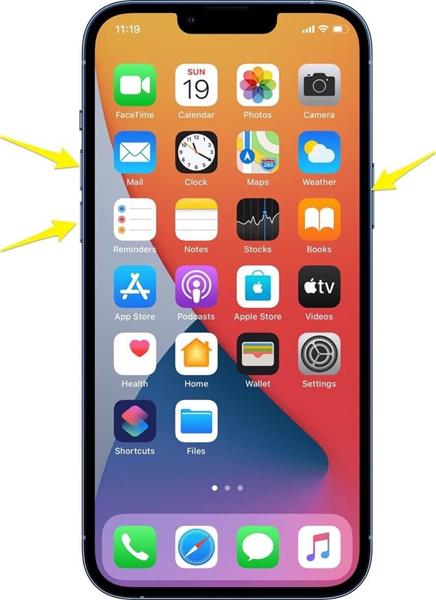
Force Restart Your iPhone
If the issue is caused by the iOS software freezing or crashing, you can force restart your device to resolve the iPhone Won't Turn On problem.
To Fix iPhone 11/12/13 that Won't Turn On:
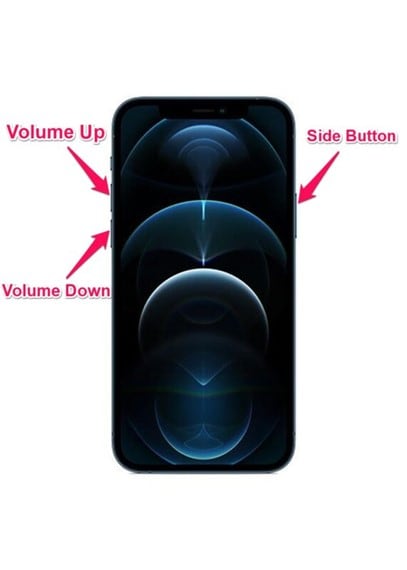
- Press and quickly release the "volume up" button
- Then press and quickly release the "volume down" button, followed by the side button.
- Release the button to see the Apple logo.
Check iPhone Screen Display
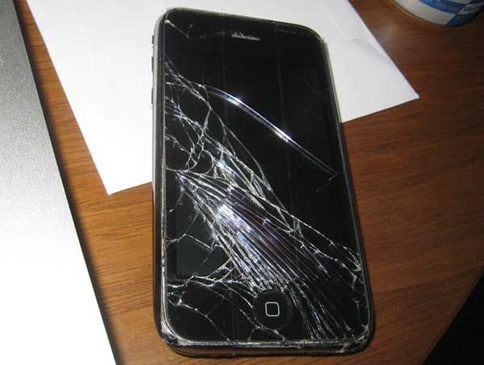
If your iPhone screen is not working, there might be a problem with your device's screen display. There are two possibilities: your display cable has been disconnected from the logic board, or your screen has become damaged. Both can happen if you drop or knock on your iPhone.
If you drop your iPhone, the screen will likely be broken. If you have knocked it against something, the screen is very likely to be dislodged. If the screen is broken, you must replace it. If it becomes dislodged, you must reconnect the cable. The dislodged screen is repaired for free at the Apple Store.
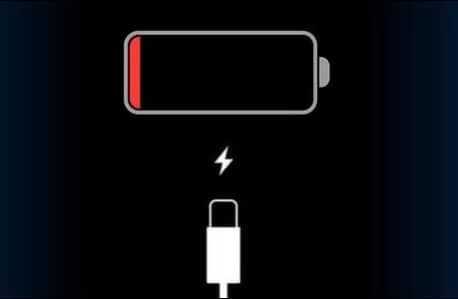
Get Your iPhone Charged
As previously stated, your dropped iPhone not turning on is due to a depleted battery. It would help if you charged it in this case by plugging it into a wall charger. Check if your iPhone turns on after 30 minutes or an hour. Please check the cable if your iPhone is not charging.
Note: Ensure that your cable, charging block, and outlet are all operational for your phone to receive power.
Try Recovery Mode to Restore iPhone
Another solution is to enter your iPhone into recovery mode. Recovery mode can proceed with restoring your device by erasing your data. To do this, you can go with our steps:
- Press and quickly release the Volume Up button.
- Press and quickly release the Volume Down button
- And press and hold the side button.
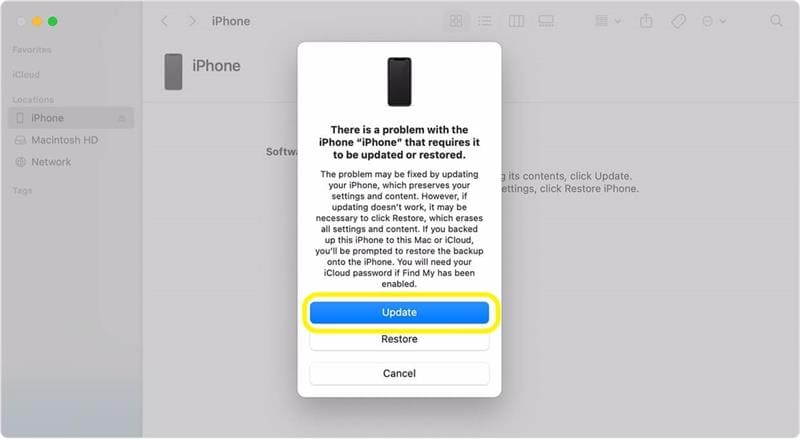
- After this, you have to exit your iPhone from recovery mode. Suppose you see the option to Restore or Update your device in Finder or the iTunes app, select Restore. Your device will exit recovery mode if it takes more than 15 minutes.
Perform DFU Mode
If Recovery mode restore does not work on your iPhone, your final option is DFU mode restore. It is not recommended because you risk bricking your iPhone if something goes wrong. That is why, if you are unsure, you should avoid taking the step. If you still want to go for it, here are the steps.
- Restart your computer and begin again. Using a lightning cable, connect your iPhone to your computer.
- While holding the Side button, press and hold the Volume Down button. If you see the Apple logo, you have failed and must release all buttons and begin again.
- If you don't see the Apple logo, release the Side button while holding down the Volume Down button.
- Once iTunes detects your iPhone, you can release the Volume Down button and follow the on-screen instructions to complete the DFU mode restoration process.
Note: If you see the message "Plug into iTunes" on your screen, it is not in DFU mode. You must restart from scratch. Let us reiterate that you can have the job done by an Apple expert who has used DFU mode before rather than you trying it for the first time.
Dr.Fone - System Repair
If you're all out of options and tried everything above but still can't fix your iPhone 11/12/13 that won't turn on, it's time to try Dr.Fone - System Repair!
Dr.Fone - System Repair has simplified the process for users to recover their iPhone, iPad, or iPod Touch from the white screen, Recovery Mode, Apple logo, or black screen and fix other iOS issues. The best thing about it is that no data will ever be lost while repairing the iOS system issues.
Note: Please remember that your iOS device will turn to the most recent iOS version after using this function. Furthermore, if your iOS device is jailbroken, it will be updated to a non-jailbroken version. If you previously unlocked your iOS device, it will be re-locked.
Standard Repair for Fixing iOS System Issues
Before fixing your iPhone, you need to download the tool to your computer.
Step 1: Begin by launching Dr.Fone on your computer after it has been successfully installed. Select System Repair from the drop-down menu on the homepage.
Step 2: After that, you must specify the type of smartphone you are repairing. Choose iOS because iPhones are being dealt with.

Step 3: You will be taken to a new screen where you must select iOS Repair to repair the iPhone's system issues.

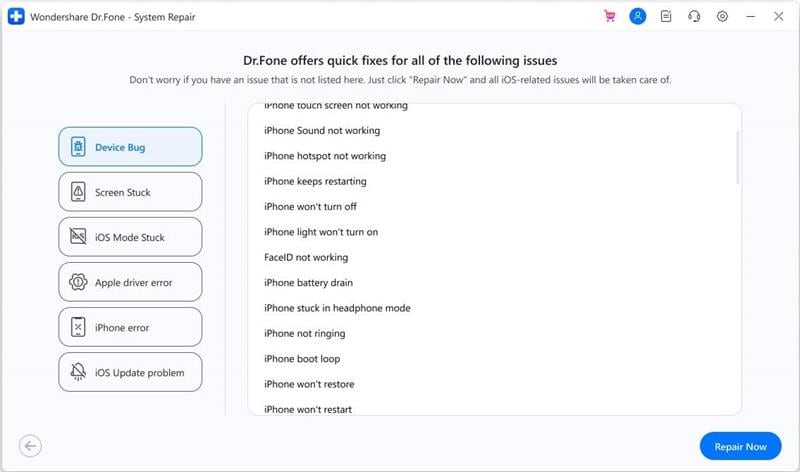
Step 4: From the list provided on the next screen, determine whether Dr.Fone - System Repair (iOS) fixes the specific issues that your device is experiencing. If so, proceed by clicking the Repair Now button. Even if the iOS system issue on your device is not listed, you can still click Repair Now to begin the recovery process.
Step 5: To proceed with the iOS repair, choose Standard Repair from the two options. This mode will attempt to repair your iOS device while protecting all data from loss.

Note: By retaining device data, Standard Repair fixes the majority of iOS system issues. The Advanced Repair option resolves even more iOS system issues, but it erases the device's data. You are recommended to use the Advanced Repair only if the Standard Repair fails.
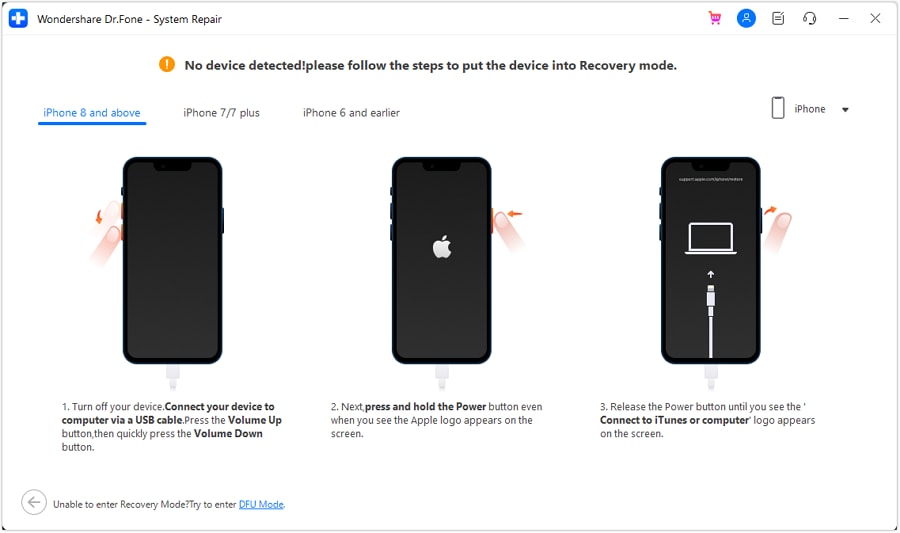
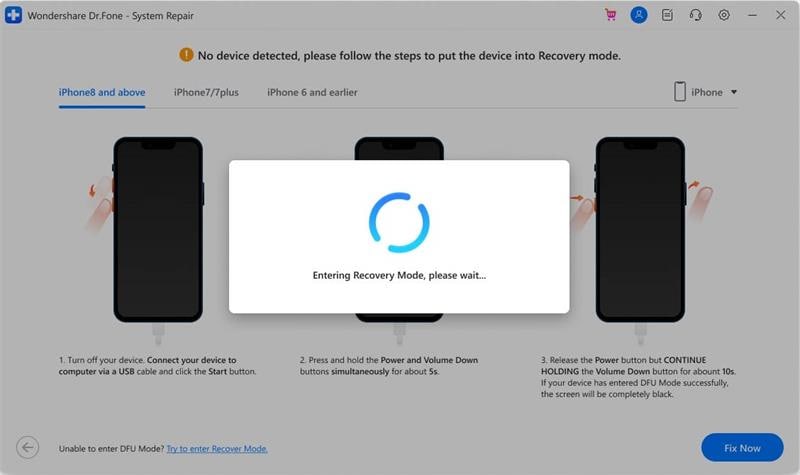
Step 6: After that, boot your iOS device into Recovery Mode.
First, trust the computer to complete this process. To do so, connect the device to the computer using a USB cable and enter the password for the lock screen. Tap the Trust option that appears in the pop-up window. Following successful coverage, click Enter Recovery Mode to proceed. Select the Guide to Recovery Mode option if your device is unresponsive or acting strangely.

Step 7: To put your device into Recovery Mode, follow the on-screen instructions for your model.
Step 8: The platform detects the device as soon as it enters Recovery Mode.
Step 9: The following window displays a list of available iOS firmware for installation on the iOS device. Click Download to begin the installation process for any of them. The iOS firmware begins to download across the computer, as indicated by the progress bar. The platform verifies the firmware before installing it across the iOS device to avoid problems.

Step 10: Once the iOS firmware has been validated, click the Repair Now button to begin the iOS system recovery process. A progress bar presents the repairing process on the following screen.
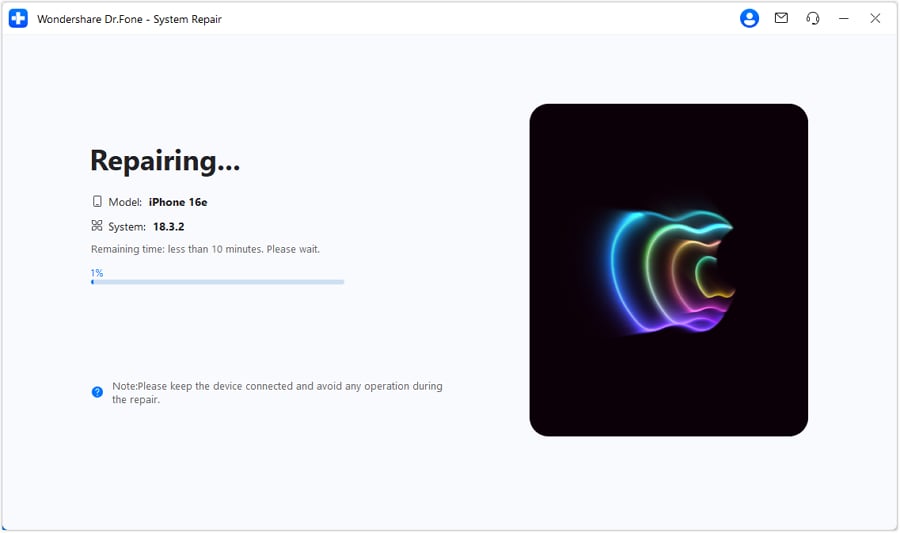
Step 11: When you're finished, the prompt window displays the successful completion of the process. To finish the execution, press the Done button.
Conclusion
In conclusion, there are several reasons why your iPhone on 11/12/13 won't turn on. But the good news is, there are also many ways to resolve such issues, and they were all provided step by step above. You can try all of them before bringing your iPhone to the Apple Store, especially the Dr.Fone - System Repair.
Dr.Fone is a complete mobile device solution for iOS and Android devices that solves problems in any scenario, including system failures and data loss, phone transfers, and much more!


iPhone 13 Issues
- Apps Keeps Stopping
- 1. iPhone 13 Safari Not Working
- 2. iPhone 13 Apps Keep Crashing
- 3. iPhone 13 Apps Stuck on Loading
- 4. iPhone 13 WhatsApp Calls Don't Work
- 5. iPhone 13 Won't Download Apps
- 6. iPhone 13 Apps Not Opening
- 7. iPhone 13 Apps Won't Update
- 8. iPhone 13 Safari Freezes
- 9. iPhone 13 Safari Not Loading Pages
- iPhone 13 Charging Issues
- 1. iPhone 13 Battery Draining Fast
- 2. iPhone 13 Overheating
- 3. iPhone 13 Overheats While Charging
- 4. iPhone 13 Won't Charge
- iPhone 13 Not Working
- 1. iPhone 13 Overheating And Won't On
- 2. iPhone 11/12/13 Won't Turn On
- 3. iPhone 13 Restarts
- 4. iPhone 13 Problems
- iPhone 13 Screen Issues
- 1. iPhone 13 Touch Screen Not Working
- 2. iPhone 13 Stuck on White Screen
- 3. iPhone 13 Frozen Screen
- 4. iPhone 13 Black Screen
- 5. iPhone 13 Camera Black Screen
- 6. iPhone 13 Goes Black During Call
- iPhone 13 Services Fail
- 1. iPhone 13 Face ID Not Working
- 2. iPhone 13 Not Ringing
- 3. iPhone 13 Call Failed
- 4. iPhone 13 Poor Call Quality
- 5. iPhone 13 iMessage Not Working
- 6. iPhone 13 Dropping Calls
- 7. iPhone 13 No Service Problem
- 8. iPhone 13 Not Receiving Calls
- 9. iPhone 13 SIM Failure/No SIM Card
- 10. iPhone 13 iMessage Not Syncing
- 11. iPhone 13 Hotspot Not Working
- iPhone 13 Tips
- ● Manage/transfer/recover data
- ● Unlock screen/activate/FRP lock
- ● Fix most iOS and Android issues
- Free Download Free Download Free Download


James Davis
staff Editor
Generally rated4.5(105participated)