5 Best Solutions to Fix iPhone 6/7/8/11/12 Not Charging

May 22, 2026 • Filed to: Phone Repair Solutions • Proven solutions
 TL;DR:
To fix an iPhone 6/7/8/11/12 that is not charging, verify you are using an MFi-certified lightning cable and a clean charging port before attempting software interventions like a force restart or a system recovery.
● Using a wireless charging pad can bypass a damaged physical port, but this hardware alternative is strictly limited to the iPhone 8, 11, and 12, excluding the iPhone 6 and 7.
● Restoring the device via iTunes or DFU mode will permanently erase all existing data, while using the Standard Repair mode in Wondershare Dr.Fone-System Repair fixes system glitches without deleting your files.
● High device temperatures prevent the battery from accepting power, requiring you to physically cool down a warm iPhone before connecting it to an adapter or attempting an iOS update.
Ask AI for a summary
 ChatGPT
 Perplexity
 Gemini
 Claude
 Grok
Grok

An iPhone 6/7/8/11/12 not charging can significantly inconvenience iOS users. Without the ability to charge their device, users may not be able to access important information. And they need help to stay connected with friends and family and complete tasks on the go.
Besides, an iPhone 6/7/8/11/12 not charging can lead to frustration and inconvenience. And you may have to miss important notifications or calls because of the low battery. Our guide shares crucial advice to ensure you can charge your iPhone once again.
What Makes iPhone 6/7/8/11/12 Not Charging?
1.Use a Lightning Cable Not from Apple

A lightning cable not from Apple can prevent you from charging your iPhone due to compatibility issues. Apple uses a proprietary technology called MFi (Made for iPhone/iPad/iPod). It ensures that third-party accessories meet specific standards for performance and safety.
Accessories not MFi-certified may be incompatible with your iPhone, leading to charging problems. For example:
- Non-MFi cables may provide enough power to charge your iPhone effectively.
- Or they may not be able to transfer data at the correct speed. This can result in slow charging or even no charging at all.
- Additionally, non-MFi cables may not have the same durability and quality as Apple's cables, which can lead to fraying or breaking.
- Moreover, non-certified cables might have different features than Apple's cables. They could lead to overheating and overcharging of the device.
2. Too Much Dirt in the Charging Port
Too much dirt in the charging port can prevent you from charging your iPhone. And the dirt can block the charging connector from connecting with the charging port. This can cause the device not to charge or to charge very slowly.
You can find the charging port on an iPhone at the bottom of the device. This part can collect dust and debris, especially if you carry the device in your pocket or purse. The dirt and debris can build up over time, making it difficult to charge.
3. Software Glitches
Another reason behind your iPhone 6/7/8/11/12 not charging is software glitches. These glitches can occur for various reasons, such as a software update, bug, or third-party app.
Software glitches can prevent you from charging your iPhone by causing issues with the charging process or the device's power management. For example, a software glitch may cause the device not to recognize the charging cable or not to charge.
Additionally, a glitch in the power management system can cause the device to drain power quickly or not to charge appropriately.

4. Physical or Water Damage in the Charging Accessories
Physical or water damage to charging accessories can prevent an iPhone from charging correctly. If the charging port on the iPhone is damaged, it can prevent the charging cable from making a proper connection, preventing the phone from charging.
Moreover, if the charging cable or adapter is damaged, it may not be able to transfer power to the iPhone. Water damage can also cause issues, as it can corrode the charging port or damage the internal components of the charging cable or adapter.
In some cases, water damage may not be immediately visible but can still cause problems with charging. Handling charging accessories with care and keeping them dry to prevent physical or water damage is essential. If you suspect that your charging accessories or iPhone have been damaged, it's best to stop using them.

Simple Tips for iPhone 6/7/8/11/12 Not Charging
1. Change Your iPhone Lightning Cable and Adapter
If you don't have a suitable lightning cable, you must get a new one. It is recommended to use an Apple-branded lightning cable to charge your iPhone as they are specifically designed and tested to work with your device and come with a warranty. This helps ensure that your iPhone charges appropriately and prevents any damage to the device.

2. Clean the Charging Port
You must clean the charging port if your iPhone 6/7/8/11/12 is not charging. This can be done using a dry toothbrush or a small brush designed explicitly for cleaning charging ports to remove the dirt and debris gently. You can also use a can of compressed air to blow out the dirt.
It is also essential to keep your iPhone clean and dry and avoid exposing it to dust and debris as much as possible. Keep in mind that cleaning the charging port should be done gently and with care to avoid damaging the charging port or any other device's internal components.
Keeping the charging port clean ensures that your iPhone charges appropriately and prevents any damage to the device.

3. Cool Down Your iPhone
We have several reasons why an iPhone may not charge properly if it is too warm. The battery may not function properly at high temperatures, and the device may become too hot to touch.
The software in the iPhone may also be affected by high temperatures, causing it to malfunction or shut down. Therefore, it is essential to cool down the iPhone before attempting to charge it to ensure that the battery and the device are functioning correctly.
4. Try a Wireless Charger

If your iPhone is not charging, one solution you can try is using a wireless charger. A wireless charger uses electromagnetic induction to charge your phone without needing a physical connection.
Place your iPhone on the charging pad to use a wireless charger and ensure it is properly aligned. If your iPhone still does not charge, ensure that the charging pad is plugged in and working correctly and that your phone is not in low-power mode.
Remember that a wireless charger can only be used by iPhone 8 and later versions. Hence, an iPhone 6 or 7 that is not charging wouldn't allow you to use a wireless charger.
6 Best Solutions to Fix iPhone 6/7/8/11/12 Not Charging
1. Force Restart Your iPhone
Sometimes, an iPhone may not charge due to a software issue, such as a frozen or unresponsive screen. In this case, you may need to force restart your iPhone to resolve the issue. A force restart can help fix minor software glitches that may prevent your iPhone from charging.
To force restart an iPhone 8 or newer.
- Press and quickly release the Volume Up button.
- Then, press and quickly release the Volume Down button.
- After the above, press and hold the Power button until the Apple logo appears.
To force restart an iPhone 7 or 7 Plus.
- Press and hold the Power button and Volume Down button at the same time.
- Continue holding the buttons for the Apple logo.
To force restart an iPhone 6s or older.
- Press and hold the Power button and Home button at the same time.
- Continue holding the buttons to see the Apple logo.
2. Restore Your iPhone with iTunes

If your iPhone 6/7/8/11/12 is not charging, restoring it with iTunes may help to resolve the issue. Because restoring your iPhone with iTunes can fix software problems of the charging issue.
To restore your iPhone with iTunes, you will need to connect it to a computer with iTunes installed, and then follow these steps.
- Open iTunes on your PC.
- Connect the two devices via a USB cable.
- Wait for iTunes to recognize your iPhone.
- Then, click on the iPhone icon that appears on iTunes.
- Next, click on the "Summary" tab in iTunes.
- After the above, click on the "Restore iPhone" button.
- Finally, click the "Restore" button to confirm that you want to restore your iPhone.
Please note that restoring your iPhone with iTunes will remove all the data and settings on your iPhone and will install the latest version of iOS. To prevent data loss, you should back up your iPhone before restoring it with iTunes.
3. Try DFU Mode to Restore Your iPhone
DFU (Device Firmware Update) mode is a more advanced method of restoring an iPhone. It is used when a standard restore with iTunes is not successful in resolving a charging issue or other software problem.
Moreover, DFY allows the iPhone to communicate with iTunes without loading the operating system or bootloader, which can help fix problems preventing the iPhone from charging or functioning correctly.
You will need to follow these steps to put an iPhone in DFU mode.
- Connect your iPhone to a computer with iTunes installed.
- Turn off your iPhone.
- Press and hold the Power button for 3 seconds.
- Then, press and hold the Home button and the Power button together for 10 seconds.
- Release the Power button but continue holding the Home button.
- If the screen remains black, the iPhone is in DFU mode, and iTunes will display it has detected an iPhone in recovery mode.
- At this point, you can restore your iPhone using iTunes.

As with a standard restore, using DFU mode to restore your iPhone will erase all data and settings on the device, so it is important to back up your iPhone before proceeding.
4. Update Your iOS Version
Updating your iOS version may help to resolve iPhone 6/7/8/11/12 not charging if a software bug or compatibility issue causes the problem. Apple regularly releases updates for iOS that include bug fixes and improvements, and updating to the latest version may address a charging issue.
To update your iOS version, you will need to follow these steps.
- Connect your iPhone to a Wi-Fi network.
- Go to the "Settings" app on your iPhone.
- Tap on "General."
- Tap on "Software Update."
- If an update is available, you will find out a notification to download and install the update.
- Tap on "Download and Install" to begin the update process.
- Follow the on-screen instructions to complete the update.

Please note that your iPhone will need to have enough battery life or be connected to a power source to perform the update.
5. Dr.Fone-System Repair
If your iPhone 6/7/8/11/12 is not charging, you should be able to resolve the issue with Wondershare Dr.Fone-System Repair. It is an incredible tool that you can use to fix iPhone battery issues quickly. Besides, it is easy to use as you only need to follow the steps below.
Step 1: To start, launch the Dr.Fone software on your computer after completing the installation process. On the homepage, select the "System Repair" option.

Step 2: From the options provided, select the type of device you want to repair, in this case, "iOS" for iPhones.
Step 3: On the next screen, select the "iOS Repair" option to fix any system issues on your iPhone.

Step 4: Choose the specific issue that your device is facing from the list provided. If the problem you're experiencing is not listed, select "Repair Now" and proceed with the recovery process.
Step 5: To keep your data secure, select the "Standard Repair" option. Keep in mind that the "Advanced Repair" option can fix more issues, but it will erase all device data. Only use this option if the standard repair is unsuccessful.

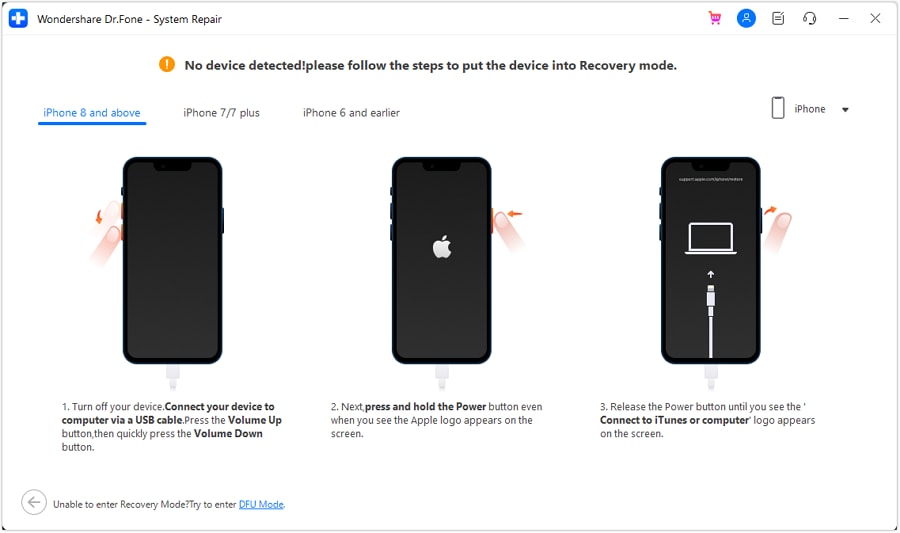
Step 6: Connect your iPhone to the computer via USB and enter the lock screen password. Trust the computer and select "Enter Recovery Mode." If your device is not responding, select the "Guide to Recovery Mode" option.
Step 7: Follow the on-screen instructions to put your device in Recovery Mode.
Step 8: Once your device is in Recovery Mode, the software will automatically detect it.
Step 9: From the list provided, choose the iOS firmware you wish to install and click "Download" to begin the process.

Step 10: A progress bar will display the status of the firmware download.
Step 11: Before installation, the software will verify the firmware to prevent any problems.
Step 12: Once the firmware is verified, select "Repair Now" to begin the iOS system recovery process. The progress will be displayed on the next screen.
Step 13: After the process is complete, the software will prompt a window indicating successful completion. Click "Done" to finish the execution.

6. Ask Apple Support for Help
Lastly, consider seeking Apple support if your iPhone 6/7/8/11/12 is not charging. Apple Support can provide additional assistance and may be able to identify the cause of the charging issue. They can also offer a solution that is unavailable through general troubleshooting steps.
To contact Apple Support, you can visit their website and access the support section, where you can find various resources such as articles, videos, and more. You can also schedule an appointment at an Apple Store, where a specialist will help you with your issue.
Moreover, you can also use the "Support" app that comes pre-installed on all iOS devices. This app will guide you to the appropriate resources and contact options.
It's important to note that if your warranty is still valid, you can contact Apple Support for a free repair or replacement. If your iPhone is no longer under warranty, you may need to pay a fee for a repair or replacement.
The Bottom Line
An iPhone not charging causes inconvenience and interruption in your daily activities. If you are looking for the ultimate solution, it is recommended that you use Wondershare Dr.Fone-System Repair.
Wondershare Dr.Fone-System Repair can be used to fix various software issues on an iPhone. It offers a user-friendly interface and easy steps to follow. As an excellent alternative to restoring an iPhone through iTunes, it keeps all data on the device.


iPhone 12 Series
- iPhone 12 Infos
- iPhone 12 Tips
- 1. Create a Custom iPhone 12 Ringtone
- 2. Reset iPhone 11/12 Without Password
- 3. Manage Subscriptions on iPhone 12
- 4. Mirror iPhone/iPad to Windows PC
- 5. Remote Control iPhone from PC
- 6. Tools for iPhone to Enter DFU Mode
- iPhone 12 Recover
- 1. Free iPhone Data Recovery Software
- 2. Recover Data from Broken iPhone
- 3. Recover from iPhone in Recover Mode
- 4. Recover Contacts without Backup
- 5. Recover from iPhone in DFU Mode
- iPhone 12 Transfer
- 1. Transfer Data to iPhone 12
- 2. Import Photo from iPhone to Windows
- 3. Browse iPhone Files on PC/Mac
- 4. Transfer Videos from PC to iPhone
- iPhone 12 Unlock
- 1. Unlock iPhone 11/12
- 2. Unlock iPhone 11 Without Passcode
- 3. Bypass iPhone 11/12 Activate Lock
- 4. Remove MDM iPhone
- iPhone 12 Problems
- 1. iPhone 11/12/13 Won't Turn On
- 2. Unstick iPhone 12/13 Hotspot
- 3. iPhone 8 or 12 Frozen
- 4. iPhone 11/12 Keeps Restarting
- 5. iPhone 11/12 No Sound
- 6. iPhone 11/12 Battery Draining Fast
- 7. iPhone 11/12 Black Screen
- 8. Phone 11/12 Not Charging
- 9. iPhone 11/12 Speaker Not Working
- 10. iPhone XR/11/12 Won't Turn Off
- 11. iPhone Stuck on Apple Logo
- iPhone 12 Alternatives


James Davis
staff Editor
Generally rated4.5(105participated)