How to Enable USB Debugging
on Android by Brand
USB debugging allows your Android phone to communicate with a computer through Android Debug Bridge (ADB). Follow this guide to enable USB debugging for Android data recovery, WhatsApp recovery, phone management, app testing, or fixing connection issues.
What Is USB Debugging?
USB debugging is a developer option on Android that allows your phone to communicate with a computer through ADB. It is commonly used by developers, Android repair tools,
data recovery software, phone managers, and transfer tools.
What USB Debugging Does on Android?
Once USB debugging is enabled, approved computer tools can interact with your Android device more deeply than a normal USB connection. Depending on the tool, this may help read basic device information, run diagnostics, test apps, access supported data, or fix connection problems when your phone is not detected by the computer.
Note:
USB debugging does not recover deleted files by itself. It only gives trusted software the permission needed to communicate with your Android device.
When Do You Need to Enable USB Debugging?
You may need to enable USB debugging when a computer tool needs permission to detect, access, or communicate with your Android phone.
- Android data recovery or deleted file recovery
- WhatsApp recovery on Android
- Android phone manager connection
- Phone transfer or Android data migration
- Broken Android data extraction
- App testing or Android Studio debugging
- ADB or command-line troubleshooting
- Fixing an Android phone not detected by computer
Is USB Debugging Safe?
Yes. USB debugging is safe when you only allow computers you trust. It lets trusted software communicate with your Android phone through ADB, but it does not erase data or recover files by itself.
Do not select “Always allow from this computer” on a public, shared, or unknown computer. After data recovery, phone transfer, or debugging is complete, turn off USB debugging or revoke USB debugging authorizations in Developer Options.

What to Do Before Enabling USB Debugging?
Before you enable USB debugging on Android, make sure your phone is ready to connect to the computer:
- Unlock your Android phone or tablet.
- Use a USB cable that supports data transfer, not charging only.
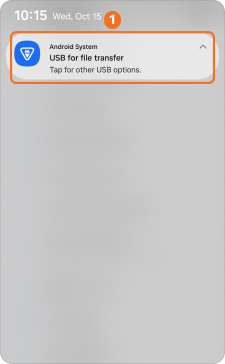
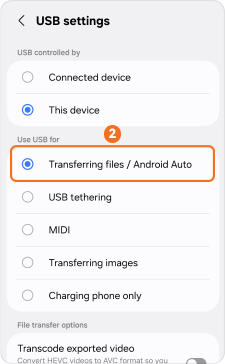
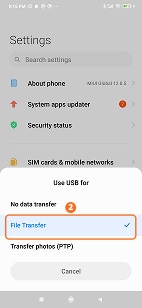
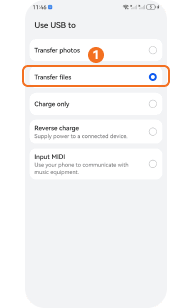
- Choose File Transfer, MTP, or Android Auto after connecting to the computer.
- Make sure you know your screen lock password, PIN, or pattern.
- Keep the phone screen on while connecting to the computer.
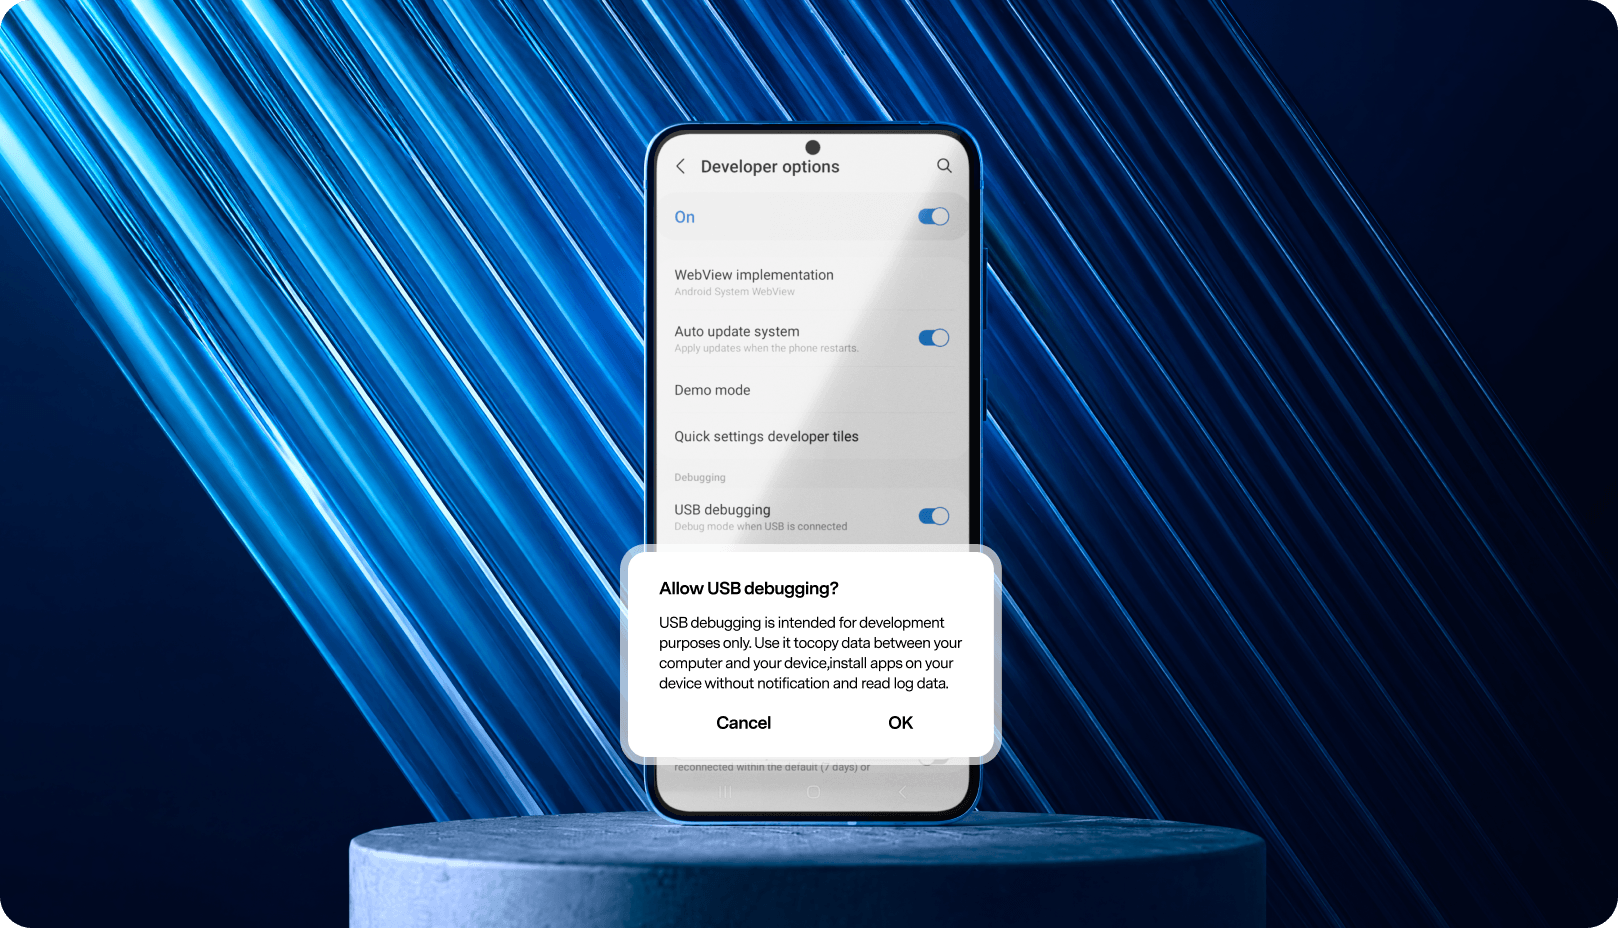
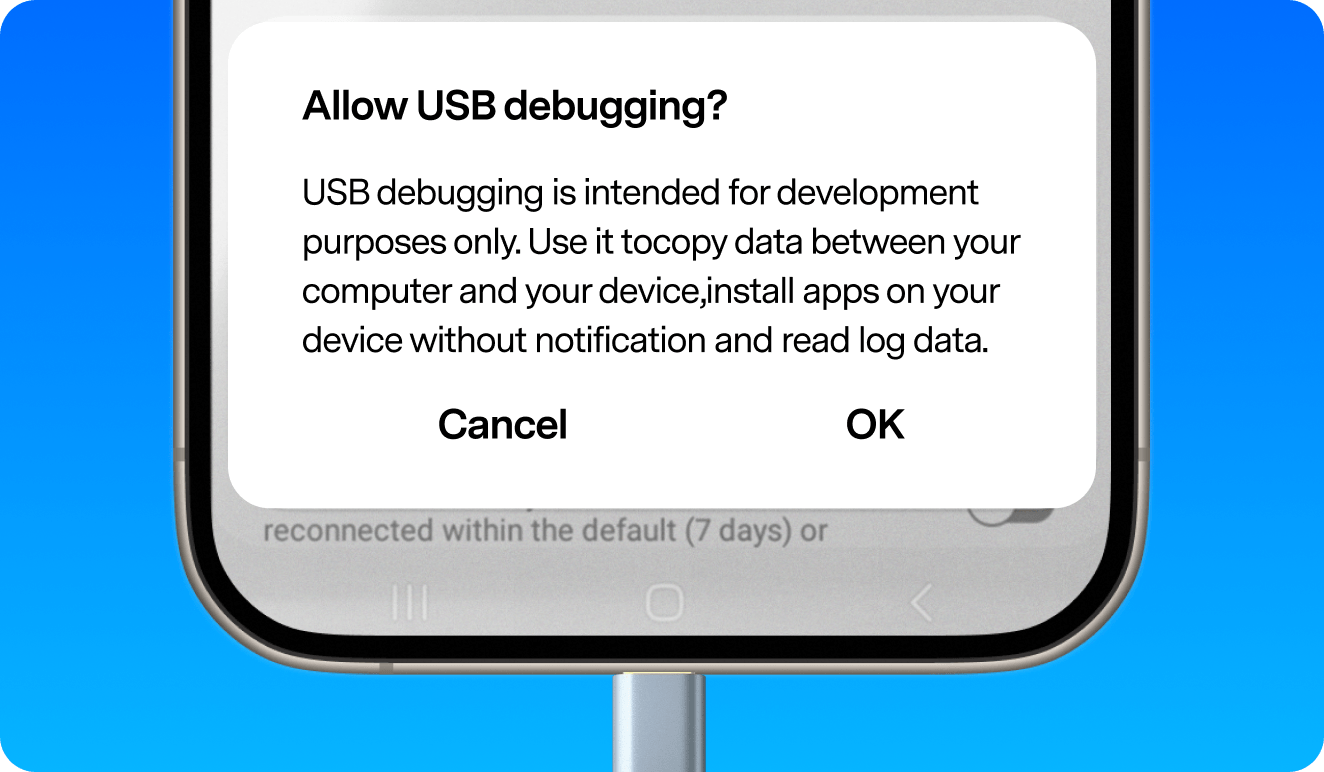
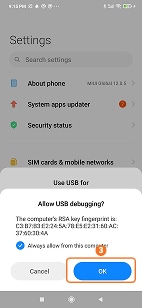
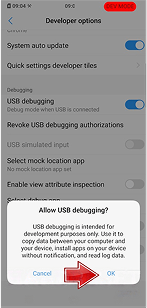
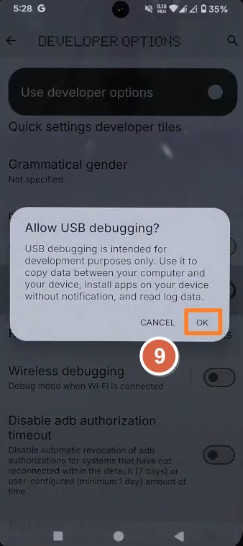
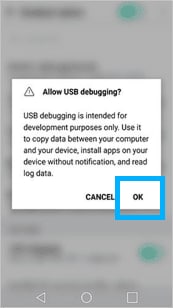
- Watch for the “Allow USB debugging?” popup after USB debugging is turned on.
How to Enable USB Debugging on Any Android
Phone or Tablet: General Method
Use this general method if you are not sure where to start, or if your Android phone or tablet brand is not listed below. Menu names may vary by Android version, manufacturer,
and device type, but the basic process is usually the same: enable Developer options, turn on USB debugging, and allow the computer.
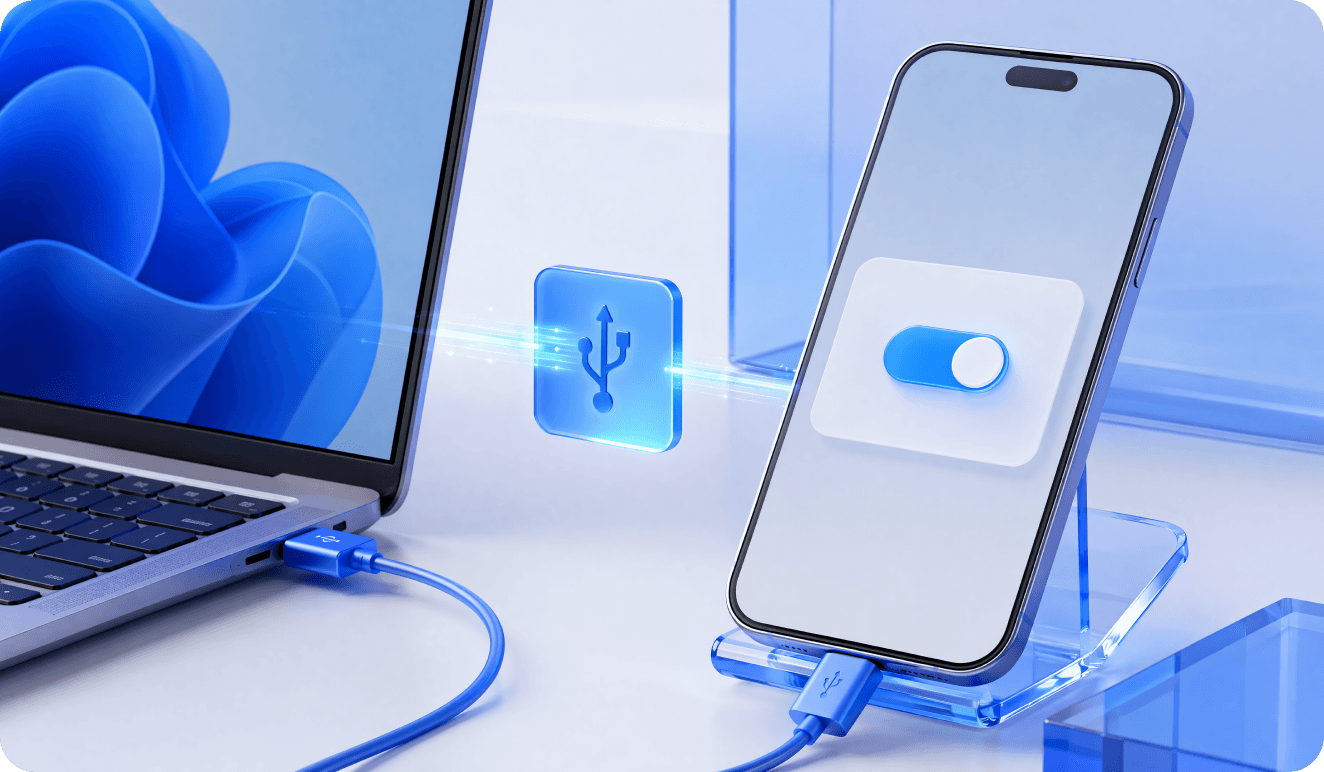
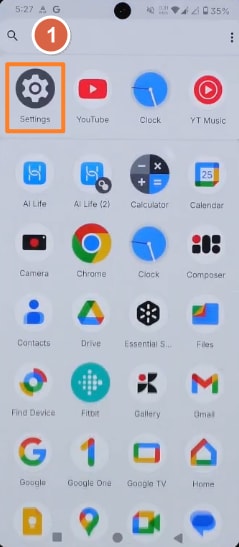
Step 1. Connect Your Android Phone to the Computer
Use a USB cable that supports data transfer. After connecting, unlock your phone and pull down the notification panel.
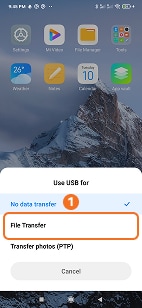
Step 2. Choose File Transfer or MTP Mode
Tap the USB notification and select File Transfer, MTP, or Android Auto. If the phone stays in Charging only mode, your computer may not detect it correctly.
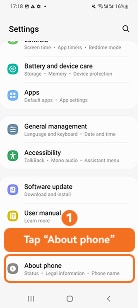
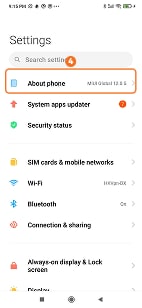
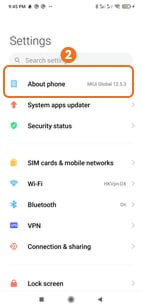
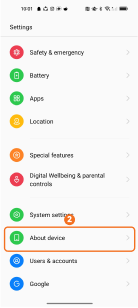
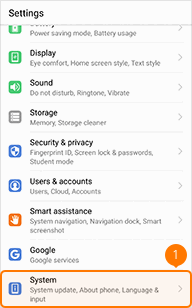
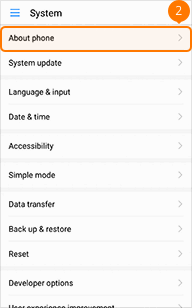
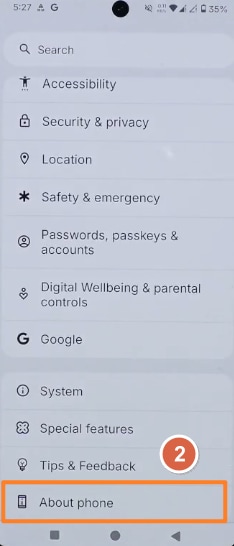
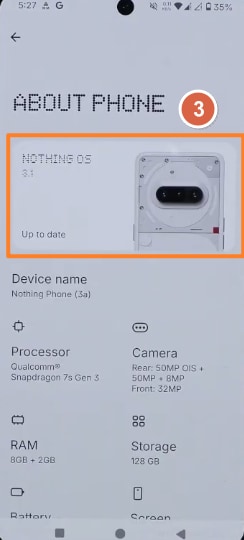
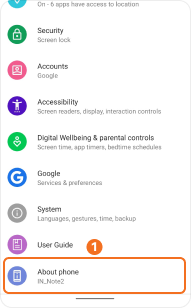
Step 3. Open About Phone
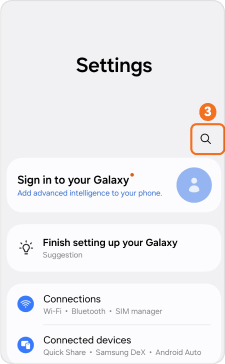
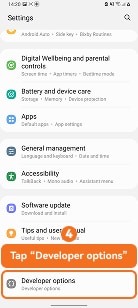
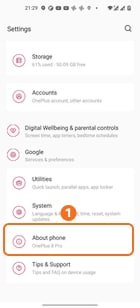
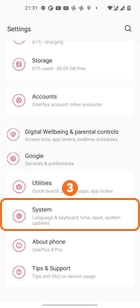
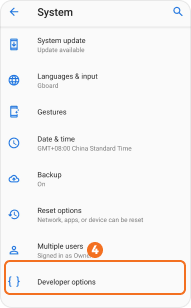
Go to Settings > About phone. On some phones, About phone may appear under System or About device.
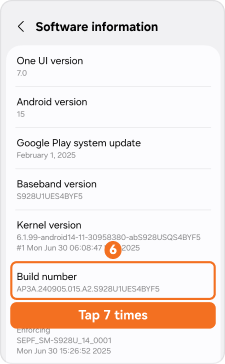
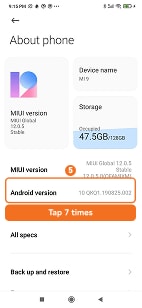
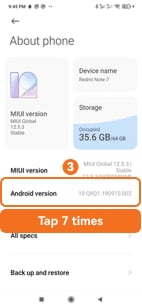
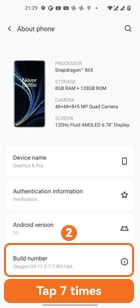
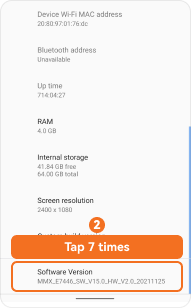
Step 4. Tap Build Number Seven Times
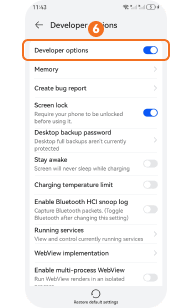
Find Build number, Software version, MIUI version, OS version, or Version info. Tap it seven times until you see a message saying Developer options are enabled.
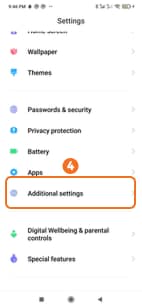
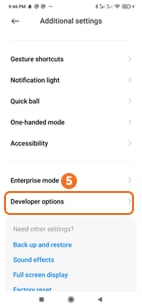
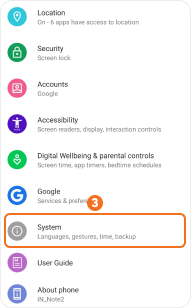
Step 5. Open Developer Options
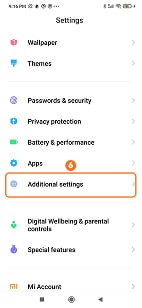
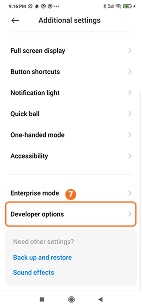
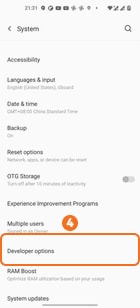
Go back to Settings. Open System, Additional settings, System settings, or More settings, then tap Developer options.
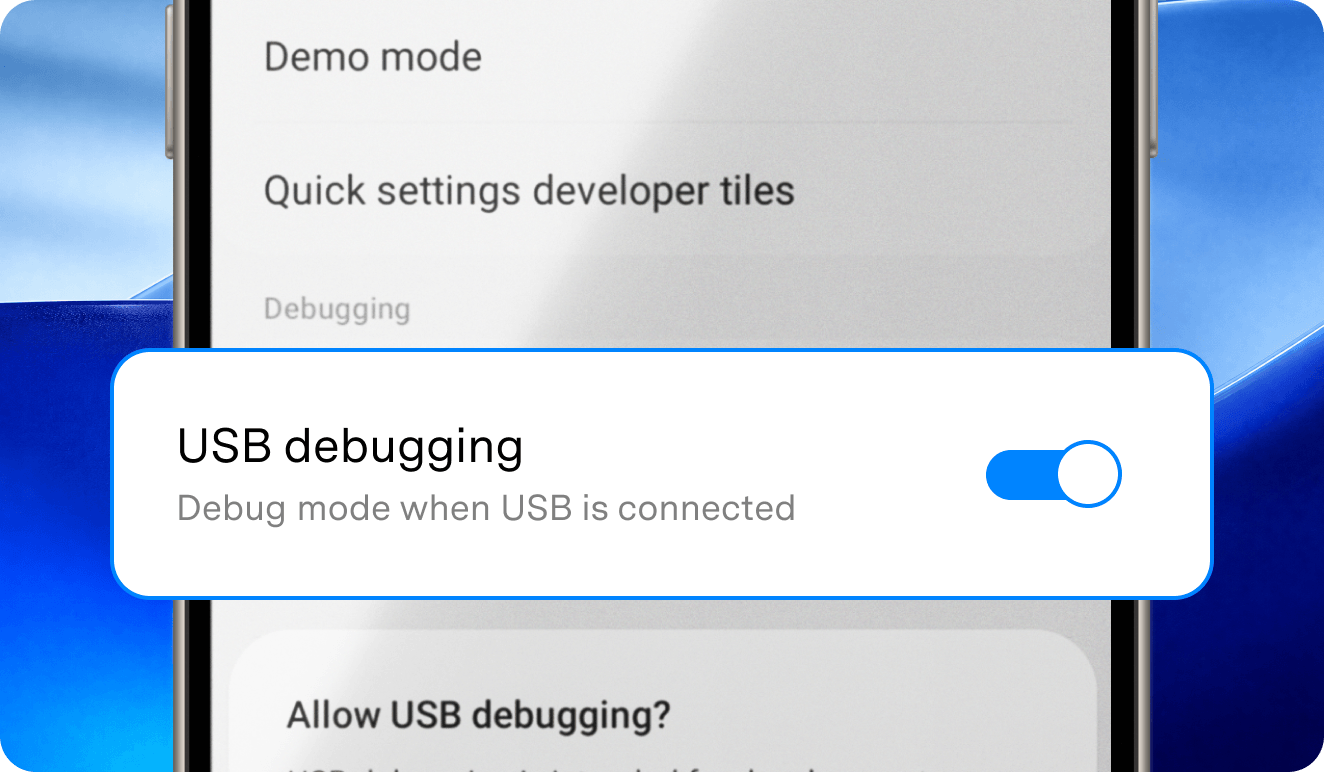
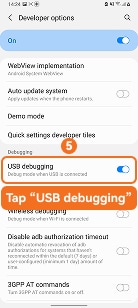
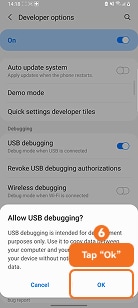
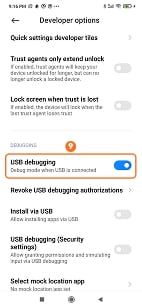
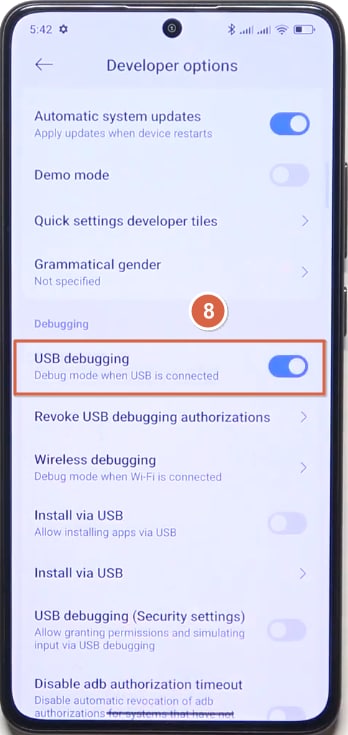
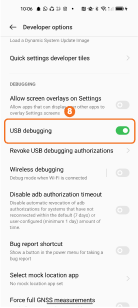
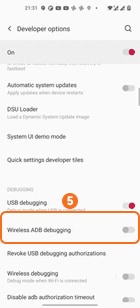
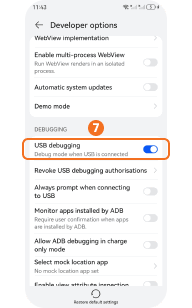
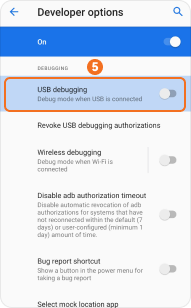
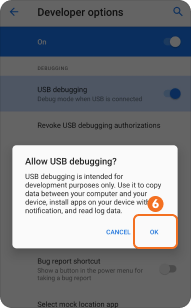
Step 6. Turn On USB Debugging
Turn on USB debugging and tap OK. When the Allow USB debugging popup appears, tap Allow. Only choose Always allow from this computer if it is your own trusted computer


USB Debugging Safety Tips
- Turn off USB debugging after recovery, transfer, or repair is complete
- Do not choose Always allow from this computer on public, shared, or unknown computers.
- Use Revoke USB debugging authorizations if you previously allowed an untrusted computer.
- Keep your phone locked when you are not actively using USB debugging.
Enable USB Debugging on Android by Brand
Need to enable USB debugging on Android? First unlock Developer options by tapping the Build number, OS version, or Software version 7 times, then turn on USB debugging. Because Android USB debugging menus vary by brand, system version, and device type, choose your Samsung, Xiaomi, OPPO, Vivo, Huawei, Google Pixel, or other Android brand below and follow the screenshot-based path.
How to Enable USB Debugging on Samsung Galaxy
Use this Samsung Galaxy USB debugging guide to enable Developer options, turn on USB debugging, and allow Android debugging for ADB, file transfer, or device connection.
Path:
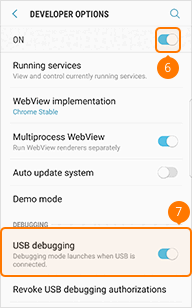
Settings > About phone > Software information > Build number > Developer options > USB debugging
Variation Note:
* On older Galaxy models, About phone may appear as About device.
* On Galaxy tablets, use About tablet instead.
* For more Samsung-specific details, you can also read this guide on how to enable Developer options and USB debugging on Samsung Galaxy.
Steps:
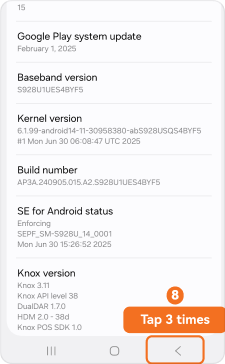
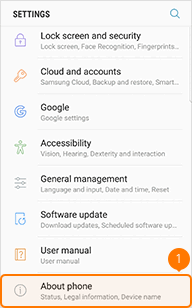
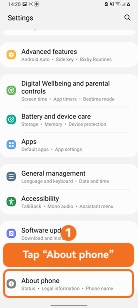
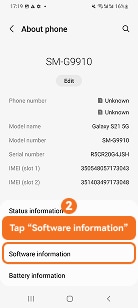
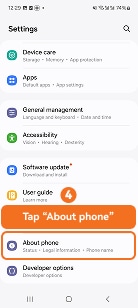
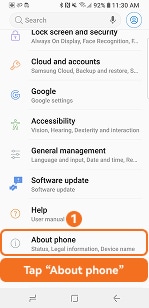
- Open Settings on your Samsung Galaxy device.
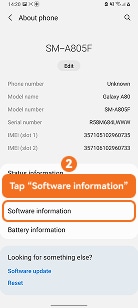
- Tap About phone.
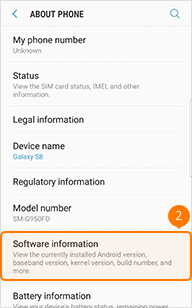
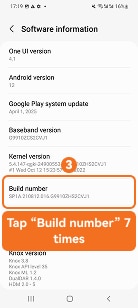
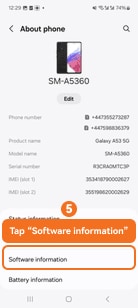
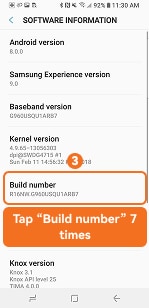
- Tap Software information.
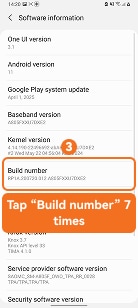
- Tap Build number 7 times to enable Developer options.
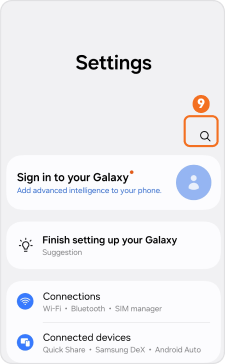
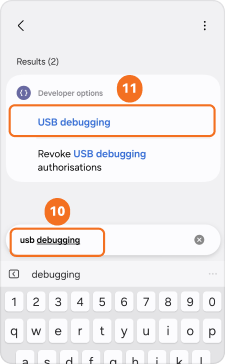
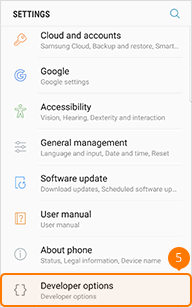
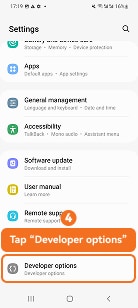
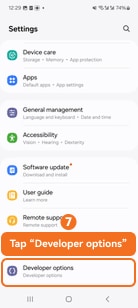
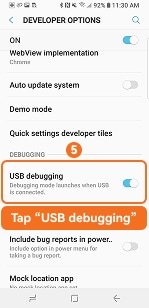
- Go back to Settings and tap Developer options.
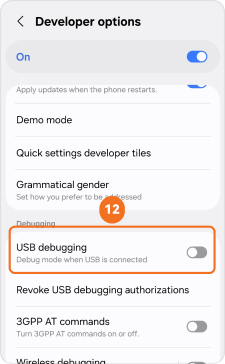
- Turn on Developer options if needed.
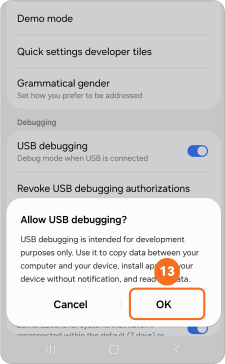
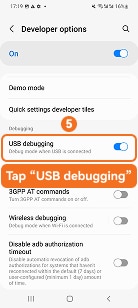
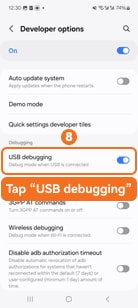
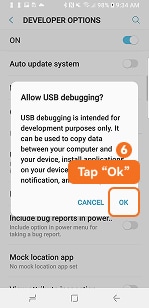
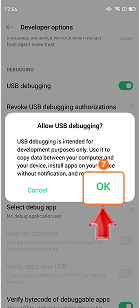
- Turn on USB debugging and tap OK.

How to Enable USB Debugging on Samsung One UI 3 or Earlier
Use this Samsung One UI 3 USB debugging guide for older Galaxy phones, including Galaxy S9/S10-style menus, to enable Developer options and turn on USB debugging.
Path:
Settings > About phone > Software information > Build number > Developer options > USB debugging
Variation Note:
* On some older Samsung phones, About phone may be shown as About device.
* If Developer options is not listed, check Settings > General > Developer options.
Steps:
- Open Settings on your Samsung Galaxy phone.
- Tap About phone.
- Tap Software information.
- Tap Build number 7 times to enable Developer options.
- Go back to Settings and tap Developer options.
- Turn on USB debugging.
- Tap OK when the Allow USB debugging? message appears.
How to Enable USB Debugging on Samsung One UI 4 or 5
Use this Samsung One UI 4 or 5 USB debugging guide to enable Developer options, turn on USB debugging, and allow USB debugging on Galaxy devices.
Path:
Settings > About phone > Software information > Build number > Developer options > USB debugging
Variation Note:
* On One UI 4 and One UI 5, Developer options usually appears near the bottom of Settings.
* If the computer does not detect the phone, unlock it and select File transfer / Android Auto.
Steps:
- Open Settings on your Samsung Galaxy device.
- Tap About phone.
- Tap Software information.
- Tap Build number 7 times to enable Developer options.
- Go back to Settings and tap Developer options.
- Turn on USB debugging.
- Tap Allow when the USB debugging prompt appears.
How to Enable USB Debugging on Samsung One UI 6 or Later
Follow this Samsung One UI 6 USB debugging guide to enable Android USB debugging on newer Galaxy devices and avoid connection blocks such as Auto Blocker.
Path:
Settings > About phone > Software information > Build number > Developer options > USB debugging
Variation Note:
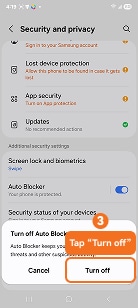
* On One UI 6 or later, turn off Auto Blocker if USB debugging or ADB connection is blocked.
* If the phone is not detected, unlock it and select File transfer / Android Auto.
Steps:
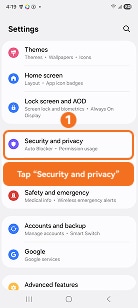
- Open Settings on your Samsung Galaxy device.
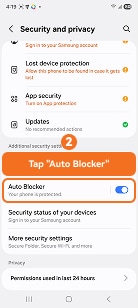
- If Auto Blocker is enabled, go to Security and privacy and turn it off.
- Go back to Settings and tap About phone.
- Tap Software information.
- Tap Build number 7 times to enable Developer options.
- Go back to Settings and tap Developer options.
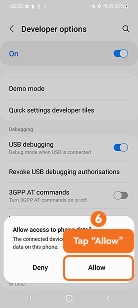
- Turn on USB debugging.
- Tap Allow when the USB access prompt appears.

How to Enable USB Debugging on Other Samsung Galaxy Models
Use this older Samsung Galaxy USB debugging guide for Samsung Experience or early Android versions that still use the classic Developer options layout.
Path:
Settings > About phone > Software information > Build number > Developer options > USB debugging
Variation Note:
* On older Samsung Experience devices, About phone may appear as About device.
* If Developer options is hidden, check Settings > General > Developer options.
If you are using an older Galaxy model, see the dedicated guide to enable USB debugging on Galaxy S7/S8.
Steps:
- Open Settings on your Samsung Galaxy device.
- Tap About phone.
- Tap Software information.
- Tap Build number 7 times to enable Developer options.
- Go back to Settings and tap Developer options.
- Turn on USB debugging.
- Tap OK when the Allow USB debugging? message appears.


How to Enable USB Debugging on Xiaomi HyperOS
Use this Xiaomi HyperOS USB debugging guide to enable Developer options, turn on USB debugging, and allow USB debugging on Xiaomi, Redmi, or POCO devices.
Path:
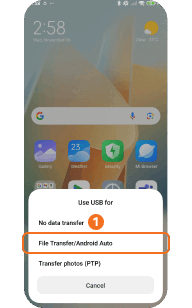
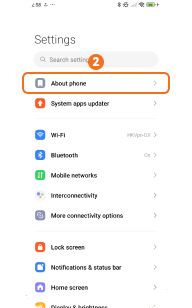
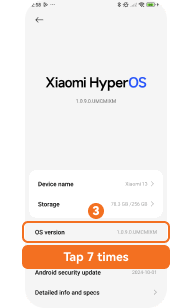
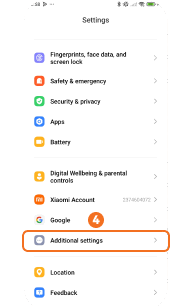
Use USB for > File Transfer / Android Auto > Settings > About phone > OS version > Additional settings > Developer options > USB debugging
Variation Note:
* On HyperOS, tap OS version 7 times. On MIUI, tap MIUI version instead.
* For USB debugging (Security settings) or Install via USB, sign in to your Xiaomi Account first.
* For Xiaomi-specific menu paths, check this guide on how to enable Developer mode and USB debugging on Xiaomi.
Steps:
- Connect your Xiaomi phone to the computer.
- Select File Transfer / Android Auto when the USB menu appears.
- Open Settings and tap About phone.
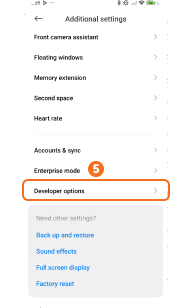
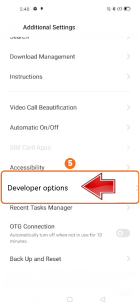
- Tap OS version 7 times to enable Developer options.
- Go back to Settings and tap Additional settings.
- Tap Developer options.
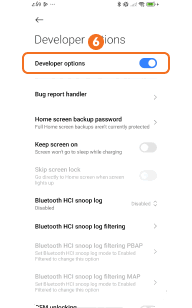
- Turn on Developer options if needed.
- Turn on USB debugging.
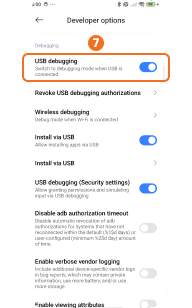
How to Enable USB Debugging on Xiaomi MIUI
Use this MIUI USB debugging guide to enable USB debugging on Xiaomi, Redmi, or POCO phones through Developer options and MIUI version settings.
Path:
Settings > About phone > MIUI version > Additional settings > Developer options > USB debugging
Variation Note:
* On some MIUI versions, open About phone > All specs, then tap MIUI version 7 times.
* For USB debugging (Security settings) or Install via USB, sign in to your Xiaomi Account first.
Steps:
- Tap Settings on your Xiaomi phone.
- Tap About phone.
- Tap MIUI version 7 times to enable Developer options.
- Go back to Settings and tap Additional settings.
- Tap Developer options.
- Turn on the Developer options switch.
- Turn on USB debugging.
- Connect the phone to your computer and select File Transfer.
- Tap OK if the Allow USB debugging? prompt appears.

How to Enable USB Debugging on Redmi Phones
Follow this Redmi USB debugging guide to enable Developer options, turn on USB debugging, and connect your Redmi phone to a computer over USB.
Path:
Use USB for > File Transfer > Settings > About phone > MIUI version > Additional settings > Developer options > USB debugging
Variation Note:
* On some Redmi models, open About phone > All specs, then tap MIUI version 7 times.
* For Install via USB or USB debugging (Security settings), sign in to your Xiaomi Account first.
Steps:
- Connect your Redmi phone to the computer.
- Select File Transfer when the Use USB for menu appears.
- Open Settings on your Redmi phone.
- Tap About phone.
- Tap MIUI version 7 times to enable Developer options.
- Go back to Settings and tap Additional settings.
- Tap Developer options.
- Turn on Developer options.
- Turn on USB debugging.

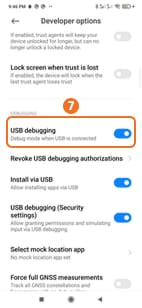
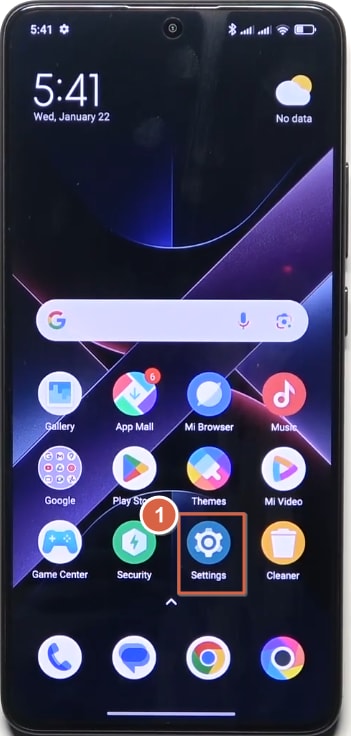
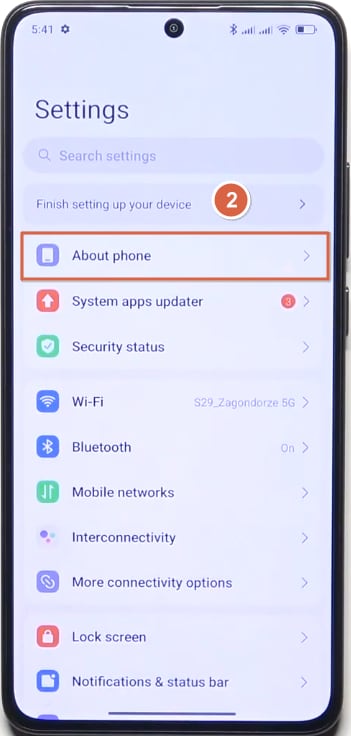
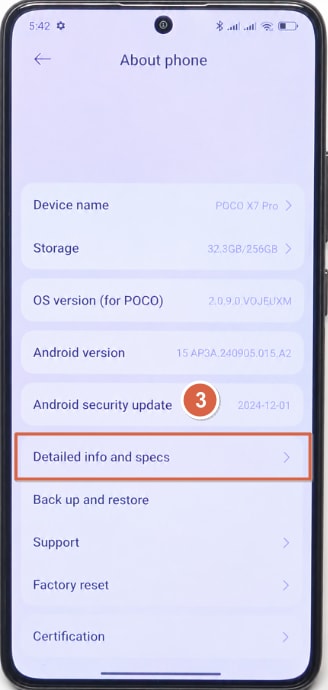
How to Enable USB Debugging on POCO Phones
Follow this POCO USB debugging guide to enable Developer options and USB debugging on HyperOS or MIUI-based POCO phones.
Path:
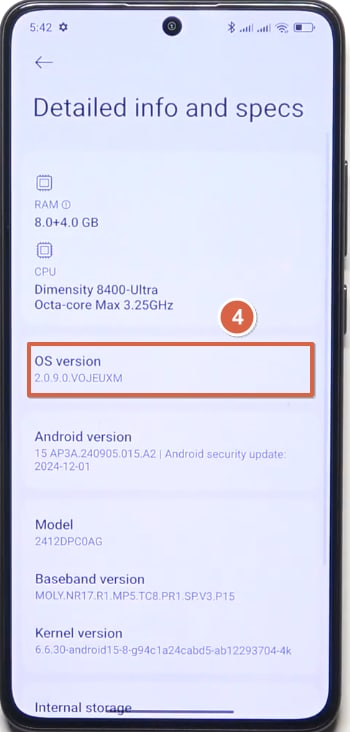
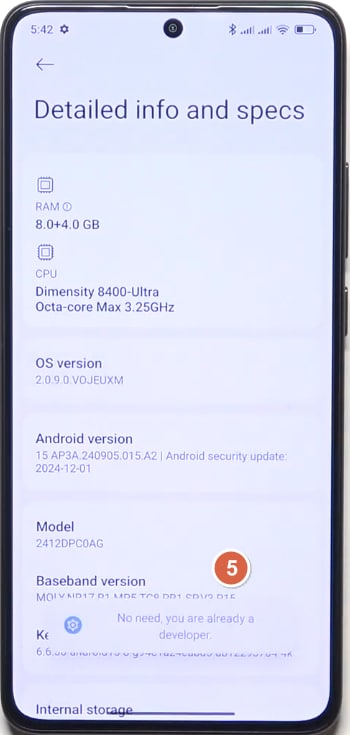
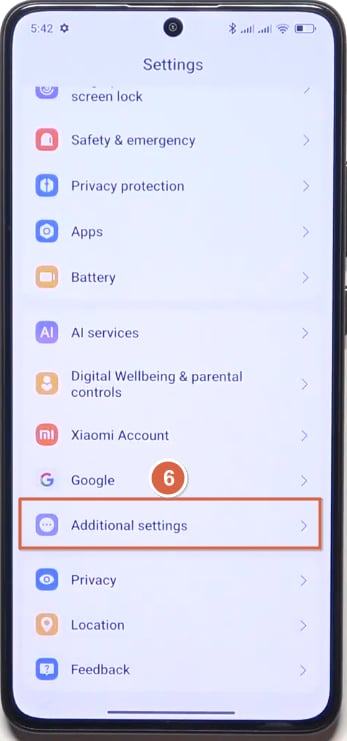
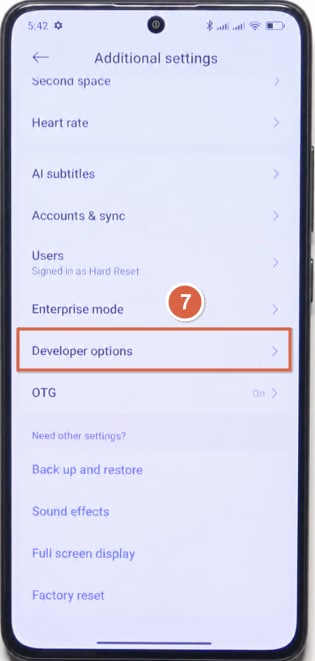
Settings > About phone > Detailed info and specs > OS version > Additional settings > Developer options > USB debugging
Variation Note:
* On older POCO models running MIUI, tap MIUI version 7 times instead of OS version.
* If USB debugging does not work after connection, select File Transfer from the USB menu.
Steps:
- Open Settings on your POCO phone.
- Tap About phone.
- Tap Detailed info and specs.
- Tap OS version 7 times to enable Developer options.
- Go back to Settings and tap Additional settings.
- Tap Developer options.
- Turn on USB debugging.
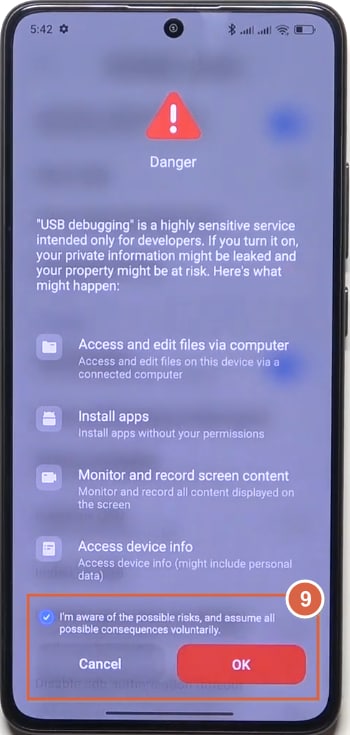
- On the Danger prompt, tick the risk confirmation box and tap OK.
How to Enable USB Debugging on OPPO ColorOS
Use this OPPO ColorOS USB debugging guide to enable Developer options, turn on USB debugging, and allow Android debugging over a USB cable.
Path:
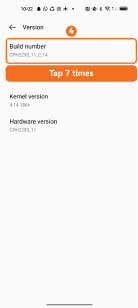
Use USB for > Transfer files / Android Auto > Settings > About device > Version > Build number > System settings > Developer options > USB debugging
Variation Note:
* On some ColorOS versions, About device may appear as About phone.
* On ColorOS 13 or later, Developer options may be under Additional settings or System & update instead of System settings.
Steps:
- Connect your OPPO phone to the computer.
- Select Transfer files / Android Auto when the USB menu appears.
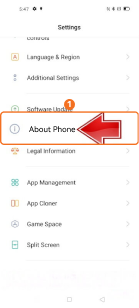
- Open Settings and tap About device.
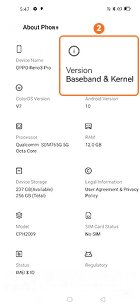
- Tap Version.
- Tap Build number 7 times to enable Developer options.
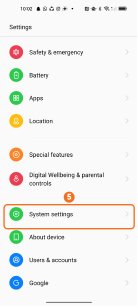
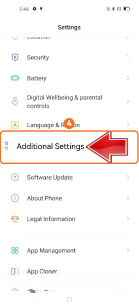
- Go back to Settings and tap System settings.
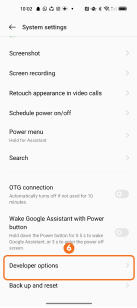
- Tap Developer options.
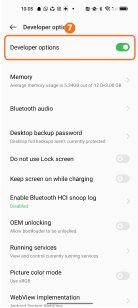
- Turn on Developer options.
- Turn on USB debugging.

How to Enable USB Debugging on Realme Phones
Use this Realme USB debugging guide to enable Developer options, turn on USB debugging, and allow USB debugging for computer connection or Android debugging.
Path:
Settings > About Phone > Version > Build number > Additional Settings > Developer options > USB debugging
Variation Note:
* On some Realme UI or ColorOS versions, Additional Settings may appear as System settings.
* If the phone is not detected after connection, select Transfer files / Android Auto from the USB menu.
Steps:
- Open Settings on your Realme phone.
- Tap About Phone.
- Tap Version.
- Tap Build number 7 times to enable Developer options.
- Go back to Settings and tap Additional Settings.
- Tap Developer options.
- Turn on USB debugging.
- Tap OK when the Allow USB debugging? prompt appears.


How to Enable USB Debugging on OnePlus OxygenOS
Use this OnePlus OxygenOS USB debugging guide to enable Developer options and turn on USB debugging for ADB, Android debugging, or USB cable connection.
Path:
Settings > About phone > Build number > System > Developer options > USB debugging
Variation Note:
* On newer OxygenOS builds, Build number may be under About device > Version.
* Do not turn on Wireless ADB debugging by mistake; use USB debugging for cable connection.
Steps:
- Open Settings on your OnePlus phone.
- Tap About phone.
- Tap Build number 7 times to enable Developer options.
- Go back to Settings and tap System.
- Tap Developer options.
- Turn on Developer options if needed.
- Turn on USB debugging.
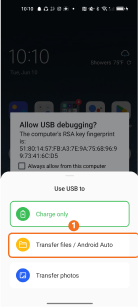
- Tap Allow if the RSA fingerprint prompt appears after connecting to a computer.
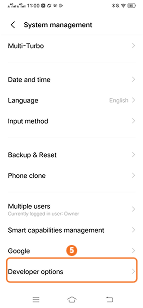
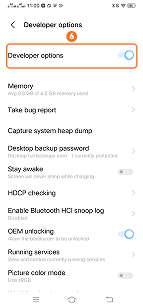
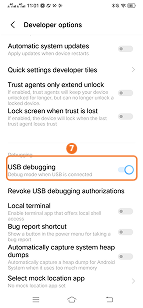
How to Enable USB Debugging on Vivo Phones
Use this Vivo USB debugging guide to enable Developer options, turn on USB debugging, and allow a computer connection on Vivo phones.
Path:
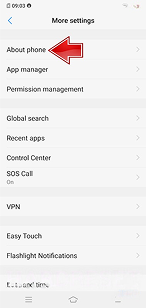
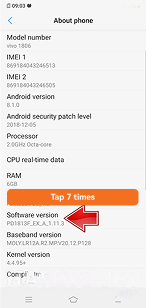
Settings > More settings > About phone > Software version > Developer options > USB debugging
Variation Note:
* On newer Vivo or OriginOS models, More settings may appear as System management or System settings.
* If the computer does not detect the phone, reconnect the USB cable and choose file transfer mode.
Steps:
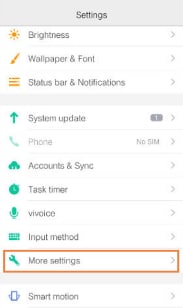
- Open Settings on your Vivo phone.
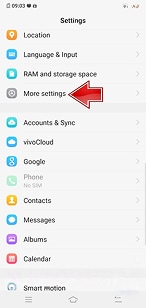
- Tap More settings.
- Tap About phone.
- Tap Software version 7 times to enable Developer options.
- Go back to More settings.
- Tap Developer options.
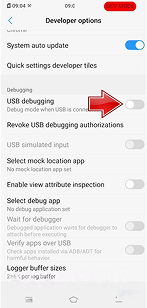
- Turn on USB debugging.
- Tap OK when the Allow USB debugging? prompt appears.

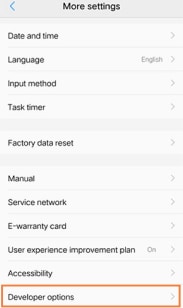
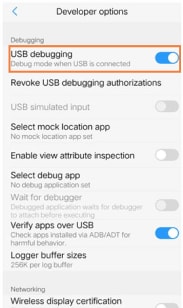
How to Enable USB Debugging on Other Vivo Models
Use this Vivo USB debugging guide for older Vivo models using classic Funtouch OS menus, including the Files USB mode and Software version path.
Path:
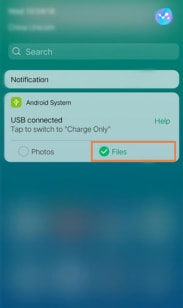
USB connected > Files > Settings > More settings > About phone > Software version > Developer options > USB debugging
Variation Note:
* On newer Vivo models, the official path may use My device > More parameters, and Developer options may appear under System management.
* If the USB prompt shows Charge only, switch it to Files before using USB debugging.
Steps:
- Connect your Vivo phone to the computer.
- Pull down the notification panel and select Files under USB connected.
- Open Settings and tap More settings.
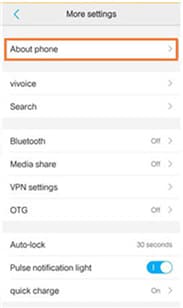
- Tap About phone.
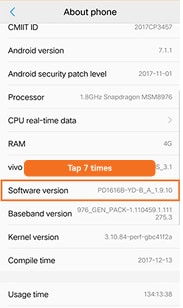
- Tap Software version 7 times to enable Developer options.
- Go back to More settings and tap Developer options.
- Turn on USB debugging.
- Tap OK when the Allow USB debugging? prompt appears.
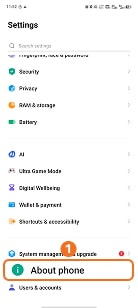
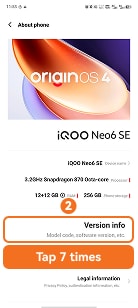
How to Enable USB Debugging on iQOO Phones
Use this iQOO USB debugging guide to enable Developer options and turn on USB debugging on iQOO phones running OriginOS.
Path:
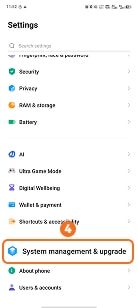
Settings > About phone > Version info > Software version > System management & upgrade > Developer options > USB debugging
Variation Note:
* On some iQOO or Vivo models, System management & upgrade may appear as System management.
* On older Funtouch OS models, go to More settings > About phone, then tap Software version 7 times.
Steps:
- Open Settings on your iQOO phone.
- Tap About phone.
- Tap Version info.
- Tap Software version 7 times to enable Developer options.
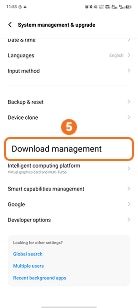
- Go back to Settings and tap System management & upgrade.
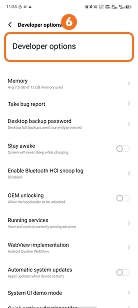
- Tap Developer options.
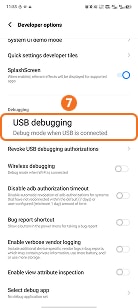
- Turn on Developer options if needed.
- Turn on USB debugging.

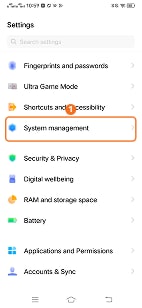
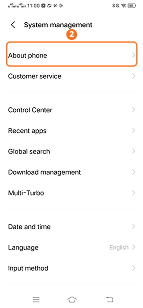
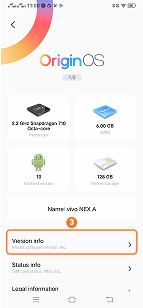
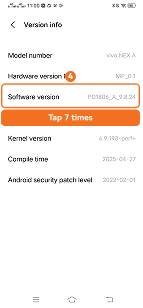
How to Enable USB Debugging on Other iQOO Models
Use this iQOO USB debugging guide for older OriginOS or Funtouch OS layouts where Developer options are under System management.
Path:
Settings > System management > About phone > Version info > Software version > Developer options > USB debugging
Variation Note:
* On newer iQOO models, the path may be Settings > About phone > Version info > Software version.
* If USB debugging does not work after connection, switch the USB mode to file transfer.
Steps:
- Open Settings on your iQOO phone.
- Tap System management.
- Tap About phone.
- Tap Version info.
- Tap Software version 7 times to enable Developer options.
- Go back to System management and tap Developer options.
- Turn on Developer options.
- Turn on USB debugging.
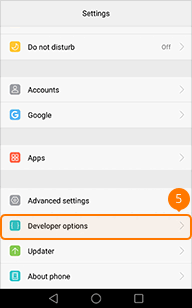
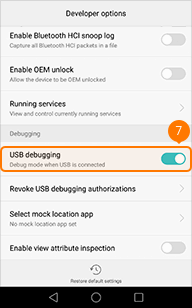
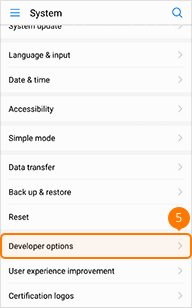
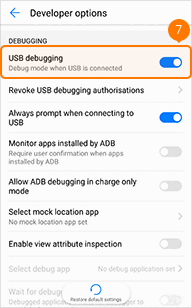
How to Enable USB Debugging on Huawei HarmonyOS
Use this Huawei HarmonyOS USB debugging guide to enable Developer options, turn on USB debugging, and connect your Huawei phone to a computer.
Path:
Use USB to > Transfer files > Settings > About phone > HarmonyOS version > System & updates > Developer options > USB debugging
Variation Note:
* On HarmonyOS 5 or later, Huawei may use Device model > Software version number to enable Developer options.
* If USB debugging cannot be turned on, switch the USB mode to Transfer files or Transfer photos first.
Steps:
- Connect your Huawei phone to the computer.
- Select Transfer files when the Use USB to menu appears.
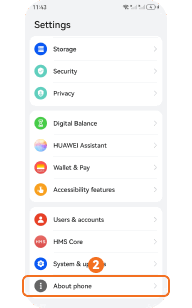
- Open Settings and tap About phone.
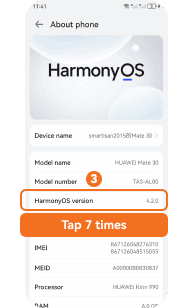
- Tap HarmonyOS version 7 times to enable Developer options.
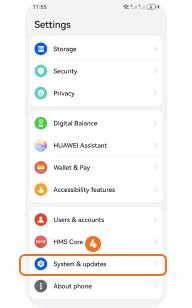
- Go back to Settings and tap System & updates.
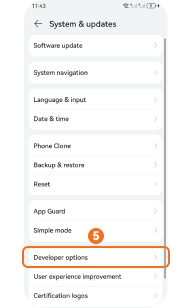
- Tap Developer options.
- Turn on Developer options if needed.
- Turn on USB debugging.
- Tap Allow or OK if the USB debugging authorization prompt appears.
How to Enable USB Debugging on Huawei Mate Series
Use this Huawei Mate USB debugging guide to enable Developer options and turn on USB debugging on Mate series phones running EMUI or HarmonyOS-based settings.
Path:
Settings > System > About phone > Build number > Developer options > USB debugging
Variation Note:
* On newer Huawei Mate models running HarmonyOS, tap HarmonyOS version 7 times instead of Build number.
* If USB debugging does not work after connection, select Transfer files from the USB menu.
Steps:
- Open Settings on your Huawei Mate phone.
- Tap System.
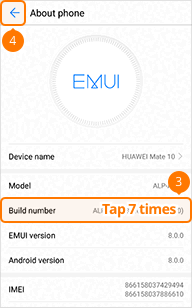
- Tap About phone.
- Tap Build number 7 times to enable Developer options.
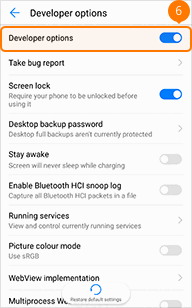
- Go back to System and tap Developer options.
- Turn on Developer options.
- Turn on USB debugging.


How to Enable USB Debugging on Huawei P9
Use this Huawei P9 USB debugging guide to enable Developer options and turn on USB debugging on older EMUI devices.
Path:
Settings > About phone > Build number > Developer options > USB debugging
Variation Note:
* On Huawei P9 and older EMUI versions, Developer options may appear directly in Settings instead of under System or System & updates.
* If USB debugging does not work after connection, switch the USB mode to File transfer.
Steps:
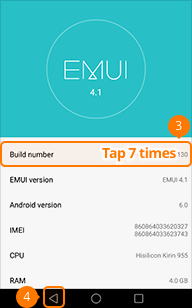
- Open Settings on your Huawei P9.
- Tap About phone.
- Tap Build number 7 times to enable Developer options.
- Go back to Settings.
- Tap Developer options.
- Turn on Developer options.
- Turn on USB debugging.


How to Enable USB Debugging on Honor Phones
Use this Honor USB debugging guide to enable Developer options, turn on USB debugging, and connect Honor phones to a computer over USB.
Path:
Settings > System > About phone > Build number > Developer options > USB debugging
Variation Note:
* On some newer Honor phones, Developer options may appear under System & updates or Additional settings.
* If the computer does not detect the phone, reconnect it and switch the USB mode to File transfer.
Steps:
- Open Settings on your Honor phone.
- Tap System.
- Tap About phone.
- Tap Build number 7 times to enable Developer options.
- Go back to System.
- Tap Developer options.
- Turn on Developer options.
- Turn on USB debugging.


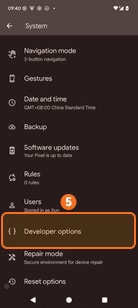
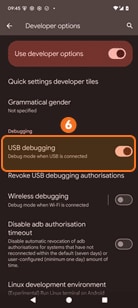
How to Enable USB Debugging on Google Pixel Phones
Use this Google Pixel USB debugging guide to enable Developer options, turn on USB debugging, and allow USB debugging on Pixel phones.
Path:
Settings > About phone > Build number > System > Developer options > USB debugging
Variation Note:
* On older Pixel Android versions, Developer options may appear under System > Advanced.
* Do not enable Wireless debugging by mistake; use USB debugging for cable connection.
Steps:
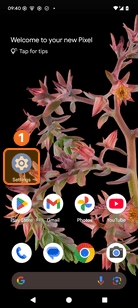
- Open Settings on your Google Pixel.
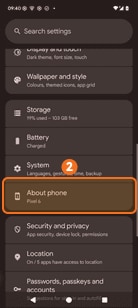
- Tap About phone.
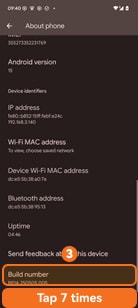
- Scroll down and tap Build number 7 times to enable Developer options.
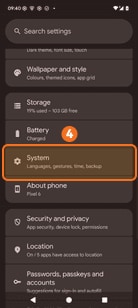
- Go back to Settings and tap System.
- Tap Developer options.
- Turn on Use developer options if needed.
- Turn on USB debugging.
- Tap Allow if the RSA fingerprint prompt appears after connecting to a computer.
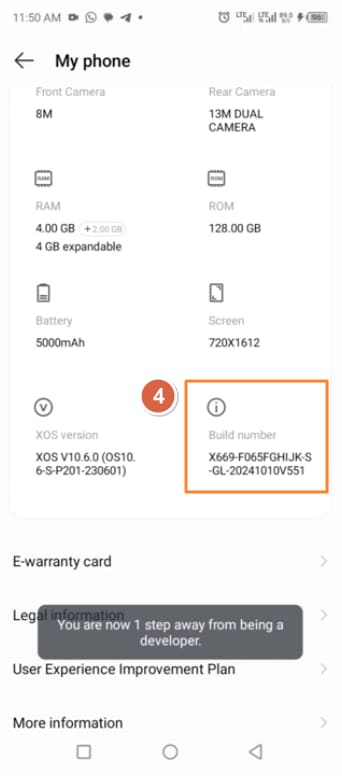
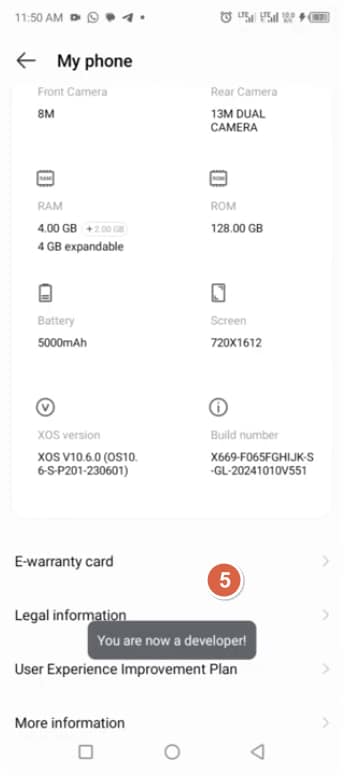
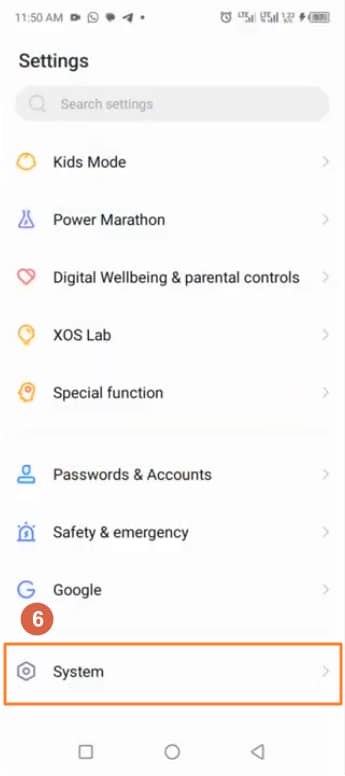
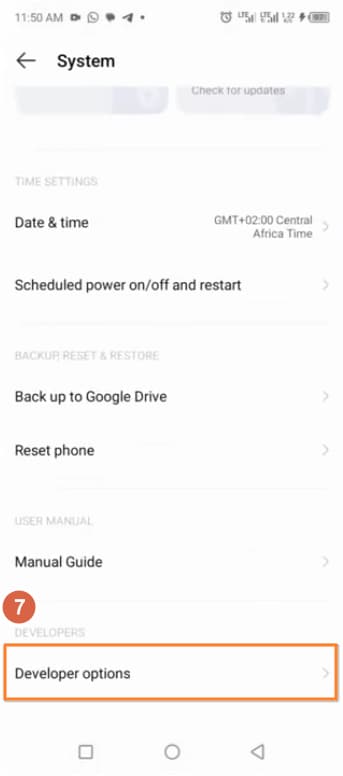
How to Enable USB Debugging on Infinix Phones
Use this Infinix USB debugging guide to enable Developer options and turn on USB debugging on XOS phones through the Build number search path.
Path:
Settings > Search settings > Build number > System > Developer options > USB debugging
Variation Note:
* On some Infinix XOS versions, Build number may appear under My phone or About phone.
* If the phone stays in charging mode, switch the USB mode to file transfer before using USB debugging.
Steps:
- Open Settings on your Infinix phone.
- Tap the Search settings bar.
- Search for Build number.
- Tap Build number 7 times to enable Developer options.
- Go back to Settings and tap System.
- Tap Developer options.
- Turn on Use developer options if needed.
- Turn on USB debugging.

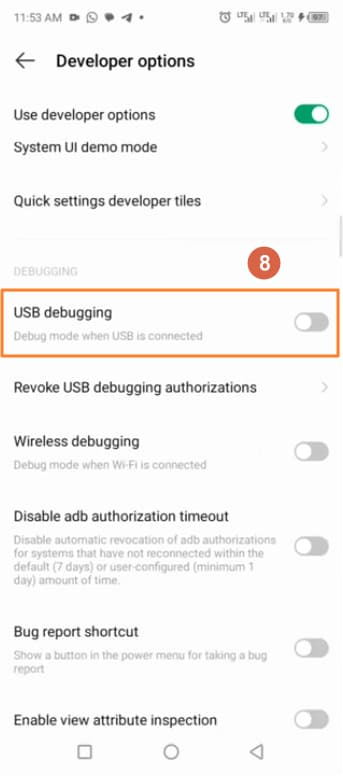
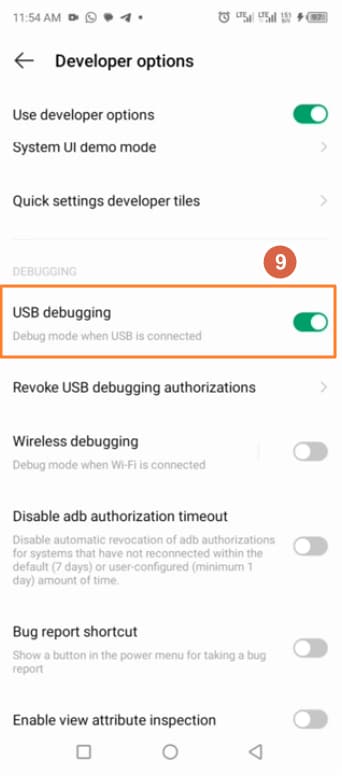
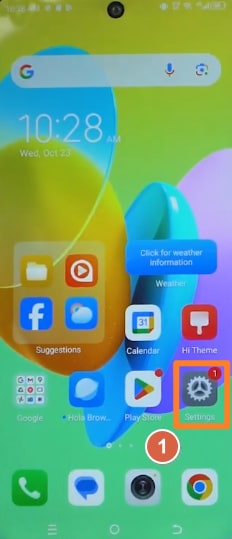
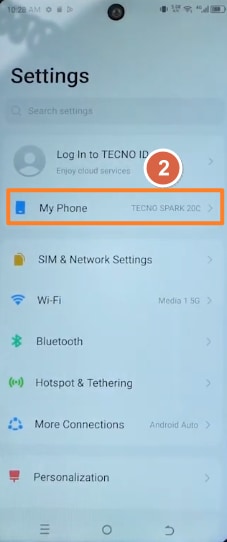
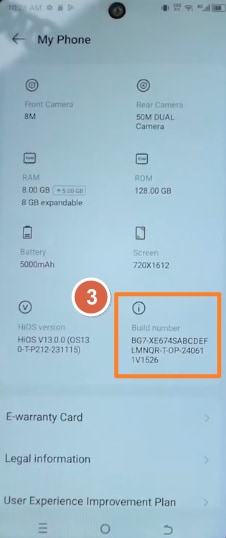
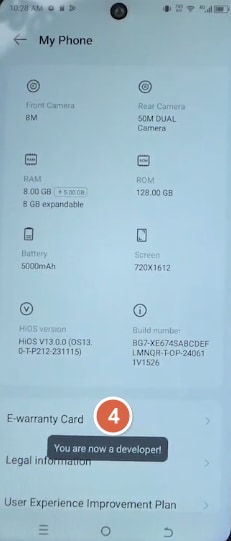
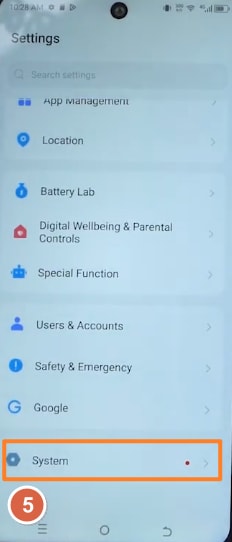
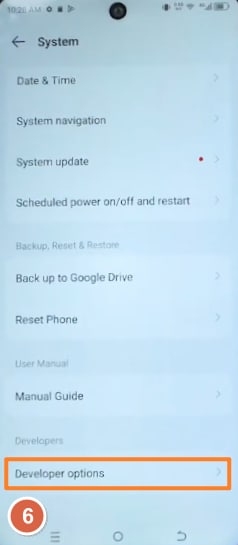
How to Enable USB Debugging on Tecno Phones
Use this Tecno USB debugging guide to enable Developer options and turn on USB debugging on HiOS phones through My Phone and Build number.
Path:
Settings > My Phone > Build number > System > Developer options > USB debugging
Variation Note:
* On some Tecno XOS or HiOS versions, My Phone may appear as About phone.
* If the phone stays in charge-only mode, switch the USB mode to Transfer files.
Steps:
- Open Settings on your Tecno phone.
- Tap My Phone.
- Tap Build number 7 times to enable Developer options.
- Go back to Settings and tap System.
- Tap Developer options.
- Turn on Use developer options if needed.
- Turn on USB debugging.
- Tap OK when the Allow USB debugging? prompt appears.
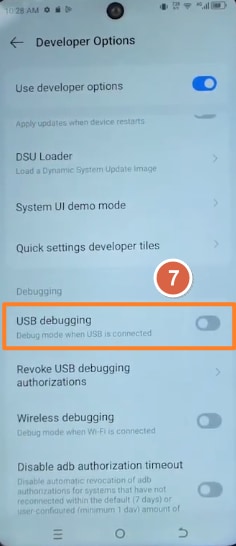

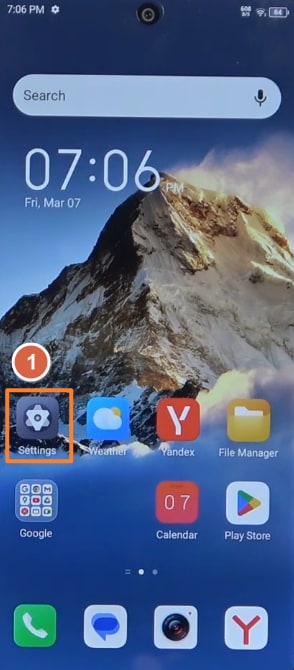
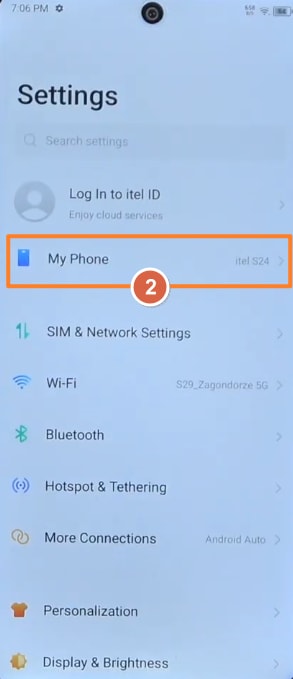
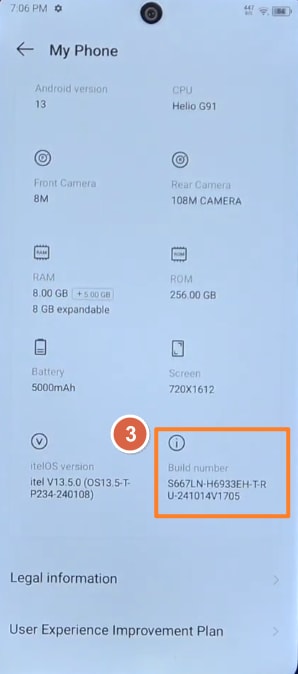
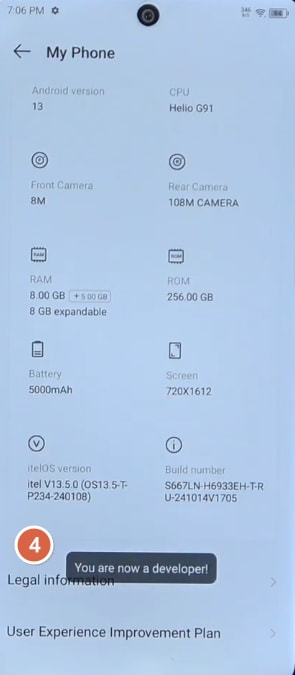
How to Enable USB Debugging on Itel Phones
Use this Itel USB debugging guide to enable Developer options and turn on USB debugging on itelOS phones through My Phone and Build number.
Path:
Settings > My Phone > Build number > System > Developer options > USB debugging
Variation Note:
* On some Itel models, My Phone may appear as About phone.
* If the phone stays in charge-only mode, switch the USB mode to Transfer files.
Steps:
- Open Settings on your Itel phone.
- Tap My Phone.
- Tap Build number 7 times to enable Developer options.
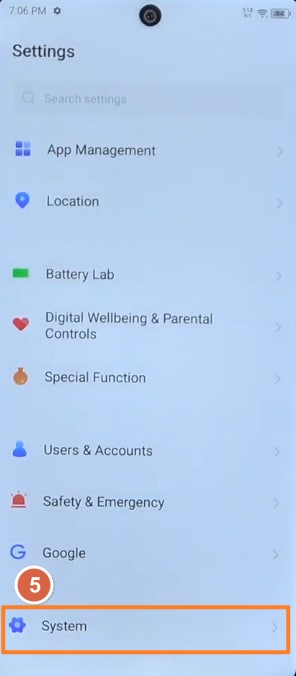
- Go back to Settings and tap System.
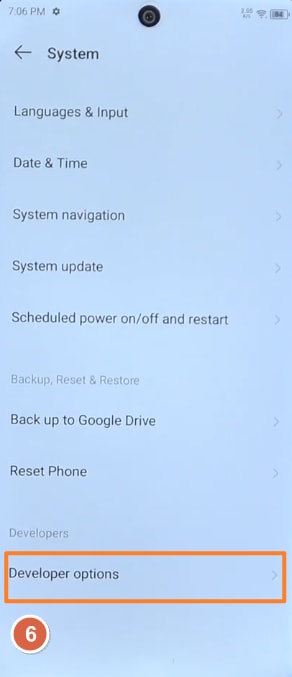
- Tap Developer options.
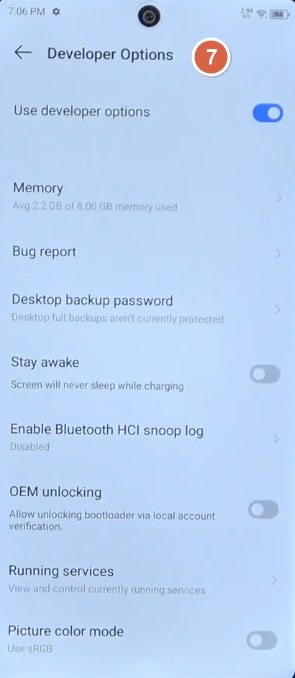
- Turn on Use developer options if needed.
- Turn on USB debugging.
- Tap OK or Allow if the USB debugging prompt appears.
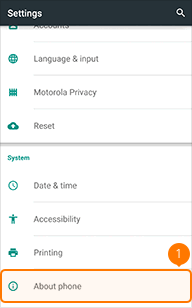
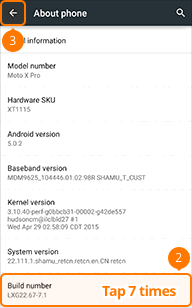
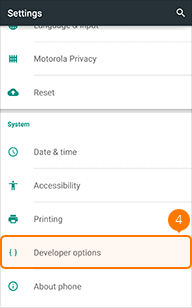
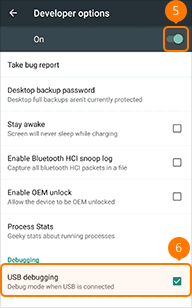
How to Enable USB Debugging on Motorola Phones
Use this Motorola USB debugging guide to enable Developer options and turn on USB debugging on Moto phones.
Path:
Settings > About phone > Build number > Developer options > USB debugging
Variation Note:
* On newer Moto phones, the path may be Settings > System > About phone > Build number.
* If the phone stays in charging mode, switch the USB setting to File transfer or PTP.
Steps:
- Open Settings on your Motorola phone.
- Tap About phone.
- Tap Build number 7 times to enable Developer options.
- Go back to Settings.
- Tap Developer options.
- Turn on Developer options.
- Turn on USB debugging.
How to Enable USB Debugging on Lenovo Phones or Tablets
Use this Lenovo USB debugging guide to enable Developer options and turn on USB debugging on Lenovo phones or tablets.
Path:
Settings > About phone > Device Information > Build number > Developer options > USB debugging
Variation Note:
* On some Lenovo tablets, About phone may appear as About tablet.
* If the computer does not detect the device, reconnect it and switch the USB mode to File transfer.
Steps:
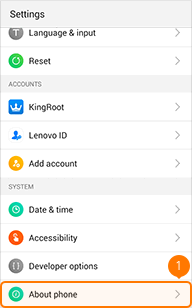
- Open Settings on your Lenovo device.
- Tap About phone.
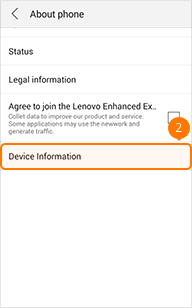
- Tap Device Information.
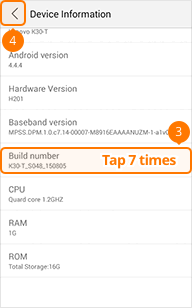
- Tap Build number 7 times to enable Developer options.
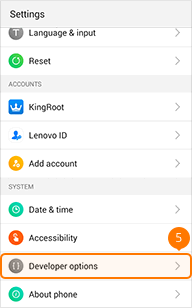
- Go back to Settings and tap Developer options.
- Turn on Developer options.
- Turn on USB debugging.

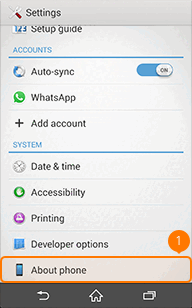
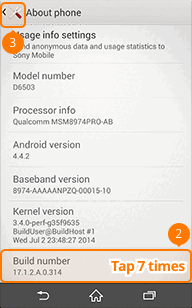
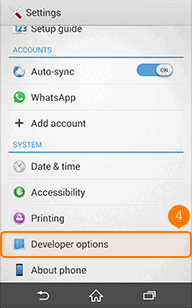
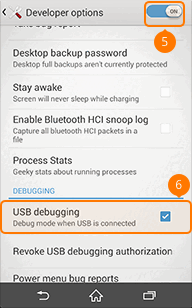
How to Enable USB Debugging on Sony Xperia
Use this Sony Xperia USB debugging guide to enable Developer options and turn on USB debugging on Xperia phones.
Path:
Settings > About phone > Build number > Developer options > USB debugging
Variation Note:
* On newer Xperia phones, Developer options may appear under Settings > System.
* If the phone is not detected after connection, switch the USB mode to File transfer.
Steps:
- Open Settings on your Sony Xperia phone.
- Tap About phone.
- Tap Build number 7 times to enable Developer options.
- Go back to Settings.
- Tap Developer options.
- Turn on Developer options.
- Turn on USB debugging.
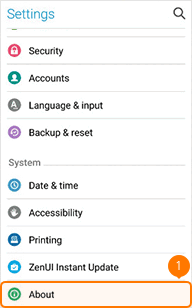
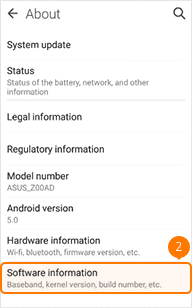
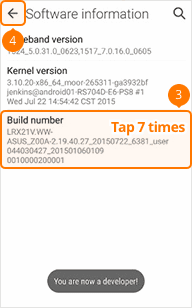
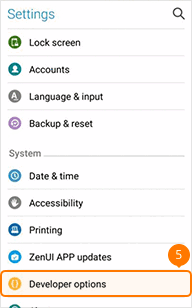
How to Enable USB Debugging on ASUS ZenFone
Use this ASUS ZenFone USB debugging guide to enable Developer options and turn on USB debugging on ZenUI phones.
Path:
Settings > About > Software information > Build number > Developer options > USB debugging
Variation Note:
* On newer ASUS phones, Developer options may appear under Settings > System.
* If the phone is not detected after connection, unlock it and select File Transfer in USB Preferences.
Steps:
- Open Settings on your ASUS ZenFone.
- Tap About.
- Tap Software information.
- Tap Build number 7 times to enable Developer options.
- Go back to Settings.
- Tap Developer options.
- Turn on Developer options.
- Turn on USB debugging.
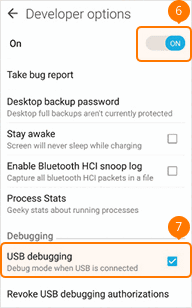
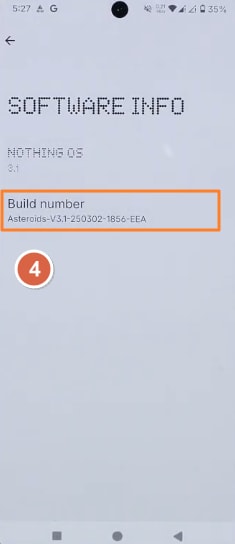
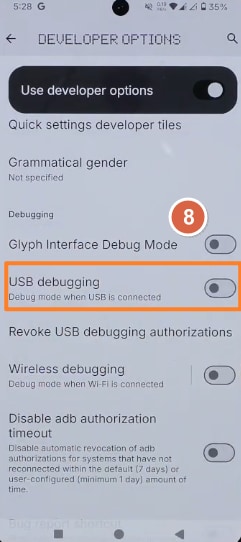
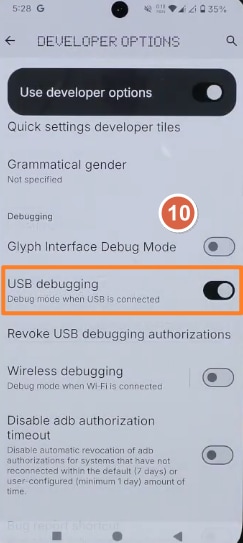
How to Enable USB Debugging on Nothing Phone
Use this Nothing Phone USB debugging guide to enable Developer options and turn on USB debugging on Nothing OS phones.
Path:
Settings > About phone > Nothing OS > Build number > System > Developer options > USB debugging
Variation Note:
* On some Nothing OS versions, Build number may appear under Software info.
* Do not enable Glyph Interface Debug Mode by mistake; use USB debugging for cable connection.
Steps:
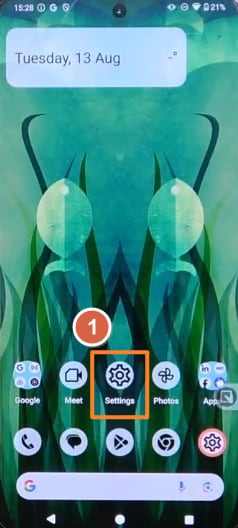
- Open Settings on your Nothing Phone.
- Tap About phone.
- Tap the Nothing OS card at the top.
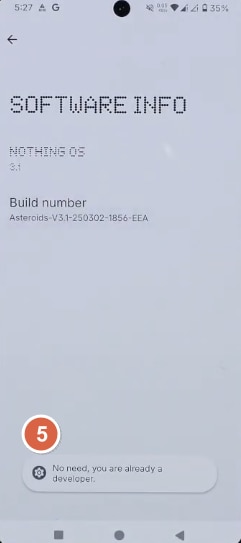
- Tap Build number 7 times to enable Developer options.
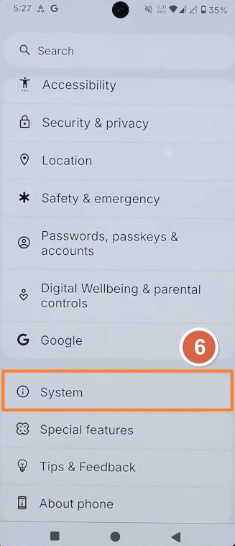
- Go back to Settings and tap System.
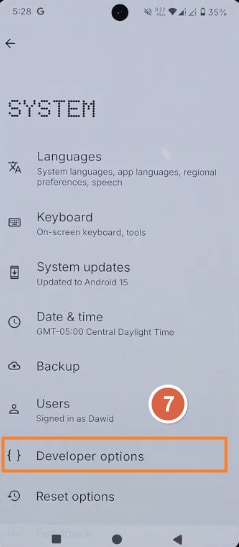
- Tap Developer options.
- Turn on Use developer options if needed.
- Turn on USB debugging.
- Tap OK when the Allow USB debugging? prompt appears.
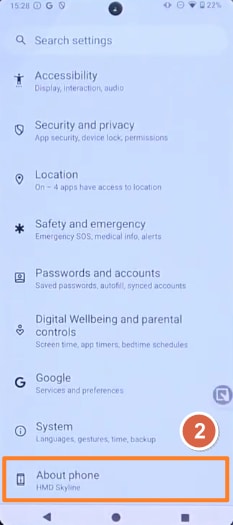
How to Enable USB Debugging on Nokia or HMD Phones
Use this Nokia and HMD USB debugging guide to enable Developer options and turn on USB debugging on stock Android-style phones.
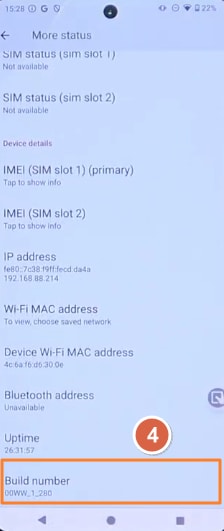
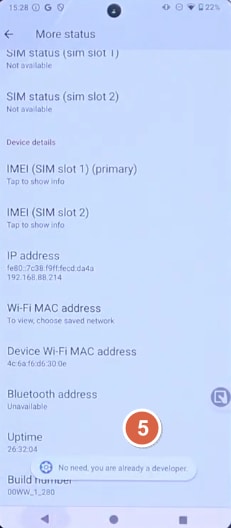
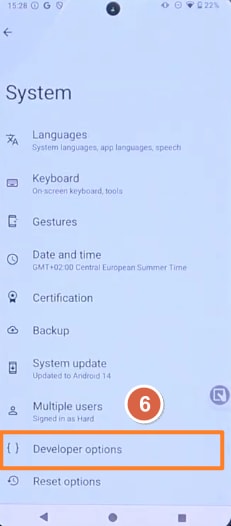
Path:
Settings > About phone > More status > Build number > System > Developer options > USB debugging
Variation Note:
* On some Nokia or HMD models, Build number may appear directly under About phone instead of More status.
* If the computer cannot detect the phone, reconnect it and switch the USB mode to File transfer.
Steps:
- Open Settings on your Nokia or HMD phone.
- Tap About phone.
- Tap More status.
- Tap Build number 7 times to enable Developer options.
- Go back to Settings and tap System.
- Tap Developer options.
- Turn on Use Developer options.
- Scroll down and turn on USB debugging.
- Tap OK or Allow if the USB debugging prompt appears.

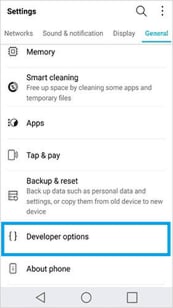
How to Enable USB Debugging on LG Phones
Use this LG USB debugging guide to enable Developer options and turn on USB debugging on LG phones running LG UX or newer Android settings.
Path:
Settings > General > About phone > Software info > Build number > Developer options > USB debugging
Variation Note:
* On newer LG phones, the path may be Settings > System > About phone > Software information > Build number.
* If the phone is not detected after connection, switch the USB mode to File transfer or MTP.
Steps:
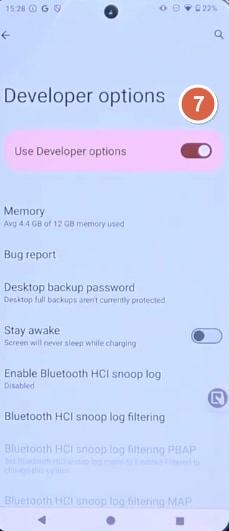
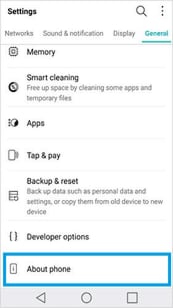
- Open Settings on your LG phone.
- Tap the General tab if it is shown.
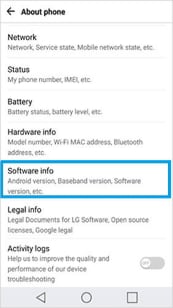
- Tap About phone.
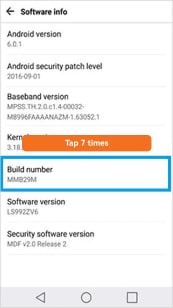
- Tap Software info.
- Tap Build number 7 times to enable Developer options.
- Go back to Settings and open Developer options.
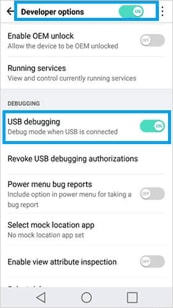
- Turn on Developer options.
- Turn on USB debugging.
- Tap OK when the Allow USB debugging? prompt appears.
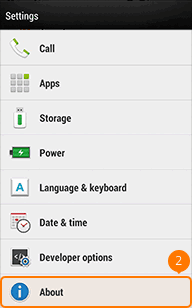
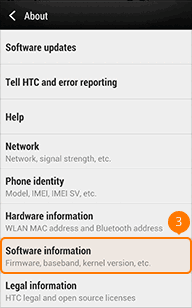
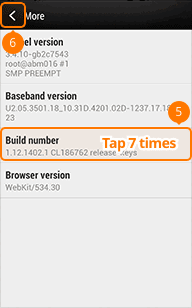
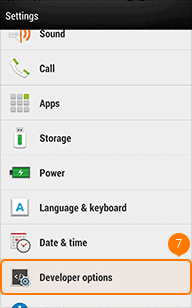
How to Enable USB Debugging on HTC Phones
Use this HTC USB debugging guide to enable Developer options and turn on USB debugging on older HTC phones.
Path:
Settings > About > Software information > More > Build number > Developer options > USB debugging
Variation Note:
* On some HTC models, Build number may appear directly under About or Software information.
* If the computer cannot detect the phone, reconnect it and switch the USB mode to File transfer.
Steps:
- Open Settings on your HTC phone.
- Tap About.
- Tap Software information.
- Tap More.
- Tap Build number 7 times to enable Developer options.
- Go back to Settings.
- Tap Developer options.
- Turn on Developer options.
- Turn on USB debugging.

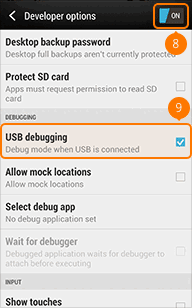
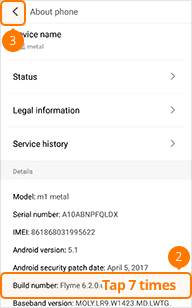
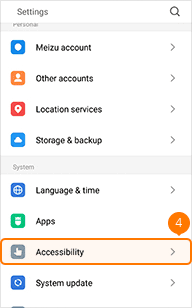
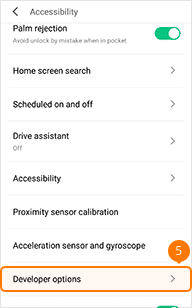
How to Enable USB Debugging on Meizu Phones
Use this Meizu USB debugging guide to enable Developer options and turn on USB debugging on Flyme phones.
Path:
Settings > About phone > Build number > Accessibility > Developer options > USB debugging
Variation Note:
* On some Flyme versions, Developer options may appear directly in Settings instead of under Accessibility.
* If the computer cannot detect the phone, reconnect it and switch the USB mode to File transfer.
Steps:
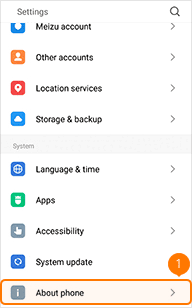
- Open Settings on your Meizu phone.
- Tap About phone.
- Tap Build number 7 times to enable Developer options.
- Go back to Settings and tap Accessibility.
- Tap Developer options.
- Turn on Enable developer options.
- Turn on USB debugging.

How to Enable USB Debugging on Micromax Phones
Use this Micromax USB debugging guide to enable Developer options and turn on USB debugging on Micromax phones.
Path:
Settings > About phone > Software Version > System > Developer options > USB debugging
Variation Note:
* On some Micromax or Android One models, the developer entry may be Build number instead of Software Version.
* If the computer cannot detect the phone, reconnect it and switch the USB mode to File transfer.
Steps:
- Open Settings on your Micromax phone.
- Tap About phone.
- Tap Software Version 7 times to enable Developer options.
- Go back to Settings and tap System.
- Tap Developer options.
- Turn on USB debugging.
- Tap OK when the Allow USB debugging? prompt appears.
Can't Find Your Android Brand?
Use the General Android Method if your brand is not listed. It works for most stock Android, Android One, near-stock Android, and other Android phones or tablets. If your menu names look different, search Settings for Build number, Software version, Developer options, or USB debugging.
USB Debugging Is On, But Android Still Won’t Connect
If USB debugging is already enabled but your Android phone is still not detected, the problem may be caused by USB mode, cable type, authorization, drivers, or brand-specific security settings. Follow the checks below in order.
How to Fix USB Debugging Not Working on Android
USB debugging not showing, Developer Options missing, no “Allow USB debugging” popup, or ADB not detecting your Android phone? Find the exact problem below and follow the step-by-step fix to reconnect your device.
- 1. USB Debugging Not Showing on Android
- 2. Developer Options Missing
- 3. USB Debugging Greyed Out
- 4. Allow USB Debugging Popup Not Appearing
- 5. Android Phone Not Detected by Computer
- 6. USB Debugging Keeps Turning Off
- 7. Enable USB Debugging with Broken Screen
- 8. USB Debugging Not Working on Samsung
- 9. USB Debugging Not Working on Xiaomi, Redmi, or POCO
- 10. USB Debugging Not Working for WhatsApp Recovery
- 11. ADB Device Not Showing Up
FAQ About USB Debugging
 Android Data Recovery
Recover deleted files, WhatsApp, and data from any Android device, even if broken.
 Android Screen Unlock
Instantly remove screen locks and bypass Google FRP on Samsung, Xiaomi, OnePlus, Motorola & more.
 Android System Repair
Easily fix black screens, boot loops, and system crashes to restore your phone to normal.

 Phone to Phone Transfer
Transfer data from Android to Android, iPhone to Android, or Android to iPhone.
 Dr.Fone Support Center
Get help when your Android phone is not detected or USB debugging does not work.
All in One & One for All
Dr.Fone takes over all your phone management problems with a one-stop solution.