Effortlessly Transfer Messages from Mac to iPhone: Top Methods Explained
Oct 24, 2025 • Filed to: Device Data Management • Proven solutions
Dr.Fone Basic:
Better Control for Your Phone
Manage, transfer, back up, restore, and mirror your device
Transferring messages from Mac to iPhone is a task that many Apple users find themselves needing to do for various reasons. Whether you're switching devices, wanting to keep a backup of important conversations, or simply want seamless access to your messages across all your devices, understanding the methods available can save you a lot of time and potential frustration.
Given that there are multiple approaches on how to connect Macbook messages to iPhone we'll explore the most efficient and reliable methods to help ensure your messages make it safely from your Mac to your iPhone.
When it comes to transferring messages from your Mac to your iPhone, there are several reliable methods you can choose from. Each method comes with its own set of benefits, depending on your specific needs and preferences. In this blog, we will explore three primary methods: iCloud Backup Storage, iTunes, and third-party tool Wondershare Dr.Fone. By understanding these options, you can select the method that best suits your situation and ensures your messages are transferred smoothly and efficiently.
Method 1: Transfer Mac Messages To iPhone Using iCloud Backup Storage
iCloud is Apple's cloud storage service that allows users to store data such as photos, documents, and messages securely. By syncing your messages with iCloud, you can easily transfer messages from Mac to your iPhone.
Step 1: Enable Messages in iCloud on Mac
Open the Messages app on your Mac. Click on Messages in the menu bar and select Preferences.
Navigate to the iMessage tab and check the box for Enable Messages in iCloud. Ensure that your Mac is signed in with the same Apple ID that you use on your iPhone.

Step 2: Enable Messages in iCloud on iPhone
On your iPhone, open Settings. Tap on your Apple ID at the top of the screen.
Go to iCloud and toggle the Messages switch to on.
Step 3: Sync Messages
Ensure that both your Mac and iPhone are connected to Wi-Fi. Your messages will begin syncing to iCloud. This process might take a while depending on the size of your message archive.
By following these steps, your messages will be available on both your Mac and iPhone, ensuring that you can access them from either device seamlessly.
Method 2: Transfer Mac Messages To iPhone Using iTunes
iTunes is another reliable method for transferring your messages and other data between Apple devices. By creating an encrypted backup on your Mac, you can restore this backup to your iPhone, ensuring all messages are retained.
Step 1: Backup Messages on Mac
Connect your iPhone to your Mac using a USB cable. Open iTunes and select your iPhone when it appears in the iTunes window.

Under Backups, select This Computer. Check the box for Encrypt iPhone backup to ensure all messages are backed up along with other data. Click Back Up Now.
Step 2: Restore Messages to iPhone
Once the backup is complete, disconnect the iPhone and set it up as new or reset it to factory settings if it’s already in use. Connect the iPhone to the Mac again and open iTunes.

Select Restore Backup and choose the most recent backup you created. Click Restore and the process will begin. Make sure not to disconnect the iPhone until the restoration is complete.
Step 3: Complete Restoration
After the process is complete, your iPhone will restart, and your messages along with other backed-up data will now be available on your iPhone.
Using iTunes ensures that all your messages are safely and completely transferred to your iPhone.
Method 3: Most Effective Tool to Get Messages from Mac to iPhone
Wondershare Dr.Fone is a powerful and versatile tool designed for managing a variety of data on iOS devices. Among its many features is the Phone Manager, which allows users to transfer messages from a Mac to an iPhone effortlessly. Below, we detail how to utilize Dr.Fone for this purpose.
Wondershare Dr.Fone's Phone Manager feature simplifies the process of transferring messages from your Mac to your iPhone. It provides a user-friendly interface and comprehensive step-by-step guidance, making it accessible even for those who are not particularly tech-savvy. Simply connect your iOS device to your computer via a wireless or wired connection, depending on your preference. Once connected, all data is displayed and accessible through the options on the left panel. You can then manage specific iOS data and perform a variety of functions with ease.

Dr.Fone - Phone Manager (iOS)
Most Effective Tool to Get Messages from Mac to iPhone
- Transfer, manage, export/import your music, photos, videos, contacts, SMS, Apps, etc.
- Back up your music, photos, videos, contacts, SMS, Apps, etc., to the computer and restore them easily.
- Transfer music, photos, videos, contacts, messages, etc., from one smartphone to another.
- Transfer media files between iOS devices and iTunes.
- Fully compatible with the newest iOS system.
Steps to Open the Complete Messages Panel on Dr.Fone
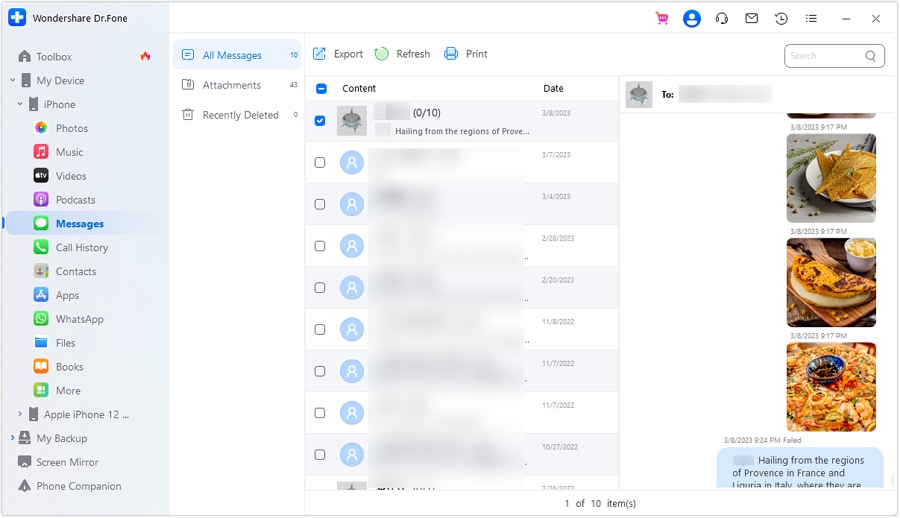
Step 1: Download and install Dr.Fone on Your PC
To manage your iOS device messages, navigate to the left panel and select My Device > iDevice > Messages. Here, you'll find various types of messages. To access your iPhone's full inbox, go to the All Messages section. You can export entire chats, including attachments, by clicking the Export button and choosing PDF, Excel, or CSV formats. Additionally, you can print chats and refresh messages as needed.

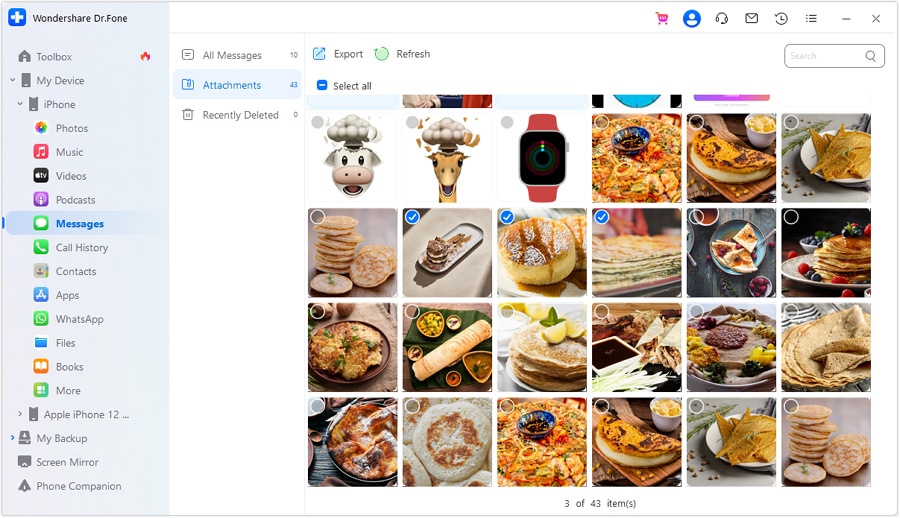
Step 2: Export Specific Message Attachments
To access specific attachments within the Messages on your iOS device, navigate to the Attachments section. You can choose to export all attachments or select specific ones using the Export option. Utilize the search bar in the top-right corner to find particular attachments efficiently.

Using Wondershare Dr.Fone for message transfer is straightforward and efficient. It not only ensures a hassle-free process but also provides additional tools for data management which can be incredibly useful.
Conclusion
In conclusion, transferring messages from your Mac to your iPhone can be easily accomplished using various methods like iCloud Backup, iTunes, and third-party tools. Each method has its advantages, whether you prefer the convenience of wireless syncing with iCloud or the direct and secure transfer options offered by iTunes. However, for those seeking a seamless and straightforward solution, Wondershare Dr.Fone stands out as a highly recommended choice.
Wondershare Dr.Fone offers a user-friendly interface and a variety of features that make the process of transferring messages not only efficient but also reliable. By using Wondershare Dr.Fone Phone Manager, you can ensure your messages and other important data are transferred safely without any hassle. We encourage you to try out the Dr.Fone method and experience the ease and added functionality it provides. Whether you're a tech enthusiast or someone looking for simplicity, Dr.Fone's comprehensive toolset will ensure your data transfer needs are met with the utmost efficiency.
FAQs
Dr.Fone Basic:
Better Control for Your Phone
Manage, transfer, back up, restore, and mirror your device
iPhone Data & Files
- iPhone File Managers
- 1. iPhone File Browsers
- 2. iPhone File Explorers
- 3. iPhone File Managers
- 4. Apps to Transfer File Wirelessly
- Transfer iPhone Files
- 1. Send Large Files For Free
- 2. Transfer File from iPhone to Laptop
- 3. Transfer Files from iPhone to Mac
- 4. Transfer Files from iPhone to PC
- 5. Transfer Files from Mac to iPhone
- 6. Transfer Files from PC to iPhone
- 7. Print Text Messages from iPhone
- 8. Transfer Files Over WiFi
- 9. iPhone File Transfer Without iTunes
- 10. Access iPhone Files Using a PC
- 11. Export Notes from iPhone to PC/Mac
- 12. Save iPhone Text Messages to Computer
- iPhone Manage Tools
- 1. iPhone Transfer Tools
- 2. Manage Apps On iPhone
- 3. Security Apps for iPhone
- 4. Call Forwarding Apps
- 5. iPhone Tracking Apps
- Manage iPhone Apps
- 1. Change Viber Number
- 2. iPhone Calls Apps
- 3. Block People in Facebook
- 4. Monitor Snapchat on iPhone
- 5. Snapchat Saver Apps
- Sync iPhone Data
- 1. Sync Notes from iPhone to Mac
- 2. Ford Sync iPhone
- 3. Sync iCal with iPhone
- 4. iPhone Calendar Not Syncing
- 5. Sync iTunes Library to iPhone
- 6. Unsync iPhone from Computer
- 7. Sync iPhone with Multiple Computers
- More iPhone File Tips
- ● Manage/transfer/recover data
- ● Unlock screen/activate/FRP lock
- ● Fix most iOS and Android issues
- Manage Now Manage Now Manage Now


James Davis
staff Editor