How to Transfer Music from iPad Air to the Computer

May 18, 2026 • Filed to: Device Data Management • Proven solutions
 TL;DR:
You can transfer music from an iPad Air to a computer using Dr.Fone - Phone Manager (iOS) for both purchased and non-purchased tracks, or use iTunes strictly for iTunes Store purchases.
● Dr.Fone - Phone Manager (iOS) allows exporting individual songs or entire playlists directly to a local hard drive or iTunes Library, supporting devices running iOS 7 through iOS 13 on both Windows and Mac.
● iTunes natively transfers store-bought files via the Transfer Purchases menu, but requires you to authorize the computer first and enforces a strict limit of 5 authorized computers per Apple ID.
Ask AI for a summary
 ChatGPT
 Perplexity
 Gemini
 Claude
 Grok
Grok
Dr.Fone Basic:
Better Control for Your Phone
Manage, transfer, back up, restore, and mirror your device
Imported a lot of music in your iPad Air, and running out of the storage space? Maybe you want to transfer them to the computer before deletion, so that you can install more apps, watch more videos on your iPad Air, or import other new songs into your iPad. It's effortless to transfer purchased (in iTunes Store) music from iPad Air to the computer. However, when it comes to the music grabbed from other music stores or ripped from CDs, things become difficult to be handled. Don't worry. This article offers 2 methods to help you transferring music from your iPad Air to the computer including purchased and non-purchased items.
Method 1. How to Copy All Music from iPad Air to Computer
As we all knew, music ripped from CDs or downloaded from other music stores (iTunes excluded) can't be copied to iTunes Library with the Transfer Purchases function of iTunes. Therefore, we highly recommend a great iPad transfer program for you: Dr.Fone - Phone Manager (iOS). Both the Windows and Mac versions are helpful for the users to transfer music from iPad Air to computer. It enables you to transfer the purchased and non-purchased music files from iPad to computer in the blink of an eye. It is also fully compatible with iOS 13.
Dr.Fone - Phone Manager (iOS)
Transfer MP3 to iPhone/iPad/iPod without iTunes
- Transfer, manage, export/import your music, photos, videos, contacts, SMS, Apps, etc.
- Backup your music, photos, videos, contacts, SMS, Apps, etc. to computer and restore them easily.
- Transfer music, photos, videos, contacts, messages, etc from one smartphone to another.
- Transfer media files between iOS devices and iTunes.
- Fully compatible with iOS 7 to iOS 13 and iPod.


In the following part of this article, I'll show you the tutorial to help you transfer music from iPad Air to a computer with the Windows version of Dr.Fone - Phone Manager (iOS). Mac users can take the tutorial as well as the process is almost the same.
How to Transfer Music from iPad Air to Computer with Dr.Fone
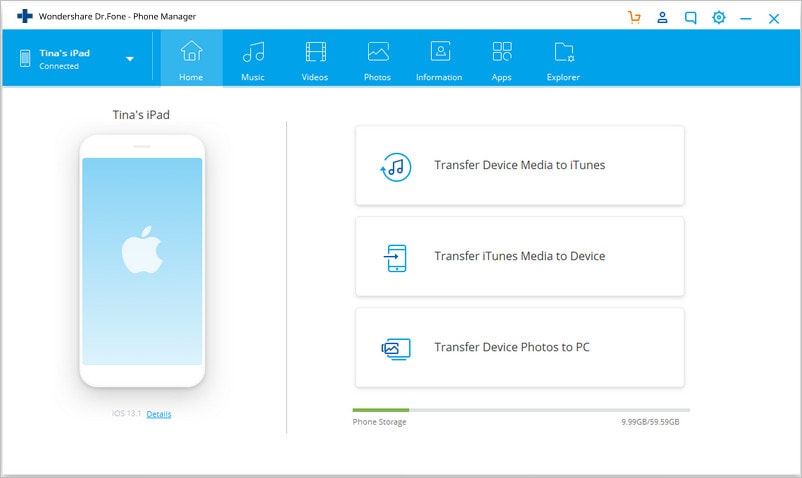
Step 1. Connect iPad Air to Computer and Run Dr.Fone
Start Dr.Fone and select Transfer from all the functions. Then connect your iPad Air to computer with the lightening USB cable. The program will automatically detect the device, and you'll see several options at the top middle of the software window.
Step 2.1. Transfer iPad Air Music to Computer
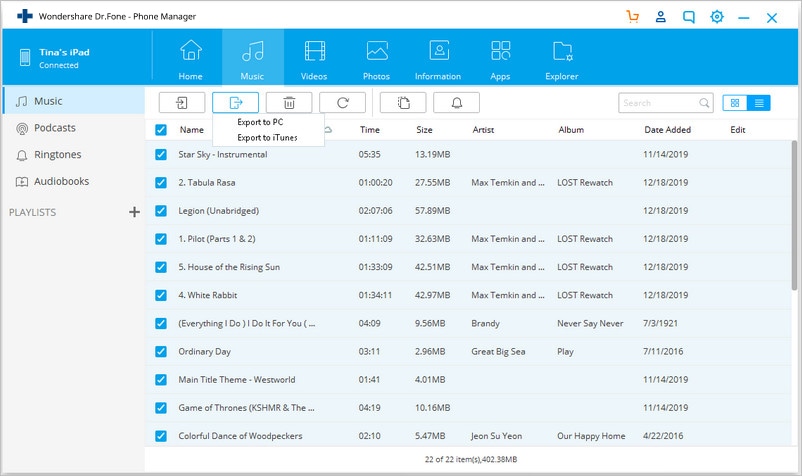
Choose the Music category in the top middle of the software window, then all the iPad music will show up in the software window. Check the music files you want to transfer to computer, and click the "Export" button at the top middle. Choose "Export to PC" in the drop-down menu, and then choose a targeted folder on your computer to save the exported music files.
Step 2.2. Transfer iPad Air Music to iTunes Library
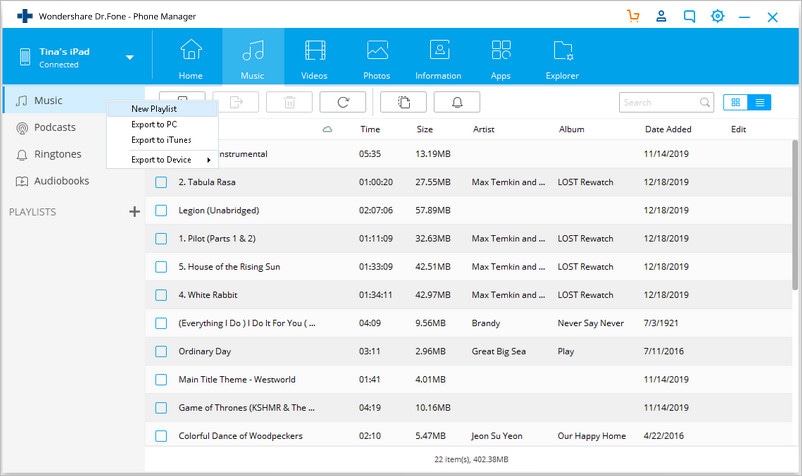
Besides the "Export to PC" option, you are also able to see the "Export to iTunes" option in the drop-down menu. By choosing this option, you can export music from iPad to iTunes Music Library with ease.
Besides exporting music files, Dr.Fone also allows you to export the whole playlist to your local hard drive. Select a playlist in the software window, and right-click it, then you'll be able to choose to export the music playlist to a computer or to iTunes library.
Dr.Fone - Phone Manager (iOS) could also help you transfer photos, videos, and music from the computer to the iPad fast. Simply download and have a try.
Method 2. How to Transfer Purchased Music from iPad Air to iTunes
It can't be easier to transfer the purchased music from iPad Air to the iTunes Library. You don't need any 3rd party tool. Instead, you just need to authorize the computer and do the transfer. Below are the full steps.
Step 1. Connect iPad to computer with the USB cable, and iTunes will start automatically. If not, you can manually start it.
Step 2. Click Account > Authorization > Authorize this computer.
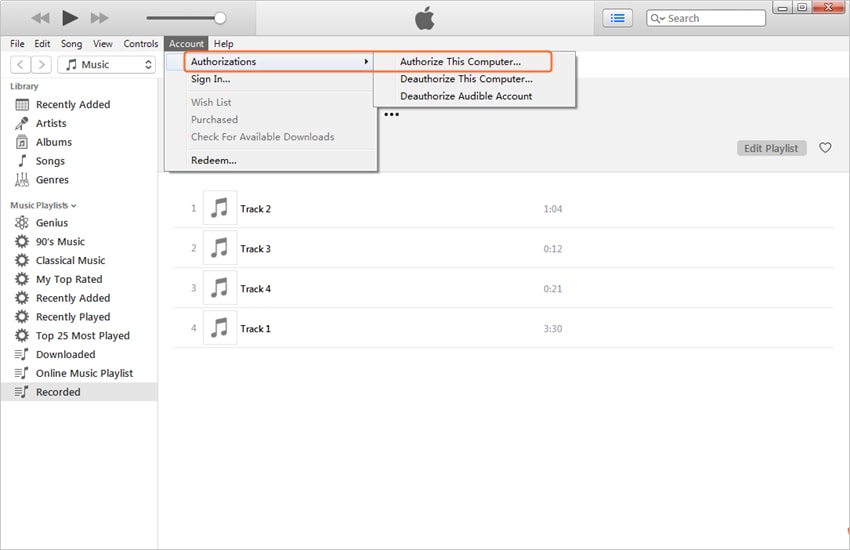
Step 3. Now go to File > Devices > Transfer Purchases from iPad to transfer purchased music from iPad Air to iTunes Library.

Note: Please note that you can only authorize 5 computers with one Apple ID. If you have authorized 5 PCs, you'll have to look for other methods.
Dr.Fone Basic:
Better Control for Your Phone
Manage, transfer, back up, restore, and mirror your device


iPad Tips & Tricks
- Make Use of iPad
- iPad Tips and Tricks
- Smart Keyboard Folio VS. Magic Keyboard
- iPad Photo Transfer
- Transfer Music from iPad to iTunes
- Transfer Purchased Items from iPad to iTunes
- Delete iPad Duplicate Photos
- Download Music on iPad
- Use iPad as External Drive
- Transfer Data to iPad
- Transfer Photos from Computer to iPad
- Transfer MP4 to iPad
- Transfer Files from PC to iPad
- Transfer Photos from Mac to iPad
- Transfer Apps from iPad to iPad/iPhone
- Transfer Videos to iPad without iTunes
- Transfer Notes from iPhone to iPad
- Transfer Photos from Android to iPad
- Transfer iPad Data to PC/Mac
- Transfer Photos from iPad to Mac
- Transfer Photos from iPad to PC
- Transfer Books from iPad to Computer
- Transfer Apps from iPad to Computer
- Transfer Music from iPad to Computer
- Transfer PDF from iPad to PC
- Transfer Notes from iPad to Computer
- Transfer Files from iPad to PC
- Transfer Videos from iPad to Mac
- Transfer Videos from iPad to PC
- Sync iPad to New Computer
- Transfer iPad Data to External Storage


Alice MJ
staff Editor