 Effortlessly manage data through preview, delete, export, etc.

 100% Security Verified | No Subscription Required | No Malware

 :
: 
 ChatGPT
 Perplexity
 Gemini
 Claude
 Grok
Grok

I have downloaded many videos from website like YouTube, Facebook and I would like to put them on my iPad so I can watch them on iPad while travelling. Please advise, thanks.
iPad User Forum
Watching high-quality videos on an iPad's pristine display is an incredible experience, especially when you are traveling without a stable internet connection. While the iPad supports a few limited video formats natively, including .mov and certain .avi extensions, MP4 remains the ultimate standard. People prefer to transfer MP4 to iPad because MP4 video files maintain stunning high resolution while keeping the file size surprisingly small.
However, getting those downloaded movies or clips from your computer to your Apple device isn't always straightforward. Many users want to figure out how to transfer MP4 to iPad safely without overwriting their existing media. This comprehensive 2026 guide will show you the most effective ways to transfer MP4 videos to iPad, detailing both the traditional iTunes route and a faster, sync-free alternative.
In this article
Part 1. How to Transfer MP4 to iPad Without iTunes (No Data Loss)
If you are looking for an option to transfer MP4 to iPad without iTunes, utilizing a dedicated iPad data management tool is your perfect solution. The biggest drawback of using iTunes is the dreaded "syncing" process, which often replaces or deletes existing media on your device. To avoid this, you can safely transfer your favorite movies with simple clicks using a robust tool like Dr.Fone - Phone Manager (iOS).
This software operates as an intelligent phone manager and an ultimate iPad transfer program. With it, you can easily transfer videos, music, photos, playlists, and contacts with zero effort. It completely bypasses the iTunes sync limitation, letting you selectively add MP4 files from your computer directly to your device. It does not only transfer media across multiple platforms, but it also allows you to organize files, create playlists, and build albums compatible with the latest iOS versions.
 Effortlessly manage data through preview, delete, export, etc.
- Transfer all data between devices.
- Robust backup solutions for reliable data protection.
- Mirror screens to PC for meetings, teaching, and control.

Steps to Transfer MP4 to iPad via Dr.Fone
-
Step 1 Download and Install Dr.Fone
First, download and install the Dr.Fone application on your Windows PC or Mac. Launch the software and choose the "Phone Manager" module from the primary window interface.

-
Step 2 Connect iPad to Transfer MP4 Videos
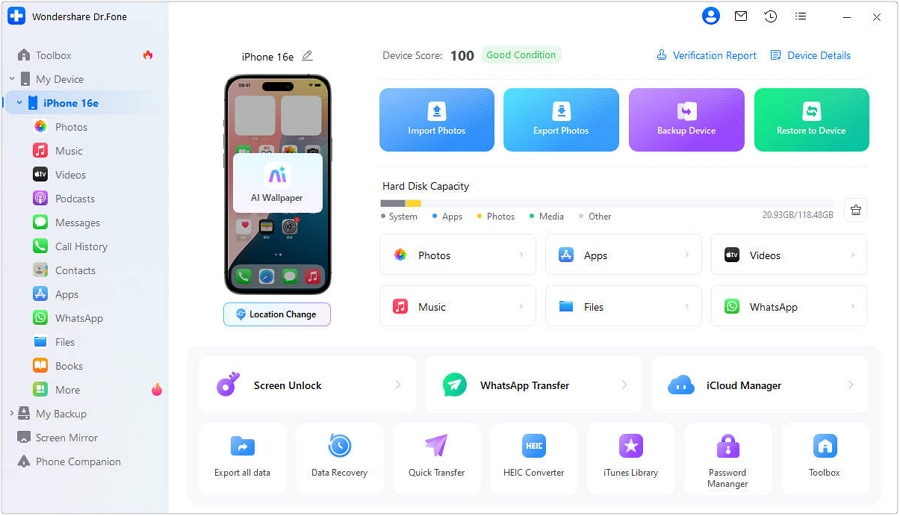
Connect your iPad to the computer using a certified USB cable. The program will automatically scan and recognize your iPad, displaying file categories at the top navigation bar of the main interface.
-
Step 3 Add MP4 Files to iPad
Navigate to the Videos category tab. You will see sections categorizing different video files in the left sidebar and the actual video contents on the right. Click the Add icon, and select either Add File or Add Folder to browse and add MP4 videos from your local computer directly to your iPad.


And that's it! Within a short time, you will successfully transfer MP4 to iPad while strictly maintaining the original files untouched on your device. Furthermore, this powerful program enables you to effortlessly transfer files to your iPhone, iPad, or iPod. Try downloading it for free to streamline your mobile management.




Part 2. How to Transfer MP4 to iPad With iTunes (Official Method)
If you prefer native Apple applications, you can easily transfer MP4 to iPad with iTunes. While beginners who have never synced devices might find the iTunes interface slightly overwhelming, a straightforward step-by-step approach simplifies the process significantly. iTunes allows you to seamlessly transfer MP4 files from your PC or Mac directly to your tablet. Before starting, ensure you meet the following hardware and software requirements.
What You Need:
- A Mac or PC with the latest version of iTunes installed.
- An updated iPad with enough storage space for your movies.
- Compatible MP4 video files saved locally on your PC or Mac.
- A certified Apple USB cable to connect the iPad to the computer.
Steps to Transfer MP4 Videos to iPad With iTunes
-
Step 1 Open iTunes and Log In
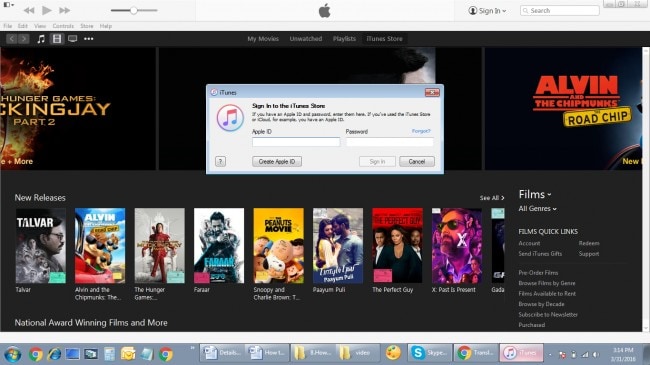
Install and launch the iTunes application on your PC. If this is your first time using the platform, you will be prompted to log in using your Apple ID credentials to authorize the computer.
-
Step 2 Add MP4 Files to iTunes Library
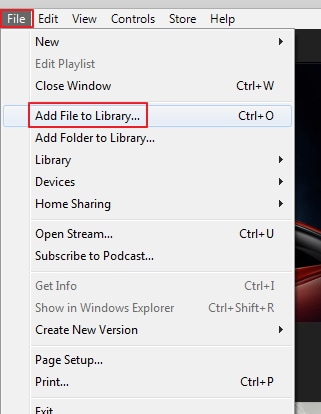
Navigate to the top menu bar, select File > Add File to Library. Browse through your local folders, locate the MP4 file you wish to transfer, and click Open.
-
Step 3 Verify the File in iTunes Library
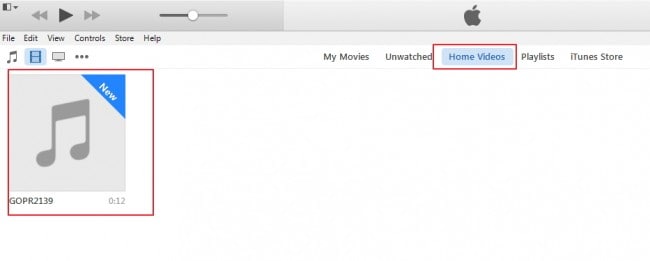
The imported MP4 file will instantly populate inside the iTunes Movie Library. You can verify it by selecting the Movies category from the top-left dropdown menu.
-
Step 4 Connect iPad to PC
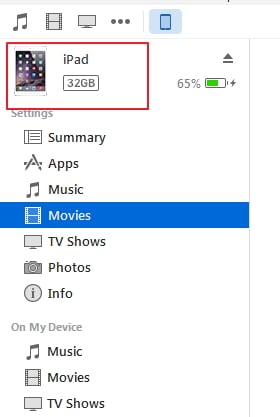
Using your Lightning or USB-C cable, securely connect your iPad to the PC. Once authenticated, a small device icon will appear near the top-left corner of the iTunes interface.
-
Step 5 Sync Movies to the iPad
Click on your iPad icon, then look at the left-side settings panel. Select the Movies tab, and check the box labeled "Sync Movies." Select the specific MP4 videos you wish to transfer to your iPad, and finally hit the "Apply" or "Sync" button at the bottom right.

-
Step 6 Find Synced Video in iPad
A progress bar will indicate the syncing status at the top. Once completed, unlock your iPad and open the native "Videos" or "Apple TV" app. Your transferred MP4 video will be waiting there for offline viewing.

Part 3. Comparison: iTunes vs. Third-Party Transfer
Still not sure which method suits you best? Review this brief breakdown of the pros and cons to make an informed decision on how to transfer MP4 videos to iPad.
- No risk of overwriting existing iPad files
- Direct transfer without lengthy library syncing
- Automatic video format conversion built-in
- Drag-and-drop interface is beginner-friendly
- Syncing overrides manually managed media
- Requires importing to Library first (extra step)
- Doesn't automatically convert unsupported formats
- Software can be slow and resource-heavy on PCs
Conclusion
To sum up, deciding how to transfer MP4 to iPad boils down to your specific needs and priorities. If you are comfortable with Apple's ecosystem and do not mind the strict media syncing rules, iTunes is a reliable, free tool that handles MP4 transfers smoothly. On the other hand, if you want a swift, drag-and-drop solution that protects your existing data from getting erased, a dedicated management tool like Dr.Fone is undoubtedly the superior choice. Choose the method that best aligns with your workflow, and enjoy watching your favorite high-definition MP4 movies on the go.
FAQ
-
1. Can an iPad play MP4 files natively?
Yes, iPads can play MP4 video files natively. MP4 is one of the most widely supported video formats across the Apple ecosystem due to its balance of high-quality compression and minimal file size. As long as the codec within the MP4 container is supported (like H.264 or HEVC), your iPad will play it seamlessly. -
2. Will transferring MP4 files via iTunes delete my current videos?
It depends on your current sync settings. When you sync movies using iTunes to transfer an MP4 file, iTunes will replace the media currently on your iPad with the library content of that computer. If your current iPad videos are not in that specific iTunes library, they will be erased during the sync. -
3. How can I transfer MP4 to iPad without cables?
You can transfer MP4 to iPad wirelessly by enabling the "Sync with this iPad over Wi-Fi" option within iTunes, using Apple's AirDrop feature from a Mac, or relying on cloud storage services like iCloud Drive, Google Drive, or Dropbox to upload the file and download it on your iPad. -
4. Why is my MP4 file not transferring to my iPad?
If your MP4 file isn't transferring, it is likely due to an incompatible audio or video codec inside the MP4 container that iOS doesn't recognize. Using a third-party management tool with an auto-conversion feature or running the file through a video converter first will solve this issue.
 Add Wondershare Dr.Fone as a preferred source on Google



