 Effortlessly manage data through preview, delete, export, etc.

 100% Security Verified | No Subscription Required | No Malware

 :
: 
 ChatGPT
 Perplexity
 Gemini
 Claude
 Grok
Grok
Apple's ecosystem is renowned for its seamless integration, making it incredibly popular for both creative professionals and casual users. As the iPad continues to evolve into a powerhouse for photography, digital art, and daily tasks, its storage can quickly fill up with high-resolution images. To free up crucial space and ensure your memories are securely backed up, knowing how to transfer your photos from your iPad to a Mac is an essential skill in 2026.
Whether you want to perform advanced photo editing on a larger screen or simply archive your camera roll, the process is easier than you might think. In this comprehensive guide, we will explore three highly effective methods to transfer photos from iPad to Mac. From utilizing robust third-party management tools to leveraging built-in macOS applications, you will learn exactly how to copy photos from iPad to Mac safely and swiftly.
In this article
Part 1. How to Use Dr.Fone to Transfer iPad Photos to Mac
To make it incredibly easy to transfer photos from iPad to Mac, we highly recommend using a dedicated third-party tool like Dr.Fone - Phone Manager (iOS). Designed for maximum efficiency, it serves as a highly functional iPad to Mac photo transfer software. Unlike standard Apple syncing methods which can sometimes be restrictive, this tool lets you preview, manage, and seamlessly transfer pictures from your iPad's Photo Library and Camera Roll directly to your iMac or MacBook. You retain full control, allowing you to copy photos from iPad to Mac selectively or in bulk, depending on your exact needs.
 Effortlessly manage data through preview, delete, export, etc.
- Transfer all data between devices.
- Robust backup solutions for reliable data protection.
- Mirror screens to PC for meetings, teaching, and control.

Follow the easy tutorial on how to transfer iPad photos to Mac
Step 1 Connect Your iPad and Launch the Software
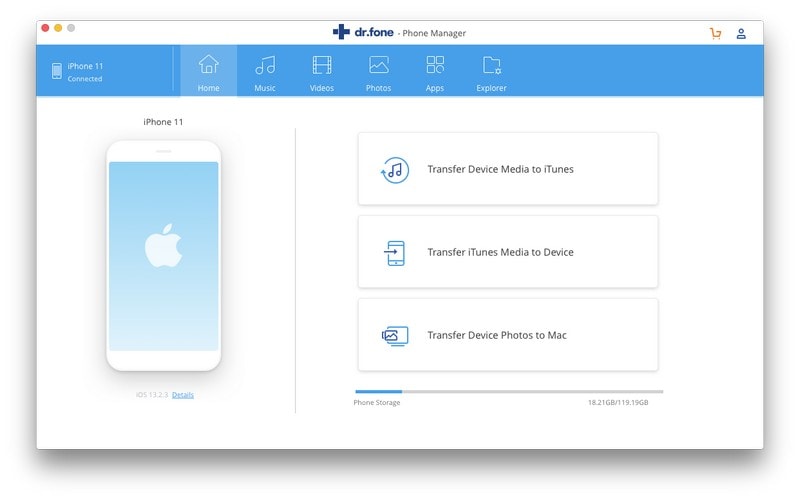
Use a reliable USB or USB-C cable to connect your iPad with your Mac. Launch the Dr.Fone software on your Mac and select the "Phone Manager" feature from the main interface. Once the software successfully detects your connected device, it will display your iPad's primary information on the home screen.
Step 2 Select and Export Photos from iPad to Mac
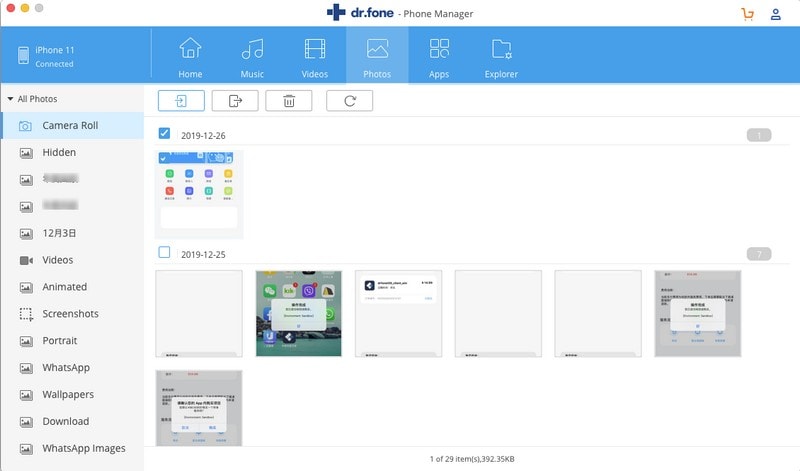
Navigate to the top menu and click on the Photos tab. On the left side of the window, you can select specific albums such as Camera Roll or Photo Library. The right panel will then display all the photos contained within those categories. Simply select the specific pictures you want to move, click the Export button, choose a destination folder on your Mac, and click Save to begin transferring photos from iPad to Mac.
Step 3 Transfer an Entire Photo Album
If you want to migrate bulk images quickly, right-click any specific photo album in the left sidebar and choose Export to Mac from the drop-down menu. This saves time when you need to download photos from iPad to Mac in organized folders.
You might also want to read more from:
How to Transfer Photos from Mac to iPad | Pictures from Mac to iPad
Part 2. How to Use the Photos App to Download Photos from iPad to Mac
While older macOS versions utilized iPhoto, modern Mac systems use the built-in Photos app to seamlessly manage images. This native application remains one of the most popular ways to download photos from iPad to Mac because it requires no additional software installations and integrates perfectly with your iCloud Photo Library.
Step 1 Connect Your Devices
Plug your iPad into your Mac using a standard Apple-certified USB cable.
Step 2 Launch the Photos App
Open the Photos app on your Mac. The application should automatically launch and display an Import screen showcasing all the photos currently saved on your iPad.
Step 3 Select and Import
Browse through your gallery and select the specific images you wish to bring over. Once selected, click the Import Selected button at the top right. If you want everything, you can choose Import All New Photos.
Step 4 Manage Storage
After the transfer is successfully completed, a prompt will ask if you want to delete the imported photos from your iPad to free up storage space, or keep them on the device.

Part 3. How to Use Image Capture to Copy iPad Photos to Mac
If you prefer not to use a library-based application like Photos and just want to save files directly to a specific folder, Image Capture is a fantastic built-in macOS utility. It offers a straightforward, bare-bones interface for transferring photos from iPad to Mac, giving you raw file access and fast transfer speeds.
Step 1 Establish a Connection
Connect your iPad to your iMac or MacBook with a USB cable.
Step 2 Open Image Capture
Open the Image Capture application on your Mac (you can find it easily using Spotlight search).
Step 3 Choose Your Files
Select your iPad from the Devices list on the left sidebar. The main window will populate with all the pictures stored on your device. Highlight the photos you want to copy photos from iPad to Mac.
Step 4 Select Destination
At the bottom of the window, use the Import To drop-down menu to choose exactly where you want to save the photos on your Mac's hard drive. Then, click on Import or Import All.
Step 5 Confirm Transfer
When done, you can see the photos imported marked with a green check mark, completing your iPad to Mac photo transfer.

Conclusion
Learning how to transfer photos from iPad to iMac or MacBook is essential for anyone looking to manage their device's storage, perform professional edits, or create reliable local backups. Whether you choose the unparalleled flexibility of Dr.Fone Basic, the integrated convenience of the Apple Photos app, or the straightforward folder management of Image Capture, you now have the knowledge to move your memories securely in 2026.
FAQ
1. Can I transfer photos from iPad to Mac wirelessly?
Yes, you can use Apple's AirDrop feature for wireless transfers. Simply select the photos on your iPad, tap the Share icon, choose AirDrop, and select your Mac. However, for large batches of high-resolution images, a wired USB connection is significantly faster and more stable.2. Why is my Mac not recognizing my iPad when connected?
This usually happens due to a faulty USB cable, a dirty charging port, or because you haven't granted the 'Trust This Computer' permission on your iPad screen. Ensure your iPad is unlocked and tap 'Trust' when prompted.3. Does transferring photos delete them from my iPad?
By default, transferring photos only copies them to your Mac. However, native apps like Image Capture and the Photos app provide an option to delete the original files from your iPad automatically after a successful import.4. What is the fastest way to copy thousands of photos to my Mac?
For massive photo libraries, using a third-party management tool like Dr.Fone or the native Image Capture app via a high-speed wired connection is the most reliable and fastest method to prevent crashes and ensure data integrity.
 Add Wondershare Dr.Fone as a preferred source on Google



