

 100% Security Verified | No Subscription Required | No Malware

 :
: 
 ChatGPT
 Perplexity
 Gemini
 Claude
 Grok
Grok
It's a classic tech dilemma: you've switched from a Mac to a Windows PC, but your cherished iPod, full of years of music, was formatted for macOS. When you connect it to your new PC, Windows doesn't recognize it and prompts you to reformat, threatening to erase everything. This cross-platform incompatibility is a significant hurdle for many users wanting to move their music libraries.
The root of the problem lies in file systems. Macs use HFS+, while Windows uses NTFS or FAT32. An iPod formatted for one system acts like a locked drive on the other. Fortunately, you don't have to lose your music. This guide provides proven methods to safely transfer all the music and songs from a Mac-formatted iPod to a Windows PC, including models like the iPod Shuffle, iPod Nano, iPod Classic, and iPod Touch.

In this article
Part 1. The Easiest Way to Transfer Music from a Mac-Formatted iPod to a Windows PC
When faced with the prospect of reformatting your iPod and losing all your music, the best solution is to use a tool designed to bridge the gap between macOS and Windows file systems. This approach allows you to transfer your library safely without any data loss.
For this task, we highly recommend Dr.Fone - Phone Manager (iOS). This software is specifically built to manage iOS device data across different platforms. It can read your Mac-formatted iPod on a Windows PC, allowing you to browse, select, and transfer your music seamlessly. The key advantage is that it preserves all the crucial metadata, including song titles, artists, albums, and playlists, saving you from hours of manual reorganization.
 Effortlessly manage data through preview, delete, export, etc.
- Transfer all data between devices.
- Robust backup solutions for reliable data protection.
- Mirror screens to PC for meetings, teaching, and control.

Follow these steps to transfer your music from a Mac-formatted iPod to your Windows PC:
-
Step 1 Download and Launch Dr.Fone
First, download Dr.Fone - Phone Manager (iOS) onto your Windows computer. Install the application and launch it. From the main screen, select the "Phone Manager" tool.
-
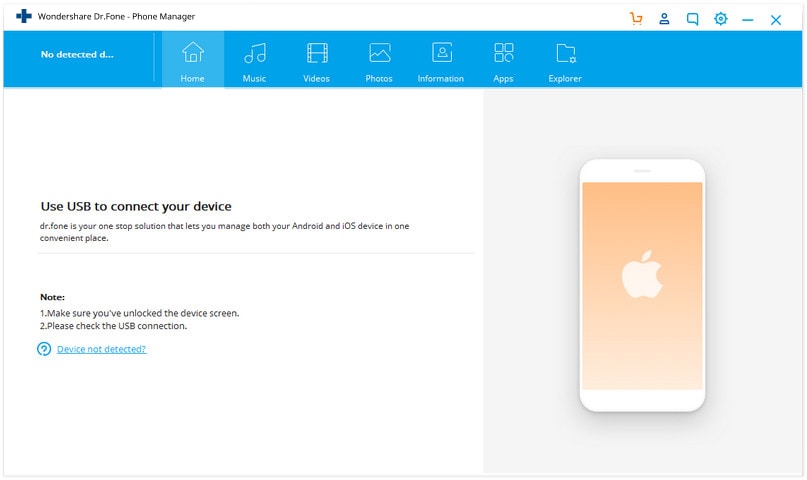
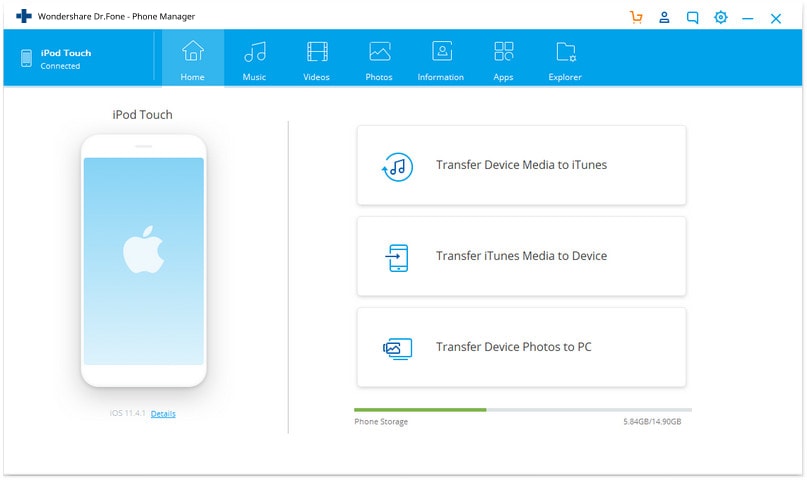
Step 2 Connect Your iPod to the PC
Connect your Mac-formatted iPod to the computer using its USB cable. The software will automatically detect your device, even if Windows cannot, and display its information on the main interface.
-
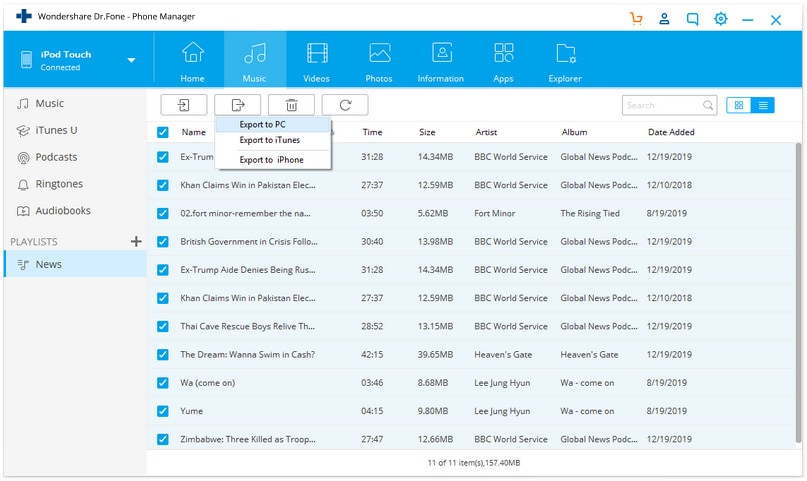
Step 3 Select the Music to Export
Navigate to the "Music" tab at the top of the interface. Dr.Fone will load and display all the audio files stored on your iPod. You can preview the songs and select the specific tracks you want to transfer. To select all, simply check the box at the top.
-
Step 4 Export Music to Your PC
After selecting your music, click the "Export" button and choose "Export to PC." A file browser window will appear, allowing you to select a destination folder on your computer to save the music files. Click "OK" to begin the transfer process.
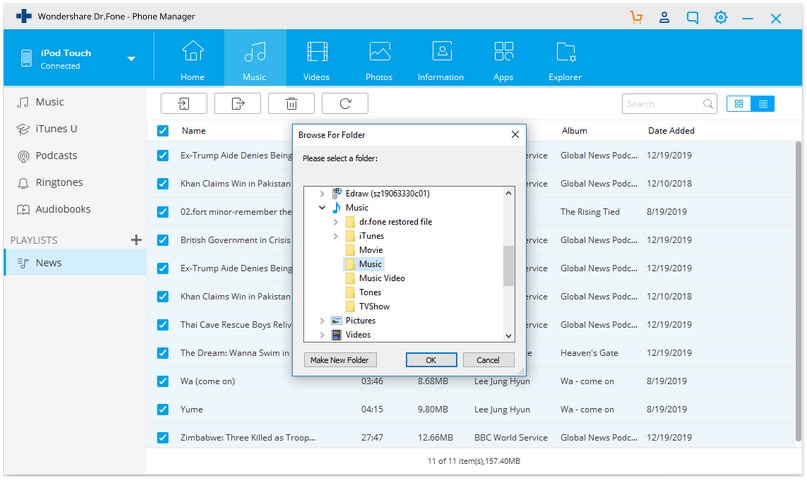
Once the process is complete, your music will be safely stored on your Windows PC with all its original information intact.


Part 2. How to Manually Transfer Music from a Mac-Formatted iPod to PC Using Disk Mode
If you prefer a manual approach and don't mind some extra work, you can use the iPod's built-in "Disk Mode" to access its files. This method treats the iPod like a standard external hard drive, but it has a major drawback: your music files will not have their original names or metadata (ID3 tags). They will appear with cryptic, four-letter filenames, and you will need to rename them manually.
-
Step 1 Enable Hidden Files in Windows
Before connecting your iPod, you need to configure Windows to show hidden files and folders. Open File Explorer, go to the "View" tab, and check the box for "Hidden items." This is crucial because the music files on an iPod are stored in a hidden folder.

-
Step 2 Connect Your iPod to the PC
Connect your iPod to the computer with a USB cable. Since it's Mac-formatted, Windows might show a format prompt—be sure to cancel or close this message. Navigate to "This PC" or "My Computer," where your iPod should appear as a removable drive.

-
Step 3 Locate and Copy the Music Files
Double-click the iPod drive to open it. Find and open the folder named "iPod_Control," and inside that, open the "Music" folder. You will see several folders with names like "F00," "F01," etc. Your music files are stored inside these folders. You'll need to copy all of these folders to a new location on your computer's hard drive.

 Note: After copying the files, you will need to import them into your music player (like iTunes or another app) and manually rename each track, as all original song information will be missing from the filenames.
Part 3. Important Tips for Handling a Mac-Formatted iPod on Windows
Navigating the compatibility issues between a Mac-formatted iPod and a Windows PC can be tricky. Here are some answers to common questions and essential tips to keep in mind.
Tip 1: Can I use a Mac-formatted iPod on Windows without losing data?
Yes, but not natively. You cannot simply plug it in and sync with iTunes on Windows. Attempting to do so will trigger a prompt to restore (format) the iPod. To access the music without data loss, you must use one of the methods described above: either a third-party tool like Dr.Fone or the manual disk mode method.

Tip 2: Is there a free way to get my music back on a Windows PC?
The manual method using the iPod's Disk Mode is free. However, it requires significant time and effort to reorganize your library because all song titles and artist information are lost. While some software may offer free trials, they often have limitations on the number of files you can transfer. For a complete and hassle-free transfer, a dedicated tool is generally worth the investment.

Tip 3: What happens if I connect my Mac-formatted iPod to iTunes on a PC?
If you connect a Mac-formatted iPod to a Windows PC and open iTunes, the application will not recognize the device's content. Instead, it will display a message stating that the iPod is formatted for another computer and must be restored to factory settings before it can be used with this computer. Clicking "Restore" will erase all data on the iPod.

Part 4. Video Guide: Transferring iPod Music to a Windows PC
For a visual walkthrough of the process, check out our video tutorial. It demonstrates how to use software to efficiently transfer music from your Mac-formatted iPod to a Windows PC, ensuring you can follow along with every step.
Conclusion
Transferring music from a Mac-formatted iPod to a Windows PC doesn't have to mean losing your entire library. While Windows and macOS use incompatible file systems, effective workarounds are available. The manual method of using Disk Mode is a free option, but it comes at the cost of losing all your song metadata, requiring a tedious reorganization process.
For a fast, reliable, and straightforward solution, using a specialized tool like Dr.Fone - Phone Manager (iOS) is the most efficient choice. It directly accesses your iPod's data on Windows, transfers your music with just a few clicks, and, most importantly, preserves all your song titles, artists, and album information. This saves you valuable time and ensures your music library remains perfectly organized on your new PC.
FAQ
-
1. Why can't my Windows PC read my Mac-formatted iPod?
Your Windows PC cannot read the iPod because of a file system conflict. Mac-formatted iPods use the HFS+ file system, which is not natively supported by the Windows operating system (which uses NTFS or FAT32). This incompatibility prevents Windows from recognizing the device's contents, leading to the prompt to reformat it. -
2. Will I lose music quality if I transfer from an iPod to a PC?
No, you will not lose audio quality. Transferring the music files is a digital copy process, meaning the data is duplicated exactly as it is. Whether you use a software tool like Dr.Fone or the manual disk mode method, the audio files themselves remain unchanged, preserving their original quality. -
3. Can I transfer playlists from a Mac-formatted iPod to a Windows PC?
Manually transferring files via disk mode will not preserve playlists. However, advanced transfer software like Dr.Fone - Phone Manager is often capable of recognizing and transferring playlists along with your music tracks. This ensures your curated collections are moved over intact, saving you the effort of recreating them. -
4. After transferring the music, can I format the iPod for Windows use?
Yes. Once you have safely backed up all your music to your Windows PC, you can proceed to format (or "restore") the iPod using iTunes on your PC. This will erase the iPod and reconfigure it with a Windows-compatible file system (FAT32), allowing you to sync it with iTunes and manage it on your Windows computer going forward.
 Add Wondershare Dr.Fone as a preferred source on Google


