Effortlessly manage data through preview, delete, export, etc.

 100% Security Verified | No Subscription Required | No Malware

 :
: 
 ChatGPT
 Perplexity
 Gemini
 Claude
 Grok
Grok
'My music stuck on my iPad and it seems iTunes refuse to help me copying them to my iTunes Library on my computer. It drives me crazy. Does anybody know how do I transfer music from iPad to iTunes?'
iPad User

This is a dilemma that frustrates countless users across the globe. Most individuals acquire their music collections for their iPad from diverse sources, not strictly the official iTunes Store. Consequently, when attempting to sync files, they often encounter iTunes' strict media and syncing restrictions. After repeatedly facing the risk of losing precious media tracks on their tablets, iPad users actively seek an alternative, robust solution to securely transfer music from iPad directly into the iTunes Music Library.
Fortunately, bypassing these limitations is entirely possible. This detailed guide provides a comprehensive and straightforward answer to the pressing question of how to successfully transfer music to iTunes and securely manage your media library in 2026 without risking data loss.
In this article
Part 1. How to Transfer Music and Playlists from iPad to iTunes with Dr.Fone - Phone Manager (iOS)
When looking to transfer playlist from iPad to iTunes, the default software that comes to mind is naturally iTunes itself. However, a major limitation exists: iTunes natively only supports transferring media files that were officially purchased from the iTunes Store. If you possess non-purchased tracks—such as CD rips, downloaded MP3s, or audio files obtained from third-party sources—Apple's ecosystem restricts you from moving them back into the iTunes Music Library. Thus, to successfully copy your complete library, you require a specialized third-party iPad transfer toolkit.
Among the myriad of management tools available, Dr.Fone stands out as the ultimate solution to smoothly transfer music from iPad to iTunes. It bypasses conventional syncing roadblocks, enabling users to move whatever audio files are saved on their device in mere seconds.
 Effortlessly manage data through preview, delete, export, etc.
- Transfer all data between devices.
- Robust backup solutions for reliable data protection.
- Mirror screens to PC for meetings, teaching, and control.

Steps to Transfer Music and Playlists from iPad to iTunes
Step 1 Disable iTunes Automatic Syncing
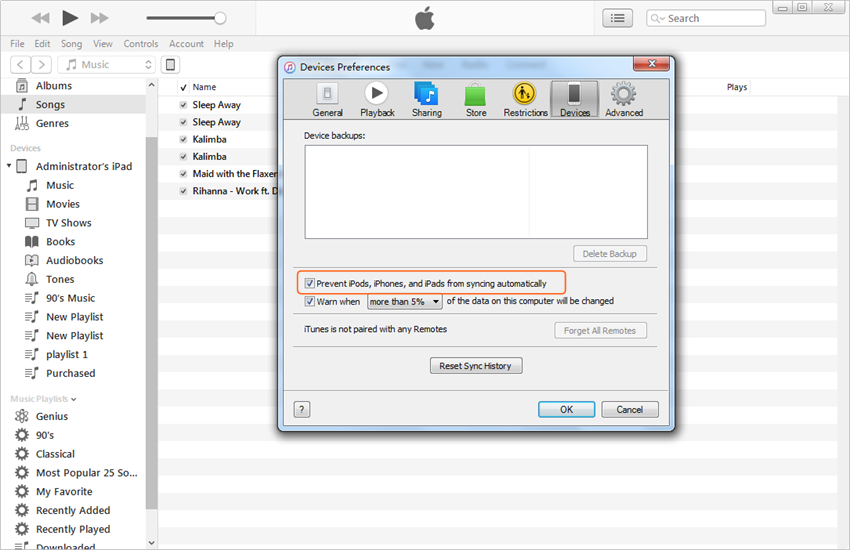
First and foremost, launch iTunes on your desktop. Navigate to the 'Preferences' menu (on Windows, click 'Edit' > 'Preferences'; on Mac, click the 'iTunes' tab next to the Apple logo). In the new window, check the box labeled 'Prevent iPods, iPhones, and iPads from syncing automatically'. If you skip this critical step, you risk having your existing iPad library overwritten.
Step 2 Install and Launch the Transfer Tool
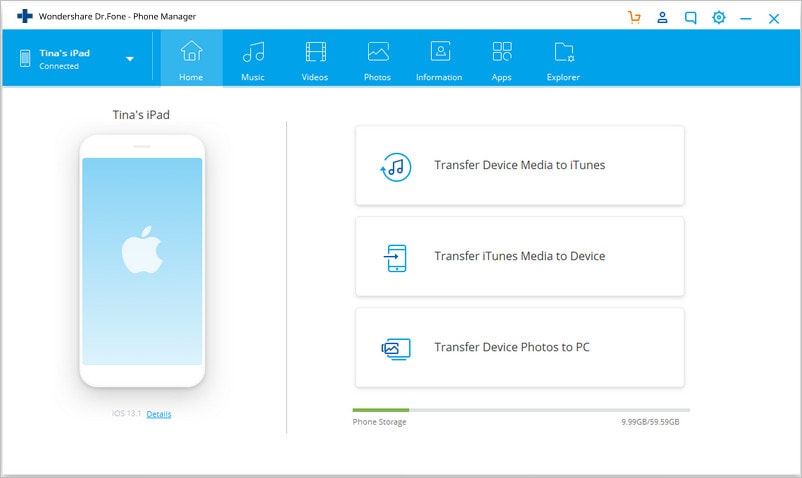
If you need to securely transfer playlist from iPad to a Windows PC or Mac, install the software and launch it. Select the 'Phone Manager' module from the primary interface. Connect your iPad via a certified USB cable. The system will detect your device instantly and categorize your files.
Step 3.1 Move Music from iPad to iTunes
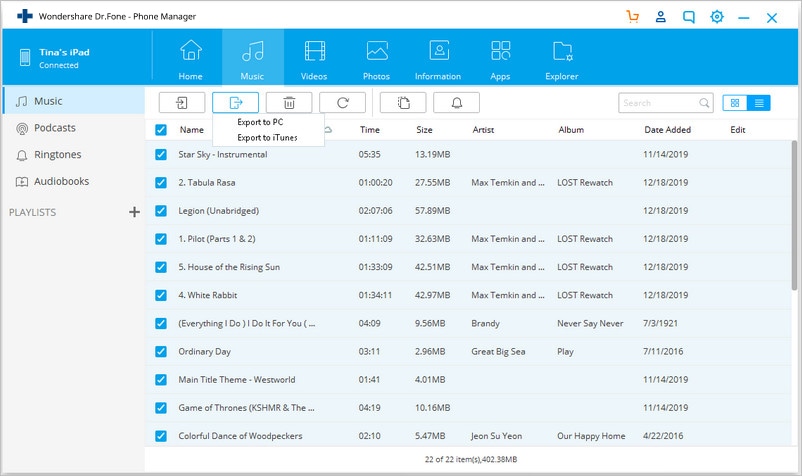
Navigate to the Music tab located at the top of the interface. Here, you will spot various audio categories on the left sidebar. Select your desired tracks, click the Export icon, and choose Export to iTunes from the dropdown menu to begin the transfer.
Step 3.2 Move Playlists from iPad to iTunes
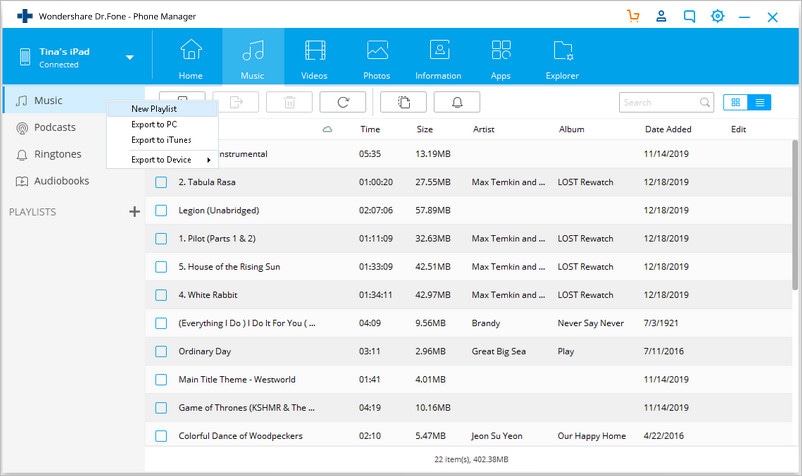
Your curated iPad playlists are positioned just below the audio categories in the left panel. To transfer playlist from iPad to iTunes, simply right-click your chosen playlist and select Export to iTunes from the context menu.
Step 3.3 Transfer Device Media to iTunes Fast
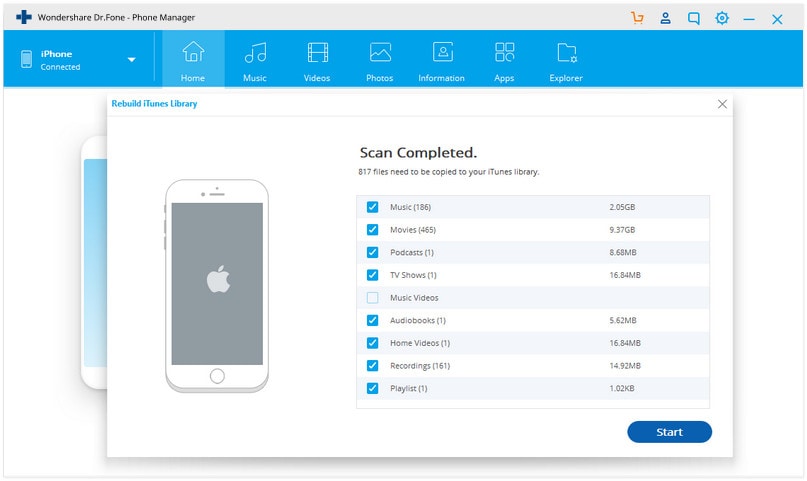
For a bulk operation, you can utilize the 'Transfer Device Media to iTunes' shortcut on the home screen. This powerful feature automatically scans your iPad and securely rebuilds your iTunes library by copying all absent media files in one click.




Part 2. Advantages of Transferring Music from iPad to iTunes
Beyond merely preventing immediate data loss, there are numerous practical advantages to backing up and transferring your media library to a stable desktop environment. Users gain enhanced storage options, better safety protocols, and advanced organization capabilities.
1. Comprehensive Media Management
Music and media management becomes exponentially more straightforward on a computer. By leveraging the built-in functions of desktop software, users can effortlessly edit metadata, arrange tracks, copy files to multiple backup locations, and transfer collections seamlessly back to any iDevice whenever required.
2. Unrestricted Storage Capacity
The storage space of a typical PC or Mac vastly outshines the limited flash memory of an iPad. With terabyte-sized hard drives being the modern standard, users can aggregate thousands of high-res tracks in a centralized hub, ensuring their device's local storage is kept free. This also extends to large media formats such as MP4 and MOV video files.
3. Advanced Library Analysis
Once you transfer music to iTunes, you gain access to a variety of robust desktop-grade tools to analyze and organize your data. Users can mass-delete duplicate content, automatically fetch album artwork, and seamlessly categorize their favorite tracks according to eras, artists, and personalized star ratings.
4. Universal Backup and Accessibility
Maintaining an up-to-date backup of your iPad's media on a computer serves as the ultimate failsafe against unexpected hardware failure or software crashes. If your iPad is lost, damaged, or wiped during an update, having a consolidated iTunes library ensures you can execute a full restoration instantly.
You can also read our related topics without relying on iTunes:
- How to Transfer Video to iPad without iTunes
- How to Transfer MP4 to iPad with and without iTunes
- Transfer Music from Computer to iPad With and Without iTunes
Conclusion
In summary, attempting to transfer music from iPad to iTunes doesn't have to be a frustrating ordeal fraught with syncing errors. By utilizing a dedicated management tool, you can securely move your entire media collection—including custom playlists and unpurchased tracks—straight to your computer. Disabling auto-sync acts as your primary defense, while specialized software ensures a flawless transfer experience. Maintain a robust backup and take full control over your media storage today.
FAQ
1. Why won't iTunes let me transfer my iPad music directly?
By default, Apple's iTunes is strictly programmed to only allow the transfer of media that was officially purchased through the iTunes Store. Any tracks downloaded from third-party sites, ripped from CDs, or transferred from other computers are restricted by copyright mechanisms, requiring a third-party application to export them successfully.2. Can I transfer a playlist from my iPad without moving all my music?
Yes. Using an iOS device manager, you can navigate specifically to your playlists section, highlight the exact playlist you wish to export, and transfer it directly to your iTunes library. The software will intelligently identify and move only the audio files contained within that specific list.3. Will syncing my iPad to a new computer erase my existing music?
Yes, if automatic syncing is enabled. iTunes fundamentally links an iPad to a single desktop library. If you plug your iPad into a new or different computer and allow it to sync, iTunes will attempt to overwrite the iPad's current data with the library on that specific computer. Always turn off auto-sync to prevent data loss.4. How do I turn off automatic syncing in iTunes?
To disable auto-syncing, open iTunes and navigate to 'Edit' > 'Preferences' on a Windows PC or 'iTunes' > 'Preferences' on a Mac. Click on the 'Devices' tab, and check the box that says 'Prevent iPods, iPhones, and iPads from syncing automatically'. Click 'OK' to save your settings.
 Add Wondershare Dr.Fone as a preferred source on Google