How to Use iPad as An External Hard Drive
Oct 24, 2025 • Filed to: Device Data Management • Proven solutions
Dr.Fone Basic:
Better Control for Your Phone
Manage, transfer, back up, restore, and mirror your device
When comparing iPad with Android device, you may be regret that iPad can't be used as a hard drive. Actually you can! However, every time you transfer data, like music or video, you have to use iTunes. More badly, the data that iTunes transferred are only allowed to limited formats. That means, if you get the music or videos with unfriendly formats, iTunes will not help you to transfer into your iPad.
Therefore, it will be perfect if you could use iPad as an external hard drive without iTunes transfer. Is it possible? The answer is positive. Thanks to the nicely-designed software, you are able to use iPad as an external hard drive with freedom. This post will show you how to use iPad as an external hard drive.
Both Windows and Mac versions of our recommended software Dr.Fone - Phone Manager (iOS) are helpful for using iPad as an external hard drive, and the following guide will take the Windows version of Dr.Fone - Phone Manager (iOS) as an example. For the Mac users, you only need to duplicate the process with the Mac version.
1. Steps Use iPad as an External Hard Drive

Dr.Fone - Phone Manager (iOS)
Transfer MP3 to iPhone/iPad/iPod without iTunes
- Transfer, manage, export/import your music, photos, videos, contacts, SMS, Apps etc.
- Backup your music, photos, videos, contacts, SMS, Apps etc. to computer and restore them easily.
- Transfer music, photos, videos, contacts, messages, etc from one smartphone to another.
- Transfer media files between iOS devices and iTunes.
- Fully compatible with iOS 7, iOS 8, iOS 9, iOS 10, iOS 11 and iPod.
Step 1. Start Dr.Fone and Connect iPad
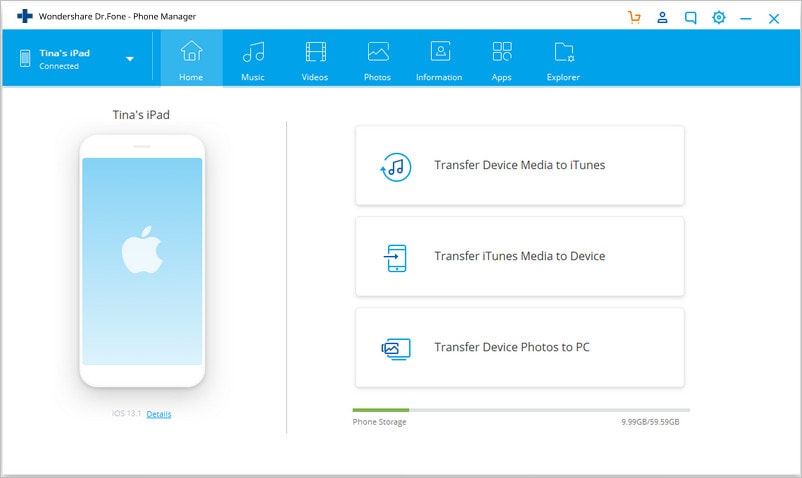
Download and install Dr.Fone on your computer. Run Dr.Fone and then select "Phone Manager". Connect iPad to computer with the USB cable, and the program will automatically detect it. Then you'll see the manageable file categories at the top of the main interface.
Step 2. Use iPad as an External Hard Drive
Choose Explorer category in the main interface, and the program will display the system folder of iPad in the main interface. Choose U Disk in the left sidebar, and how you can drag and drop any file you want into iPad.
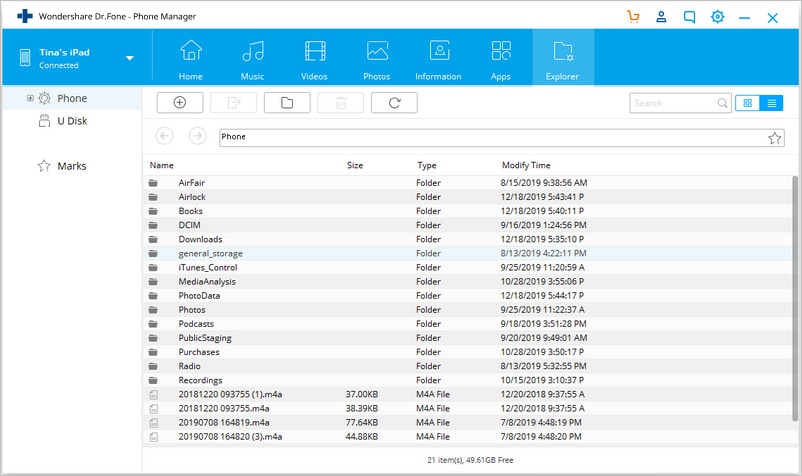
Note: Dr.Fone - Phone Manager (iOS) only supports to save files into iPad, but won't allow you to view the files on your iPad directly.
Of course, besides using iPad as an external hard drive, Dr.Fone - Phone Manager (iOS) also enables you to manage iPad files with ease. The following part will show you more. Check it out.
2. Transfer Files from iPad to Computer/iTunes
Step 1. Start Dr.Fone and Connect iPad
Start Dr.Fone and connect iPad to computer with the USB cable. The program will recognize your iPad automatically, and it displays the manageable file categories in the main interface.

Step 2. Export Files from iPad to Computer/iTunes
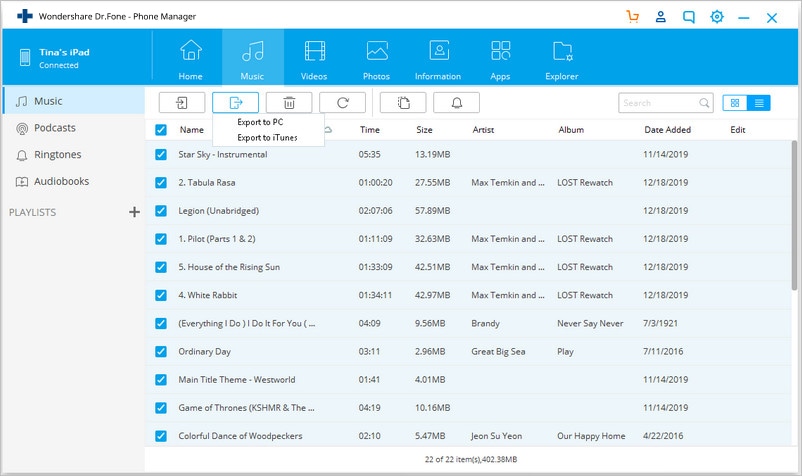
Choose a file category in the main interface, and the program will show you the sections of the files in the left sidebar, along with the contents in the right part. Check the files you want, and click the Export button in the window, and select Export to PC or Export to iTunes in the drop-down menu. The program will then start exporting files from iPad to computer or iTunes library.
3. Copy Files from Computer to iPad
Step 1. Copy Files to iPad
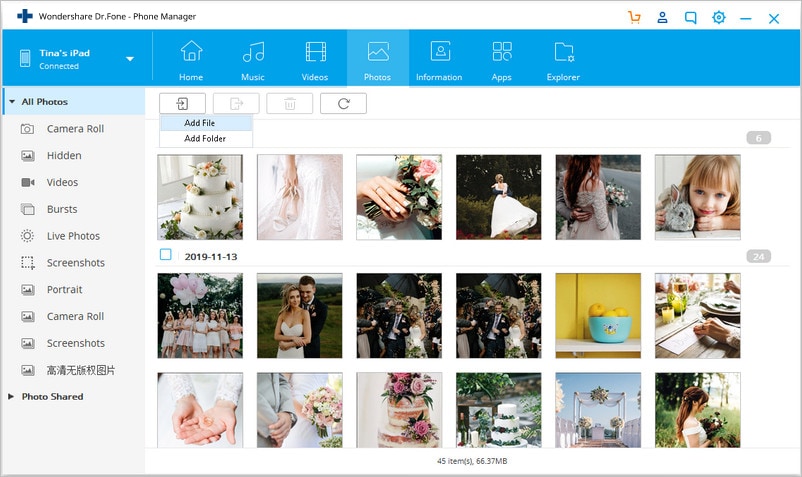
Choose a file category, and you'll see the details about this file category in the software window. Click the Add button in the main interface, and choose Add file or Add Folder in the drop-down menu. Then you can add files from computer to iPad.
4. Remove Unwanted Files from iPad
Step 1. Delete Files from iPad
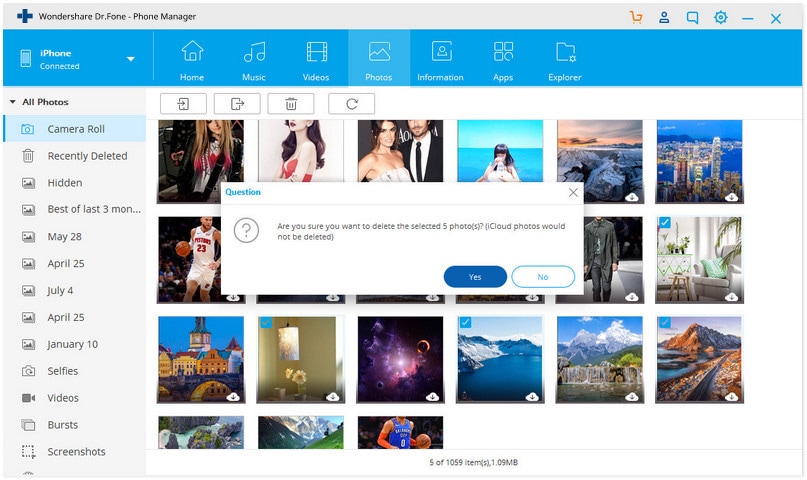
Choose a file category in the software window. After the software displays the details, you can select the files you want, and click the Delete button to remove any unwanted file from your iPad.
Related Reading:
Dr.Fone Basic:
Better Control for Your Phone
Manage, transfer, back up, restore, and mirror your device
iPad Tips
- iPad Manage
- 1. Download Movies on iPad
- 2. Download Music on iPad
- 3. Delete Duplicate Photos on iPad
- 4. Use iPad as An External Hard Drive
- 5. Delete Device Management on iPad
- 6. iPad Remote Management Software
- 7. Send Text Messages from iPad
- 8. Download WhatsApp on iPad
- 9. Change Weather Location on iPad
- iPad Backup
- 1. Ways to Restore iPad Without iTunes
- 2. Restore iPhone from iPad Backup
- 3. Backup iPhone/iPad in DFU Mode
- iPad Erase
- 1. Clear iPad data effectively
- 2. Delete Bookmarks on iPhone/iPad
- 3. Delete Browsing History on iPad
- 4. Ways to Delete Movies from iPad
- 5. Clear Cookies on iPad
- 6. Permanently Delete Emails from iPad
- 7. Wipe your iPad and Erase Everything
- 8. Clear System Data on iPad Storage
- iPad Mirror
- 1. Screen Recorders for iPad
- 2. Mirror iPad to Fire TV Stick
- 3. Screen Share Mac to iPad
- 4. Screen Mirror iPad Display
- 5. Share iPad Screen with PC
- 6. Screen Mirroring iPhone to iPad
- 7. iPad Mirror to PC without Lagging
- 8. Mirror iPad to Mac without Lagging
- iPad Recover
- 1. Recover Deleted Files on iPad
- 2. Recover Data from Broken iPad
- 3. Recover Deleted Safari Bookmarks
- 4. Recover Deleted Notes from iPad
- iPad Reset
- 1. Hard Reset/Factory Reset iPad 2
- 2. Reset iPad Air / Air 2
- 3. 5 Tactics to Reset Your iPad Mini
- 4. Factory Reset Your iPad Air/Pro
- 5. Factory Reset Your iPad 2023
- 6. Reset iPad, iPad Pro, and iPad Mini
- 7. Reset iPad Network Settings
- 8. Factory Reset iPad without Password
- iPad Tricks
- 1. Block People in Facebook on iPad
- 2. 25+ Cool Tips and Tricks on iPad
- 3. Play PC Games on iPad
- 4. Detect Spyware on iPhone
- 5. iPad Mini Jelly Scroll Issue
- 6. Fix Apple Keyboard Trackpad
- 7. iCloud Unlock without Passcode
- 8. Restore iPad from DFU Mode
- 9. Bypass Activation Lock on iPad
- 10. Photo Transfer Apps for iPad
- 11. Remove MDM from iPad Like a Pro
- 12. Reset iPad without Password
- ● Manage/transfer/recover data
- ● Unlock screen/activate/FRP lock
- ● Fix most iOS and Android issues
- Manage Now Manage Now Manage Now Manage Now


Alice MJ
staff Editor