How to Erase Data on Old Device before Switching to iPhone 13: Step-By-Step Guide

Aug 27, 2025 • Filed to: Data Wipe Solutions • Proven solutions
It's September, that time of the year again - the Apple Christmas, if you will - where new iPhones are released like clockwork and we are tempted like hell to upgrade. That means it is also that time of the year again where we do not look forward to the ordeal that is backing up data on the old iPhone, transferring it to the new iPhone, erasing data on the old iPhone before trading it off, etc. You are all too familiar with it, but this year, you've come to the right place, and we have just the tool you need to make your life as easy as 123.
Part I: Transfer Data from Old Device to iPhone 13 with Dr.Fone - Phone Transfer
You've pre-ordered the new iPhone 13, right? Now is the time to start thinking about backing up your data on your current device and transferring data from your old device to the new iPhone 13. If you have an iPhone that you are upgrading from, you might also use the built-in utility Apple provides when you set up a new iPhone, but what if you are not using an iPhone? How do you transfer your data from your old device to iPhone 13 then? Then, you use the wonderfully simple-to-use but powerful and feature-packed tool called Dr.Fone, specifically, the Dr.Fone - Phone Transfer module.
Kindly note that you will need a computer with two (2) free USB or USB-C ports for this.
Here are steps to transfer data from your old device to the new iPhone 13 using Dr.Fone - Phone Transfer:
Step 1: Download Dr.Fone.
Step 2: After Dr.Fone installation, launch Dr.Fone and select the Phone Transfer module.

Step 3: Connect your old device to the computer and wait for Dr.Fone - Phone Transfer to recognize it.
Step 4: Connect your new iPhone 13 to the computer and wait for Dr.Fone - Phone Transfer to recognize it.

Step 5: Ensure that the Source Device is your old device, and the Target Device is your new iPhone 13. If not, you can use the Flip button to flip the source and target devices to match the requirement (the old device needs to be the source device in this case).
Step 6: Start by checking the data you want to transfer from your old device to your new iPhone 13.
There is a long list of data you can copy, ranging from contacts, text messages, bookmarks, photos, etc. to other data such as call logs, calendar items, reminders, alarms, etc. Choose what you want to transfer from your old device to the new iPhone 13.
Step 7: After selection, click the big Start Transfer button below the list.

Wait for the transfer to finish. Do not remove the devices before the transfer is complete, and for good measure, avoid using the devices as well.
And, just like that, you have transferred data from your old device to the new iPhone 13, using a state-of-the-art software called Wondershare Dr.Fone.
Part II: Backup Data on Old Device and Restore the Backup to iPhone 13
If your old device is an iPhone, you may use iTunes and iCloud Backup to backup data on your old device and restore it to your new iPhone 13 during setup. If you have an Android device, there are a few ways you can go.
Backup Data on iPhone Using iTunes/ iCloud Backup
If you have not changed any settings specifically, iTunes is configured to backup your iPhone automatically upon connecting. This means that all you need to do to backup data on your old iPhone using iTunes is to connect your old iPhone to the computer and start iTunes if it does not start automatically.
If, for some reason, the automatic backup did not start, here are manual instructions:
Step 1: Connect your device to the computer and launch iTunes.
Step 2: When the device is successfully connected, there will be a button in iTunes near the top left with an iPhone inside it.

Click that button.
Step 3: By default, your iPhone summary should be displayed, but click the Summary option from the sidebar nonetheless.

Step 4: Under Automatically Back Up, select This Computer to create local backups on your computer, otherwise, click iCloud to create a backup in iCloud that can be restored over-the-air during the setup of your new iPhone 13.
Step 5: Under Backups, click Back Up Now to start the backup process. You can also encrypt your backups here, and you will need to remember the password you provide here. If you forget this password, this backup will become useless since you won't be able to decrypt it to restore to your new iPhone 13.
Backups thus made are stored in iCloud if so selected or locally on your computer (if you selected This Computer). Local backups can be accessed using the Edit menu from the menu bar, as Edit > Preferences and choosing Devices from the window that pops up.
Backup Data on Android Device Using Google Drive
Understandably, if you have an Android device, you cannot back that up using iTunes or iCloud Backup. You can, however, use some of Google's tools to backup your Android device to Google.
Now, a large part of your everyday (and important) data would likely already be getting backed up to your Google Account and Google Drive automatically. Your contacts, for example, are likely getting backed up automatically and are going to be available in Gmail and the Contacts app online. The same goes for your Keep Notes. Google Drive, by nature, would be online, not needing any specific backup routine. Your app data and apps are what you might have to configure to backup routinely. Same way for Google Photos, they are likely being backed up in the resolution you have chosen.
All this is great, but Google being Google, there are caveats - on the whole, Google's backup systems are fragmented. This means that what you might understand as a device backup in the Settings app would only be backing up your apps and settings along with the phone settings. If you want to backup user data (aka Contacts, Drive contents, Photos, etc.) you have to specify that separately or do that in their own apps. Awkward, right?
Thus, this guide about backing up the Android device to Google Drive will need to be fragmented as well, in line with Google's own fragmentation.
Backup Phone Settings and App Data
Here is what you do to backup app data and phone settings on an Android device:
Step 1: Launch Settings.
Step 2: Scroll down and tap Google.

Step 3: Scroll down and make sure that Backup by Google One is enabled.
Step 4: Tap Back up Now to start the backup immediately.
Step 5: If you want to use mobile data, you can scroll down and enable the option to Backup Using Mobile Data.
Backup Google Photos and Videos
Step 1: In the same screen (Settings > Google) tap on Photos & Videos to be taken directly to backup settings for these:

Step 2: Enable Backup & Sync.
How to Make Sure Everything Gets Backed Up Properly
To ensure that all your important data has been backed up to your Google Account/ Google Drive, check the following in Settings:
Step 1: Go to Settings > Accounts.
Step 2: Tap your Google Account.

Step 3: Tap Account Sync and make sure that what you want to sync to the cloud is checked, so that it is included in the backup.
Backup and Restore Data to iPhone 13 Using Dr.Fone - Phone Backup (iOS)
Both Apple and Google offer ways to back up their devices and restore that backup to another of their devices. So, you can restore your iPhone 12 backup to an iPhone 13 easily using only iCloud and iTunes, if you want to. The same goes for Google, albeit in a fragmented way. What happens when you want to wrest some more control out of these processes, and what happens when you want to transfer Android data to your new iPhone 13? This is where Dr.Fone - Phone Backup (iOS) comes into the picture.
With this one piece of software, you can say goodbye to all hassles that create headaches for you when you want to backup and restore devices, be it iPhone or Android. Whether you want to back up your old iPhone and restore the backup to your new iPhone 13 or you want to backup your Android device and restore data to your new iPhone 13, you can do that in a seamless, hassle-free, joyous manner.
Here is how to use Wondershare Dr.Fone to backup and restore data to your new iPhone 13, without worrying about iOS and Android processes and fragmentation.
Step 1: Get Dr.Fone.
Step 2: Connect your old iPhone to the computer.
Step 3: Launch Dr.Fone and select the Phone Backup module.

Step 4: Dr.Fone will detect and show the number and types of files on your old iPhone. Select All at the top left or check individually.
Step 5: At the bottom, click Backup.
The backup will take a few minutes depending on the amount of data held and will notify when the process is complete. When done, you can remove the old iPhone and close Dr.Fone.
To restore the backup to a new iPhone 13:
Step 1: Connect the new iPhone 13 to the computer.
Step 2: Launch Dr.Fone and select the Phone Backup module.
Step 3: Select Restore.

Step 4: Select the backup you previously created and click Next.
Step 5: Backup will be analyzed and displayed.

You can now select everything you want to restore to the new iPhone 13 and then click Restore To Device.
Dr.Fone - Phone Backup (iOS) will now start restoring your backup from the old device to the new iPhone 13. It is a seamless, painless, easy-to-use, and quick process that gets the job done without hassles and headaches. You can even export the selected files from the backup to your computer, using the Export to PC button beside the Restore to Device button!
Part III: Erasing Data on Old Device
Apple has always provided users with options and functionality that Apple thinks is the best way for users of a certain mindset, and for those who want more, Apple devices are often found limiting in terms of features and options. Advanced users who demand more options will find the same philosophy extends into outlining the way you erase data on your iPhone. When you are talking about data erasure on your iPhone, Apple provides only two options - you can either erase all settings on your iPhone or you can erase all data and settings on your iPhone. There is no customization here to allow you to delete only what you want. But, depending on what you are looking for, there are things you can do.
III.I Using Apple Files
Using the Apple Files app, you can browse data that may reside on your device, such as when you use apps like VLC for watching videos. If you transferred videos to your iPhone to watch them using VLC, they would be stored locally on your iPhone. Instead of opening all apps to see which ones are storing large amounts of data locally, you can use Apple Files to see what is on your device (that Apple allows you to delete):
Step 1: Launch Apple Files.
Step 2: Tap the Browse tab at the bottom. It should open in iCloud Drive. Tap it again to go to the Browse section.

Step 3: Tap On My Phone and you will see local app folders and if they have some data inside that you might want to consider removing, to free up space on your device.

Step 4: You can now simply tap to go into the folder and long-press on items and tap Delete to delete them individually or tap the circular ellipses at the right and tap Select to start selecting multiple items and delete them in a batch by tapping the trash can icon at the bottom.
Step 5: When done, tap the Browse tab at the bottom until you are back to the Browse section and go to Recently Deleted. Delete everything there.
III.II Using Third-Party Tools Such As Dr.Fone - Data Eraser (iOS)
As you might have realized by now, there is simply no way Apple provides for a user to delete cache files on an iPhone, or app data, or everyday diagnostics such as logs. But, third-party software such as Dr.Fone - Data Eraser (iOS) allows you to do that and more.
Dr.Fone may be the ultimate toolkit in your fanny bag when dealing with all kinds of mobile devices and operations you want to perform on them. Dr.Fone - Data Eraser (iOS) allows you to both wipe all data from the device and lets you do what you cannot do otherwise, which is wipe selective data from the iPhone, for example, if you only want to remove junk files.
Dr.Fone - Data Eraser (iOS)
Permanently delete data and protect your privacy.
- Delete junk files to speed up iOS devices.
- Erase iOS SMS, contacts, call history, photos & video, etc selectively.
- 100% wipe 3rd-party apps: WhatsApp, LINE, Kik, Viber, etc.
- Works greatly for iPhone, iPad, and iPod touch, including the latest models and the latest iOS version fully!

Remove All Data from Devices
Step 1: Connect your device to the computer and launch Dr.Fone.
Step 2: Select the Data Eraser module.
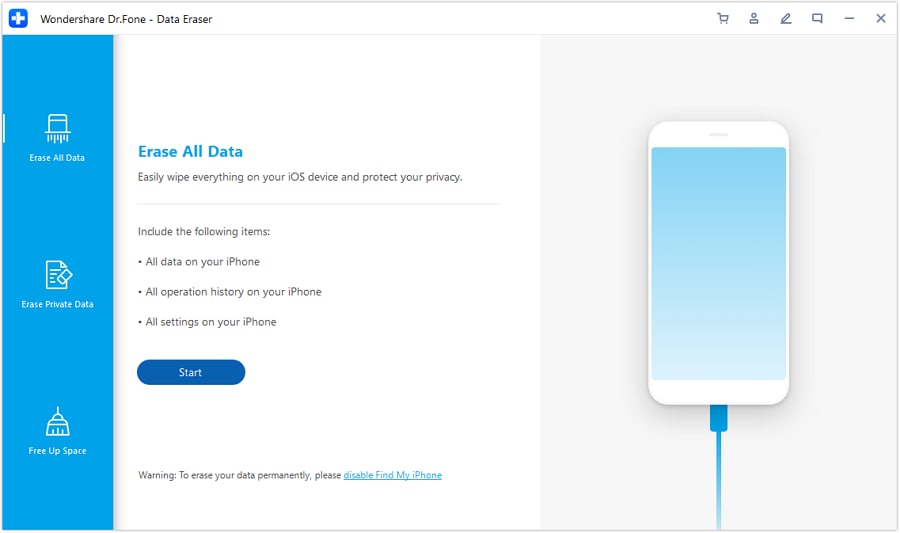
Step 3: Click Erase All Data and click Start.
Step 4: You can select the security level from 3 settings. Default is Medium.
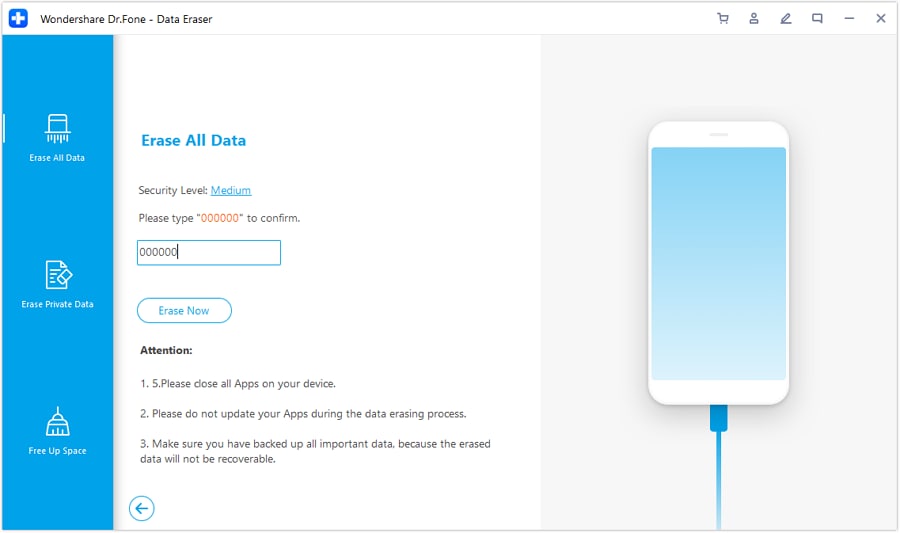
Step 5: When ready, enter the digit zero (0) six times (000000) to confirm and click Erase Now to start wiping the device completely.
Step 6: When the device is done erasing, you need to confirm to reboot the device. Click OK to continue rebooting the device.
When the device reboots, it will start at the setup screen, just as it did from the factory.
Remove Data from Devices Selectively
Step 1: After connecting the device to the computer and launching Dr.Fone, select the Data Eraser module.
Step 2: Select Free Up Space.
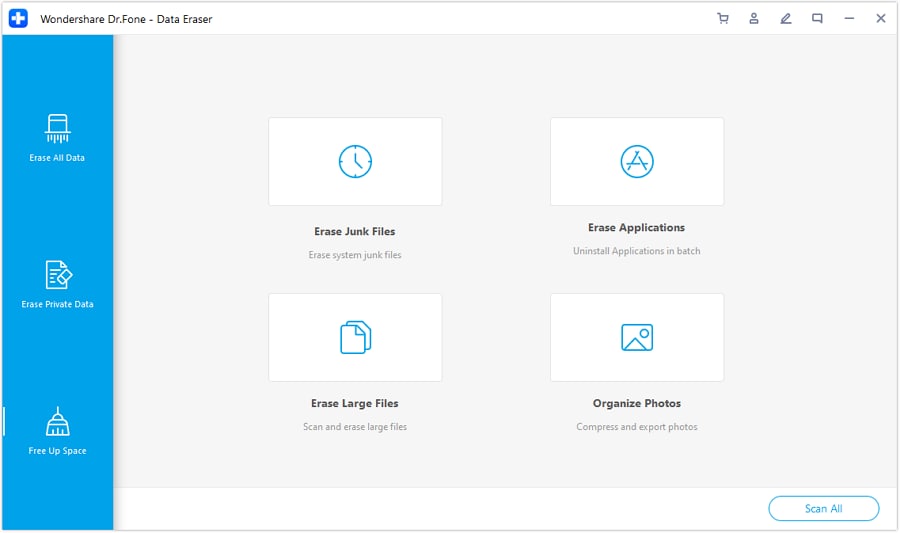
Step 3: Now, you can choose what you want to wipe from your device - junk files, specific apps, or large files. You can even compress and export photos from the device.
Step 4: Pick any, for example, Junk Files. This will scan your device and display the junk files on your device.
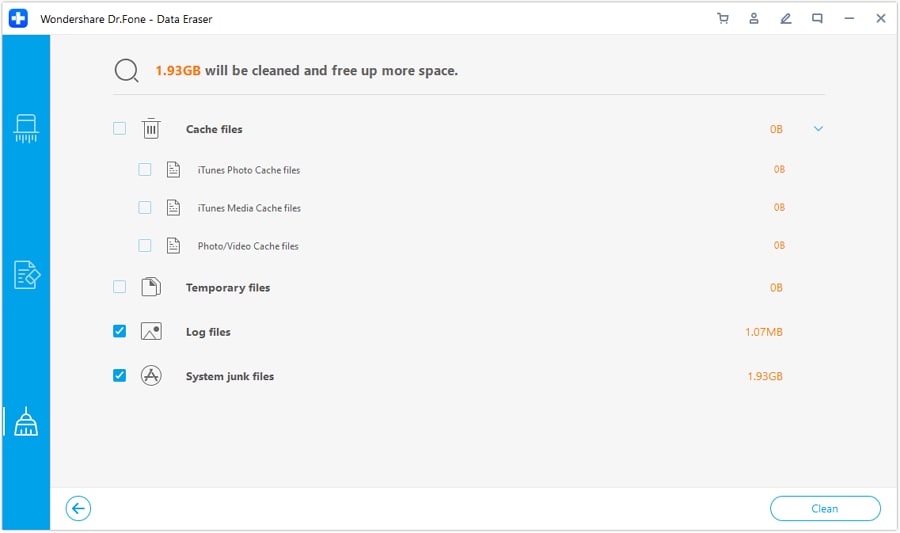
As always, it is good practice to go through the list and see if there is nothing important that was marked as junk erroneously.
Step 5: Select all files that you want to get rid of and click Clean at the bottom right. All junk will be cleaned.
You should reboot the device for changes to take effect completely.
Part IV: Conclusion
While both Apple and Google provide ways to create backups and allow for restoring data from old devices to the new, there is a lot that people are missing out on, that they do not even realize. There is a big difference between offering these tools as afterthoughts and providing professional tools to take care of every possible requirement that a user might have. That is the difference between these tools by Apple and Google and Wondershare Dr.Fone, a professional toolkit for users of both iOS and Android devices. Comprising of a suite of modules that take care of virtually all possible user requirements, the software allows for quick backups of both Android and iOS devices and for restoring the backups to new devices. This time, when you get your hands on your new iPhone 13, try Dr.Fone to backup and restore data from the old device to iPhone 13 or to transfer your data to iPhone 13 and erase data on the old device using Dr.Fone - Data Eraser (iOS).


iPhone Erase
- Clear iPhone
- Delete iPhone
- 1. Delete Albums on iPhone
- 2. Delete Apps from iPhone
- 3. Delete Calendar Event on iPhone
- 4. Delete Documents on iPhone
- 5. Delete Email Account on iPhone
- 6. Delete Visited Sites on iPhone
- 7. Delete Music from iPhone
- 8. Delete Snapchat Messages on iPhone
- 9. Delete Songs from iCloud
- 10. Delete Voicemail on iPhone
- 11. Delete WhatsApp Message for Everyone
- 12. Delete WhatsApp Message Permanently
- 13. Delete Downloads on iPhone
- 14. Delete Calendars from iPhone
- 15. Delete History on iPhone
- 16. Delete Snapchat Story/History
- 17. Delete Call History on iPhone
- 18. Delete Kik on iPhone
- 19. WhatsApp Delete Message Tips
- 20. Anti Spyware for iPhone
- 21. Get Rid of Virus on iPhone
- 22. Delete Other Data on iPhone/iPad
- 23. Remove Subscribed Calendar iPhone
- Erase iPhone
- 1. Erase an iPhone without Apple ID
- 2. iPhone Data Erase Softwares
- 3. Remove Cydia from iPhone/iPad
- 4. Erase All Content and Settings
- 5. Erase Old iPhone
- 6. Erase iPhone 13 Data
- 7. Erase Data Old Device
- 8. Erase iPhone without Apple ID
- 9. Empty Trash on iPhone
- 10. Sell My Old iPhone
- 11. Sell A Used Phone
- 12. Safely Sell Used Phones
- 13. Apple Trade in Program
- iPhone Storage Full
- 1. iPhone Cleaners to Clean iPhone
- 2. Clean Master for iPhone
- 3. Clean Up iPhone
- 4. Free Up Storage on iPhone
- 5. Make iPhone Faster
- 6. Speed Up iPhone/iPad
- Wipe iPhone
- Sell Old iPhone


Daisy Raines
staff Editor