100% Security Verified | No Subscription Required | No Malware

 :
: 
 ChatGPT
 Perplexity
 Gemini
 Claude
 Grok
Grok
Modern smartphones are far more than communication devices; they are digital vaults holding our most sensitive personal information, private memories, and critical data. When it's time to upgrade or sell your iPhone, simply deleting files isn't enough. Failing to properly wipe your device can leave your data vulnerable to recovery, creating a significant privacy risk.
Ensuring that your personal information is permanently and securely erased is crucial before letting go of your old iPhone. Fortunately, several effective methods and tools exist to completely wipe your device, making the data unrecoverable. This guide will walk you through the essential preparations and step-by-step processes to wipe your iPhone securely.
In this article
Part 1: Essential Preparations Before Wiping Your iPhone
Before you initiate the process to wipe your iPhone, taking a few preparatory steps is critical for a smooth and secure transition. These preliminary measures safeguard your valuable information from being lost forever and ensure the wiping process works as intended. Here are the vital tasks you must complete before resetting your iPhone.
1-1. Back Up Your iPhone Data
The single most important step before wiping your iPhone is to create a complete backup of your data. This ensures that your photos, contacts, messages, application data, and other essential files are preserved and can be transferred to your new device. You have a couple of primary options for backing up your iPhone:
iCloud Backup: Navigate to your iPhone's Settings, tap your Apple ID banner at the top, and select iCloud. From there, go to "iCloud Backup" and tap "Back Up Now" to start a manual backup to the cloud.
iTunes/Finder Backup: Connect your iPhone to your computer and open the latest version of iTunes (on older PCs or macOS Mojave and earlier) or Finder (on macOS Catalina and later). Select your device, go to the "Summary" tab (in iTunes) or "General" tab (in Finder), and click "Back Up Now" under the Backups section.

Need a More Flexible Backup Solution?
If you're facing iCloud storage limits or want more control over what you back up and restore, Wondershare Dr.Fone offers a superior alternative. Dr.Fone allows you to selectively back up and restore data, bypassing the all-or-nothing approach of iCloud and iTunes. It works offline, doesn't require your Apple ID for the process, and gives you complete control over your backups without worrying about cloud storage constraints.


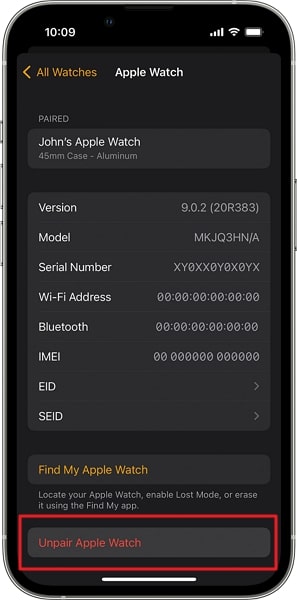
1-2. Unpair Your Apple Watch
If you own an Apple Watch, it's essential to unpair it from your iPhone before wiping the phone. This process creates a backup of your Apple Watch data on your iPhone, which will then be included in your main iPhone backup. To do this, open the Watch app on your iPhone, go to the 'My Watch' tab, tap your watch at the top, select the 'i' icon, and then choose "Unpair Apple Watch."
1-3. Deactivate Critical Services
To ensure the next owner has a seamless experience and your account remains secure, you must sign out of your Apple ID and disable Find My. If these steps are skipped, the device could remain locked to your account (Activation Lock), making it unusable for anyone else.
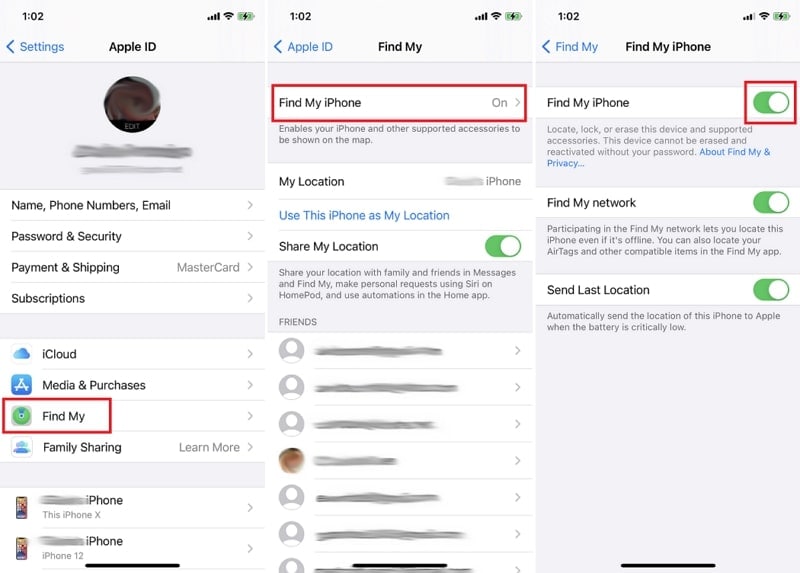
Disable Find My iPhone
Activation Lock is tied to the Find My feature. Disabling it is a mandatory step. Here’s how:
Instructions: Open Settings, tap your Apple ID banner, and select "Find My." On the next screen, tap "Find My iPhone" and toggle the switch to the off position. You will be prompted to enter your Apple ID password to confirm.
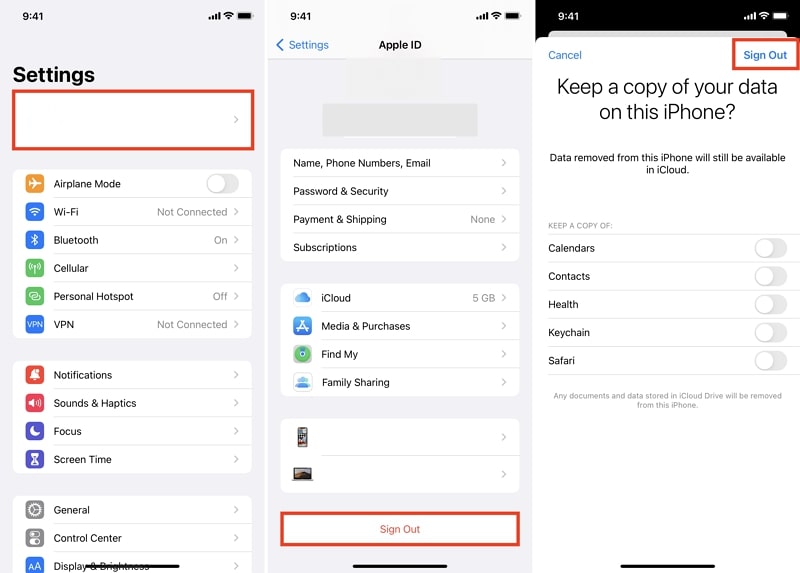
Log Out of Your Apple ID
Finally, completely disassociate your iPhone from your Apple account by signing out. This removes your access to iCloud, the App Store, and other Apple services from this specific device.
Instructions: Go to "Settings" and tap your Apple ID banner at the top. Scroll all the way down and tap "Sign Out." Follow the on-screen prompts to complete the sign-out process. You may be asked if you want to keep a copy of certain data on the device; since you are about to wipe it, you can choose to remove everything.
Part 2: How to Factory Reset an iPhone via Settings
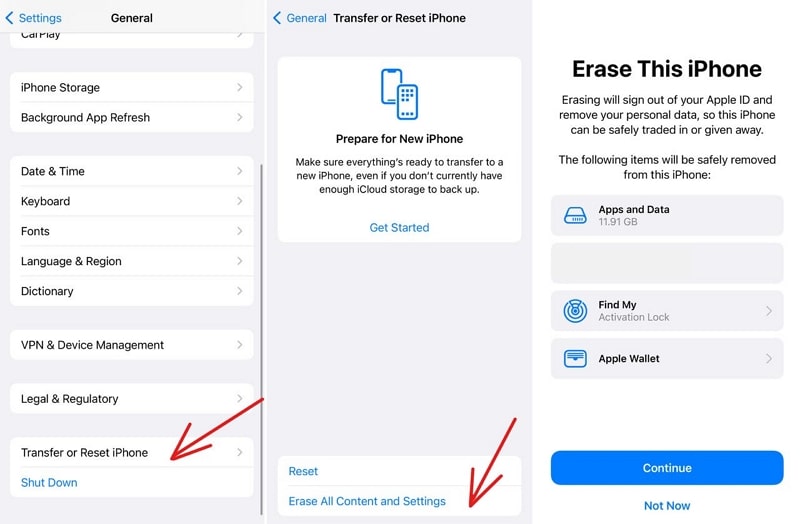
After you have successfully backed up your data and disabled all necessary security features, you can proceed with the standard factory reset. This built-in iOS function erases all content, settings, and personal information on your iPhone, returning it to its original software state, just like when it came out of the box. This is the most common method for wiping an iPhone you plan to keep or give to a family member.
Instructions: Open the Settings app and navigate to "General." Scroll to the bottom and tap "Transfer or Reset iPhone." On the next screen, select "Erase All Content and Settings." Confirm your decision by tapping "Continue" and follow the final on-screen instructions, which may include entering your device passcode and Apple ID password to finalize the process.
Part 3: How to Permanently Wipe an iPhone with One Click
While a standard factory reset is effective for most casual uses, it doesn't guarantee that your data is 100% unrecoverable with advanced software. If you're selling, donating, or recycling your iPhone, you need a more robust solution to ensure your private information is permanently destroyed. Dr.Fone - Data Eraser (iOS) is a professional tool designed for this exact purpose.
This tool overwrites your existing data with random files, making it virtually impossible for any data recovery software to retrieve your old information. It offers a simple, one-click process to achieve military-grade data destruction, giving you ultimate peace of mind. It can also help optimize storage and improve device performance by securely removing junk files.
 Permanently erase all data on iOS & Android — completely unrecoverable.
- Military-grade wiping to fully protect your privacy.
- Generate verified erasure reports to boost device resale value.
- Selectively erase private data and remove junk & large files.
Using Dr.Fone - Data Eraser to Securely Wipe Your iPhone
Follow these straightforward steps to ensure every trace of your personal data is removed from your iPhone permanently.
-
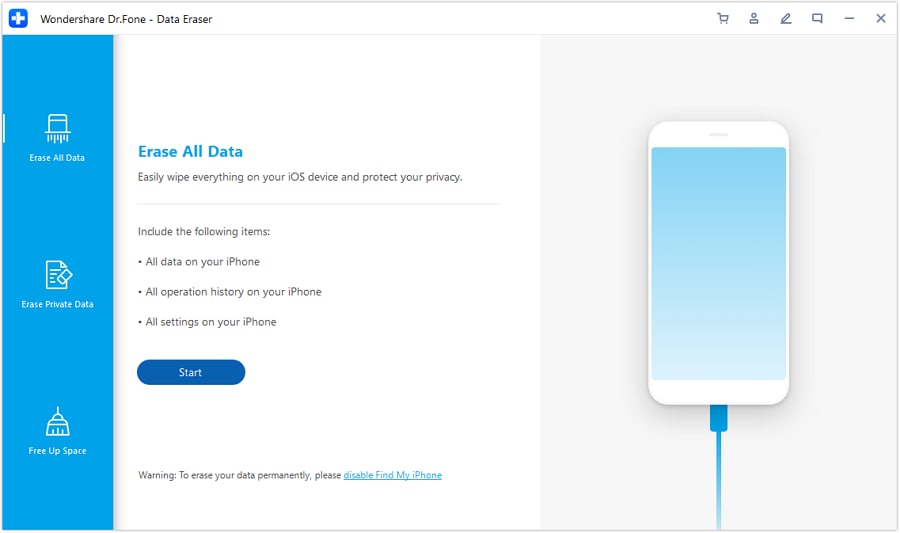
Step 1 Connect Your iPhone and Launch the Tool
Download and install Wondershare Dr.Fone on your computer. Launch the program, connect your iPhone via a USB cable, and select "Data Eraser" from the main toolbox. Then, choose the "Erase All Data" option.

-
Step 2 Initiate the Erasing Process
On the next screen, click the "Start" button to begin the data wiping process. The software will analyze your device and prepare for the erasure.
-
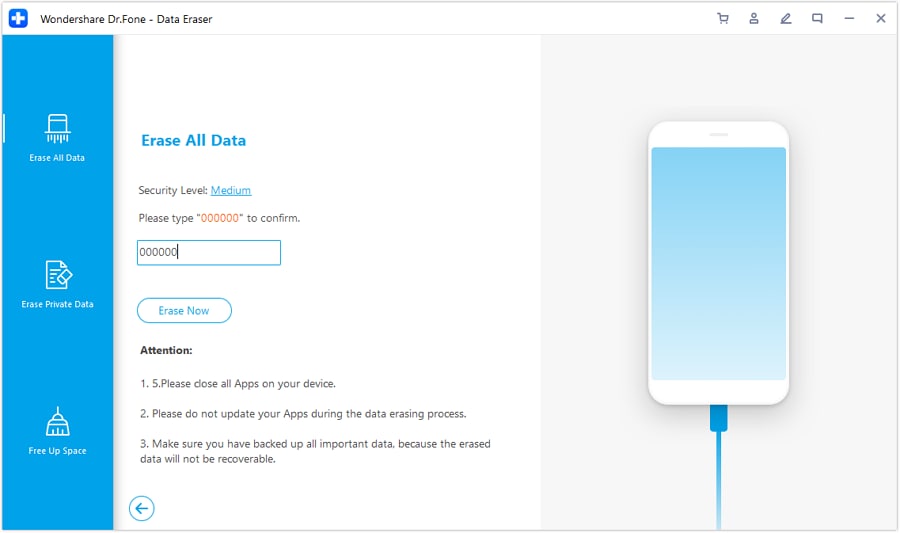
Step 3 Confirm the Deletion
To prevent accidental deletion, the program will ask for confirmation. Type "000000" into the text box as prompted and then click "Erase Now" to proceed.
-
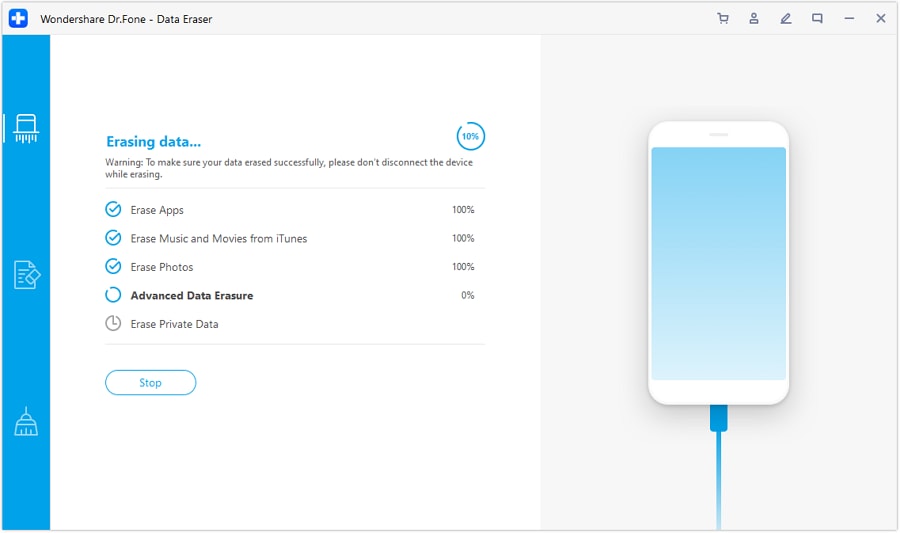
Step 4 Wait for the Process to Complete
Ensure your iPhone remains connected to the computer throughout the entire process. Dr.Fone will securely overwrite the data on your device. This may take some time depending on the amount of storage.
-
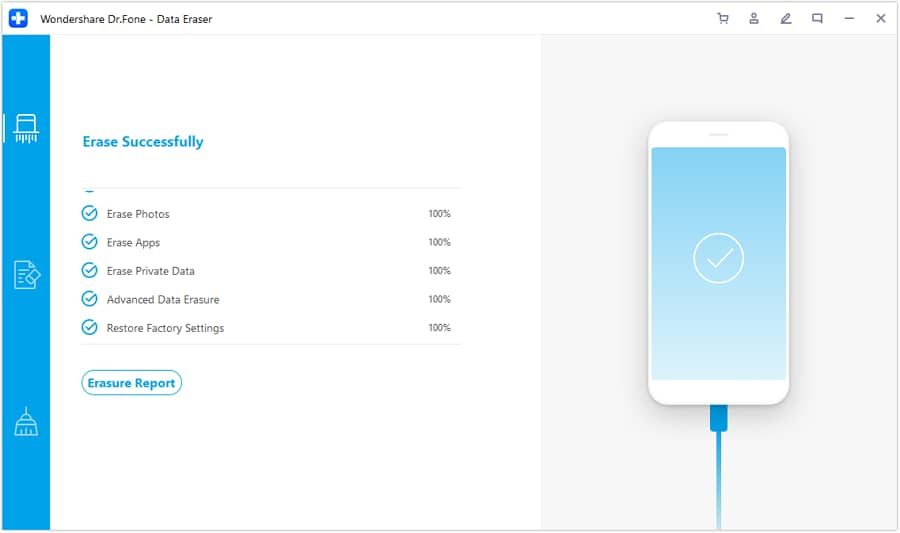
Step 5 Erasure Complete
Once the process is finished, you will see an "Erase Successfully" message. You can click on "Erasure Report" to verify which data types have been permanently removed from the device.
Part 4: How to Wipe a Locked or Disabled iPhone
Forgetting your passcode can be stressful, leaving you locked out of your own device. In such scenarios, you can't access the Settings menu to perform a standard factory reset. Fortunately, there are methods to wipe a locked iPhone and restore access. Here are two effective approaches.
Method 1: Use Dr.Fone - Screen Unlock (iOS) to Wipe a Locked iPhone
Wondershare Dr.Fone - Screen Unlock (iOS) is a powerful tool designed to bypass any type of screen lock, including 4/6-digit passcodes, Face ID, and Touch ID. The process will wipe all data on the device, effectively resetting it to factory settings and removing the forgotten passcode. It's a quick and reliable solution for regaining access to your device.
- Unlock iPhone/iPad passcode in minutes.
- Remove Face ID, Touch ID, and screen lock.
- Bypass iCloud Activation Lock easily.
- Support all iOS versions and devices.
- Simple steps, no technical skills needed.

-
Step 1 Select the Unlock iOS Screen Feature
Launch Wondershare Dr.Fone on your computer and go to "Toolbox" > "Screen Unlock." Select "iOS" as the device type, and then click on "Unlock iOS Screen." Connect your locked iPhone and click "Start." You will be guided to put your device into Recovery Mode using the on-screen instructions.

-
Step 2 Download Firmware and Unlock
Once your iPhone is in Recovery Mode, Dr.Fone will automatically detect its model and system version. Verify the information is correct and click "Start" to download the appropriate firmware. After the download is complete and verified, click "Unlock Now" to begin wiping the device and removing the lock screen.

Method 2: Use iTunes/Finder to Wipe a Locked iPhone
Apple's native solution for a locked iPhone is to use Recovery Mode with iTunes or Finder. This process also erases all data and settings on the device, allowing you to set it up as new or restore from a backup.
-
Step 1 Enter Recovery Mode
Connect your iPhone to your computer while launching iTunes or Finder. Then, force your device into Recovery Mode. The button combination varies by model:
- iPhone 8 or later: Quickly press and release Volume Up, then Volume Down. Then, press and hold the Side button until the Recovery Mode screen appears.
- iPhone 7/7 Plus: Press and hold the Side (or Top) button and Volume Down button together until you see the Recovery Mode screen.
- iPhone 6s or earlier: Press and hold the Home and Side (or Top) buttons simultaneously until the Recovery Mode screen appears.
-
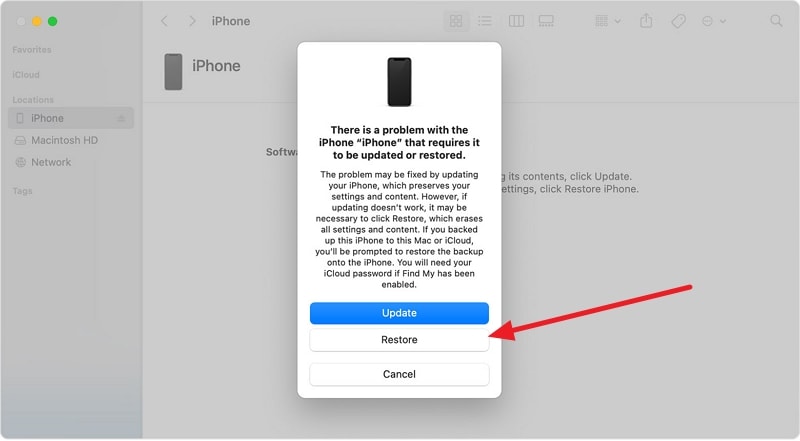
Step 2 Restore Your iPhone
Once in Recovery Mode, iTunes or Finder will detect the device and show a pop-up window with two options: "Update" or "Restore." Select "Restore." This will erase all data on your iPhone and reinstall the latest version of iOS. After the process is complete, your iPhone will restart as a new device.
Part 5: How to Remotely Wipe a Lost or Stolen iPhone
Realizing your iPhone is lost or stolen is a frightening experience, especially when you consider the sensitive data it contains. Fortunately, you can take immediate action to protect your information. Your options depend on whether you had the "Find My iPhone" feature enabled.
Option 1: "Find My iPhone" is Enabled
If "Find My iPhone" was active, you have powerful tools at your disposal to locate, lock, and erase your device remotely.
-
Step 1 Access Find My
Using a web browser on any computer, log in to icloud.com/find with your Apple ID. Alternatively, use the "Find My" app on another Apple device like an iPad or a friend's iPhone.
-
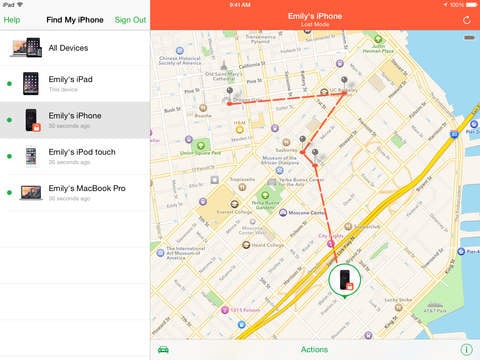
Step 2 Locate Your Device
Once logged in, open the "Find My" interface and select your missing iPhone from the device list. You should see its current or last known location on a map.
-
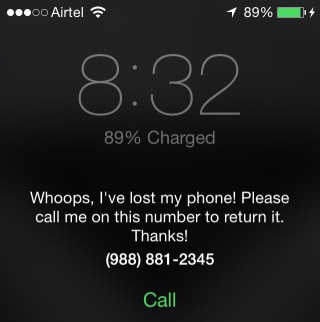
Step 3 Enable Lost Mode
As a first measure, activate "Lost Mode." This will remotely lock your iPhone with its passcode and allow you to display a custom message on the lock screen with a contact number. This also suspends Apple Pay on the device.
-
Step 4 Erase Your iPhone
If you believe the device is unrecoverable, select "Erase iPhone." This will remotely delete all data and settings. This is a final step, as you will no longer be able to track the device after erasing it. The erase command will execute the next time the device connects to the internet.
 Note: Do not remove the device from your iCloud account until you are certain it is gone forever. Removing it will disable Activation Lock, allowing someone else to activate and use it.
Option 2: "Find My iPhone" is Not Enabled
If "Find My" was not turned on, you cannot track or remotely wipe your device. However, you can still take crucial steps to protect your data.
-
Step 1 Change Your Apple ID Password
Immediately change your Apple ID password. This will prevent anyone from accessing your iCloud data (like photos and notes) and from using services like iMessage and iTunes on your missing device.
-
Step 2 Change Other Account Passwords
Change the passwords for all other important accounts that were accessible on your iPhone, including email, social media, and banking apps.
-
Step 3 Report to Law Enforcement
File a report with your local police. They may ask for your device's serial number, which you can find on its original packaging or your purchase receipt.
-
Step 4 Contact Your Cellular Carrier
Report your device as lost or stolen to your mobile carrier. They can disable your account and SIM card to prevent unauthorized calls, texts, and data usage.
Conclusion
Knowing how to properly wipe an iPhone is an essential data security skill in today's digital world. Whether you're upgrading to a new model, selling your old one, or dealing with a lost or locked device, this guide has provided a comprehensive overview of your options. From the standard factory reset to advanced methods for locked devices and permanent data destruction, you now have the knowledge to handle any situation.
For the ultimate peace of mind, especially when your privacy is on the line, using a dedicated tool is the most reliable choice. Wondershare Dr.Fone offers a suite of solutions, from secure data erasure to screen unlocking, ensuring your data remains yours and yours alone.
FAQ
-
1. What is the difference between a factory reset and securely wiping an iPhone?
A factory reset (Erase All Content and Settings) removes the pathways to your data, making it inaccessible to the average user. However, with sophisticated software, some data might be recoverable. A secure wipe, like that performed by Dr.Fone - Data Eraser, overwrites the data with junk files, making it permanently and completely unrecoverable. -
2. Will wiping my iPhone remove the iCloud Activation Lock?
No. Wiping the iPhone does not remove the Activation Lock. This security feature is tied to your Apple ID and the Find My service. To remove it, you must either turn off Find My iPhone in Settings before wiping or sign in with your Apple ID and password during the setup process after a reset. -
3. Can I recover my data after wiping my iPhone?
If you performed a standard factory reset, recovery is technically possible but very difficult. If you used a secure erase tool like Dr.Fone, recovery is virtually impossible. This is why creating a complete backup before you wipe your device is the most critical step. -
4. Do I need to remove my SIM card before wiping my iPhone?
Yes, it is always a good practice to remove your SIM card before selling or giving away your iPhone. The SIM card is tied to your cellular service and account, not the data on the phone. Removing it ensures the new owner cannot accidentally use your service.
 Add Wondershare Dr.Fone as a preferred source on Google