
If I Erase my Old iPhone, Will it Affect my New One?

Jun 30, 2026 • Filed to: Data Wipe Solutions • Proven solutions
 TL;DR:
Erasing your old iPhone will not affect your new device, provided you first securely unpair connected accessories and sign out of your Apple ID, iCloud, and iTunes accounts before initiating the wipe.
● For standard device resets, manually back up your data and sign out of iCloud (menu paths vary for iOS 10.3 or later versus iOS 10.2 or earlier) before selecting "Erase All Content and Settings," leaving your iMessage active since you are moving to a new iPhone.
● Wiping an iPhone via default settings makes files temporarily inaccessible but professionally recoverable; for permanent, unrecoverable deletion to prevent identity theft, you must use a third-party tool like Dr.Fone - Data Eraser (iOS).
● The Dr.Fone full erasure process is strictly irreversible and requires you to enter the passcode "000000" to confirm, maintain a stable lightning cable connection, and keep the device powered and unused until the software prompts a final reboot.
Ask AI for a summary
 ChatGPT
 Perplexity
 Gemini
 Claude
 Grok
Grok
If you haven’t erased personal data from your old iPhone, you may be concerned about the security of your sensitive information, including documents, photos, and personal details. Most people prefer not to share their private data with a new iPhone user unless they have specific reasons or have nothing personal to protect.
When you are thinking of erasing the data, the chances are that you are selling the phone or upgrading to a new iPhone. That said, how will you deal with your old iPhone?
When considering iPhone data, think about your emails, messages, photos, and documents, as well as downloads, app logs, cache, preferences, and cookies. Simply deleting these items doesn’t fully remove them from your device's storage—it just makes them temporarily inaccessible.
Apart from deleting iPhone data, there are other crucial things to do before getting rid of it. Such include
- Unpair your apple watch,
- Backing up your iPhone data,
- Sign out of iCloud, app store, and iTunes,
- Turn off find my iPhone,
- Remove the iPhone from the apple id account,
- Unlock the iPhone
- Remove your SIM
Part 1: How to erase iPhone data?
Before upgrading to a new iPhone, ensure you transfer all your data from the old device. While manually deleting contacts, photos, documents, and iCloud info may seem like a solution, these items still remain in your storage, even if they aren’t visible.
Deleting iPhone data through device settings may seem effective, but it can still be recovered professionally. Whether your old iPhone is lost or in hand, you can securely erase all data without affecting your new device. Follow these steps for a successful data removal.
1.1 If you have your iPhone
You will have to follow the following steps to move your data before removing all your old iPhone information. Your new iPhone will allow you to transfer information from your old device automatically using the QuickStart. However, this applies to users with devices that support IOS 11 or later. Suppose you are using iPhones with IOS 10 or earlier. In that case, you can transfer your iPhone information to your new device by using iCloud, the Finder, or iTunes successfully.
If you're using a new phone number on your iPhone, add trusted contacts to your account to prevent losing access. If you no longer have access to the old number, trusted contacts can help generate the two-factor authentication code when needed.
Here is how you will remove your personal information from your old iPhone.
- Step 1: Remove paired devices such as the Apple Watch if you had connected one to the old iPhone.
- Step 2: Backup important data that you will not want to lose.
- Step 3: Sign out of your accounts such as iTunes, App Store, and iCloud.
Here is how to go about it:
- On devices that support IOS 10.3 or later, check the tap the settings icon> icon with your name, then select sign out. You should enter your Apple ID password then tap on the Turn off section.
- For those using IOS 10.2 or earlier, go to settings, tap icloud>sign out, and then tap again to access “Delete from my device.” It will help if you enter the Apple ID passcode to complete the process. Finally, go to settings and select iTunes and App Store> Apple ID, then sign out.
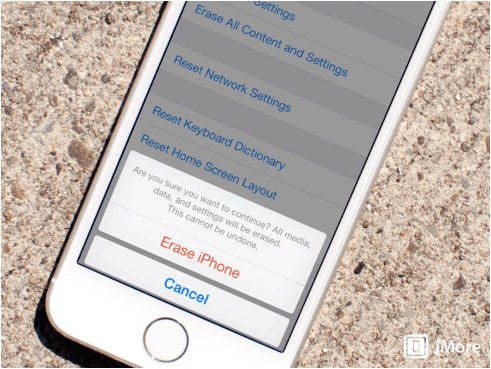
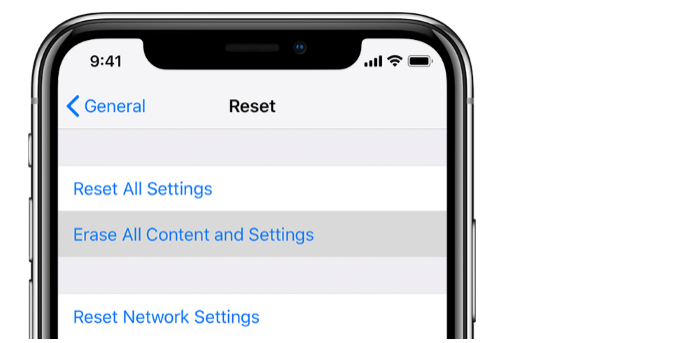
- Step 4: Once you are done signing out all your accounts, go to settings again. Under the ‘general tab,’ select ‘reset,’ then ‘erase all content and settings.’ If your iPhone has the Find function turned on, you will be asked to enter the Apple ID password.
- Step 5: The iPhone will probably ask for the device passcode before you tap on the erase device tab.
- Step 6: Since you are moving to a new iPhone device, you don’t have to deregister iMessage.
- Step 7: Lastly, contact your carrier to transfer services to the new owner if you are giving away the old iPhone. Also, don’t forget to remove your old iPhone from the list of your trusted devices.
1.2 If you don’t have the old iPhone
If you no longer have your old iPhone, you can ask the new owner to erase the content and settings using the steps above. Alternatively, sign in to iCloud or the Find My iPhone app on another device to erase the data remotely. Once done, select "Erase from Account" to complete the process.
Another option is to reset your Apple ID password to prevent unauthorized access to your iCloud account. This will stop anyone from deleting your personal data. Additionally, you can remove credit and debit card information linked to Apple Pay via iCloud if it was used on your old iPhone.
Part 2: Erasing iPhone data by Dr.Fone-Data Eraser (iOS)
While deleting your iPhone data by phone can guarantee recovery in a professional process, you can permanently erase the data to protect your privacy even from a professional identity thief using the Dr. Fone – Data Eraser.
The software is available for use on both windows and mac users. The following are the features that come with this incredible data eraser;
- Erase unwanted items hence creating more space and speed up your iPhone
- Can permanently remove 3rd party apps such as Viber, Whatsapp, Kik, etc.
- Large file management in a more sophisticated way
- Erase items on your iPhone selectively
Dr.Fone – Data Eraser provides top-tier privacy protection for iPhone users, safeguarding against identity theft in the face of rising cybersecurity risks. It ensures that deleted data is permanently erased, unrecoverable by even the most advanced recovery tools.
2.1 Full Data Eraser
Dr.Fone - Data Eraser is the ultimate solution for permanently wiping iPhone data. This powerful tool safeguards your privacy by completely removing even the most stubborn files, ensuring your personal data is secure and inaccessible to professional identity thieves.

From the functions on the window, select the Data Eraser option. Here is a guideline for using the Dr. Fone – full Data Eraser function when removing data on your iPhone;
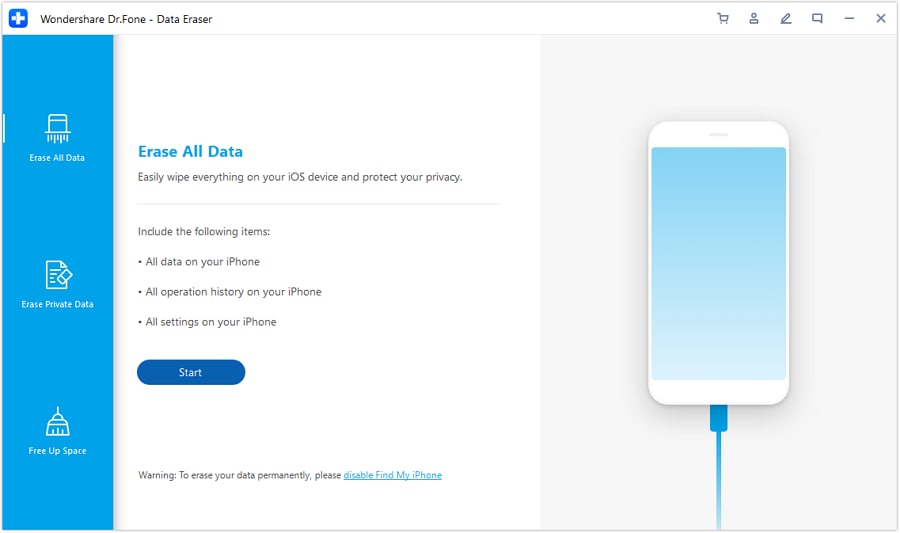
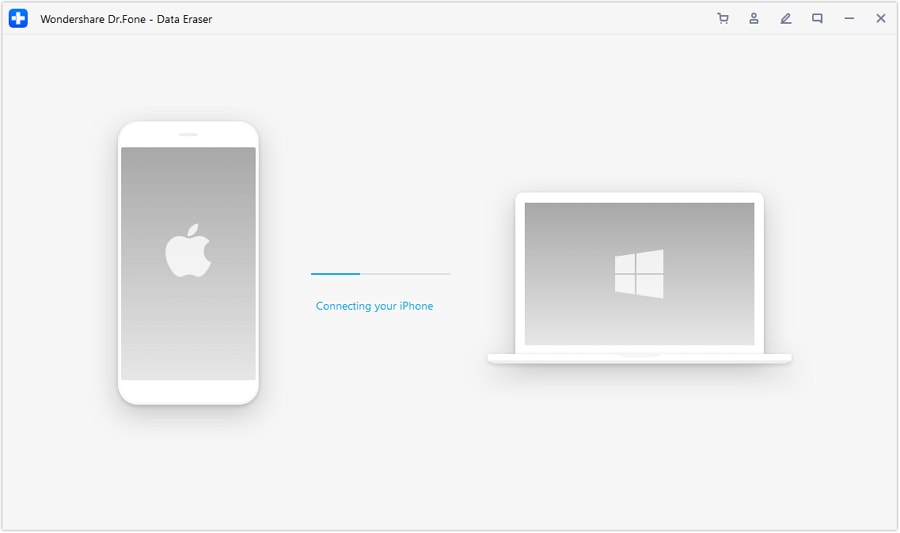
Connect the iPhone to the computer: a lighting cable is used to connect your device to the computer. Once the iPhone is recognized, you will have three options on the window, including Erasing Private Data, and Free up space on iPhone and Erase all Data. From the list on your left vertical edge, choose the Erase All Data option to begin the erasing process.
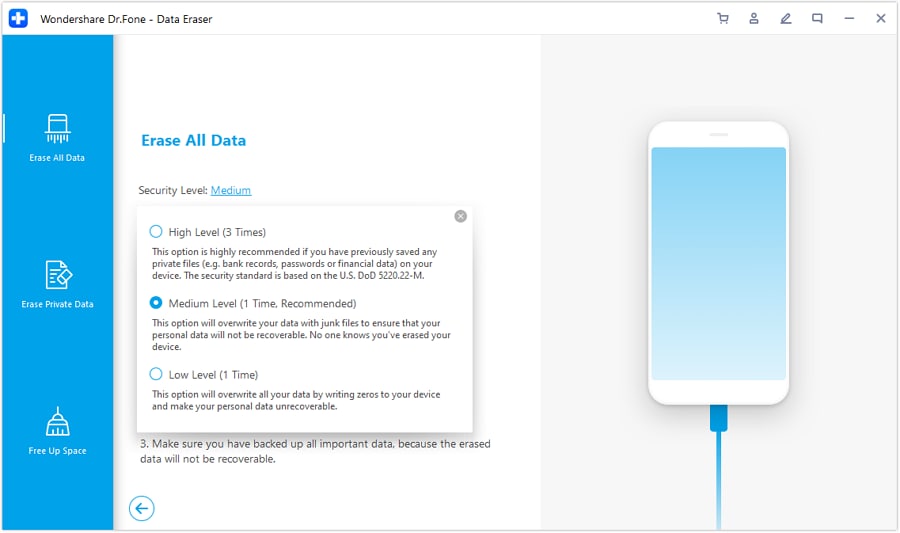
The phone starts to erase permanently: once the device is detected on the Dr. Fone – Data Eraser software, go ahead to select the security level to erase the iPhone data. Beware that a higher security level gives no chance for recovering your data. Also, the option takes a while to remove everything from the computer completely.
While the erasing process is ready to begin, you need to be careful since you cannot recover the data. Enter the passcode 000000 to confirm when you are prepared to take action.
Wait for the erasing process to complete: Upon beginning the erasing operation, you will need to wait without using the iPhone. Ensure that the device is connected to a power source during the whole erasing process.
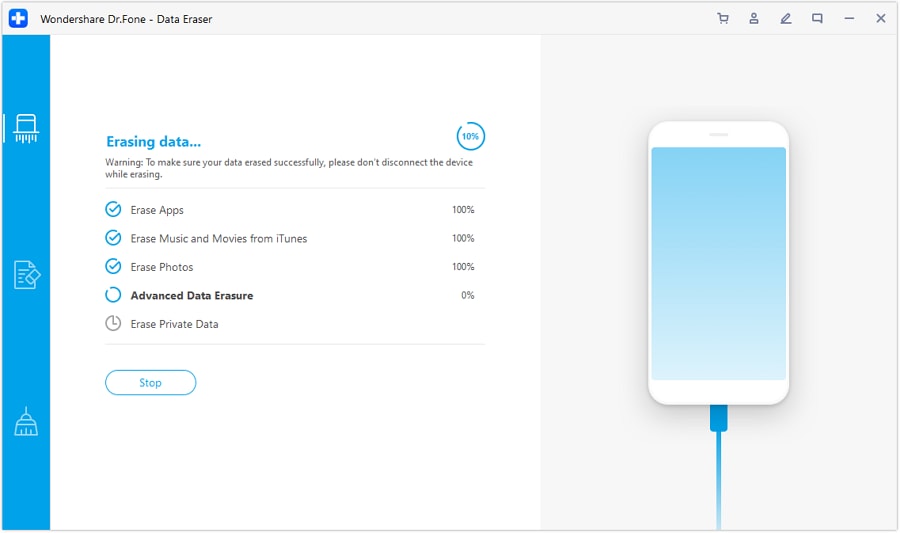
The program will prompt you to accept the rebooting process of your iPhone. Click ok to confirm and continue.
A window indicating the erasing process is complete appears. This indicates that the iPhone turns into a new device since it does not contain any content. You can, therefore, begin setting it based on your preferences.
2.2 Private data eraser
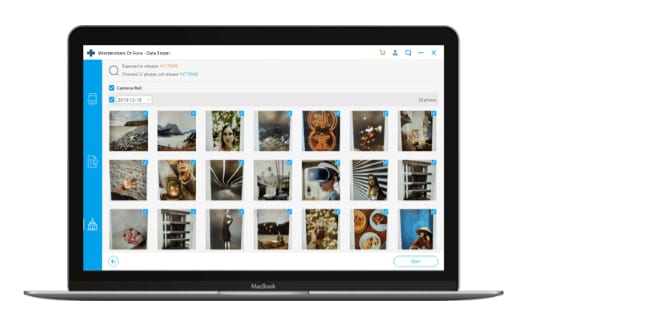
The private data eraser is among the powerful Dr. Fone toolkits that help iPhone users wipe their personal information such as messages, notes, call history, bookmarks, calendars, and photos.
Moreover, Dr. Fone – private Data Eraser allows iPhone users to select items that require permanent erasure. As such, there are no chances of recovering personal data again.
To use this feature, you need to launch Dr. Fone on your computer. Select the Data Erasure option from the modules available on the program's window. The erasing process will take place in the following procedure:
Connect the iPhone to your computer: use a lighting cable to plug in the device. Please tap on the Trust option that appears on your iPhone to ensure it connects successfully.
Once the iPhone connects successfully, you will access three options. Select the erase private data options.
The program will then scan the private data on your iPhone after clicking on the start button. The scanning process usually takes some time to find personal data.
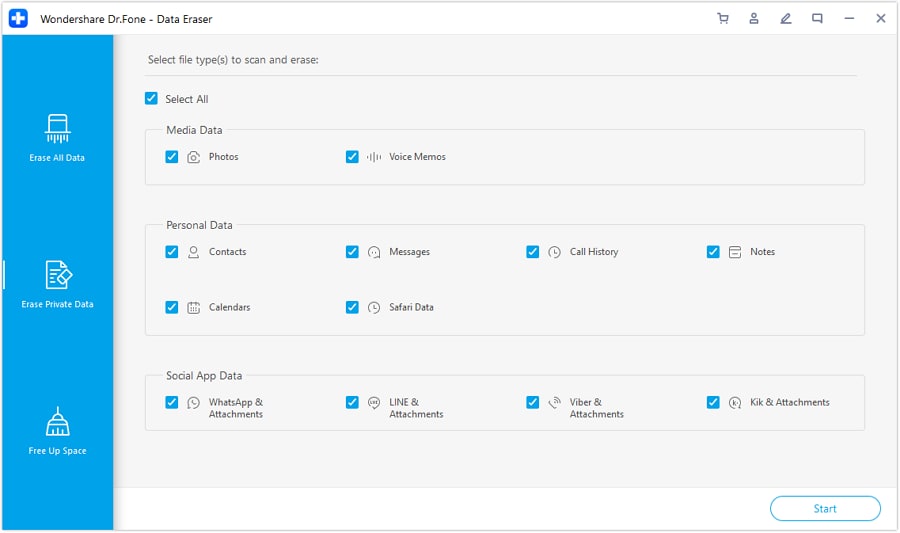
When the scan results show up, choose the data you want to delete and initiate the process by clicking on the erase button.
2.3 Space saver
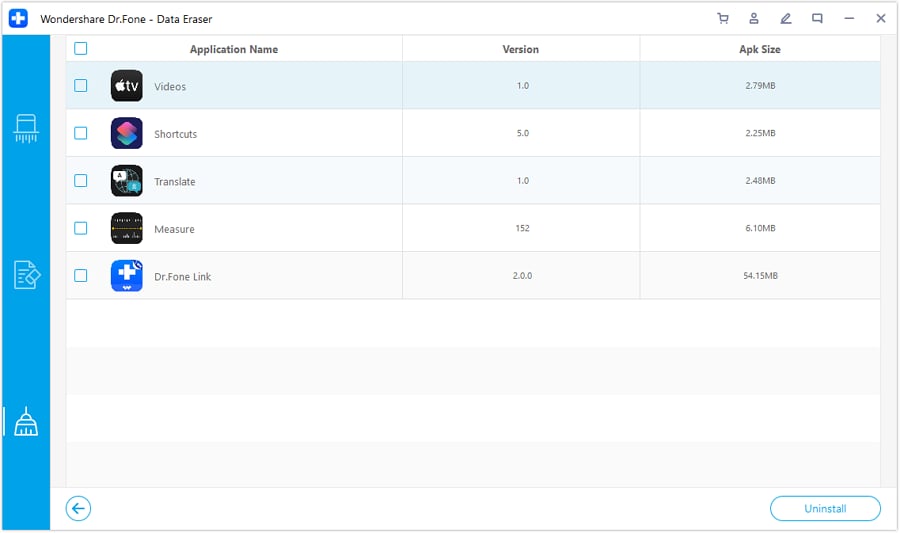
When your iPhone becomes slower or keeps displaying an error message, the chances are that the storage space is fed up. In that case, you can use the space saver function on the Dr.Fone program. Once you have launched the program and connected the device, click on the data eraser button.
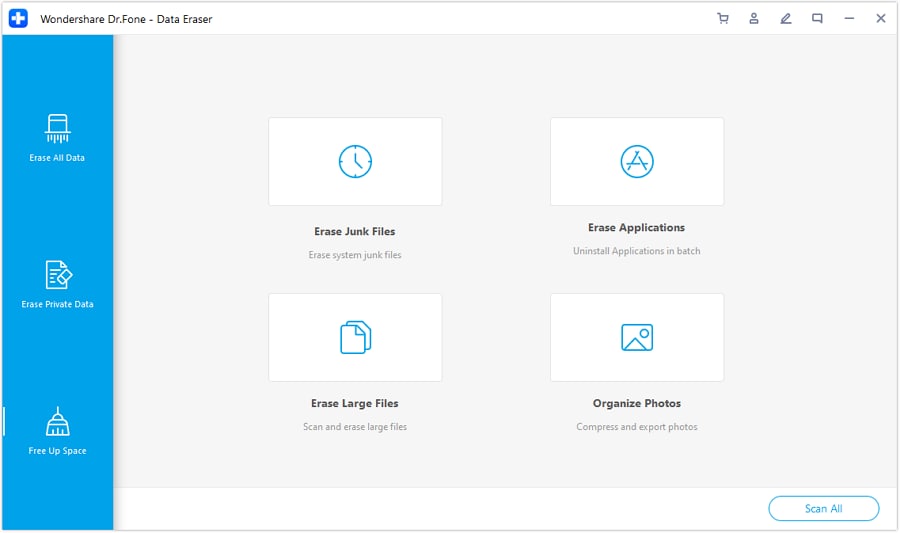
You can erase junk files from the data erasure option, remove useless apps, manage large files, compress photos, or export them.
Clicking on each of the functions will prompt you to select options as follows;
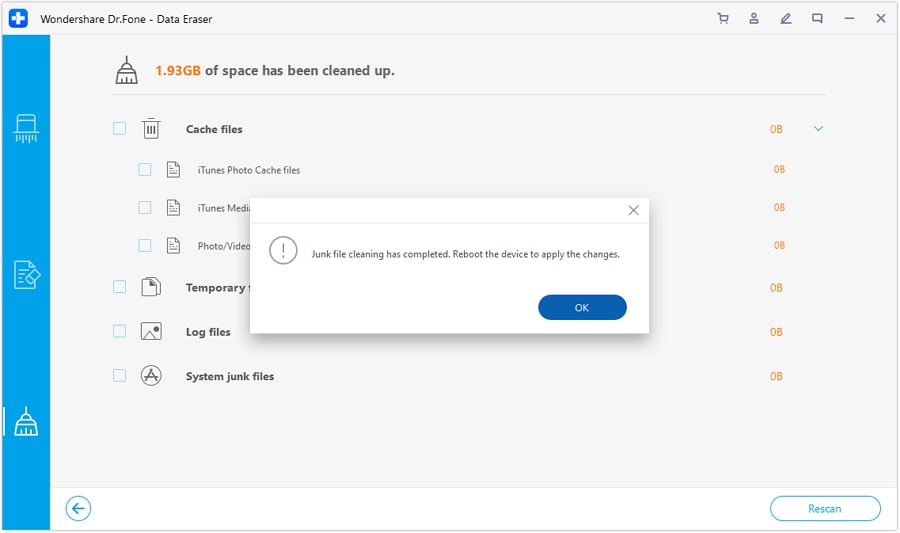
- ‘Clean’ to remove selected junk files
- ‘Uninstall’ to remove useless apps.
- ‘Delete’ button to remove or export large files to your computer before deleting.
- And lastly, you will organize photos or compress them to free up some space.
Part 3: What should I pay attention to while wiping data?
When using the Dr. Fone program to erase iPhone data, you need to be careful because there is no likelihood to recover in any way whatsoever. The erasure process s unlike when you are doing the process by phone. That said, you need to pay attention to the following:
- Ensure the lighting cable has connected firmly so that it does not disconnect before the erasure process is complete
- Your device should have enough battery power
- Don’t use the phone or open any application during the process of erasing data
- Always confirm the information you need to delete permanently because you will not recover it once the erasure process is complete.
Bounce tip
Before erasing personal data from your iPhone, make sure to back it up. This ensures you can recover your data when needed, especially when transferring to another iOS device. You can back up your iPhone using iCloud or iTunes. To back up with iCloud, go to Settings, select iCloud, and enable iCloud Backup. Alternatively, connect your iPhone to your Mac via USB to back up your data using iTunes.
While these backup options work excellently in backing up iPhone data, you can also rely on Dr.Fone – phone backup to backup and export your iPhone data to a computer. This program makes it easier for users to backup data selectively and restores conveniently to the ios devices.
Conclusion
Dr.Fone is an essential tool for iPhone users looking to erase various types of data from their device. While iPhones offer simple backup and erasure methods, Dr.Fone provides additional features that enhance usability and convenience, allowing users to perform critical actions that are otherwise unavailable directly on the device.
3,730,615 people have downloaded it


iPhone Erase
- Clear iPhone
- Delete iPhone
- 1. Delete Albums on iPhone
- 2. Delete Apps from iPhone
- 3. Delete Calendar Event on iPhone
- 4. Delete Documents on iPhone
- 5. Delete Email Account on iPhone
- 6. Delete Visited Sites on iPhone
- 7. Delete Music from iPhone
- 8. Delete Snapchat Messages on iPhone
- 9. Delete Songs from iCloud
- 10. Delete Voicemail on iPhone
- 11. Delete WhatsApp Message for Everyone
- 12. Delete WhatsApp Message Permanently
- 13. Delete Downloads on iPhone
- 14. Delete Calendars from iPhone
- 15. Delete History on iPhone
- 16. Delete Snapchat Story/History
- 17. Delete Call History on iPhone
- 18. Delete Kik on iPhone
- 19. WhatsApp Delete Message Tips
- 20. Anti Spyware for iPhone
- 21. Get Rid of Virus on iPhone
- 22. Delete Other Data on iPhone/iPad
- 23. Remove Subscribed Calendar iPhone
- Erase iPhone
- 1. Erase an iPhone without Apple ID
- 2. iPhone Data Erase Softwares
- 3. Remove Cydia from iPhone/iPad
- 4. Erase All Content and Settings
- 5. Erase Old iPhone
- 6. Erase iPhone 13 Data
- 7. Erase Data Old Device
- 8. Erase iPhone without Apple ID
- 9. Empty Trash on iPhone
- 10. Sell My Old iPhone
- 11. Sell A Used Phone
- 12. Safely Sell Used Phones
- 13. Apple Trade in Program
- iPhone Storage Full
- 1. iPhone Cleaners to Clean iPhone
- 2. Clean Master for iPhone
- 3. Clean Up iPhone
- 4. Free Up Storage on iPhone
- 5. Make iPhone Faster
- 6. Speed Up iPhone/iPad
- Wipe iPhone
- Sell Old iPhone
- ● Manage/transfer/recover data
- ● Unlock screen/activate/FRP lock
- ● Fix most iOS and Android issues
- Free Download Free Download Free Download


Alice MJ
staff Editor