How to Delete Snapchat Story/History without Any Hassle?

May 22, 2026 • Filed to: Data Wipe Solutions • Proven solutions
 TL;DR:
You can delete individual Snapchat Stories and chat history directly within the mobile app to free up space, but permanently wiping your entire account history requires using a computer to access the Snapchat web portal or a third-party desktop tool like Dr.Fone - Data Eraser.
● Deleting a Snap or Custom Story removes it from the app but does not prevent users from keeping screenshots they have already taken, though you can use the download icon to save your own copy before deletion.
● Erasing your complete Snapchat account history requires logging into accounts.snapchat.com via a computer, which places the account into a 30-day dormant grace period where it can still be reactivated.
● Using Dr.Fone - Data Eraser to make Snapchat history irrecoverable on an iPhone, iPad, or iPod touch requires a Windows or Mac computer, an active USB connection, and executing a Medium Level data overwrite confirmed by typing 0000.
Ask AI for a summary
 ChatGPT
 Perplexity
 Gemini
 Claude
 Grok
Grok
In this time and age, trending social media platforms are developed every other day to enhance virtual interaction among people. To mention a few, we have Snapchat, Instagram, and Facebook that are most popular to all of us. These three apps have one thing in common, the Your Story feature. This feature allows you to share with followers your everyday experiences in real time!
In this article, however, our primary focus is on Snapchat stories and history. With time, especially if you post stories on Snapchat regularly, most of your storage space gets used up, thus the need to find out how to delete Snapchat Story on your device.
- Erasing Snap stories and history is vital since it improves the performance speeds of your gadget.
- Plus, you get to have your data and information, e.g., contacts and stories, organized well.
- You could also be looking to delete a Snap Story only because it had some glitches when you posted it.
- Or it is an old Story, and you don’t need its contents anymore. So, the logical thing to do is delete it.
- Another reason why you would want to delete Snapchat history and Story is to maintain your privacy on social media and preventing others from accessing your essential details.
Below is an outline of what we shall be talking about throughout the article:
Part 1. How to Delete Snapchat Story
Here, we will look at three subsections concerning Snapchat stories as follows:
Delete a Snapchat Story
For whatever reason, you may want to erase a Snapchat Story, follow the steps below:
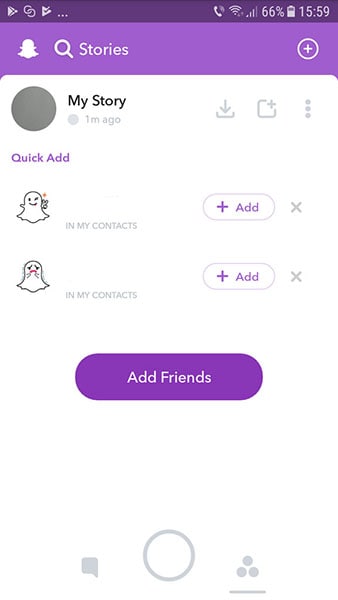
Step 1: To start with, on your device, get to the Camera screen. On the lower right, tap on the Stories icon, or you can swipe left on your Camera screen.
Step 2: Next, on the Stories screen, select the Story that has the Snap you wish to get rid of. Then tap on the Overflow Menu icon.
Step 3: Now choose the Snap you want to delete and tap on it.
Step 4: Next, tap on the Overflow Menu icon, which is on the Snap screen on the top right.
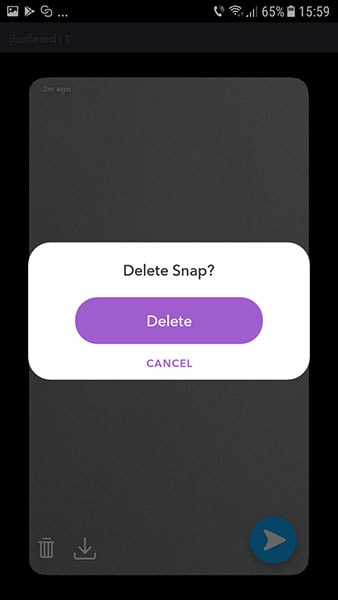
Step 5: On the lower left, you will see a Trashcan icon. Tap on it.
Step 6: Lastly, click on Delete.
You might wonder about the Custom Story you created since the steps above are for deleting a single Snap. Worry not, below is a guideline on deleting Snaps posted in a Custom Story.
Step 1: Look for the Custom Story you want to delete from the Story Screen.
Step 2: Now, click on the Settings gear icon just next to it.
Step 3: Click on the Settings gear icon once more.
Step 4: Finally, select Delete Story to get rid of it.
Note: The above is not a foolproof way to erase your Snapchat Story because someone who is part of your Story can take screenshots of particular Snaps if they wish to and have your data at hand.
If you wish to be able to access a Snap Story even after you remove it, read the next sub-section.
How to save a Snapchat Story before deleting it
Yes! It is possible to save a Snap or Custom Story to your Camera Roll or Memories before deleting it.
To save a Custom Story, here are the simple steps to follow:
Step 1: First of all, on your device, find the Story Screen.
Step 2: Secondly, look for the Custom Story you wish to save.
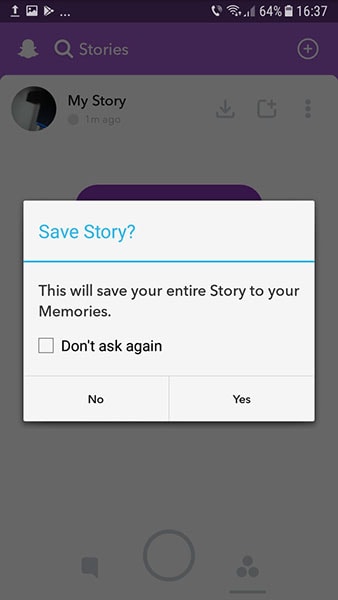
Step 3: Now, click on the Download icon next to the selected Custom Story.
Step 4: On the popup window asking ‘Save Story?’ click on Yes.
In case you prefer to save a specific Snap from the collection in the Custom Story, these are the steps:
Step 1: As usual, first go to the Stories Screen.
Step 2: Secondly, click on the Overflow Menu icon next to Stories.
Step 3: Now, select the Snap you want to save.
Step 4: Next, on the Snap Screen, in the top right corner, tap on the Overflow Menu icon.
Step 5: You can now click on the Download icon, which is in the lower left. This action saves that particular Snap.
And just like that, you can proceed to delete Snapchat stories to clear up storage space. You have the Story backed up anyway!
In the next section, we will look at how you can manage who views your Snapchat Story. Crazy, right?
How to set the audience of your Snapchat Story
Now that you know how to delete Snapchat stories and how to save them for a down the memory lane session, you also need to know how to manage who gets to see your Snap Story.
Well, we have you covered with the following steps.
Step 1: To start, find the Snapchat app on your device and open it.
Step 2: Now, go to its Home Screen by swiping down on the Camera screen that opens first.
Step 3: Next, tap on the Gear icon in the upper right corner of your screen. It takes you to your Snapchat Settings menu.

Step 4: Now, under the WHO CAN…, select View My Story option.
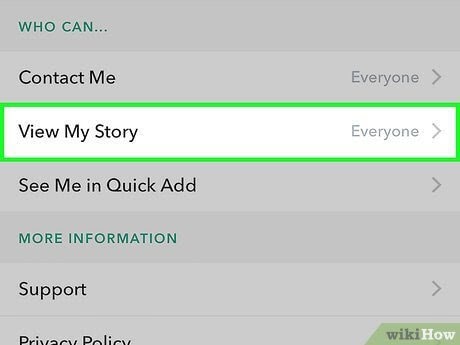
Step 5: Finally, in the window with the options Everyone, My Friends, Custom, choose whom you’d like to view your Snap Story.
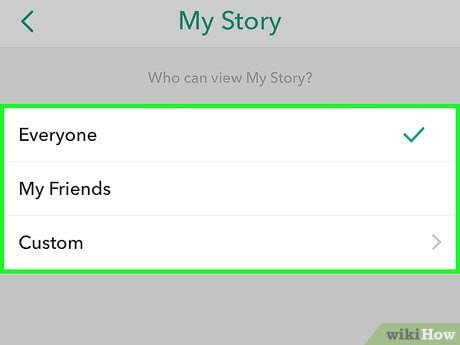
Selecting ‘Everyone’ allows anybody, friends, or not to view your Story.
My Friends option limits viewing of the Story to just those on your friends list.
To have specific friends see your Story, choose the Custom option. It allows you to block some of your friends from viewing your Story. Though they can still see the Snapchats you send.
Well, that’s enough talk about the Snapchat Story, now let us move on to how can you delete the Snapchat history.
Please note that these are two different entities of Snapchat. Read the next part to find out how.
Part 2. How to Delete Snapchat History
There are two ways you can implement to clear Snapchat history.
One way is:
Delete Snapchat History with the App Itself
Find a complete guide to deleting Snapchat history in this subsection. These include your chats, friends list, and the entire account.
To get rid of your chat history with a particular friend, you will have to:
- Go to Settings, then scroll down to Clear Conversations, visible under the Account action.
- Next, tap on the X that is next to the name of your friend you desire to delete your chat with.
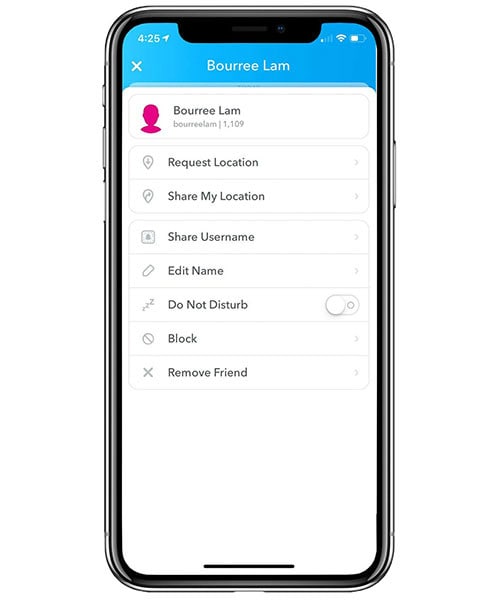
To remove a friend from the friend’s list,
- Find their name using the search bar which will open a chat with them.
- Next, on the upper left corner of the screen, tap on the Menu icon. Choose Remove Friend found at the bottom.
- In the popup window, Confirm that you want to delete your friend.
That’s all! You have successfully removed your specific friend from the list.
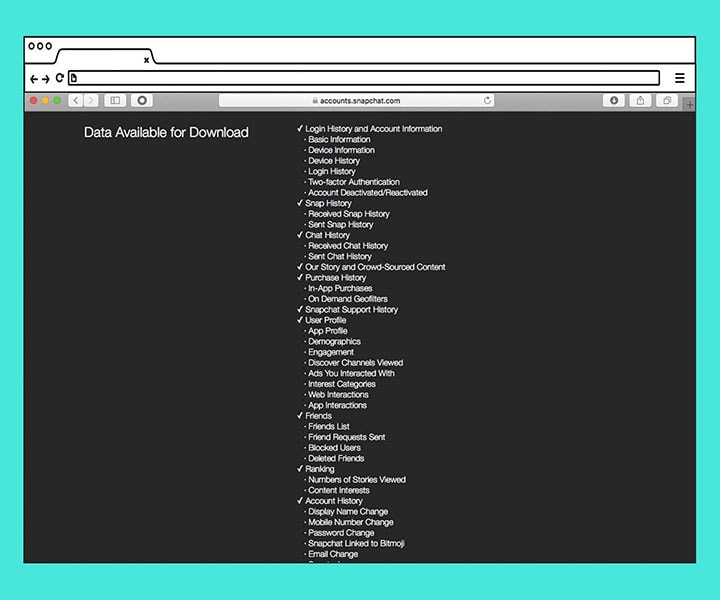
Finally, before you delete your account and the app itself, you need a preview of your activities on Snapchat.
For that, you can go to accounts.snapchat.com, log in then choose My Data > Submit Request. Next, you will be sent for an email with a link. Tapping on this link will enable you to download a copy of your Snapchat history.
Or, you can request a copy from the application. Just go to Settings > Account Actions > My Data.
Now, let’s delete the account. It is effortless. You will need a computer for this.
- Once your PC is on and connected to the Internet, log in to your Snapchat account.
- The next step is to tap on Delete My Account.
- When asked, enter your username and password. It doesn’t render your account deleted immediately. There’s a thirty-day grace period in which your account is just dormant. You cannot get Snaps or chats from your friends. But, before the grace period expires, you can log back in and reactivate your account.
The other way of getting rid of your Snapchat history is by use of a Snapchat history eraser app. The most recommended tool is Dr.Fone - Data Eraser.
Let’s look at it in detail in the sub-section below.Permanently delete Snapchat history with a Snapchat history eraser
Again, Dr.Fone - Data Eraser is the best application to permanently erase Snapchat data, and media. The eraser tool is handy and efficient since:
Dr.Fone - Data Eraser
Effective tool to permanently delete Snapchat history
- It provides you a simple click-through process of deletion.
- Enables you to delete data and media files permanently.
- It helps protect your privacy and personal information from identity thieves. Not even the best professional data recovery software can retrieve these files once they are gone.
- It works with no glitches whatsoever on all iDevices. These include all versions, old and updated, of Mac/iPhone/iPad/iPod touch.
- Is available at a friendly price and is worth every cent you get to spend on it. It doesn’t cause any damage to your device or install other software in the background like other apps do.
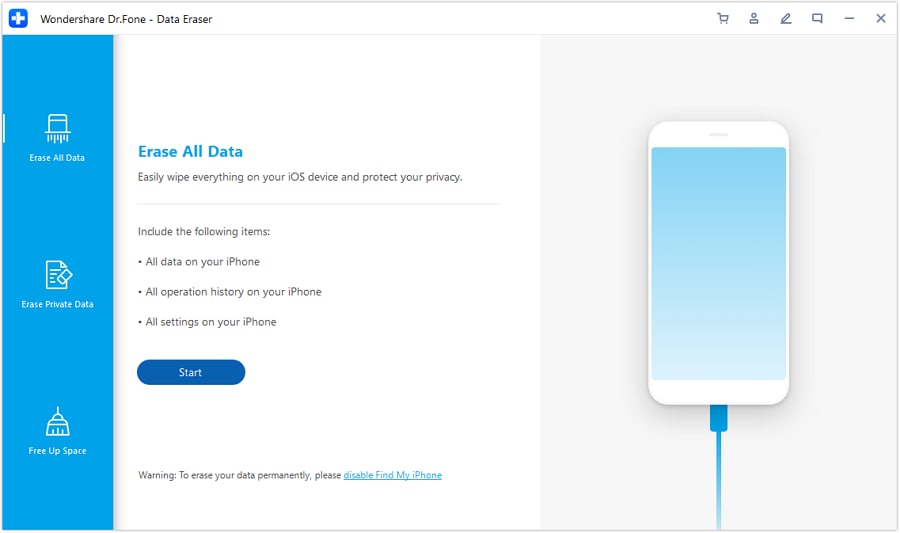
Now, to permanently erase data from your gadget, inclusive of Snapchat history, using Dr.Fone - Data Eraser, follow the simple steps below:
Step 1: First of all, download, install, and launch the software on your computer and connect you iPhone/iPad/iPod to your PC using a USB data cable.
Step 2: The connection will take some time. Ensure it is complete before you move on to the next step.
Step 3: Once the connection is successful, select Erase All Data out of the 3 listed options on the first screen.

Note: Make sure to not disconnect the cable and keep your iPhone fully charged during the process.
Step 4: Now, click on Start for the erase process to begin.
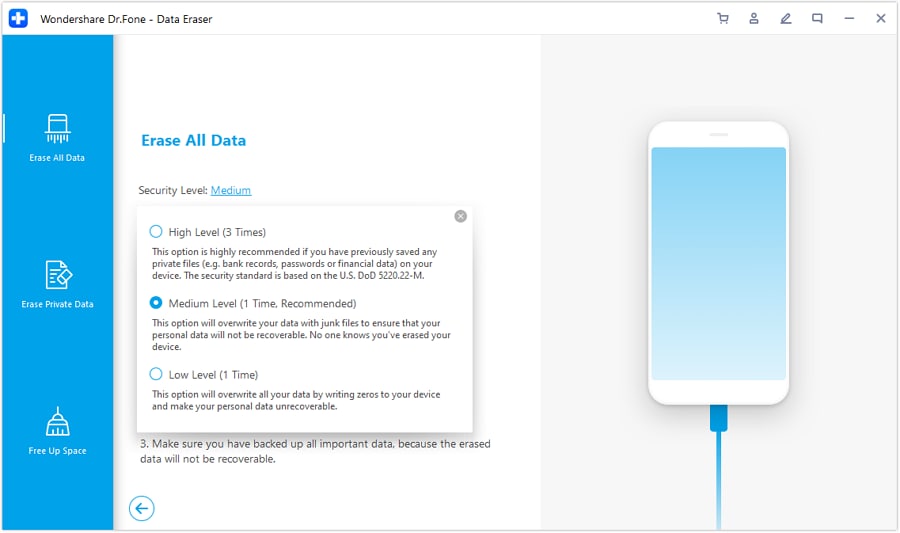
Step 5: You will now see three options: High Level, recommended in case you have saved private files example, finance, etc. Medium Level, recommended for removing junk files, and the Low Level, recommended to overwrite all data.
Select, Medium Level to delete Snapchat history and proceed.
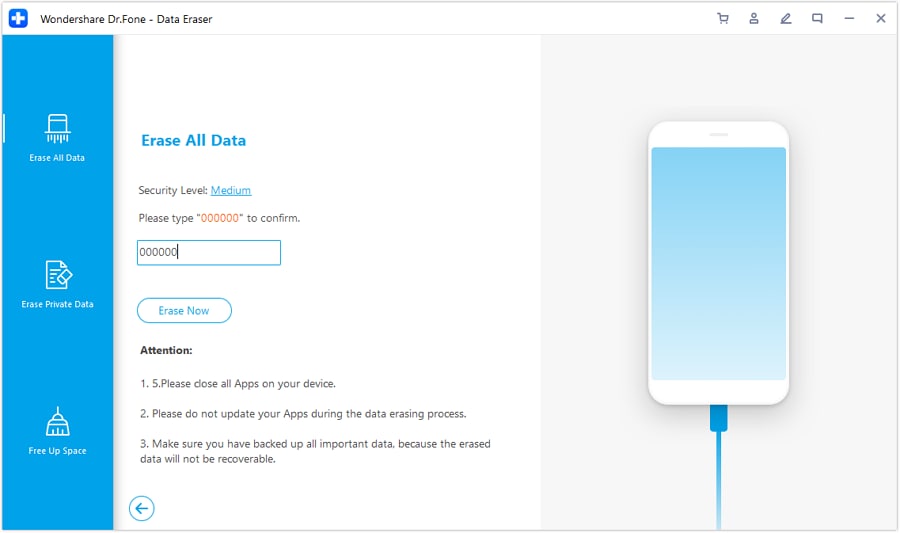
Ensure that you confirm to proceed by entering 0000 in the box and then click on Erase Now. Remember, your data will be irrecoverable.
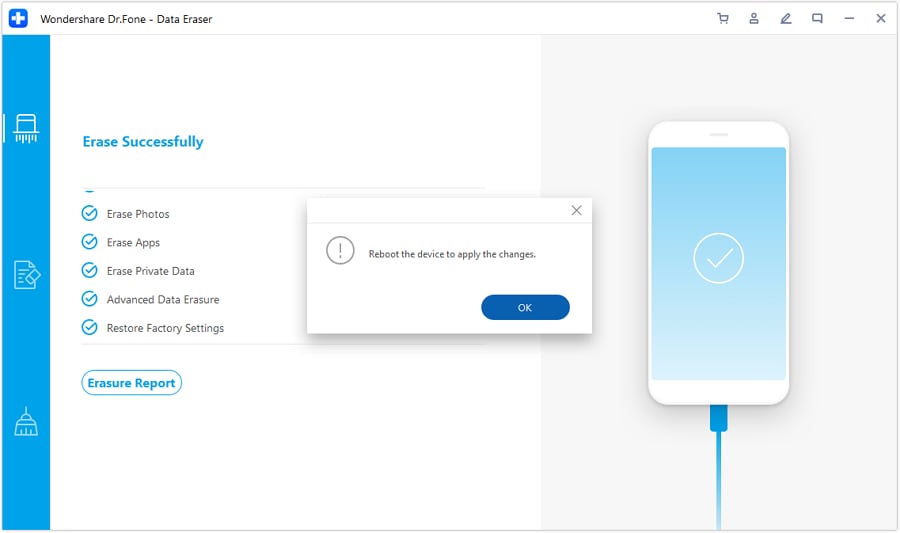
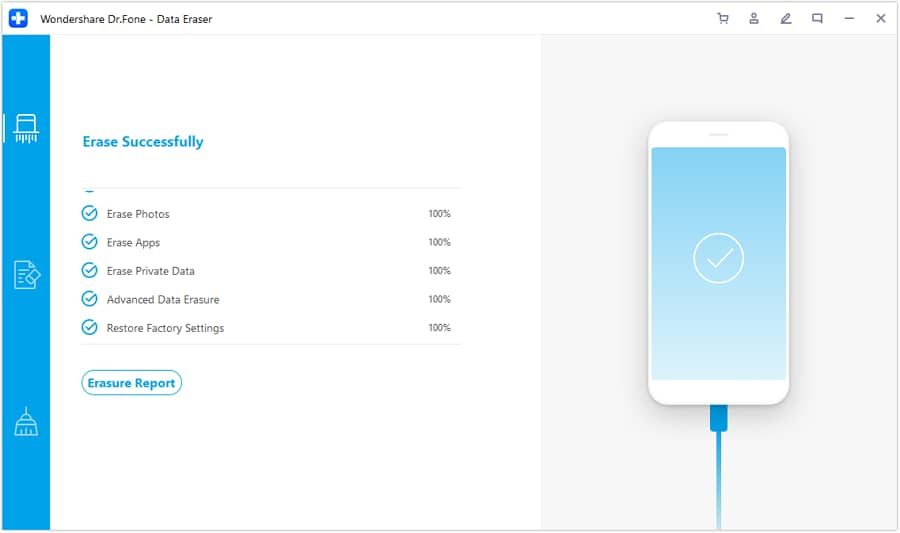
Step 6: Once the process is complete, you will receive a notification as in the picture below. Reboot your device as instructed.
Step 7: You can now finally close the data eraser software and start using the device.
You successfully along with other data files, you also permanently erased Snapchat history.
Conclusion
To conclude, it is clear that Dr.Fone - Data Eraser is the ideal data eraser tool to get rid of data and media files permanently. It is cost efficient, available for both Windows and Mac operating system. It is also safe and secure with a user-friendly interface. I believe that this article will be useful in helping you understand how to delete the Snapchat Story and also to learn about the best Snapchat history eraser, Dr.Fone - Data Eraser.
Therefore don’t forget to share this article with your friends to help them manage their Snapchat Story and history effortlessly.


iPhone Erase
- Clear iPhone
- Delete iPhone
- 1. Delete Albums on iPhone
- 2. Delete Apps from iPhone
- 3. Delete Calendar Event on iPhone
- 4. Delete Documents on iPhone
- 5. Delete Email Account on iPhone
- 6. Delete Visited Sites on iPhone
- 7. Delete Music from iPhone
- 8. Delete Snapchat Messages on iPhone
- 9. Delete Songs from iCloud
- 10. Delete Voicemail on iPhone
- 11. Delete WhatsApp Message for Everyone
- 12. Delete WhatsApp Message Permanently
- 13. Delete Downloads on iPhone
- 14. Delete Calendars from iPhone
- 15. Delete History on iPhone
- 16. Delete Snapchat Story/History
- 17. Delete Call History on iPhone
- 18. Delete Kik on iPhone
- 19. WhatsApp Delete Message Tips
- 20. Anti Spyware for iPhone
- 21. Get Rid of Virus on iPhone
- 22. Delete Other Data on iPhone/iPad
- 23. Remove Subscribed Calendar iPhone
- Erase iPhone
- 1. Erase an iPhone without Apple ID
- 2. iPhone Data Erase Softwares
- 3. Remove Cydia from iPhone/iPad
- 4. Erase All Content and Settings
- 5. Erase Old iPhone
- 6. Erase iPhone 13 Data
- 7. Erase Data Old Device
- 8. Erase iPhone without Apple ID
- 9. Empty Trash on iPhone
- 10. Sell My Old iPhone
- 11. Sell A Used Phone
- 12. Safely Sell Used Phones
- 13. Apple Trade in Program
- iPhone Storage Full
- 1. iPhone Cleaners to Clean iPhone
- 2. Clean Master for iPhone
- 3. Clean Up iPhone
- 4. Free Up Storage on iPhone
- 5. Make iPhone Faster
- 6. Speed Up iPhone/iPad
- Wipe iPhone
- Sell Old iPhone
- ● Manage/transfer/recover data
- ● Unlock screen/activate/FRP lock
- ● Fix most iOS and Android issues
- Free Download Free Download Free Download


James Davis
staff Editor