No iTunes, No Problem! How To Move Song From iTunes To iPhone Faster
Oct 24, 2025 • Filed to: Device Data Management • Proven solutions
Dr.Fone Basic:
Better Control for Your Phone
Manage, transfer, back up, restore, and mirror your device
Imagine turning your iPhone into the ultimate music hub with just a few clicks. No tedious setups, no outdated tools—just pure convenience. Whether you want to prepare a playlist for that morning jog or set the mood for an overnight, knowing how to put music on iPhone can be quite a game-changer.
Well, imagine that you can evade all the frustrations of iTunes and enjoy your favorite songs instantly. This is about transferring music, but with a new definition of its experience. From basic tricks to modern tools, it's going to be shown how smartly you can download music onto iPhone, and hence, revolutionize your playlist. Dive in to explore the secrets that make your iPhone the perfect music companion.
- How To Add Music on iPhone without iTunes
- Method 1: How to Transfer Music to iPhone Without iTunes Using Dropbox
- Method 2: How to Transfer Music to iPhone Without iTunes using Email
- Method 3: How to Add Music to iPhone Using Google Drive
- Method 4: Transfer Music to iPhone via Spotify

- Method 5: The best way to Transfer Music from Computer to iPhone (Including iPhone 18) Without iTunes
How To Add Music on iPhone without iTunes
iTunes is Apple's official method of adding music to iPhone, iPad, or iPod Touch. Through iTunes, music is transferred by syncing your computer with your iPhone. However, this syncing process replaces existing media files—such as music, TV shows, movies, and books—with the newly synced items. This approach is often inconvenient and unwanted by most users.
As a result, many users look for ways to transfer music to iPhone without iTunes. Continue reading if you want to know how to accomplish it. You’ll discover how to upload music to iPhone without iTunes, making the process straightforward and hassle-free.
Method 1: How to Transfer Music to iPhone Without iTunes Using Dropbox
Dropbox is a cloud-based platform that lets you share music, photos, videos, and other files across devices linked to the same account. By installing the Dropbox app on your iOS device, you can easily transfer music from computer to iPhone wirelessly over an internet connection.
To use Dropbox, ensure you have enough cloud storage to save the songs and log in to the same Dropbox account on both the source and target devices.
Follow these steps to learn how to add music to iPhone without iTunes:
Step 1: Install Dropbox on Both Devices
Download and install the Dropbox app on both your computer and iPhone. After installation, sign in using the same Dropbox account on both devices.
Step 2: Transfer Song from Computer to Dropbox
On your computer, upload the MP3 files or songs you want to transfer into your Dropbox account. Step 3: Access Songs on Your iPhone
Open the Dropbox app on your iPhone. You will see the music files you uploaded from your computer.
Step 4: Download Songs for Offline Listening
Select and download the song onto iPhone directly from Dropbox. Doing so lets you listen to music without an internet connection.

Method 2: How to Transfer Music to iPhone Without iTunes using Email
This approach lets you wirelessly download music onto iPhone for free. Here's a step-by-step guide without syncing through iTunes.
Step 1: Attach Songs to an Email
On your computer, compose an email and attach the desired music files.
Step 2: Send the Email to Yourself
Send the email to your personal account.
Step 3: Open the Email on Your iPhone
Access the email on your iPhone.
Step 4: Load and Share the Song
Tap on the attached song to load it. Once the music finishes loading, close the playback window. Next, to move forward, touch the "Share" icon.
Step 5: Add the Song to a Music App
Choose to open the song in a music app on your iPhone. This step finalizes the process making it accessible in your preferred app.

Method 3: How to Add Music to iPhone Using Google Drive
Step 1: Access Google Drive on Your PC
Open your browser and visit Google Drive. Use your existing Google account to log in, or sign up for one if you don't.
Step 2: Organize Your Music
Use File Explorer to create a folder on your PC. Add all the tracks you want to copy into this folder.
Step 3: Upload Your Music to Google Drive
After you've gone to Google Drive, choose Folder Upload from the Add New button. Choose your music folder and start the upload. Keep your PC powered and connected to Wi-Fi.
Step 4: Access Music on Your iPhone
Launch Google Drive on your iOS device. Sign in to access your uploaded tracks.

Step 5: Play or Save Music
Tap a song to stream directly. Pick Save to Files from the Open in the menu after tapping the three dots.

Key Points to Consider
- Free Google Drive gives 15GB; more space requires a subscription.
- PlaybaGoogle Drive or Files app is used instead of the iPhone Music app.
Method 4: Transfer Music to iPhone via Spotify
Spotify, the world’s leading music streaming service with a significant global market share, offers a simple way to transfer music to iPhone without iTunes. With a Premium subscription, you can download music onto iPhone directly from your PC. To listen to music without any hiccups, follow these procedures.
Step 1: Install Spotify on PC and iPhone
Get Spotify for Desktop and install it on your computer. Get the Spotify app for iOS and install it on your iPhone. If you haven't done so previously, sign up for Spotify. Use your Spotify account information to access both applications.
Step 2: Add Music from PC to Spotify
Open the Spotify Desktop app on your PC. Navigate to the Settings menu by clicking on your profile picture in the upper right corner. To play music from your computer, go to Your Library and turn on Show Local Files.
Step 3: Create a Playlist for Local Files
Spotify will generate a Local Files playlist automatically. To ensure your PC music is accessible on your iPhone, create a new custom playlist by Clicking the + icon next to Your Library, then select Create a new playlist. Right-click on the new playlist to rename or edit its details.

Add your local files to the playlist:
Open the Local Files playlist in the navigation bar. Select all songs by clicking the first track, holding Shift, and clicking the last track. Drag and drop the selected tracks into your custom playlist.
Step 4: Enable Local Files on iPhone
Keep the Spotify Desktop app open on your PC. Launch the Spotify app on your iPhone and tap your profile icon. Go to Settings and Privacy and scroll to Local Files.
Enable "Show audio files from this device" and allow any requested permissions. Disable "Hide Unplayable Songs" under Playback Settings to view PC tracks on your iPhone.
Step 5: Download Music onto iPhone
Open Spotify on your iPhone. Navigate to Your Library, locate the playlist you created on your PC, and open it. Tap the download icon to download songs onto iPhone.
Step 6: Play Music Offline and Access Files
Once downloaded, your music will be available for offline playback on Spotify. To access the music files directly on your iPhone:
Open the Files app > On My iPhone > Spotify. Locate the Synced files folder containing your downloaded tracks.

Method 5: The best way to Transfer Music from Computer to iPhone (Including iPhone 18) Without iTunes
Looking for an easy way to transfer music from computer to iPhone without using iTunes? Dr.Fone offers a fast and efficient solution. It allows you to copy music from PC to iPhone without iTunes through a straightforward process that takes just a few clicks. Whether you’re transferring your favorite songs or other data, Wondershare Dr.Fone makes the process smooth and hassle-free.
Features of Dr.Fone:
- Transfer various file types, including music, photos, and videos.
- Manage iPhone data easily with intuitive options.
- Compatible with all iOS versions and devices, including iPhone 18.
- Simple and fast user interface.

Wondershare Dr.Fone
The Best way to Transfer Music from Computer to iPhone (Including iPhone 18).
- Transfer, manage, export/import your music, photos, videos, contacts, SMS, Apps, etc.
- Back up your music, photos, videos, contacts, SMS, Apps, etc., to the computer and restore them easily.
- Transfer music, photos, videos, contacts, messages, etc., from one smartphone to another.
- Transfer media files between iOS devices and iTunes.
- Fully compatible with the newest iOS system.
Here is the step-by-step process to transfer music to iPhone without iTunes.
Step 1: Connect Your iPhone and Start Quick Transfer
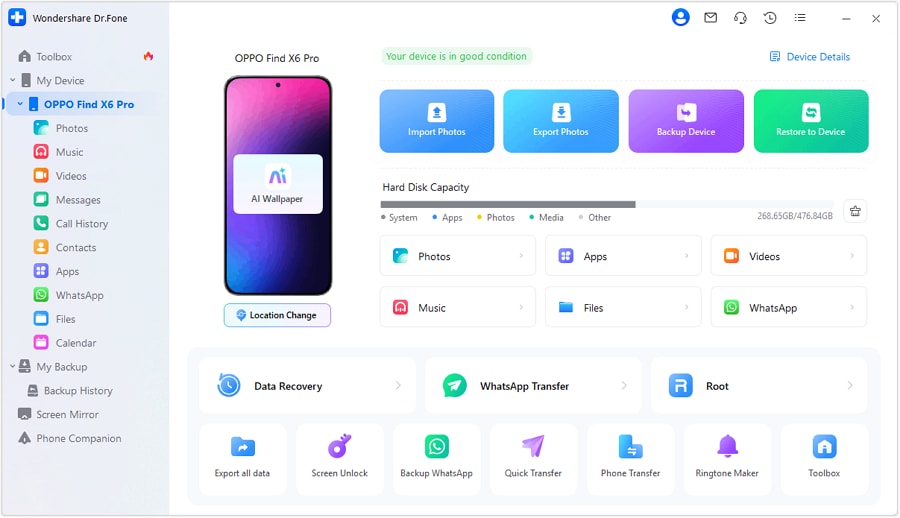
Open Wondershare Dr.Fone on your computer and connect your iPhone via a USB cable. Once your device is detected, navigate to the home screen and click on the Quick Transfer option at the bottom.

Step 2: Import Files to Be Transferred
A new window will appear. Click on the Select Files button to import the music files you wish to transfer. Alternatively, you can drag and drop the files directly into the interface for quicker action.

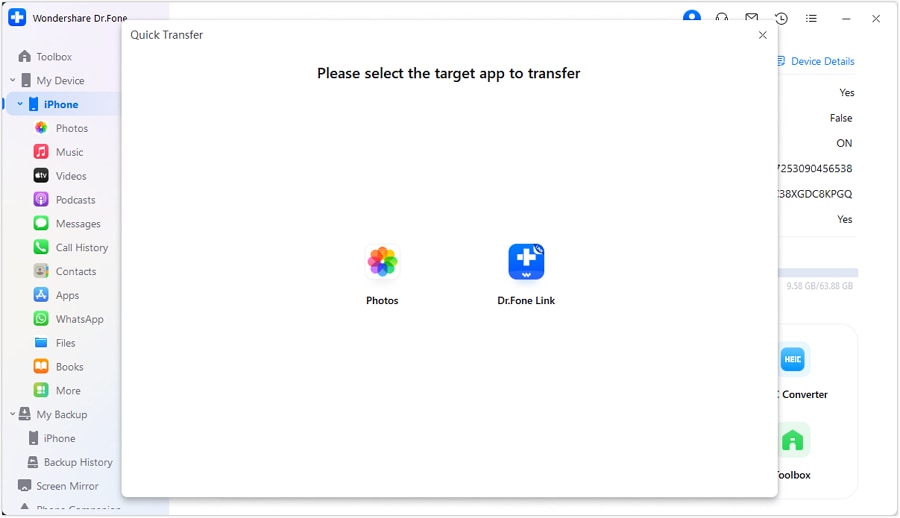
Step 3: Choose the Target Application
Dr.Fone might prompt you to select a target app for storing the music files. Choose the desired app to proceed with transferring your music.

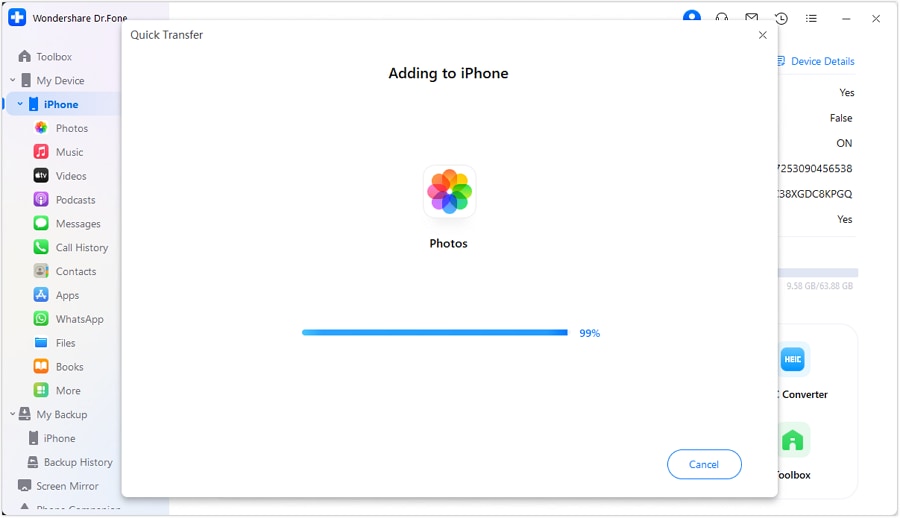
Step 4: Monitor the Transfer Progress
A progress bar will display the status of the transfer. If needed, you can click the Cancel button to stop the process at any point.

Step 5: Complete the Process and View the Stored Files
Once the transfer is complete, a confirmation prompt will appear. To locate the transferred music files, click on the "i" icon. This will open a pop-up window showing where the files are stored on your iPhone.

Conclusion:
Finding the right way to manage your music transfers can transform your iPhone experience. The methods explored here provide seamless solutions, whether you want to transfer music to iPhone without iTunes or download song onto iPhone with ease.
The efficiency and ease with tools like Dr.Fone can keep away all the hassle associated with the traditional process. Then, with these few steps, you will enter a new world of ease where you can enjoy music on the go. Decide on what method works the best for you, and get an iPhone that accompanies you and becomes your absolute music mate with just these simple procedures.
FAQs
Step 1: Check the available storage space on your iPhone. Ensure a stable Wi-Fi or USB connection.
Step 2: Launch iTunes and click on Music. Ensure "Entire Music Library" is checked. Also, ensure that iTunes is under the latest version.
Issue 1: iCloud Music Library Is Enabled
- Cause: iCloud Music Library prevents manual song addition.
- Solution: Go to Settings > Music and disable iCloud Music Library.
Issue 2: iTunes Match Is Active
- Cause: iTunes Match conflicts with manual song management.
- Solution: Navigate to Settings > iTunes & App Store > Apple ID > Subscriptions and cancel iTunes Match.
Issue 3: Outdated iTunes Version
- Cause: Older versions of iTunes might not support manual song transfers.
- Solution: Update to the latest version via the Apple Store by selecting "Update."
Dr.Fone Basic:
Better Control for Your Phone
Manage, transfer, back up, restore, and mirror your device
iPhone X Series
- iPhone X Backup
- iPhone X Problems
- 1. iPhone SE/X/XR Won't Turn On
- 2. iPhone X/XR Stuck on Black Screen
- 3. iPhone 11 Frozen Screen
- 4. iPhone XR/11/12 Won't Turn Off
- 5. iPhone X Screen Not Responding
- 6. iPhone X Siri Not Working
- 7. iPhone XS Screen Not Responding
- 8. IPhone XS Won't Turn On
- 9. iPhone SE/X Keep Restarting
- 10. iPhone SE/X Won't Charge
- iPhone X Transfer
- 1. Put Music to iPhone X/8 (Plus)
- 2. Music from iTunes to iPhone X
- 3. Music from Mac to iPhone XS
- 4. Data from Computer to iPhone
- 5. Transfer from iPhone 6 to iPhone 8
- 6. Message from Android to iPhone XS
- 7. Data from iPhone to iPhone XS
- 8. Messages from iPhone to iPhone XS
- 9. Sync Music from iTunes to iPhone XS
- iPhone X Unlock
- 1. Unlock iPhone X/XR from Carrier
- 2. Unlock iPhone X/XR Lock Screen
- 3. Unlock iPhone XS without Face ID
- 4. Unlock iPhone XS without Passcode
- 5. Bypass iPhone X Activate Lock
- iPhone X Tips
- 1. Factory Reset iPhone X/XR/XS (Max)
- 2. Save Text Messages on iPhone
- 3. Screen Record on iPhone X
- 4. Screen Record on iPhone XR
- 5. Screen Record on iphone XS
- 6. Sell Old iPhone X Series Online
- 7. iPhone XR Screen Mirroring
- 8. Screen Mirror iPhone X
- 9. iPhone Photo Printers
- 10. Enter & Exit DFU Mode on iPhone X
- 11. Add Ringtones to iPhone XS


Julia Becker
staff Editor