Transfer Photos from Samsung Galaxy Note 8/S20 to Mac
Oct 24, 2025 • Filed to: Device Data Management • Proven solutions
Dr.Fone Basic:
Better Control for Your Phone
Manage, transfer, back up, restore, and mirror your device
Well, photos are something that we click to remind us of the memories of the past. We can just look at them and drawn into the past. Unlike the older days, we do now have tech gadgets to capture every moment with ease. However, the question is about limited storage spaces in the smartphones that we use or the professional cameras. If you are seeking an answer, then you are at the right place. If you bought a new Samsung S20, all methods are suitable for S20. Follow the guide below to understand how quickly you can transfer photos from Samsung to Mac.
Part 1: Copying photos using Dr.Fone
Samsung operates on the advanced version of the Android operating system, the Nougat. Although Android is the leading market shareholder, it does have a few barriers in connecting with gadgets running on iOS such as Mac.
Dr.Fone from Wondershare is phone management software. The software implements Samsung file transfer to Mac with ease. The incredible factor about the product is its ability to detect any device and any content on the connected phone.

Dr.Fone - Phone Manager (Android)
Transfer Photos from Samsung Galaxy Note 8/S20 to Mac Easily
- Transfer your music, photos, videos, contacts, SMS, Apps etc. to computer and restore them easily.
- Manage, export/import your music, photos, videos, contacts, SMS, Apps etc.
- Phone to Phone Transfer - Transfer everything between two mobiles.
- Highlighted features such as 1-click root, gif maker, ringtone maker.
- Fully compatible with 7000+ Android devices (Android 2.2 - Android 10.0) from Samsung, LG, HTC, Huawei, Motorola, Sony etc.
The major advantages that one receives with the product are its flexible nature and features. As it supports all the file formats, you can quickly move music files, movies, pictures, documents, and others from the phone to Mac, and even transfer files from Mac to the phone.
Apart from moving content, the product is further helpful in creating backups. You can backup whole content, contacts, and text messages. The file explorer will allow you to enter the root of the directories, which otherwise have “no trespassing” boards. If you wish to gain access to developer options, Dr.Fone will give you a chance through which you can easily root Galaxy Note 8.
1.1: How to use Dr.Fone to transfer photos from Samsung to Mac?
Note: Before beginning with the steps, ensure that you have installed the trial version of the Dr.Fone software.
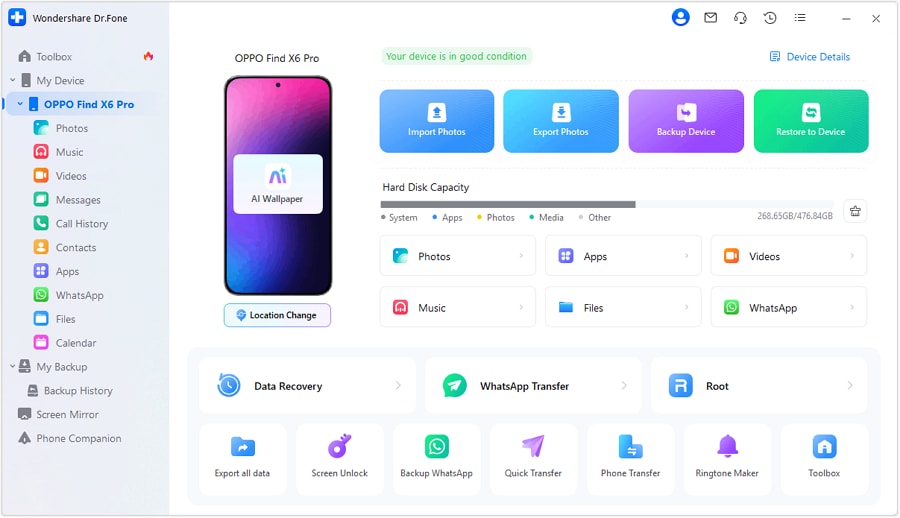
Step 1: After installation of the software, connect the Samsung device to the PC or Mac. Start the Dr.Fone program and select Transfer. Once the Transfer feature starts, you will see the details of the connected device in the main window as shown in the picture below.

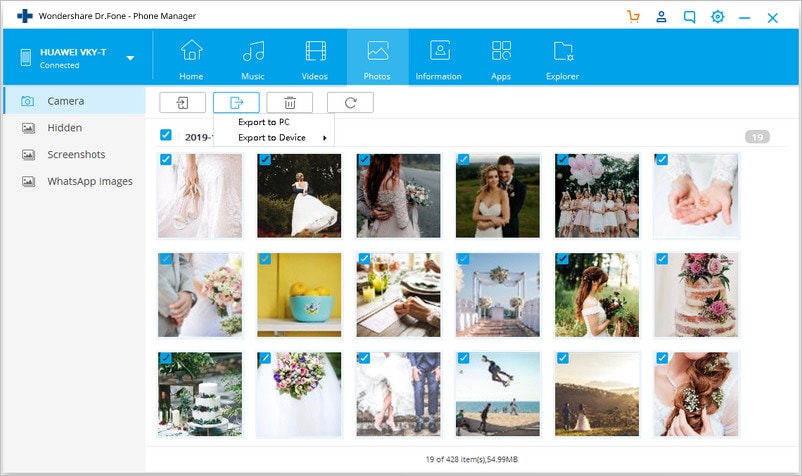
Step 2: From the menu bar, as you can see in the picture below, opt for “Photos” feature. It will open the pictures available in the device. Additionally, you will notice the presence of the categories or folders under which you stored the images. You can choose the “Export” button and click “Export to PC” option to transfer all the pictures.

Step 3: You can individually choose a particular album and export to Mac. You can pick an album from the left pane, right click, select properties, and choose the “Export to PC” option.
1.2: A single-click process to transfer photos from Samsung to Mac
You can also transfer all phtos from Galaxy Note 8 to Mac all with one click.
Start the program and connect the Samsung device. Establish the connection using the company provided USB cable. Now, click on the “Transfer Device Photos to PC” option. It will open a window asking you to choose the destination to save the images from the phone. Pick a target or create a folder, and press OK. Wait for the process to complete.
Part 2: How to move photos from Samsung Note 8/S20 to Mac with Android File Transfer?
Before starting the procedure, remember to download the Android File Transfer from the official site and follow the steps to complete the installation on the Mac. Follow the steps below after finishing the installation.
Step 1: Connect your Samsung Note 8/S20 to the Mac to a free USB port.
Step 2: Swipe the screen from the top. Click on the “Connected as media device” option.
Step 3: Choose “Camera (PTP)” as the option.
Step 4: Open the installed Android File Transfer program on the Mac.
Step 5: Choosing it will open the DCIM folder available in the Samsung Note 8/S20.
Step 6: Under the DCIM folder, click the Camera folder.
Step 7: From the available list, pick the images that you wish to transfer to the Mac.
Step 8: Move the files to the destination folder on your Mac.
Step 9: Disconnect the Samsung Note 8/S20 from the Mac after completing the transferring procedure.
Part 3: Create a backup of photos from Samsung Galaxy Note 8/S20 to Mac using Samsung Smart Switch?
To complete the process, you will have to install Samsung Smart Switch on your Mac. After finishing the installation procedure, follow the below steps.
Step 1: Connect your Mac with Samsung Galaxy Note 8/S20 using USB cable. Start the Samsung Smart Switch software. From the screen, click “more” as shown in the picture below.

Step 2: From the Preferences option, choose the Backup items tab. From the displayed categories, choose images, and click OK. You'll be required to allow access permissions on your phone.
Step 3: From the displayed categories, choose images, and click OK.
With several methods explained, you can choose the best option to transfer photos from Samsung to Mac. However, the flexibility and ease of operation provided by Dr.Fone is what you need right now. Give it a shot and distribute it to your friends to let them know about a smart phone management application that connects their smartphone running on iOS or Android to Windows or Mac.
Dr.Fone Basic:
Better Control for Your Phone
Manage, transfer, back up, restore, and mirror your device
Samsung Manage
- Samsung Data Manage
- 1. Best Samsung Manager
- 2. Manage Contacts on S9/S8
- 3. Manage Music on Samsung
- 4. Manage Music on Samsung S8
- 5. Transfer Photos to Samsung S8
- 6. Manage Photos on Samsung S9
- 7. Best Galaxy S9 Manager
- 8. Samsung Gear Manager
- 9. Samsung Task Manager
- 10. Remove Samsung Bloatware
- Samsung Erase
- 1. Tips for Selling Old Samsung
- 2. Wipe A Samsung Phone
- 3. Tips to Erase Data
- 4. Remove Samsung Apps
- 5. Uninstall Apps on Samsung
- Samsung Mirror
- 1. Share the Phone Screen
- 2. Screen mirror to Samsung TV
- 3. Use Allshare Cast To Mirror
- 4. Samsung Mirror Screen to PC
- Samsung Record
- 1. Screen Record on Samsung A50
- 2. Screen Record on Samsung S10
- 3. Screen Record on Samsung s9
- 4. Samsung S8 Screen Record
- 5. Top Samsung Screen Recorder
- Samsung Root
- 1. Root Samsung Galaxy S7
- 2. Jailbreak Samsung Phones
- 3. Root Samsung Galaxy S3
- 4. Root Samsung Galaxy S4
- 5. Root Samsung Galaxy S5
- 6. Root Samsung Galaxy J5
- 7. Samsung Root Apps Without PC
- 8. Top 6 Samsung Root Software
- 9. Used Apps to Root Samsung Note
- 10. Root Samsung Galaxy S3 mini
- 11. Root Galaxy Tab 2 7.0
- 12. Unroot Android Devices
- Samsung to Mac
- 1. Transfer Photos to Mac
- 2. Samsung File Transfer for Mac
- 3. Transfer Photos from Samsung
- 4. Transfer Pictures to Mac
- 5. Transfer Pictures from Samsung
- 6. Transfer Files to Macbook
- Samsung to PC
- 1. Transfer Contact from Samsung
- 2. Transfer Photos to PC
- 3. Transfer Photos to Laptop
- 4. Transfer Photos from Samsung
- 5. Transfer Files to PC
- 6. Transfer Photos From Note 8 to PC
- USB Debugging
- Samsung Tips
- ● Manage/transfer/recover data
- ● Unlock screen/activate/FRP lock
- ● Fix most iOS and Android issues
- Manage Now Manage Now Manage Now


James Davis
staff Editor