

 100% Security Verified | No Subscription Required | No Malware

 :
: 
 ChatGPT
 Perplexity
 Gemini
 Claude
 Grok
Grok
Unlocking the full potential of an older device like the Samsung Galaxy Tab 2 7.0 can breathe new life into it. By gaining root access, you can move beyond the manufacturer's limitations, allowing for custom modifications, performance enhancements, and the removal of unwanted pre-installed applications. This process gives you administrative-level control over the Android operating system.
This comprehensive guide provides a detailed, step-by-step walkthrough for rooting your Samsung Galaxy Tab 2 7.0. We will specifically cover models P3100, P3110, and P3113 using the reliable CF-Auto-Root method. Following these instructions carefully will ensure a smooth and successful rooting experience.
In this article
Understanding the Pros and Cons of Rooting
Before you proceed to root your Samsung Tab, it's crucial to weigh the benefits against the potential risks. Rooting gives you unparalleled control over your device, but it also comes with certain responsibilities and drawbacks. Understanding both sides will help you make an informed decision.
- Full Customization: Install custom ROMs and themes to completely change your device's look and feel.
- Remove Bloatware: Uninstall pre-installed apps from the manufacturer or carrier to free up space and memory.
- Improved Performance: Overclock the CPU for better speed or underclock it to save battery life.
- App Compatibility: Run specialized apps that require root access for advanced features.
- Voided Warranty: Rooting your device will almost certainly void its manufacturer warranty.
- Security Risks: Improperly managed root access can expose your device to malware and viruses.
- Bricking Potential: If the process goes wrong, your device could become permanently unusable (bricked).
- No OTA Updates: You may no longer receive official over-the-air (OTA) software updates from Samsung.
Essential Preparations Before Rooting Your Galaxy Tab 2
Proper preparation is the key to a successful rooting process. Before you begin, please carefully complete the following checklist to minimize risks and ensure everything goes smoothly. Do not skip any of these items.
- Confirm Your Device Model: This guide is exclusively for Samsung Galaxy Tab 2 7.0 models P3100, P3110, and P3113. Using these files on any other model will likely damage it. Check your model number in Settings > About tablet.
- Charge Your Battery: Ensure your tablet's battery is charged to at least 80%. A sudden shutdown during the rooting process can brick your device.
- Back Up Your Important Data: Rooting will wipe all data from your device. Create a complete backup of your contacts, photos, apps, and other important files. You can check how to backup Android files to PC.
- Enable USB Debugging: On your tablet, go to Settings > Developer options and enable 'USB Debugging'. If you don't see Developer options, go to Settings > About tablet and tap on 'Build number' seven times to unlock it.
- Download Required Files: You will need the rooting package for your specific device model and the Odin flashing tool. Download them to your computer from the links below.
1. CF-Auto-Root Packages (Choose one for your model):
- CF-Auto-Root-espressorf-espressorfxx-gtp3100.zip (for P3100)
- CF-Auto-Root-espressowifi-espressowifiue-gtp3113.zip (for P3113)
- CF-Auto-Root-espressowifi-espressowifixx-gtp3110.zip (for P3110)
2. Odin Flashing Tool:
3. Samsung USB Drivers (If needed):
- If Odin doesn't recognize your device, you'll need to install the USB drivers for your device.
How to Root Galaxy Tab 2 7.0 (P3100/P3110/P3113) Step-by-Step
Once you have completed all the preparations, you can proceed with the actual rooting process. Follow each step carefully and do not disconnect your device from the computer until the entire process is finished.
-
Step 1 Extract the Downloaded Files
Locate the CF-Auto-Root and Odin3 zip files you downloaded. Right-click on each and extract them to a new folder on your desktop for easy access. After extraction, you will find a .tar.md5 file (from the CF-Auto-Root package) and an Odin3.exe file.
-
Step 2 Launch Odin as Administrator
Navigate to the folder where you extracted Odin3. Right-click on the Odin3 v1.85.exe file and select 'Run as administrator'. This will launch the Odin flashing tool interface on your computer.
-
Step 3 Boot Your Tablet into Download Mode
First, completely power off your Galaxy Tab 2. Now, press and hold the Power and Volume Down buttons simultaneously. Keep holding them until a warning screen appears. Release the buttons and press the Volume Up button to enter Download Mode.
-
Step 4 Connect Your Tablet to the PC
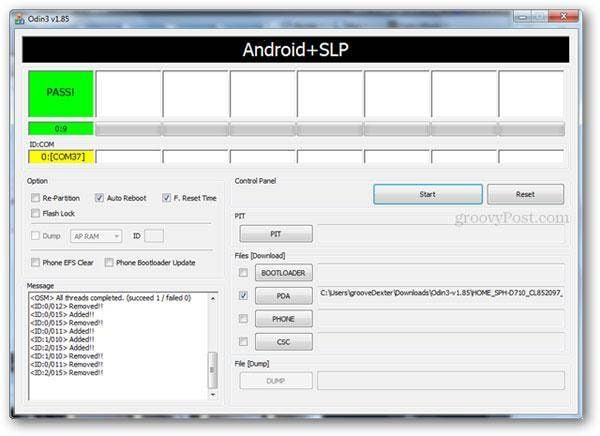
Connect your tablet to the computer using a quality USB cable. Odin should now detect your device. You will see a message saying "Added!!" in the log box, and one of the ID:COM boxes will turn yellow (or blue in newer versions), indicating a successful connection.
 Note: If you don't see the yellow-highlighted port, you need to disconnect the device and install the Samsung USB drivers. Then, restart your PC and repeat this step.
 -
Step 5 Load the Root File in Odin
In the Odin window, click on the PDA button. A file browser will open. Navigate to the folder where you extracted the CF-Auto-Root package and select the file ending in .tar.md5. Next, ensure that only the Auto-Reboot and F.Reset Time boxes are checked. The Re-Partition box must remain unchecked.
-
Step 6 Begin the Rooting Process
After confirming all settings are correct, click the Start button in Odin. The rooting process will now begin. Do not disconnect the tablet or use your computer during this time. The process takes a few minutes.
-
Step 7 Wait for the Process to Complete
Once the flashing is finished, your tablet will reboot automatically. You will see a green PASS! message in the Odin window. You can now safely disconnect your device. The first boot may take longer than usual. After it starts, you should find the SuperSU app in your app drawer, confirming that your device has been successfully rooted.
 Effortlessly manage data through preview, delete, export, etc.
- Transfer all data between devices.
- Robust backup solutions for reliable data protection.
- Mirror screens to PC for meetings, teaching, and control.

Conclusion
Congratulations! You have successfully completed the Android root process for your Samsung Galaxy Tab 2 7.0. You now have full administrative control, opening up a world of customization and performance tweaks. Remember to be cautious with your new powers, as incorrect modifications can cause system instability. Enjoy exploring the new capabilities of your rooted tablet and tailoring it to your exact preferences.
FAQ
-
1. What does rooting an Android device actually mean?
Rooting is the process of allowing users of smartphones, tablets, and other devices running the Android mobile operating system to attain privileged control (known as root access) over various Android subsystems. It's similar to gaining administrator permissions on a Windows computer or jailbreaking on an Apple device. -
2. Is it safe to root my Samsung Galaxy Tab 2 7.0?
Rooting comes with inherent risks. While the CF-Auto-Root method is generally reliable for these specific models, there is always a small chance of "bricking" your device if steps are not followed correctly or if there's an interruption during the process. It also voids your warranty and can expose you to security vulnerabilities if not managed properly. -
3. Will rooting erase the data on my tablet?
Yes, the process of unlocking the bootloader and rooting your device will perform a factory reset, which erases all of your personal data, including apps, photos, and settings. This is why creating a complete backup before you begin is a critical and non-negotiable step. -
4. Can I reverse the rooting process?
Yes, it is possible to unroot your Galaxy Tab 2. The most common method involves downloading the official stock firmware for your specific model and flashing it using Odin. This will restore the device to its original factory state, remove root access, and allow you to receive official OTA updates again.
 Add Wondershare Dr.Fone as a preferred source on Google


