How to Root Galaxy S3 mini I8190/I8190L/I8190N/I8190T
Nov 13, 2025 • Filed to: Device Data Management • Proven solutions
Dr.Fone Basic:
Better Control for Your Phone
Manage, transfer, back up, restore, and mirror your device
Rooting can make your warranty invalid, but the benefits it brings still attract lots of Android users. More and more people choose to root their phones, in order to enjoy more great free apps. Well, there are strict rules for different phones' rooting. This guide is only telling how to root Samsung Galaxy S3 mini I8190/I8190L/I8190N/I8190T.
Before you get started, you need to know that rooting voids your warranty, and you still agree to root your Android device at your own risk. Next, let's do it together in steps.
How to Root Galaxy S3 Mini Manually
Step 1. Download the resources that you'll need during the device rooting process.
a. Download Samsung usb drivers here
b. Download Odin3 here
c. Download recovery-clockwork-touch-6.0.2.7-golden.tar.zip recovery image from here
d. Download SuperSu Last version
Step 2. Power your phone off, and then turn to the Download Mode on it:
Press the Volume Down + Home + Power buttons together for about 5 seconds (all at the same time).
Then press the Volume Up button to comfirm to get into the Download Mode.
After that, plug the USB cable to connect your phone to the computer. Then install the drivers you've downloaded in step 1.
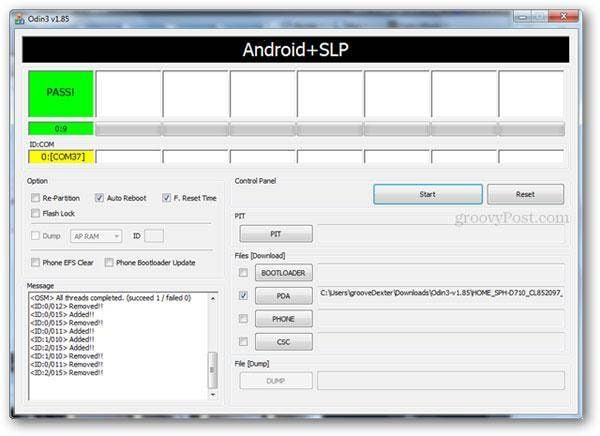
Step 3. Unzip the Odin3 v3.04.zip, and run Odin3 v3.04.exe. Tick off these two options: Auto Reboot and F.Reset Time. Then extract the recovery-clockwork-touch-6.0.2.7-golden.tar.zip. Continue to tick off the option PDA, and browse to recovery-clockwork-touch-6.0.2.7-golden.tar.md5, which is extracted from the recovery-clockwork-touch-6.0.2.7-golden.tar.zip, and select it.

Step 4. The Odin should show a device under 1 of the ID:COM port (generally the yellow highlighted box). If you don't see the yellow highlighted box, please repeat from the step 2. When you see it, click the Start button. Then your phone will switch on after flashing completed.
Step 5. Now, you're at the last step to root your phone. Copy the downloaded SuperSU to the SD card on your phone. Then switch off your phone. After it, press and hold the Volume Up + Power + Home buttons at the same time. When your phone is on, release the Power button, but keep pressing the Volume Up + Home buttons.
When your phone is powered on completely, you can move on according to the options shown on the screen of your phone. What you need to do is: Choose Install zip from the SD card < choose zip from the SD card < 0/ < CWM-SuperSU-v0.99.zip < Yes. Now your phone is under the process of real rooting. When it's over, you'll see a message which tells you that it's DONE!
Then back to the main menu and choose reboot system now to get your phone restarted. After that, you'll see the SuperSU app appearing on your phone's screen. Run it to update the SU binary.
OK. Your Galaxy S3 has been successfully rooted.
Dr.Fone Basic:
Better Control for Your Phone
Manage, transfer, back up, restore, and mirror your device
Xiaomi Topics Series
- Xiaomi Screen & FRP Unlock
- 1. Unlock Xiaomi Bootloader
- 2. Mi Account Unlock Tools
- 3. Redmi Note 8 FRP Unlock Tool
- 4. Redmi Note 9 FRP Bypass Tool
- 5. Redmi 9A FRP Bypass
- 6. Remove FRP on Xiaomi/Redmi
- Xiaomi Repair
- Xiaomi Recover
- Xiaomi Reset
- Xiaomi Tips & News
- 1. Xiaomi HyperOS 3.0
- 2. Screen Mirror Xiaomi to PC
- 3. Run Hardware Tests on Xiaomi
- 4. Conduct battery test on Xiaomi
- 5. How Do I Obtain the Security Code Xiaomi
- 6. DND Mode Xiaomi
- Xiaomi Transfer & Backup
- ● Manage/transfer/recover data
- ● Unlock screen/activate/FRP lock
- ● Fix most iOS and Android issues
- Try for Free Try for Free Try for Free


James Davis
staff Editor