Pixel Backup and Restore Solutions: 6 Easy Methods
Google Pixel/Nexus
- Google Phone Transfer
- 1. Manage Contacts on Google Pixel
- 2. Transfer Photos to Google Pixel
- 3. Transfer Google Pixel to Samsung
- 4. Transfer Google Nexus to Samsung
- 5. Transfer iPhone To Google Pixel
- Google Phone Unlock
- 1. Unlock Google Pixel 4a
- 2. Unlock Google Pixel 5
- 3. Unlock Google Pixel 5a
- 4. Unlock Google Pixel 6/6 Pro
- 5. Unlock Any Google Pixel Phones
- 6. Bypass Google Pixel FRP Lock
- Google Phone Problems
- 1. Nexus 7 Won't Turn On
- 2. Google Pixel 4a Touchscreen Issues
- 3. Android App Not Installed Error
- 4. Bricked Your Android Phone
- 5. Encryption Unsuccessful Error
- 6. Android.Process.Media Has Stopped
- 7. Flash Dead Android Phone Safely
- 8. Stuck at Android System Recovery
- 9. Google Pixel Screen Stuck on Boot
- 10. Google Play Services Won't Update
- 11. Settings Has Stopped on Android
- Google Phone Alternatives
- Google Phone Tips
- 1. Install Apps to Android from PC
- 2. Manage Google Phones on PC
- 3. Control Mac from Google Phone
- 4. Factory Reset Pixel Phones
- 5. Root Google Nexus 7 Easily
- 6. Screen Record Google Pixel
- 7. iTunes Alternatives for Android
- 8. Top Android PC Suites
- 9. Top Android Contact Manager
- 10. Top Game Hacker Apps for Android
- 11. Top Android Restarting Apps
- ● Manage/transfer/recover data
- ● Unlock screen/activate/FRP lock
- ● Fix most iOS and Android issues
- Free Download Free Download Free Download

Jun 11, 2026 • Filed to: Backup & Restore Solutions • Proven solutions
 TL;DR:
To secure and restore your Google Pixel data, choose a method based on your storage preference and technical comfort, ranging from automated Google Drive cloud syncs to local physical storage or direct PC transfers via ADB Commands and Wondershare Dr.Fone.
● When using the built-in Phone Backup and Reset feature synced to Google Drive, you cannot restore a backup created on a higher Android version to a Google Pixel device running a lower Android version.
● Exporting to an SD card is best for offline physical storage of contacts using the vCard (VCF) format, whereas ADB Commands suit technical users who want to execute backups directly to a PC via the Command Prompt and set a password on their device.
● Wondershare Dr.Fone provides selective backup and restoration to a computer without data loss across 8000+ Android devices, but requires you to temporarily set the Dr.Fone app as your default SMS application if you want to include text messages.
Ask AI for a summary
 ChatGPT
 Perplexity
 Gemini
 Claude
 Grok
Grok
Dr.Fone Basic:
Better Control for Your Phone
Manage, transfer, back up, restore, and mirror your device
Ever wondered why Google Pixel backup and restore are so important?
Imagine losing all your photos from a family trip or important contacts from work. Or think about getting a new Google Pixel and wanting all your old stuff on it. Pixel backup and restore is the answer to these problems.
It helps keep your data safe and makes moving to a new phone easy. With different methods to choose from, you can pick what works best for you. So, if you're looking to keep your Google Pixel's data secure and easily accessible, learning about Pixel phone backup and restore is a must!
- Part 1. Why Do You Need To Backup And Restore Google Pixel?
- Part 2: Backup and Restore Google Pixel Using Google Drive App
- Part 3: Backup and Restore Google Pixel Using Phone Backup and Reset Feature
- Part 4. Backup and Restore Google Pixel with Google Photos (Photos and Videos Only)
- Part 5. Back and Restore Google Pixel Using an SD Card
- Part 6. Backup Google Pixel Data to PC With ADB Command

- Part 7. Dr.Fone: Back and Restore Google Pixel Without Data Loss
Part 1. Why Do You Need To Backup And Restore Google Pixel?
Backing up your Google Pixel phone is essential. It keeps your data safe from loss due to device issues, theft, or accidents. With a pixel backup, your contacts, photos, and messages are stored safely online. This is very helpful if you need a new phone.
Also, it saves time to restore pixel backup. It's great when you get a new Pixel or reset your current one. It quickly puts back all your apps, settings, and data. Doing regular backups means you're always ready. This gives you comfort and ease.
Part 2: Backup and Restore Google Pixel Using Google Drive App
It's super easy to back up and restore Google Pixel using the Google Drive app. Google Drive allows you to save your phone's data, like contacts, photos, and documents. This is helpful if you lose your phone or get a new one.
You can quickly get your data back on any new device by backing up to Google Drive. It's a simple and effective way to keep your important information safe and accessible.
Steps to Backup and Restore Google Pixel Via Google Drive App
Follow the below steps to back up pixel phone using the Google Drive app.
- Step 1. Download and Install Google Drive. For this, go to the Google Play Store on your Google Pixel. Search for Google Drive and install it.
- Step 2. Sign In and Upload Files. For this, Open Google Drive and sign in with your Gmail account. Tap the "+" icon, choose "Upload". Then, select the files you want to upload, like photos, videos, audio, and documents.
- Step 3. After uploading, you can check the uploaded files by going to Google Drive. Now, select "My Drive" to view them.
![]()
After you finish the Google Pixel backup, you can restore it from the backup by following the steps below.
- Step 4. Open the Google Drive application on your phone and log in using your Gmail account.
- Step 5. Find the file you wish to restore, then tap and hold on to it.
- Step 6. Tap the "Download" option to start restoring the selected file to your Pixel from the backup.
![]()
Now that you've learned how to Google Pixel backup and restore files from Google Drive. Let's move on to another method.
Part 3: Backup and Restore Google Pixel Using Phone Backup and Reset Feature
The Backup and Reset feature on your Google Pixel phone is a handy tool. It's built into your phone and helps keep your data safe. You can use it when you get a new phone or if there's a problem. It's easy to use and really useful.
It backs up your important stuff like contacts, apps, and settings. This way, your information is always safe. If you need it, you can get your data back fast. This feature is good for keeping your phone's information protected.
How to Backup and Restore Google Pixel via Phone Backup and Reset Feature?
The below steps will help you to backup Pixel using the phone backup and reset feature.
- Step 1. Open the Settings application on your Google Pixel phone. Then, go to "Personal," and then select "Backup & reset.
- Step 2. Choose "Device backup," then "Back up to Google Drive." Sign in with your Google account as it prompts.
- Step 3. Select the data you want to back up from your device. For photos and videos, go to "Photos backup" and enable "Backup & sync".
![]()
You can restore your Google Pixel from a backup. However, you can't restore a backup from a higher Android version to a phone with a lower version. Follow these easy steps to restore from backup Pixel using the phone back up and reset feature.
- Step 4. Open Settings on another Pixel phone.
- Step 5. Go to "User & account," then "Add account." Choose "Google" and sign in with the Google account used for the backup. Enable "Automatic restore" or follow the on-screen instructions to restore your Pixel from the backup.
![]()
Ready for more? Let's jump into another cool way to back up and restore your Pixel. Stay tuned!
Part 4. Backup and Restore Google Pixel with Google Photos (Photos and Videos Only)
Backing up and restoring your Pixel using Google Photos is a great way to keep your photos and videos safe. Google Photos is a user-friendly app. It automatically saves your memories to the cloud. This means you can easily get them back if you lose your device or switch phone.
It's perfect for just photos and videos. You don't have to worry about losing your special moments. Google Photos makes sure they're always just a tap away.
How to Google Pixel Backup and Restore with Google Photos?
For Pixel phone backup with Google photos, follow the below steps.
- Step 1. Open the Google Photos app on your Google Pixel and log in with your Google account. Go to the menu and select "Settings," then find "Back up & sync".
- Step 2. Enable the "Back up and sync" option for automatic backup. The time it takes depends on the number of photos and videos on your phone.
![]()
That is it! You will be able to back up Pixel data now. The following steps will help you to restore your Pixel backup using Google Photos.
- Step 3. Open the Google Photos application on your phone. Next, sign in with the Google account Image nameed to your backups. Go to "Menu".
![]()
- Step 4. Choose the photos or videos you want to restore. Tap "Download," and then choose "Save to device" to copy them to your Google Pixel.
That's how you use the power of Google Photos! Next up, another simple yet effective method awaits to keep your Pixel perfectly synced. Let's check it out!
Part 5. Back and Restore Google Pixel Using an SD Card
Backing up and restoring your Google Pixel with an SD card is a solid, traditional method. It's great for those who prefer physical storage. Using an SD card, you can easily save your phone's data, like photos, contacts, and more.
It's really handy if you're not into cloud storage or need a quick way to transfer data to a new phone. Just pop in the SD card, and you're good to go. It's a simple, effective way to keep your data safe and within reach.
Steps for Google Pixel Backup and Restore with a USD Card
Here are the steps for Pixel phone backup using a USD card.
- Step 1. Unlock your Google Pixel, go to "Contacts," and tap on "Import/Export" in the menu. Choose "Export to SD Card" to create a backup file in vCard format (VCF).
- Step 2. Access the vCard file on the SD card using your Pixel. Then, decide where to send or store it in your desired folder.
![]()
Here are the steps to restore backup Google Pixel using a USD card.
- Step 3. To restore contacts from the SD card, open "Contacts" on your Google Pixel, then select "Import/Export".
![]()
- Step 4. Choose "Import from SD card. Find your backup in the SD card folder, and select the contacts you want to copy to your Google Pixel.
Done with SD cards? Great! Let's leap into another exciting method to keep your Pixel updated and your data secure. Stay tuned for more!
Part 6. Backup Google Pixel Data to PC With ADB Command
For Google Pixel backup to PC, ADB Command is an efficient way to keep your information safe. This method is perfect for those who like using computer commands. It lets you save your phone's data, like apps and personal files, straight to your computer.
This is a good choice if you want more control over your backup. It's a bit more technical but very practical. With ADB Command, you can be sure all your essential data is stored on your PC.
Steps to Backup Google Pixel Files to PC Using ADB Command
The below steps will help you to backup Pixel phone to PC with the ADB command.
- Step 1. Connect your Google Pixel to your PC using a USB cable.
- Step 2. On your PC, open the Search bar near the Windows icon. Then, type in " Command Prompt".
![]()
- Step 3. Enter "ADB devices" in the Command Prompt and grant access to your mobile.
![]()
- Step 4. A backup window will appear on your Google Pixel. Set a password to start the backup. After a while, your data will be saved on your PC.
Using ADB commands can be tricky, but you've got it! Now, let's shift gears to a simpler solution for your backup needs. Stay tuned for the next easy method!
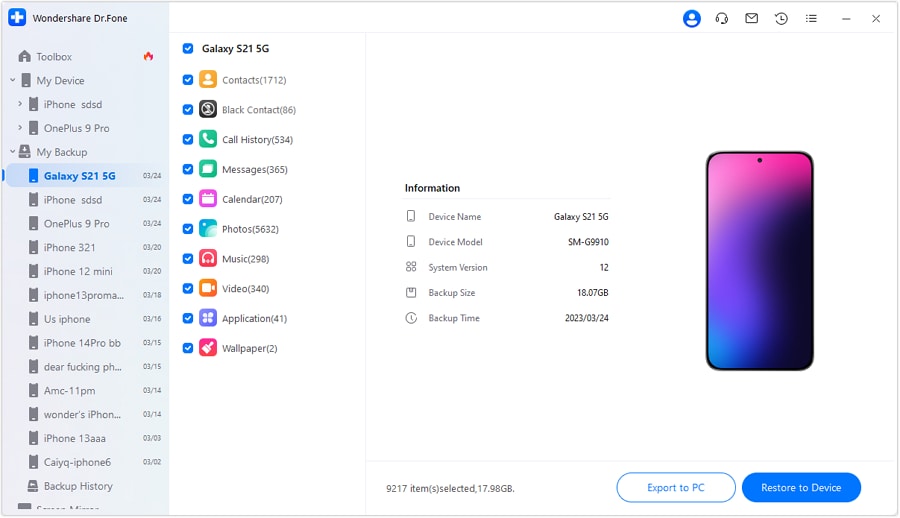
Part 7. Dr.Fone: Back and Restore Google Pixel Without Data Loss
Wondershare Dr.Fone is a great tool for backup and restore Google Pixel. It does a lot, like fixing and backing up your phone. It's easy to use and works with many phones. This makes it a top pick for managing phone data.
Dr.Fone is more than just a backup. It moves data, fixes systems, and unlocks features. It's simple to use and great for everyone, even if you're new to tech.
It is really helpful for saving your important stuff like photos and contacts. It's also safe and reliable, so that you can trust it with your phone's data. This tool is perfect for keeping everything on your Google Pixel safe and sound.
Wondershare Dr.Fone
Flexibly Backup and Restore Android Data
- Selectively backup Android data to the computer with one click.
- Preview and restore the backup to any Android device.
- Supports 8000+ Android devices.
- There is no data lost during backup, export, or restoration.


Steps for Google Pixel Backup and Restore with Wondershare Dr.Fone
The following step-by-step guide will help you to backup and restore Google Pixel using Wondershare Dr.Fone.
- Step 1. Start by opening Dr.Fone on your computer and connecting your Android device to it. Then go to My Backup > Back Up Now.

- Step 2. Now, set the Dr.Fone Image name app as the default SMS app. Click OK after performing this task.
- Step 3. The backup will begin automatically. A progress bar will show how much of the backup is complete.

- Step 4. As the backup nears completion, a prompt will ask you to set the default SMS app on your Android. To do this, open the SMS app and choose the default application. Click OK when done. If you don't want to back up text messages, just tap Cancel.
- Step 5. When the backup finishes, it will show up in the window. To see the backup on your PC, click "Open in Folder." To look at all backups made, select "View Backups".

4,624,541 people have downloaded it
Steps to Restore Google Pixel Backup to Android Device
Follow the below easy steps to restore your Google Pixel phone data.
- Step 1. To restore an Android backup, connect your smartphone to your computer. Go to the My Backup section on the left panel. Now, pick your backup file. Look at the file, and if you want to restore it, select the data for restoration. Next, click "Restore to Device" at the bottom of the screen. Alternatively, you can choose "Export to PC" to save the data on your computer.
- Step 2. A window will appear, listing the data types that can and cannot be restored to the connected smartphone. The types of files you can restore vary between Android and iOS devices. After reviewing the data, click "Continue" to proceed with the restoration.

- Step 3. The next window displays the data restoration progress. You can see the progress bar to see how much of the data has been restored.
- Step 4. When the Android backup restoration finishes, a message of completion will appear. Click "Done" to complete the entire data restoration process.

That's how you can backup and restore data on Google Pixel using Wondershare Dr. Fone! Let's conclude our discussion.
Conclusion
Wrapping up, Google Pixel backup and restore are super important. There are many ways to do it, like Google Drive, your phone's backup feature, Google Photos, an SD Card, ADB Command, or Wondershare Dr.Fone. Each method is helpful in its own way.
You keep things like photos and contacts safe by doing a Pixel backup. These steps are simple, helping you restore your data whenever needed. So, make sure to handle the Pixel backup and restore. It's the key to a smooth, worry-free experience with your Google Pixel!
Dr.Fone Basic:
Better Control for Your Phone
Manage, transfer, back up, restore, and mirror your device


Daisy Raines
staff Editor