
The Ultimate Guide: How to Safely Flash a Dead Android Phone

Jun 16, 2026 • Filed to: Phone Repair Solutions • Proven solutions
 TL;DR:
You can safely revive a completely unresponsive Android phone by flashing its firmware to fix severe software corruption, provided the issue is not caused by physical hardware damage or a depleted battery.
● Select a tool based on your technical comfort and device model: Dr.Fone automates the firmware matching process for Samsung Galaxy phones, Odin provides manual control for Samsung devices, SP Flash Tool is built for MediaTek (MTK) chipsets, and PhoenixSuit handles Nokia or Allwinner devices.
● Manual flashing methods require bypassing the non-functional OS by booting the device into Download Mode or Fastboot, and writing a firmware file that strictly matches your exact model number and region to avoid permanently bricking the phone.
● Prior to flashing, connect the device to a wall charger for at least 60 minutes to eliminate battery failure, and verify the phone is not functioning with a broken screen by checking for vibrations, incoming call rings, or charging LEDs.
Ask AI for a summary
 ChatGPT
 Perplexity
 Gemini
 Claude
 Grok
Grok
An Android phone is considered "dead" when it powers off completely and refuses to restart—no screen response, no vibration, and no charging indicator. When this happens, the most effective fix is often to flash a dead Android phone: a process that reinstalls or replaces the device's firmware to restore full functionality. Unlike a simple reboot or factory reset, the android flashing process rewrites the core operating system at a low level, making it possible to recover from severe software corruption that no standard troubleshooting method can address.
Many users immediately assume a dead battery or hardware failure when their Android phone stops responding—but in the majority of cases, the real culprit is firmware corruption, a failed OTA update, or a botched root attempt. If the cause is software-related, learning how to flash a dead Android phone can fully revive your device without expensive professional repairs. The key is knowing which method applies to your device model and what caused the failure in the first place.
This guide covers nine proven, step-by-step methods to flash a dead Android phone—from one-click automated tools to manual PC-based solutions—compatible with Samsung Galaxy, MTK/MediaTek-based phones, Nokia devices, and virtually any android phone flash scenario. Whether you prefer a beginner-friendly tool or need a manual approach for a specific chipset, at least one of these methods will work for your situation. Read on to find the right solution for your device.
- Part 1: Can a Dead Phone Be Flashed?
- Part 2: How to flash Samsung Galaxy in one click?

- Part 3: How to flash Samsung Galaxy dead phone with Odin?
- Part 4: How to flash MTK Android dead phone with SP Flash tool?
- Part 5: How to flash Nokia dead phone with the Phoenix tool?
- Part 6: How to flash a dead phone that won't turn on via factory reset?
- Part 7: How to flash a dead Android Phone via checking screen faulty?
- Part 8: How to fix a dead Android phone by changing the battery?
- Part 9: How to repair a dead Android Phone By contacting official support?
Part 1: Can a Dead Android Phone Be Flashed?
Yes—in most cases, a dead Android phone can be successfully flashed back to life. However, the outcome depends entirely on what caused the device to become unresponsive. Flashing means overwriting a device's existing firmware or operating system with a new, clean version. It gives the phone a complete software-level reset, which is why it's one of the most powerful recovery methods available when standard troubleshooting fails.
Before you attempt to flash a dead Android phone, it's critical to identify the root cause. Dead Android phones typically fall into one of three categories:
- Software or Firmware Failure: This is the most common cause—and the most fixable. It includes corrupted OS files, incomplete or failed OTA updates, failed rooting attempts, and incompatible custom ROM installations. These issues are directly resolved by the android flashing process.
- Battery Failure: A completely drained or defective battery will prevent the phone from powering on. Flashing won't help here until the battery issue is addressed. Always try charging for at least 30–60 minutes on a wall adapter before attempting any repair.
- Hardware Damage: Physical damage—such as a cracked logic board, water ingress, or a broken charging port—renders a phone unresponsive in ways that no software fix can resolve. These scenarios require physical component repair or replacement.
To determine whether your dead phone is a software issue (and therefore a candidate for flashing), look for these signs: Did the phone die immediately after a system update, rooting attempt, or custom ROM installation? Does it show any brief signs of life—such as a charging LED, a quick vibration, or the Samsung/brand logo flashing—when plugged in? If yes to any of these, the problem is very likely software-related, and flashing should be your first serious repair attempt.
The android flashing process works by placing the device into a special low-level boot state—known as Download Mode (Samsung), Fastboot Mode (most Android brands), or EDL Mode (Qualcomm devices)—that exists independently of the Android operating system. In this state, a connected PC can use a flashing tool to directly write a new firmware image to the device's storage, completely replacing the corrupted files. The specific tool and firmware required depend on your device's brand and chipset, which is exactly what the following nine parts of this guide cover in detail. For users who also want to recover data from a dead Android phone before or after flashing, dedicated data recovery tools can extract files even from unresponsive devices.
Part 2: How to Flash Samsung Galaxy in One Click with Dr.Fone?
For users who want to flash a dead Android phone—especially a Samsung Galaxy—without navigating complex manual processes, Dr.Fone - System Repair (Android) by Wondershare is the most reliable and beginner-friendly solution available. Unlike manual android flash tool options such as Odin—which require finding the correct firmware, installing Samsung drivers, and configuring flashing parameters manually—Dr.Fone automates the entire android flashing process in just a few guided steps. It automatically matches your device model to the correct firmware version, downloads it securely, and flashes it to your phone. It supports all major Samsung Galaxy series (S, A, Note, Tab) and handles a full range of issues including dead phone recovery, persistent black screen, stuck boot loop, failed OTA update, and unresponsive touchscreen.
Dr.Fone - System Repair (Android)
One-click solution to flash Samsung Galaxy
- A completely user-friendly tool where no technical skills are needed.
- All Android models are easily supported.
- Fix various Android system issues, stuck in boot loop, black screen, or won't turn on, looping on start, etc.
- Full security is promised with the tool so there's no need to worry about harmful activities like viruses or malware.
- Trusted by a lot of users and carries a high success rate.


Step-by-step Tutorial
Before you begin, ensure your setup meets these requirements for a successful flash:
- A Windows PC (Windows 7 or later) or Mac (macOS 10.9 or later)
- At least 2GB of free disk space for the firmware download
- A functioning USB cable—the original Samsung cable is strongly recommended
- A stable internet connection throughout the firmware download phase
We are going to explain how to flash a dead Android phone using a PC using Dr.Fone - System Repair (Android)
Note: Before you understand how to flash Dead Android phone, take a backup of your data and then proceed to avoid any data loss.
Phase 1: Prepare your Android device
Step 1: Once you have downloaded and installed Dr.Fone, launch it. From the main menu, tap on 'System Repair' and get your Android device connected to it.

Step 2: Click 'Android Repair' from the available options, and then press the 'Start' button to fix the Dead Android phone by flashing it.

Step 3: On the device information screen, pick the appropriate device brand, name, model, and other details followed by tapping the 'Next' button. Selecting the exact model number is essential—Dr.Fone uses this information to automatically match and download the correct firmware for your specific Samsung Galaxy variant.

Phase 2: Put the Android device in Download mode to start repair.
Step 1: It is essential to boot your Android device in Download mode before repairing. Download Mode is a special low-level boot state that allows the flashing tool to communicate directly with the device's storage, bypassing the non-functional Android OS.
- If the device has a 'Home' button: Turn it off and then hold down the 'Volume Down', 'Home', and 'Power' buttons altogether for 5-10 seconds. Un-hold all of them and hit the 'Volume Up' button for entering 'Download' mode.

- In the absence of a 'Home' button: Switch off the Android device and hold the 'Volume Down', 'Bixby', and 'Power' buttons for 5 to 10 seconds, then release them. Hit the 'Volume Up' button for entering the 'Download' mode.

Step 2: Press the 'Next' button for initiating firmware download. Dr.Fone will automatically identify the correct firmware package for your Samsung Galaxy model and begin downloading it. Do not disconnect the device or close the application during this phase.

Step 3: Once the firmware gets downloaded and verified Dr.Fone - System Repair (Android) starts to flash your Dead Android phone. All the Android system issues will be fixed soon after. The entire flashing process typically takes 5–15 minutes. Once complete, your Samsung Galaxy will reboot automatically and return to normal operation.

Part 3: How to Flash Samsung Galaxy Dead Phone with Odin?
Odin is a free, Samsung-developed android flash tool widely used to unbrick Samsung Galaxy devices, install stock firmware, and perform carrier-unlocking operations. It's the go-to manual option for advanced users who prefer full control over the android flashing process without relying on third-party software. Because Odin communicates directly with Samsung's proprietary Download Mode protocol, it works even when your Samsung Galaxy is completely unresponsive. However, it requires that you download the exact correct firmware for your device's model number and region—using the wrong firmware can result in a permanently bricked device, so proceed carefully.
Important before you start: Always verify that the firmware file matches your exact Samsung model number (e.g., SM-G991B vs SM-G991U). Flashing the wrong regional firmware is a common mistake that can make the situation worse. You can find your exact model number on the back of the device or on the original packaging.
Step 1: Install the driver software on the computer. You can find the best driver software for your device and PC on the official Samsung website. You may also download Samsung Kies on your PC. Once you have downloaded and installed the driver software, restart the PC.
Step 2: Now download suitable firmware for your device in the form of a zip folder that you can open and store on your desktop.

Make sure the file is .bin, .tar, or .tar.md5 only as these are the only file types recognized by Odin.


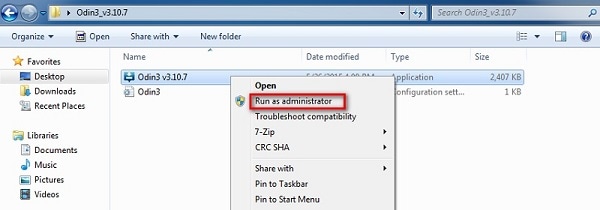
Step 3: In this step, download the latest version of Odin on your PC and move it to the desktop, and then right-click on the downloaded Odin file to select "Run as Administrator".

Step 4: Now, boot your dead device to Download Mode by pressing the power, volume down, and home button together. When the phone vibrates, release the power button only.

Step 5: Gently press the volume up button, and you will see the Download Mode Screen.

Step 6: Now, you may use a USB to connect your device to the PC. Odin will recognize your device, and in the Odin window, you will see a message saying "Added".

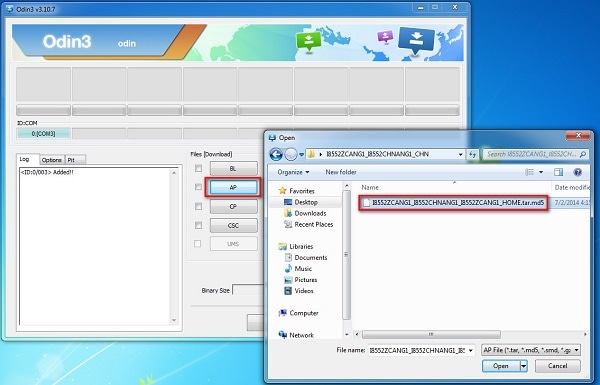
Step 7: In this step, find the tar.md5 file you downloaded by clicking on "PDA" or "AP" on the Odin window and then click "Start".
Once the flashing process is complete, your Samsung Galaxy phone will reboot and start normally, and you may see a "Pass" or "Reset" message on the Odin window on the PC. If Odin shows "FAIL" instead, the most common causes are an incorrect firmware file, an unsupported device region, or a faulty USB connection—try a different USB port or cable and verify your firmware model number before retrying.
Part 4: How to Flash MTK Android Dead Phone with SP Flash Tool?
The SP Flash Tool (SmartPhone Flash Tool) is the definitive android flash tool for MediaTek (MTK) chipset devices—one of the most widely used chipsets in budget and mid-range Android phones from brands like Xiaomi, OPPO, Vivo, Tecno, Infinix, and many others. If your dead Android phone runs on a MediaTek processor, SP Flash Tool is likely the most appropriate way to flash android firmware and restore your device. It supports flashing custom ROMs, stock firmware, and recovery images, and can operate even when the Android system is completely non-functional—because it communicates directly with the MediaTek bootloader.
Before starting, confirm your device uses a MediaTek chipset (check specifications on the manufacturer's website). You will also need: the correct MTK USB driver installed on your PC, and the stock ROM or firmware package specific to your exact device model. Using firmware from a different model—even the same brand—can brick the device permanently.
Let us look at the steps given below to learn how to flash dead Android phones using PC with the help of the SP Flash tool.
Step 1: To start with, download and install the MTK driver on your PC and then download the ROM/firmware you wish to use for flashing purposes. Ensure the firmware file contains a "scatter" file (MT####_Android_scatter.txt), which is required by SP Flash Tool to map the firmware partitions.
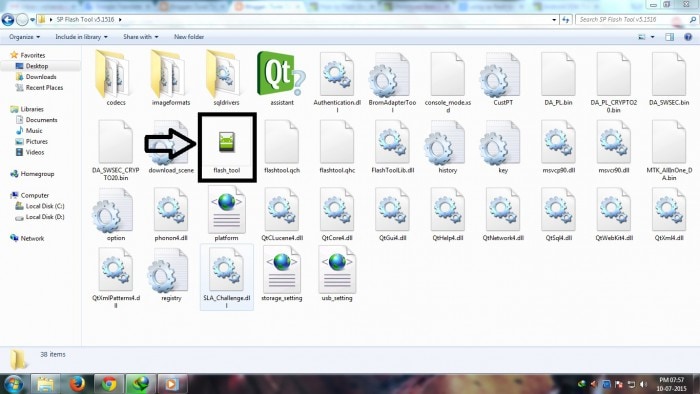
Step 2: Once done, you should download the SP Flash tool and extract it on your PC and move on to launch the Flash_tool.exe file to open the SP Flash tool window.
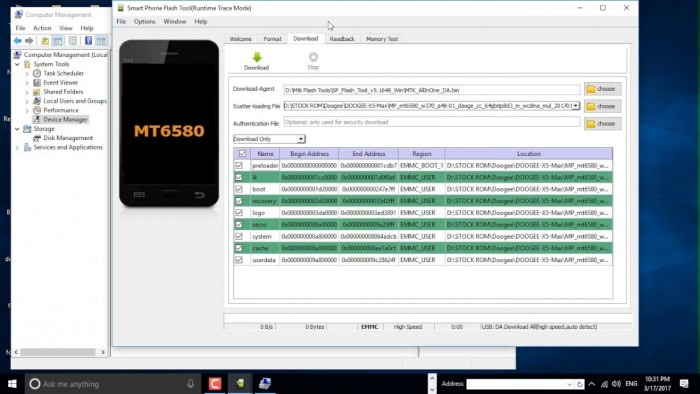
Step 3: Now, on the SP Flash tool window, click on "Download" and select "Scatter-loading".

Step 4: The last step would be to locate the file downloaded by you and click "Open" and then finally, select "Download" on the SP Flash tool window.
After completing the above steps, connect your dead device to the PC with a USB cable and wait for it to get recognized. The android flashing process will take a few minutes to finish and then you will see a green circle indicating "OK Download". Once this appears, the flash was successful. Simply disconnect your phone and wait for it to reboot. If the phone doesn't reboot within 3 minutes, hold the power button for 10 seconds to force-start it.
Part 5: How to Flash Nokia Dead Phone with the Phoenix Tool?
PhoenixSuit is the recommended android flash tool for Nokia phones and devices running Allwinner (AW) chipsets. It's particularly effective when a Nokia Android device becomes completely unresponsive—stuck in a boot loop, failing to load the OS, or showing no activity whatsoever. PhoenixSuit is also commonly used to answer the question "how to flash a dead Android phone using a PC" for Nokia-specific devices, as it provides a direct, low-level connection to the device's recovery partition. Note that PhoenixSuit is primarily designed for older Nokia Android models and Allwinner-based phones; newer Nokia phones using Qualcomm or MediaTek chipsets may require different flashing tools.
Before starting, download the Nokia PC Suite driver for your specific device model from the official Nokia support website and install it on your PC. Also, download the correct stock firmware package for your Nokia device—ensure it matches your model number exactly.
First, download and install the Nokia PC Suite driver on your PC. Then you will need to download the PhoenixSuit tool and then launch it.

Now, on the toolbar, click "Tools" and select "Data Package Download" from the drop-down list.

Then move to download the firmware for your dead Nokia phone and save it in a new Folder. Once done, go back to the Phoenix tool window and click on "File" and select "Open Product".

Simply, feed in the details and then click "OK".

After this, click on "Flashing" and select "Firmware update" and then browse to select the appropriate product code and then click "OK" again.
Then move on to select "Dead Phone USB Flashing" from the Firmware Update Box. This option is specifically designed for completely unresponsive Nokia devices and bypasses the normal boot sequence to write firmware directly to the device storage.

Lastly, just click on "Refurbish" and connect your phone to the PC using a USB cable.
That was it, the flashing process may take up to a few minutes after which your dead Nokia phone will restart automatically. If the device does not restart on its own within 5 minutes, disconnect it and attempt a manual power-on by holding the Power button for 15 seconds.
Part 6: How to Flash a Dead Phone That Won't Turn On via Factory Reset?
When your Android phone won't turn on and you don't have access to a PC or brand-specific flashing tools, performing a factory reset through Recovery Mode is a viable alternative. This method doesn't require any PC or android flash tool—it uses only the hardware buttons on your device to wipe and restore the system partition. It's especially useful when the phone is stuck due to a corrupted system app, failed update, or a locked-out state—but it's important to understand that a factory reset will erase all personal data, apps, and settings stored on the device. There is no way to recover this data after the reset unless you have a prior backup.
This method works on virtually any Android brand—Samsung, LG, Motorola, OnePlus, Nokia, and others—though the key combinations to enter Recovery Mode may vary. Common combinations include: Power + Volume Up (most Android devices), Power + Volume Down + Home (older Samsung devices), or Power + Volume Up + Volume Down (some Motorola and LG models).
To know how to flash a dead Android phone using factory reset, go through the steps featured below:
Step 1: To initiate the process, you will have to put your Android device in Recovery Mode. Generally, Android phones are put in Recovery Mode by holding the "Power" and "Volume Up" keys for a few seconds after turning them off. The key combinations can vary according to your Android device. If the first combination doesn't work, search for your specific model's Recovery Mode key combo online before proceeding.
Step 2: As the Android boot menu opens on your screen, use the "Volume Down" and "Volume Up" keys to scroll up and down the menu. On accessing the "Wipe Data/Factory Reset" option, use the "Power" key to select the particular option.
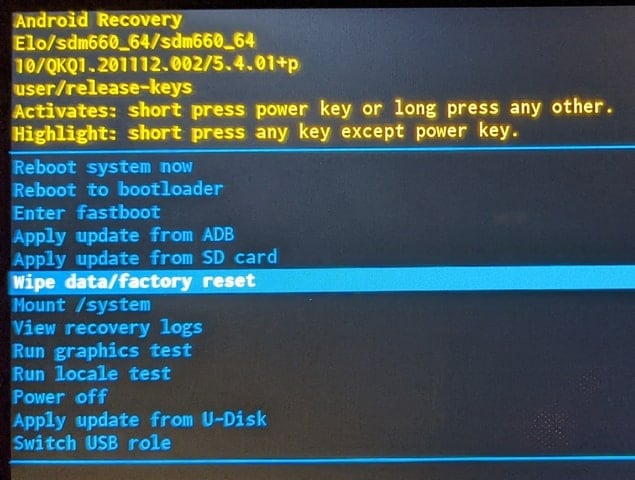
Step 3: Continue to select the "Yes" option for confirming the factory reset of the Android device. The phone will automatically reboot after successfully factory resetting. The reboot process after a factory reset can take 5–10 minutes, as the system re-initializes from scratch—this is normal. If the device does not successfully boot after 15 minutes, a deeper firmware issue is likely present and a full flash using one of the PC-based methods above will be necessary.
Part 7: How to Fix a Dead Android Phone by Checking Screen Faulty?
One of the most commonly overlooked reasons an Android phone appears "dead" is a damaged or completely unresponsive display. Before concluding that your device needs firmware flashing or hardware repair, it's worth performing a display-specific diagnosis. Many Android phones continue to function normally—receiving calls, playing audio, and running apps—while their screen shows absolutely nothing. In these cases, the android flashing process would be entirely unnecessary; the device simply needs a screen replacement.
Use the following diagnostic steps to determine whether a faulty screen is the cause of your "dead" Android phone:
- Attempt a Force Restart: Hold the Power button for 10–30 seconds. On Samsung Galaxy devices, press and hold Power + Volume Down simultaneously for 10 seconds. If you feel a vibration or hear startup sounds but see no display, the device is very likely running normally with a broken screen.
- Check for a Charging LED or Vibration: Plug the phone into a wall charger. If the device vibrates on connection, or if a charging LED lights up, but the screen remains black, this strongly points to a display fault rather than a system failure.
- Call the Device: Using another phone, call your "dead" device. If the speaker rings and the screen stays dark, the Android OS is fully operational—only the display module is defective.
- Connect to an External Monitor: Some Android phones support video output via a USB-C to HDMI adapter. If your device outputs video to an external display but the built-in screen shows nothing, the internal panel needs replacement.
- Inspect for Physical Screen Damage: Examine the screen carefully for cracks, pressure marks, dark ink-like blotches, or areas where the display has separated from the glass. These are all indicators of LCD or OLED damage that can only be resolved with hardware repair.
If your phone vibrates on restart, rings when called, or responds to a charger—but the screen remains completely dark—the display itself needs physical replacement. This is not a software issue, and attempting to flash firmware on a screen-damaged device is inadvisable unless you can monitor the flashing progress through other means (audio cues or external display). You have two primary repair paths:
- Professional Repair Service: Authorized service centers and reputable third-party repair shops can replace most Android screens. Typical costs range from $50–$200+ depending on the device model. For flagship phones like Samsung Galaxy S or Google Pixel, screen replacements may cost more but come with quality guarantees.
- DIY Screen Replacement: Replacement screen assemblies are available for many popular models through parts suppliers. DIY repair requires heat tools, pry tools, and careful adhesive work. A poorly executed replacement can damage the phone's waterproofing, flex cables, or fingerprint sensor integration.

Part 8: How to Fix a Dead Android Phone by Changing the Battery
A failing or completely depleted battery is one of the most common—and most frequently misdiagnosed—causes of a "dead" Android phone. Lithium-ion batteries in smartphones are rated for approximately 300–500 full charge cycles before significant capacity degradation occurs. For most users, this translates to 2–3 years of regular use. After this period, the battery may become unable to hold or deliver a charge, causing the phone to refuse to power on even when connected to a charger.
Signs That a Dead Battery Is the Likely Cause:
- The phone shows no response at all—no LED, no vibration, no screen activity—even after extended charging
- The device was working fine and then suddenly shut off one day without warning and never turned back on
- The phone is 3 or more years old and has never had a battery replacement
- The battery previously showed signs of swelling, unusual heat during charging, or rapid drain within the last few months before failure
- The phone only responds (vibrates or shows a screen briefly) when connected to a charger, then shuts off again immediately
How to Test Whether the Battery Is the Problem:
Before proceeding with a battery replacement, perform this simple test: connect the phone to a wall charger (not a power bank or laptop USB port) using the original charging cable and leave it for a minimum of 60 minutes. Deeply discharged lithium-ion batteries can take 30–60 minutes of trickle charging before the phone shows any signs of life. If there is still no response after 60 minutes, try a completely different charging cable and power adapter to rule out a faulty charger. If the device still doesn't respond after ruling out charger faults, battery replacement is the logical next step.
Battery Replacement Options:
- Authorized Manufacturer Service Center: This is the safest option. Manufacturer-authorized centers use genuine OEM batteries and typically offer a repair warranty. Samsung, Google, and Nokia all have service center networks where battery replacements can be performed professionally.
- Third-Party Repair Shop: A reputable local shop can often complete the repair faster and at lower cost than official service centers. Insist on quality replacement batteries and avoid suspiciously cheap options—low-quality batteries can cause further damage, overheating, or safety risks.
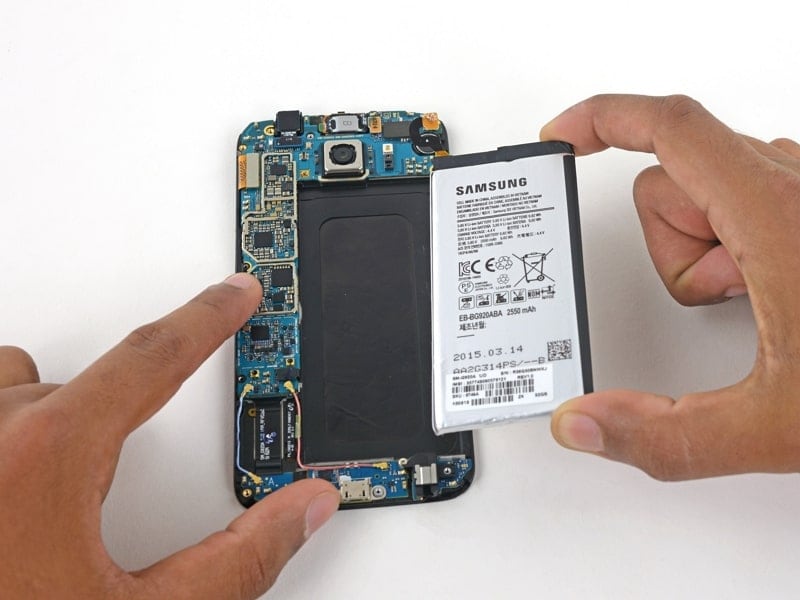
- DIY Replacement (Removable Battery Phones): Older Android models with removable back covers make battery replacement straightforward—simply pop off the cover, remove the old battery, and install the replacement. Ensure the replacement battery matches the model number printed on the original.
- DIY Replacement (Non-Removable Battery Phones): Most modern Android phones have sealed batteries that require heat tools, suction cups, and pry tools to access safely. This carries a risk of damaging the display, flex cables, or waterproof sealing if done incorrectly. Only attempt this if you have prior repair experience.
If the phone successfully powers on after a battery replacement, charge it fully before regular use. However, if the device still won't turn on after a new battery is installed, the root cause is likely a software/firmware issue—in which case, refer to Part 2 for the Dr.Fone one-click flashing method—or a more serious hardware fault requiring professional diagnosis.
Part 9: How to Repair a Dead Android Phone by Contacting Official Support
When none of the above methods have successfully revived your dead Android phone, contacting the device manufacturer's official support is the most reliable and risk-free remaining option. Official support is especially appropriate when the device is still under warranty, when hardware damage is suspected, or when previous attempts to flash android firmware have left the device in an uncertain or worsened state.
When Should You Contact Official Support?
- The phone is within its manufacturer warranty period (typically 1–2 years from purchase date)
- All software-based repair methods, including the android flashing process, have been attempted without success
- The phone shows signs of hardware damage such as liquid ingress, physical impact, or a damaged charging port
- The device is a premium flagship model where professional repair is preferable to DIY risk
- You are not comfortable performing manual flashing procedures or interpreting error codes from flash tools
Information to Prepare Before Contacting Support:
- Device model number and IMEI (available on the original box, receipt, or inside the SIM card tray)
- Original proof of purchase or warranty registration documentation
- A clear description of how and when the phone stopped responding
- A list of any repair actions already attempted (e.g., factory reset, firmware flash, battery replacement)
- Any error messages displayed on the device before it became completely unresponsive
Official Support Channels by Brand:
- Samsung: Visit samsung.com/support or call Samsung's regional support line. Samsung's authorized service centers (including Samsung Experience Stores) are available in most major cities globally.
- Google Pixel: Submit a repair request through Google's support portal or visit the Google Store. Mail-in and walk-in repair options are available depending on your region.
- Nokia: Contact HMD Global's support team through the official Nokia website. Authorized Nokia service partners are listed on the website by country.
- Other Android Brands: Manufacturers like Motorola, OnePlus, Xiaomi, OPPO, and Vivo all maintain dedicated support portals with live chat, call-in options, mail-in repair services, and service center locators.
What to Expect from Official Repair:
Official repairs typically take 3–10 business days depending on the issue severity and parts availability. If the device is under warranty and the failure was not caused by user damage (such as water exposure or physical impact), repairs are generally performed free of charge. Out-of-warranty repairs may cost anywhere from $50 to several hundred dollars depending on the extent of the damage and the device model.
Important note: If you previously attempted a manual android flash that partially failed or produced an unknown result, disclose this to the support team upfront. While unauthorized modifications can void warranty coverage, providing accurate information allows the technician to diagnose and approach the repair correctly—and in some cases, a firmware-related damage can still be covered under goodwill repair programs.
Conclusion
A dead Android phone is a stressful situation—but as this guide demonstrates, it's rarely a permanent one. The nine methods above cover every major cause and scenario: software corruption, firmware failure, MediaTek and Samsung-specific flashing procedures, Nokia recovery, no-PC options, screen faults, battery failure, and last-resort professional support. By correctly identifying the root cause first and selecting the right approach for your device, you can restore a dead Android phone without costly repairs in most cases.
For the fastest, safest, and most reliable result across the widest range of Android devices and issues, Wondershare Dr.Fone - System Repair (Android) remains the top recommendation. It eliminates the risk of downloading incorrect firmware, eliminates manual driver configuration, and guides even first-time users through the complete android flashing process step by step. Whether you're dealing with a Samsung Galaxy that won't boot, an MTK phone stuck at the logo, or any other Android phone flash emergency—Dr.Fone is the most reliable single tool to have on hand. Try it today and bring your dead Android device back to life.
FAQs


Android Issues
- Android Update
- 1. Download and Use Samsung Odin
- 2. Samsung Phone Stuck in Odin Mode
- 3. Android 9 Pie Problems & Fixes
- 4. Latest Updates in Android 11
- 5. Update Android Oreo 8.1
- Android Not Working
- 1. Solution To Bricked Android Phone
- 2. Fix 'Android Phone Won't Turn On'
- 3. Flash Dead Android Phone
- 4. Fix Phone Keep Turning Off
- 5. Fix Android Bootloop Problem
- 6. Fix Android Phones and Tablets
- Android Errors
- 1. Fix Error 495 While Download Apps
- 2. Fix Error 505 in Google Play Store
- 3. Fixes For Authentication Error
- 4. Fix Error Code 963 on Google Play
- 5. Fix Error Code 920 In Google Play
- 6. Fix Encryption Error
- Screen Problems
- 1. Fix Unresponsive Fire Tablet Screen
- 2. Fix Unresponsive Android Screen
- 3. Fix Android Screen Problem
- 4. Fix Phone Is Stuck on Boot Screen
- 5. Fixes for Tablet Screen Not Working
- 6. Tools for Removing Stuck Pixels
- 7. Fix Android Black Screen of Death
- 8. Fix Android Stuck on Boot Screen
- 9. Fix Android White Screen of Death
- 10.Fix Android Blue Screen of Death
- 11.Fix ONN Tablet Screen Not Working
- 12.Fix Android Touch Screen Proble
- 13.Fix Smartphone With a Black Screen
- 14.Fix Realme Screen Not Responding
- 15.Fix Phone Screen Not Responding
- Android Problems
- ● Manage/transfer/recover data
- ● Unlock screen/activate/FRP lock
- ● Fix most iOS and Android issues
- Free Download Free Download Free Download


Alice MJ
staff Editor
Generally rated4.5(105participated)