A Comprehensive Guide on How to Delete Reminders on iPhone
Selena LeeOriginally published Jul 27, 2026, updated Oct 24, 2026
:
TL;DR:
Deleting reminders on your iPhone is essential for maintaining an organized and clutter-free digital workspace. You can achieve this using the built-in iOS app or a professional data erasure tool.
Manual Deletion: Quickly remove individual reminders by swiping left in the native app, or use the 'Select Items' option to delete multiple entries at once.
Permanent Erasure: For those selling or recycling their device, third-party software like Dr.Fone - Data Eraser ensures that reminders and other sensitive data are permanently wiped beyond recovery.
Status Management: Simply marking a reminder as complete is an effective alternative to deletion, keeping your active list clean while preserving a record of finished tasks.
Do you frequently scroll through an overwhelming list of finished tasks and wonder how to delete reminders on iPhone to start with a clean slate? Have you ever felt that having too many outdated notifications on your device makes you feel stressed or disorganized? You are definitely not the only one. Many users struggle to manage their digital planners effectively and find themselves unsure about how to erase reminders on iPhone when they are no longer relevant.
In this comprehensive guide, we will explore various methods to remove reminders from iPhone. By understanding these techniques, you can regain control over your digital to-do list and maintain a distraction-free environment. Whether your goal is to delete a single mistakenly created task or wipe all your synced reminders securely, this tutorial will walk you through the entire process.
We will provide clear, step-by-step instructions, actionable workflow tips, and introduce you to advanced professional software that makes it incredibly easy to get rid of reminders on iPhone permanently.
Part 1. How to Delete Reminders on iPhone Efficiently
When it comes to managing your digital lifestyle, having multiple solutions at your disposal is incredibly helpful. Leaving old tasks piling up can drain your device's storage and clutter your visual interface. In this section, we will thoroughly explore two highly effective methods to delete reminders iPhone users can rely on: leveraging a powerful third-party privacy tool and utilizing the native iOS capabilities.
1-1. Method 1: Use Wondershare Dr.Fone Data Eraser to Remove Reminders From iPhone
Dr.Fone - Data Eraser
Erase iOS & Android Data Permanently
Permanently erase all data on iOS & Android — completely unrecoverable.
Military-grade wiping to fully protect your privacy.
Generate verified erasure reports to boost device resale value.
Selectively erase private data and remove junk & large files.
If you are looking for a highly secure and comprehensive solution to erase reminders on your iPhone—along with other traces of personal data—the Wondershare Dr.Fone Data Eraser stands out as the premium choice. This advanced desktop utility goes beyond simple deletion, allowing you to wipe out sensitive information completely so it can never be recovered.
While the standard iOS tools are useful for casual, day-to-day interactions, Dr.Fone provides an essential safety net for individuals trading in their devices, handing phones over to employees, or seeking to permanently purge all existing files to free up massive amounts of storage space. By utilizing this program, you can effortlessly figure out how to get rid of reminders on iPhone alongside messages, call logs, and cache data simultaneously.
Here are the detailed steps explaining how to delete reminders on iPhone permanently using Dr.Fone:
Step 1 Launch the Tool and Connect Your iPhone
Begin by visiting the official website to download and install the software. Once opened, connect your iPhone to your PC or Mac using an MFi-certified USB cable. From the main dashboard interface, navigate to and select the Data Eraser module.
Step 2 Access the Erasure Mode
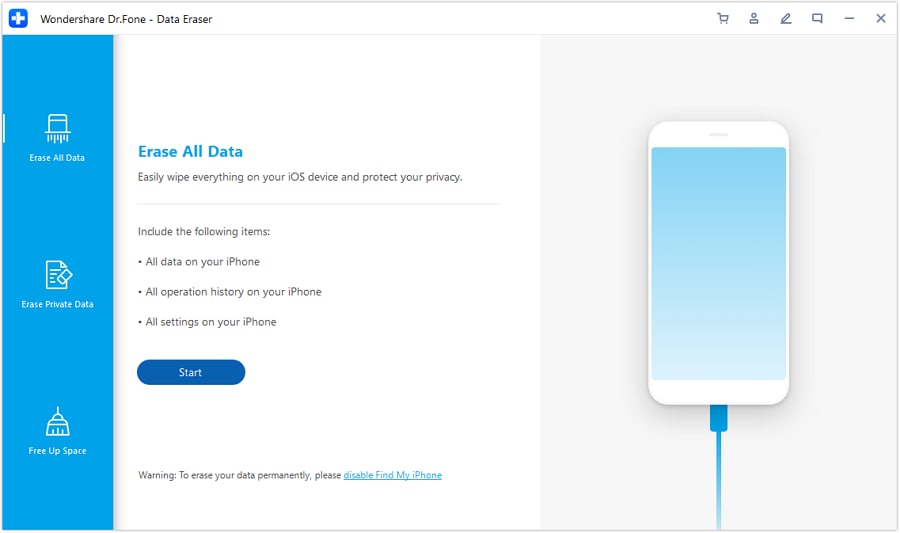
Look at the left-hand navigation pane and click on the Erase All Data option to initiate the full wiping feature. Proceed by clicking the Start button on the main screen to instruct the software to begin reading your connected device.
Step 3 Choose Your Security Level
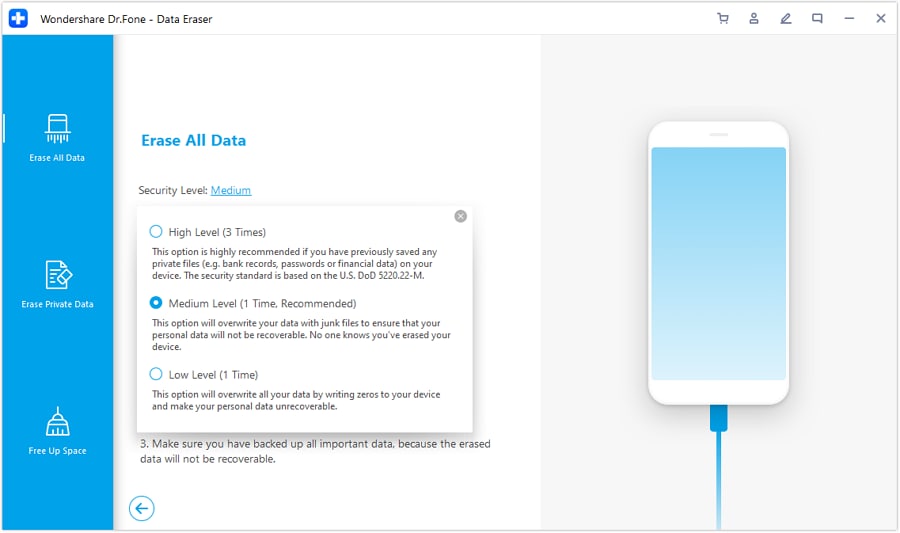
You will be prompted to select the security level for your data erasure. For everyday usage and standard resetting, the default Medium level is highly recommended, as it overwrites data reliably without consuming excessive time.
Step 4 Confirm the Operation
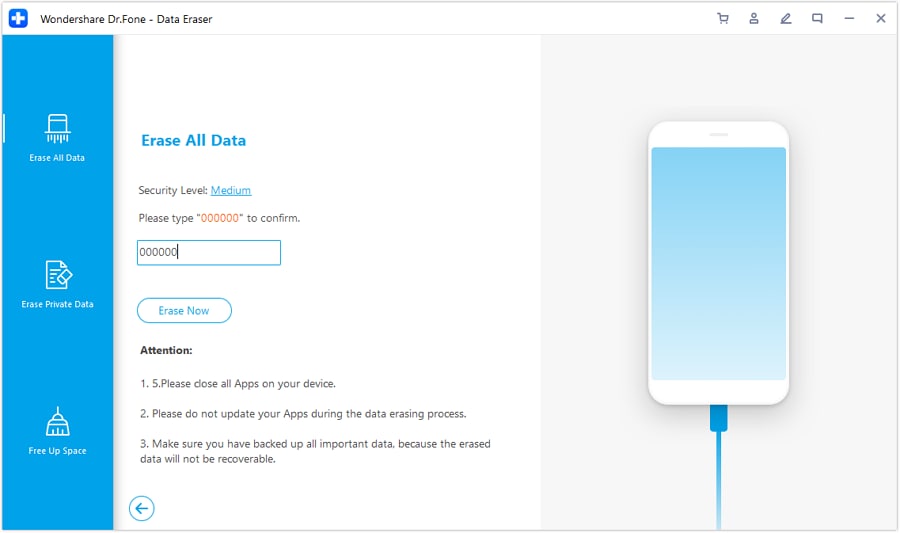
As a safety precaution to avoid accidental deletion, you must enter a specific confirmation code in the dialog box. After typing it correctly, hit Erase Now. The software will take over; the process length depends on how much data needs to be wiped from your iPhone's internal storage.
Step 5 Wait for Device Restart
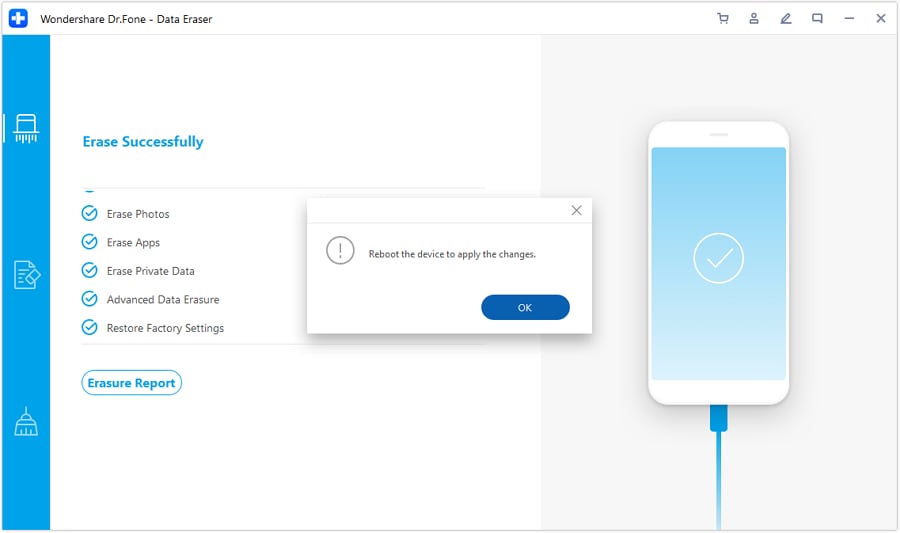
Once the deep erasure is finalized, your device will automatically restart as a blank slate. All redundant files and personal data will be unrecoverable, successfully demonstrating how to remove reminders from iPhone permanently.
1-2. Method 2: How to Erase Reminders on iPhone From the Reminders App
If you prefer an approach that does not require installing external software, handling tasks directly from the native iOS interface is very intuitive. The built-in framework provides flexible gesture controls that let you manage tasks quickly.
Follow these instructions for deleting a single entry:
Step 1 Locate the Specific Reminder
Unlock your iPhone and tap to open the native Reminders app. Scroll through your folders to find the exact list and the corresponding reminder you wish to discard.
Step 2 Swipe to Delete
Simply place your finger on the targeted reminder and firmly swipe it to the left. A red Delete icon will slide into view. Tap it to immediately remove the reminder from the list.
Alternatively, if your lists are heavily populated and you want to know how to delete reminders on iPhone in batches, you can use the multi-select feature:
Step 1 Access the Options Menu
Launch the app and enter the list that contains the tasks you want to erase. Look at the top-right corner of the interface and tap the icon displaying three horizontal dots.
Step 2 Select and Remove
Tap Select Items from the dropdown menu. Small circles will appear next to every task. Check off the ones you want to discard, and then hit the Delete button situated at the bottom of the screen.
This localized method is excellent for ongoing daily upkeep. It keeps your interface clean without interfering with your broader backup environments.
Part 2. BONUS: Mark Reminders As Read on iPhone and iPad
Often, users might mistake their need for deletion with a simple need for organization. While it is beneficial to know how to erase reminders on iPhone completely, occasionally you might just want to move them out of your active view while keeping a historical log. This is where marking tasks as "Completed" comes into play.
Here is the standard workflow to mark them as done:
Step 1 Open the Active List
Navigate to your active Reminders application. Locate the specific task you just accomplished and no longer want dominating your primary screen.
Step 2 Toggle the Completion Status
Tap the empty circle located directly to the left of the task text. It will instantly fill in, and the reminder will automatically disappear from your immediate list, migrating smoothly to your "Completed" section.
By regularly adopting this practice, you can keep your main dashboards neat while retaining a satisfying trail of all the productive work you have completed over time.
Part 3. Pro Tips to Manage Reminders on iPhone in 2026
Understanding how to delete reminders on iPhone is just the tip of the iceberg. True productivity comes from smart management. Let's explore several best practices and advanced strategies for keeping your device flawlessly organized:
Embrace Voice Commands via Siri: Utilize Siri to generate and categorize reminders entirely hands-free. A quick voice command can set up complex tasks without you ever needing to unlock the screen.
Categorize Into Distinct Lists: Establish separate categories for distinct facets of your life, such as "Professional", "Groceries", or "Fitness". This targeted separation ensures you only delete reminders iPhone considers relevant to one aspect at a time.
Deploy Location-Based Triggers: Maximize the potential of your GPS capabilities. Have your device ping you only when arriving at or departing from a predefined geo-fence. This prevents arbitrary, time-based alerts from cluttering your notification center.
Leverage Automated Smart Lists: Make full use of built-in filters like "Today", "Scheduled", and "Flagged". These smart metrics pull scattered tasks into a unified, focused view, making it much easier to decide which items are obsolete.
Implement Routine Maintenance: Designate a few minutes every Sunday to audit your app. Aggressively remove reminders from iPhone that are no longer actionable, keeping your digital footprint agile.
Maintain iCloud Synchronization: Make certain your settings have iCloud syncing turned on. This way, when you learn how to get rid of reminders on iPhone, the changes instantly reflect across your iPad and Mac.
Collaborate Using Shared Lists: Distribute task loads by sharing specific lists with family or colleagues. When tasks are handled collectively, it prevents identical duplicate entries from piling up on individual devices.
Fine-Tune Alert Aesthetics: Personalize the notification chimes and banner styles. Creating a distinct visual and auditory experience for tasks ensures that you pay attention to priority items and easily dismiss the rest.
Conclusion
This concludes our extensively detailed guide on exactly how to get rid of reminders on iPhone securely and swiftly. As digital workflows continue evolving into 2026, handling and pruning your personal databases shouldn't be a source of stress. Whether navigating through old shopping lists or outdated professional meeting alerts, applying the insights from this guide ensures your productivity stays top-notch.
You can either take advantage of the seamless built-in app gestures for quick cleanups, or you can opt for professional-grade utility software like Wondershare Dr.Fone Data Eraser to guarantee privacy and permanently remove reminders from iPhone prior to a device transition.
Ultimately, a tidy application creates a tidy mind. Commit to evaluating your to-do lists frequently, clear out finished duties, and eradicate redundant data. By integrating these strategies, you will confidently master how to delete reminders on your iPhone, empowering you to sustain a highly organized digital life.
FAQ
1. Can I recover deleted reminders on my iPhone after they are gone?
Unfortunately, the moment you decide to delete reminders on iPhone via the standard app, the deletion is instantaneous and irreversible natively. However, if you possess a prior iCloud backup that actively contained those entries, executing a full device reset and restoring from that historical backup might recover them. Consistent backups are strongly advised to guard against accidental deletion.
2. Will uninstalling or deleting the Reminders app remove all my tasks?
No, simply deleting the application icon from your home screen does not permanently erase reminders on iPhone. When you choose to download and reinstall the app from the App Store, as long as you authenticate with the identical Apple ID and have iCloud syncing enabled, all your previous lists will repopulate immediately. This is not a viable method for permanent data wiping.
3. How do I delete all reminders at once on my iPhone efficiently?
To execute a mass deletion natively, the fastest method is to delete the entire list grouping. Navigate to your app, swipe the master list name, and select "Delete List". You must repeat this for each active folder to clear the phone. For individuals demanding a faster, absolute wipe of all data arrays simultaneously, deploying Wondershare Dr.Fone Data Eraser remains the superior solution.
4. Is it possible to set and manage reminders inside other third-party apps?
Yes. While the standard iOS tool handles baseline functionality perfectly, numerous productivity suites exist with independent alerting algorithms. Furthermore, several of these third-party platforms integrate deeply with iOS architecture, mirroring their notifications into your core Apple environment. Always review the dedicated settings of your external productivity tools to determine compatibility.
Chief Editor of the Dr.Fone team since 2012, Selena is a veteran technology editor known for turning complex iOS and Android topics into clear, user-focused guidance.
 Permanently erase all iOS & Android data—completely unrecoverable.

 100% Security Verified | No Subscription Required | No Malware

 :
: 
 ChatGPT
 Perplexity
 Gemini
 Claude
 Grok
Grok

 Permanently erase all data on iOS & Android — completely unrecoverable.







 Add Wondershare Dr.Fone as a preferred source on Google