Ways You Can Fix the “iPhone App Not Updating” Problem

Jul 12, 2024 • Filed to: Mobile Repair Solutions • Proven solutions
Is your iPhone app not working and can’t update? You’re not alone. It’s more common than you’d think. There are multiple reasons for the “iPhone app not updating” problem. Fortunately, there are various solutions to it as well.
Therefore, we’ve prepared a thorough, step-by-step guide to solving your problem of the iPhone app not updating. Firstly, we’ll go through the reasons behind this problem so that you can understand why it is happening.
Secondly, we’ll introduce ten ways to fix the problem. These fixes include various solutions, from checking your internet connection to updating apps via iTunes. With our guide, you’ll be able to solve the problem and update your iPhone app with little to no effort.
Part 1. Why Is My iPhone App Not Updating?
App not updating is a more common problem for iPhone users than you’d think. One of the most common reasons is your iPhone’s need for more storage space. However, it can be something completely different.
For example, your internet might be disconnected, or you might have turned Airplane mode on. Moreover, the low data option might be on, or there’s a problem with your system. Various reasons can cause the “iPhone app not updating,” but you can try fixing it in several ways.
Part 2. 10 Fixes You Can Try If Your iPhone Apps Aren’t Updating
If your iPhone apps aren’t updating, our guide will help you fix that. Since you’ve established your apps aren’t updating, it’s time to diagnose the reason behind it. There might not be a visible reason; your phone might only need a reset. Therefore, we’ve prepared a list of ten fixes for the “iPhone app not updating” problem.
If you need help finding the root of the problem, try the multiple solutions we offer. If one doesn’t work, that isn’t the problem, so you should move on to the next one. In the worst-case scenario, you try up to ten ways to fix the problem. With some luck, you’ll settle the issue in a few minutes.
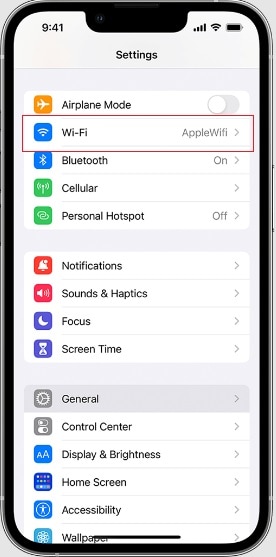
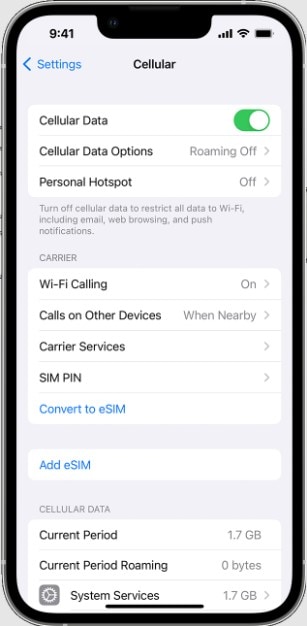
iPhone App Not Updating Fix 1: Check Cellular Data and Wi-Fi Connections
The first problem behind your iPhone apps not updating could be the internet connection. Check whether your cellular data or Wi-Fi is on and connected. If not, that’s probably why your apps refuse to update. The steps for checking cellular data and Wi-Fi connections on your iPhone are as follows:
- Step 1: Open Settings on your iPhone.

- Step 2: Select Wi-Fi.
- Step 3: If the switch next to Wi-Fiis white or gray, toggle it to turn it green.
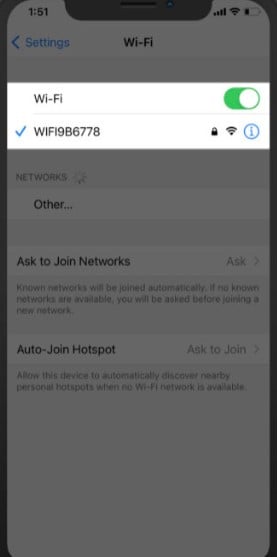
- Step 4: Find a secure network and connect to it.
- Step 5: If there isn’t an available Wi-Fi network, go back to settings and select Mobile Data/Cellular.
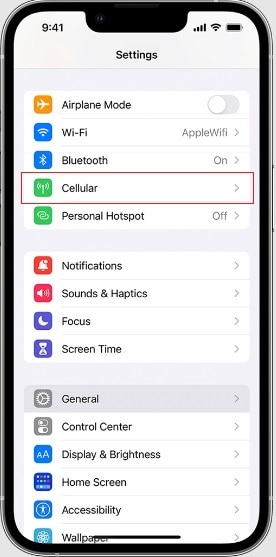
- Step 6: Toggle the switch next to Mobile/Cellular Datato turn it green. It will turn your cellular data on and allow the apps to update.
iPhone App Not Updating Fix 2: Disable Airplane Mode
Another possible reason for your apps not updating could be Airplane Mode. You could’ve accidentally turned it on or just forgot to turn it off. Fortunately, it’s an easy fix. There are two ways to check and disable Airplane Mode.
- Step 1: Open Settings on your iPhone.

- Step 2: The first option under your iCloud account is Airplane Mode.
- Step 3: If the switch is green, toggle it to disable Airplane Mode.
The easier way to access and disable Airplane Mode is as follows:
- Step 1: Swipe down from the upper-right corner of the Homeor Lock screen to access the Control Center.
- Step 2: You’ll see the Airplane Modeicon in the upper-left corner of the Control Center.
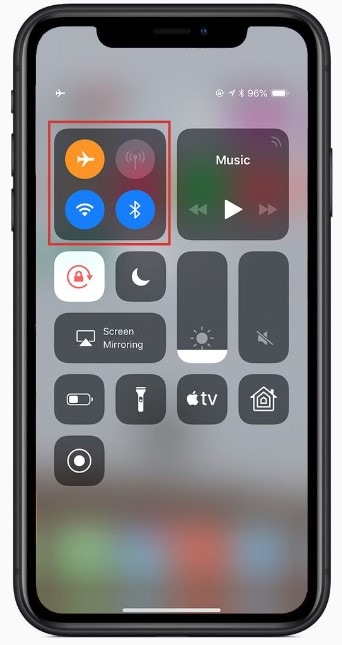
- Step 3: If it’s orange, tap it to disable Airplane Mode.
iPhone App Not Updating Fix 3. Reinstall the App Before Updating
The problem might be in the app itself. It could be an app software problem or a bug preventing the app update. You can try reinstalling the app. Reinstalling can solve the possible problem and allow you to update the iPhone app. The steps are as follows:
- Step 1: Find the app you want to reinstall on the Home
- Step 2: Tap and hold its icon until several options pop up for this app. Tap the Remove Appoption in red.
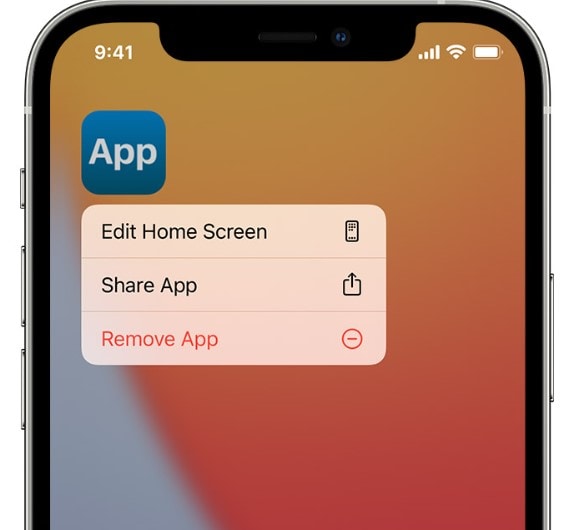
- Step 3: Then, go to the App Storeand find the app you just deleted.
- Step 4: Tap Installto download the latest app version that includes the update.
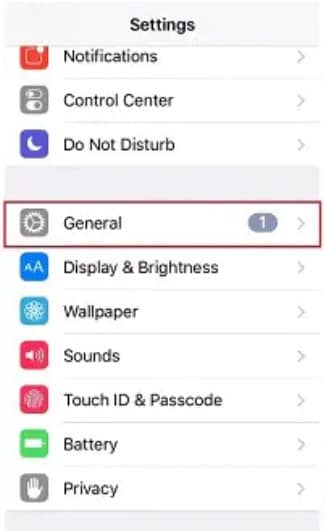
iPhone App Not Updating Fix 4: Check If You Have Enough Storage Space
The most common reason behind iPhone apps not updating is the need for more storage space. If your storage space is at its capacity, you won’t be able to update your apps. Check the storage space if your apps need an update by following these steps:
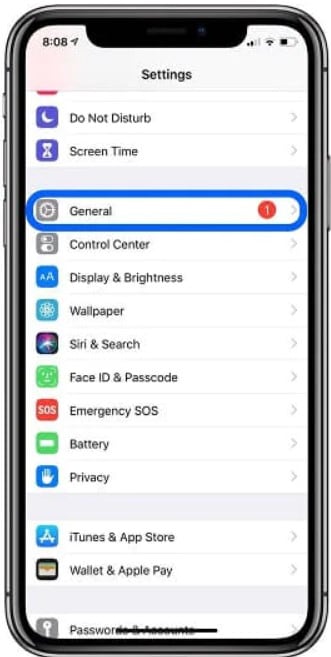
- Step 1: Open Settingson your iPhone.
- Step 2: Go to General.
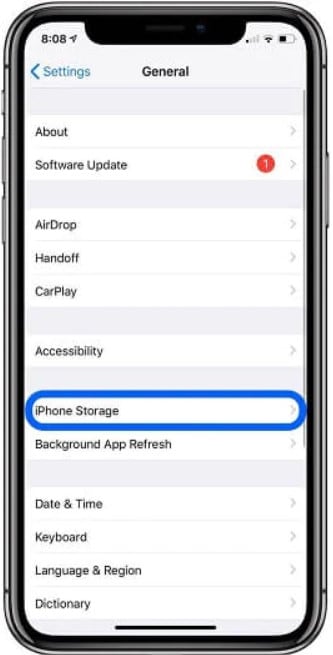
- Step 3: Then, select iPhone Storage.
- Step 4: You’ll see how much storage space you have left and what files take up most space.
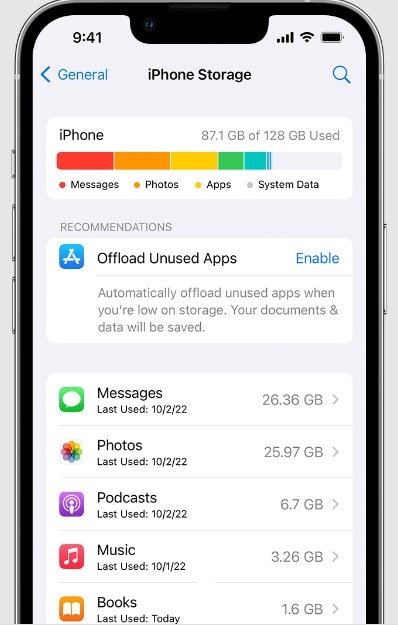
- Step 5: If your storage space is at capacity, delete some files you don’t need, then update the app.
iPhone App Not Updating Fix 5: Repair Your System With Wondershare Dr.Fone
![]()
If none of the solutions work, there could be a problem with your iOS system. If that’s the case, try Wondershare Dr.Fone. It’s a reliable tool that helps you repair the iOS system on your Apple devices without data loss. This tool effectively solves system problems in just a few minutes and is easy to use.
The steps for repairing your system with Wondershare Dr.Fone are as follows:
- Step 1: Download Wondershare Dr.Fone on your computer.
- Step 2: Launch the program, go to the Toolboxsection, and click System Repair.

- Step 3: Connect your iPhone to your computer using a lightning cable.
- Step 4: On the screen, you’ll see two options for your device type. Click iPhone.

- Step 5: Then, select iOS Repair.

- Step 6: Next, you’ll see two options for system repair. Select Standard Repairto retain all the data on your iPhone.

- Step 7: You’ll have to put your phone into recovery mode. Follow the instructions on the screen.

- Step 8: Once your iPhone enters recovery mode, Wondershare Dr.Fone will automatically detect the iOS firmware available for installation. Choose the firmware and click Download next to it.

- Step 9: Wait for the downloading process to complete.
- Step 10: Once it finishes, click Repair Nowto fix your iPhone.

- Step 11: Wait for the process to complete, then click Done.

Wondershare Dr.Fone will restore your iPhone and reinstall the system without data loss. Now, you won’t face any system problems that will prevent you from updating iPhone apps.
iPhone App Not Updating Fix 6: Clear App Store Cache
Another possible reason behind iPhone apps not updating could be the App Store cache. Sometimes, the App Store cache meddles with app updates. Thus, you can clear the cache to enable the iPhone app update. Removing the App Store cache is simple:
- Step 1: Open the App Storeon your iPhone.
- Step 2: Tap any of the buttons at the bottom of the screen ten times.
- Step 3: Then, restart your iPhone.
iPhone App Not Updating Fix 7: Reset Settings to Default
Your iPhone apps might not update because of some manual settings you’ve set. It’s not a big problem, and it’s an easy fix. You only need to reset settings to default to fix the “iPhone app not updating” issue. The steps are as follows:
- Step 1: Go to Settings> General.
- Step 2: Tap Reset.
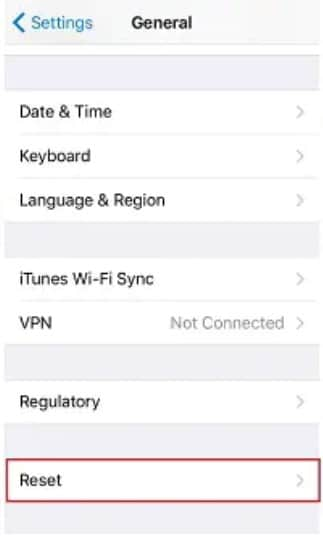
- Step 3: Then, select Reset All Settings.
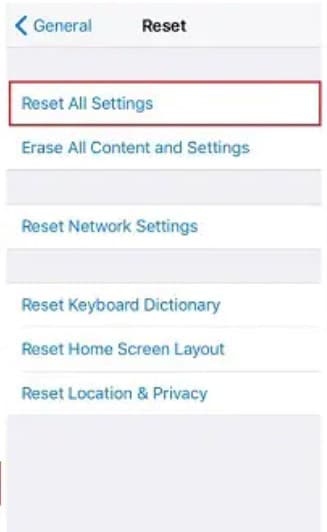
- Step 4: Enter your passcode and confirm the reset.
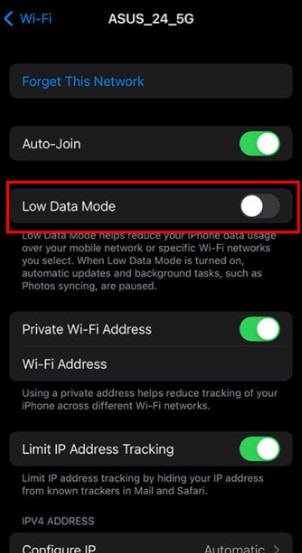
iPhone App Not Updating Fix 8: Turn off The Low Data Option
Low Data mode reduces the network data your iPhone and apps use. It restricts background network usage to save mobile data and Wi-Fi. You can turn your Low Data mode on for your mobile data, Wi-Fi, or both. The steps for turning it off are straightforward:
- Step 1: Go to Settings.
- Step 2: Select Mobile Data.
- Step 3: Then, go to Mobile Data Options.
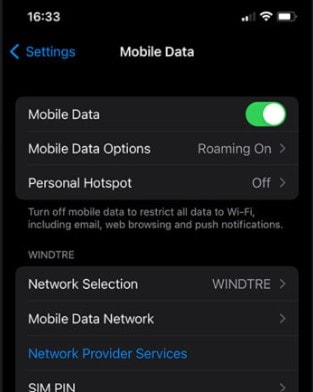
- Step 4: If the switch next to Low Data Modeis green, tap it to turn it off.
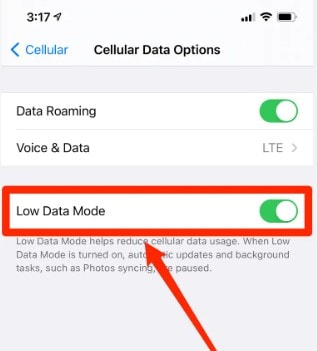
- Step 5: Then, go back to Settingsand select Wi-Fi.
- Step 6: Connect to a Wi-Fi network and click the ( i )icon on the right.
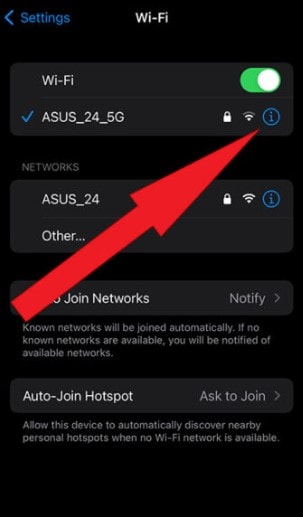
- Step 7: Again, if the switch next to Low Data Modeis green, tap it to turn it off.
iPhone App Not Updating Fix 9: Restart App Store
If your iPhone app isn’t updating, the App Store might be the problem. If that is the case, then it’s an easy fix. Therefore, before trying anything else, try force-restarting the App Store. This bug can happen occasionally, and it’s not a big deal. More importantly, it’s effortless to check if the App Store is the problem by restarting it.
- Step 1: Swipe up from your Home screen to open your recent apps.
- Step 2: Then, find the App Storeand swipe up across it.
- Step 3: You’ve closed the App Store altogether, and you can open it again to try updating your apps.
iPhone App Not Updating Fix 10: Use iTunes to Update Apps
If your iPhone apps aren’t updating, you can do it using iTunes on your computer. iTunes is a media player, library, and iPhone user management tool. With iTunes, you can perform many mobile device functions, such as updating apps on your iPhone. The steps for this action are as follows:
- Step 1: Open iTuneson your PC or Mac.
- Step 2: Connect your iPhone to the computer via a lightning cable.
- Step 3: Click Appsin the Library
- Step 4: You’ll see the Updates Availablelink if there are available app updates. Click it.
- Step 5: Then, click Download All Free Updates.
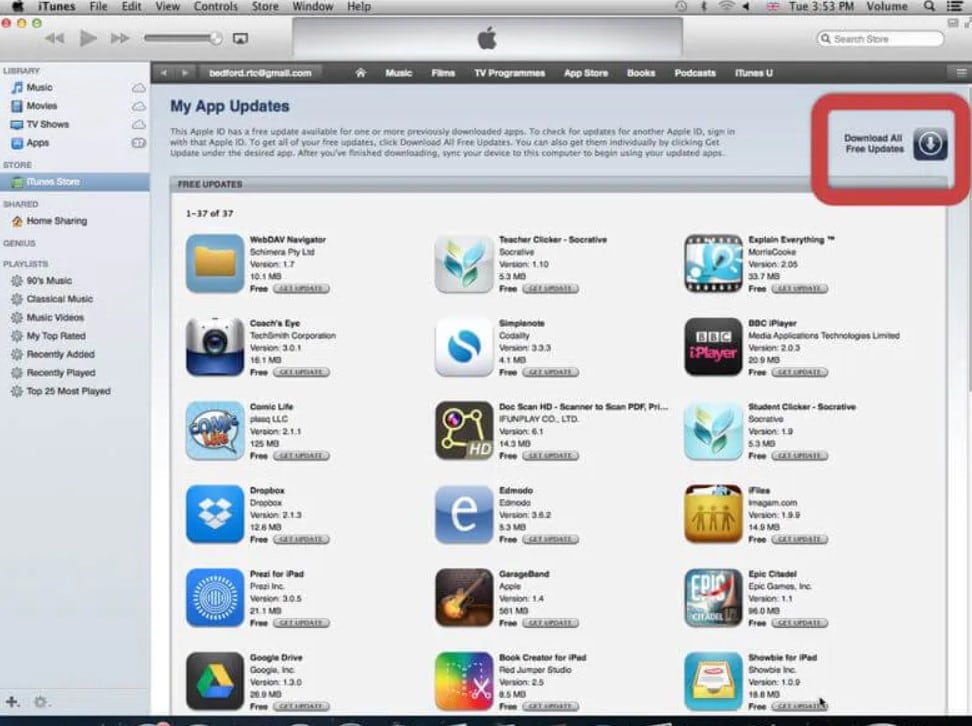
- Step 6: When the updates download, select your iPhone’s name and click Sync. That will transfer all the app updates to your iPhone.
Conclusion
If your iPhone apps aren’t updating, there are many possible reasons behind it. These can be simple bugs in the App Store or the app itself, or the problem can be your iPhone’s system. Since there are numerous possible reasons for this problem, there are multiple solutions to the “iPhone app not updating” issue.
We’ve presented ten possible fixes for your app update problem. The fixes can be as simple as restarting the App Store, checking if Airplane Mode is on or if your storage space is at capacity, and a bit more complicated, like repairing your iPhone system. If your iPhone needs a system repair, try Wondershare Dr.Fone for the most effortless fix with zero data loss.


iPhone Apps Problems
- iPhone Apps Problems
- 1. iMessage Not Working
- 2. Apps Disappeared From iPhone
- 3. Apps Keep Crashing on iPhone
- 4. Google Calendar Not Syncing
- 5. iPhone Calendar Not Syncing
- 6. iPhone Calendar Problems
- 7. Find My iPhone Problems
- 8. Apple CarPlay Not Working
- 9. Safari Cannot Connect to Server
- 10. Safari Not Working
- 11. iPhone Notes Icon Missing or Hidden
- 12. iPhone Apps Crashing
- 13. Health App Not Tracking Steps
- 14. Health App Not Working
- 15. iPhone App Not Updating
- 16. iPhone Alarm Not Working!
- iPhone Mail Problems
- 1. AOL Mail Not Working
- 2. Mail Not Connect to Server
- 3. Email Disappeared from iPhone
- 4. Gmail Not Working on iPhone
- 5. iPhone Email Won't Update
- 6. iPhone Voicemail Not Working
- 7. Reset Voicemail Password
- 8. Yahoo Mail Not Working
- 9. iPhone Asking for Email Password
- 10. iPhone Hotmail Not Working
- Social Apps Problems
- 1. Whatsapp Not Working on iPhone
- 2. YouTube Not Working on iPhone
- 3. Youtube Search Not Working
- 4. WhatsApp Calls Won't Ring on iPhone
- 5. Facebook App Problems on iPhone
- TinyUmbrella for iPhone
- Other iPhone Problems
- 1. iPhone Couldn't Be Activated
- 2. Ghost Touch on iPhone 13/12/11
- 3. Save A Water Damaged iPhone
- 4. iPhone Got Bricked
- 5. Identify Refurbished iPhones
- 6. iPhone Attempting Data Recovery
- 7. iPhone Boot Loop
- 8. Resurrect Dead iPhone
- 9. iPhone Says Searching
- 10. iPhone Won't Reset
- 11. Recently Deleted Photos Album Miss
- 12. iPhone 13 Stuck On White Screen
- 13. iTunes Unknown Error 1100
- 14. iPhone 13 Camera Black
- 15. iPhone/iTunes Error 4013
- 16. iTunes Error 11
- iPhone Repair Tools
- ● Manage/transfer/recover data
- ● Unlock screen/activate/FRP lock
- ● Fix most iOS and Android issues
- Repair Now Repair Now Repair Now
Alice MJ
staff Editor
Generally rated4.5(105participated)