
How to Recover the Missing 'Recently Deleted Photos' Album on iPhone?
Dec 16, 2025 • Filed to: Phone Repair Solutions • Proven solutions
Mistakes make us utterly annoyed by our own actions. And then, we regret it later. One such is when you’ve selected like the 20s-30s images together only to share with your friends. But then what you see is photos getting vanished in just a blink of an eye! By mistake, you hit the “delete” button. Or maybe, you have recently updated to the beta version for fun and see the photo album is missing. Okay, your heart might have skipped and given you goose-bumps! However, swallow your emotions as we are here to give you the apt ways for recovering the missing photos from your iPhone. You just patiently need to understand the methodologies for each method written below. So, take a chill pill and get started.
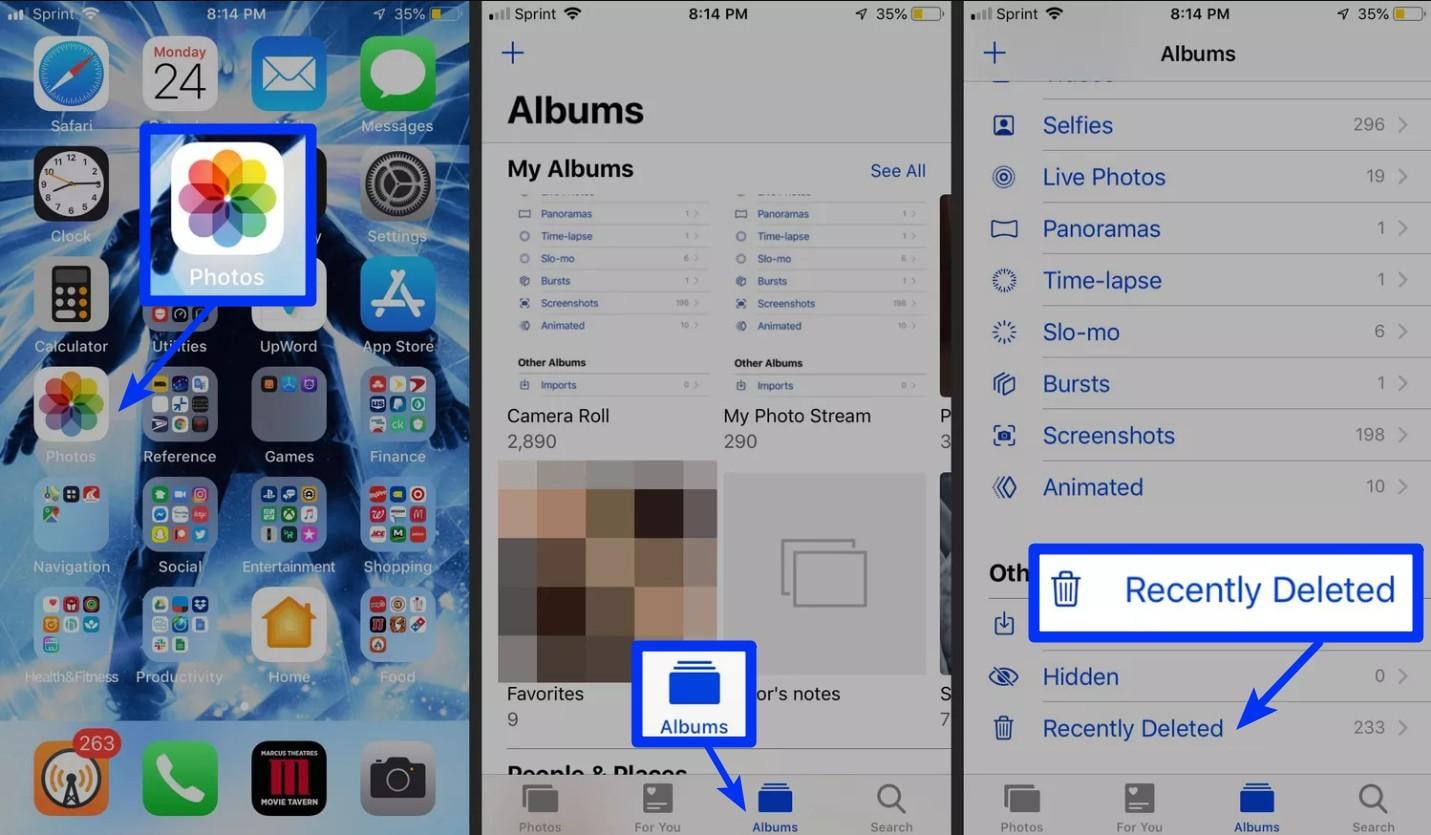
Part 1. The Reason That My Recently Deleted Photo Album is Missing
It is really a nightmare to not have all your selfies, portraits, and pictures that you loved so much. And, that might have garnered you thousands of likes, being there no more. But, you need to understand what went wrong. Sometimes, you are not one to be blamed for. Chances are you might have updated to the latest iOS version, and then you try to use your phone and get into the pictures, but they are no longer there. If that’s not the case, then you might have accidentally deleted your photos. Instead of tapping on another option, you would have accidentally opted for the “delete/trash” button.
Part 2. How to Recover the Missing Album from iCloud?
When you’re looking to recover the lost photo on your iPhone, one way of getting it is through iCloud. Phew, feeling relieved? Well, it is not so easy to recover your accidentally deleted photo on your iPhone. As, first you have to erase all the contents and settings that have been there on your phone and then get on to the recovery phase. For that, you can directly recover from the built-in iPhone app. alternatively, you can log in to iCloud and then restore.
Note: To perform the following steps, double-check that you have backed up the photos via iCloud.
In the following steps, we will see how to get the recently deleted photo albums.
- Step 1. To recover from iCloud, it is important that the iCloud photo library option was enabled already before losing the photos. To check if it is enabled or not, Head to “Settings”, click on [your name], then tap “iCloud,” and opt for “Photos”.
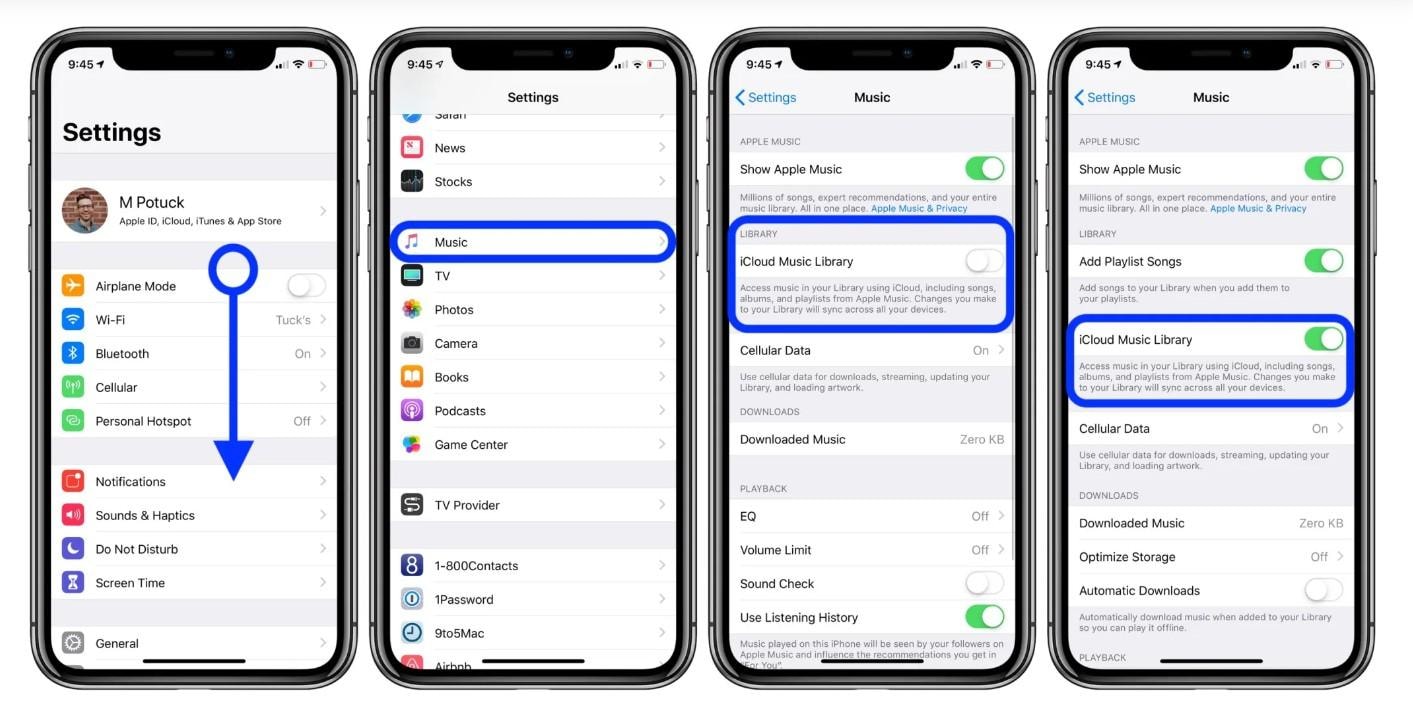
- Step 2. If it is enabled, you need to jump on to reset the device by going to “Settings”. From there, click on “iCloud” followed by “Reset” and “Erase All Content and Settings”, respectively.
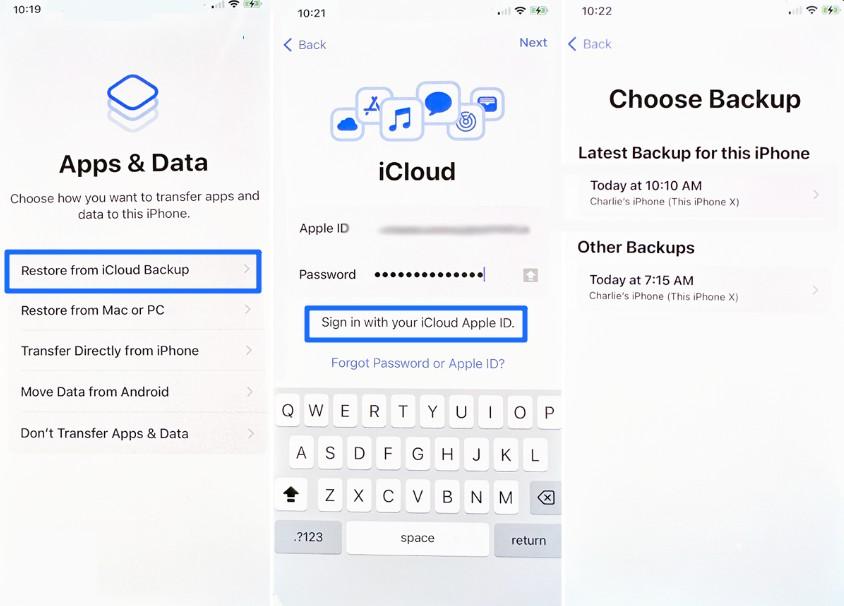
- Step 3. Now, turn your device on and follow the thread of on-screen instructions to get on the “Apps & Data” screen.
- Step 4. Then, tap on “Restore from iCloud Backup” and opt for “iCloud backup” as per the time backup time and data size.
Part 3. How to Recover Photos from iTunes?
If you are not ready to pay the price for recovering from iCloud, you can trust Apple’s iTunes to do the work for you. You might usually tune to iTunes to play your favorite playlist and podcasts, but it can go the extra mile to recover your photo album that has been missing since the heavens know when. All you need is your working PC or laptop, get into iTunes and restore the backup. There is no way you can certainly recover selective photos or photo albums.
Here is how you can restore deleted photos on your iPhone.
- Step 1. Draw a connection between your iPhone with PC (with a pre-synced to iTunes device) using a genuine USB cable.
- Step 2. Visit iTunes on your PC/laptop and allow it to detect your device.
- Step 3. There, you’ll see your iPhone’s icon, click on it and then opt for the “Summary” panel.
- Step 4. Click on the “Restore Backup” option under the “Manually backup and restore section”.
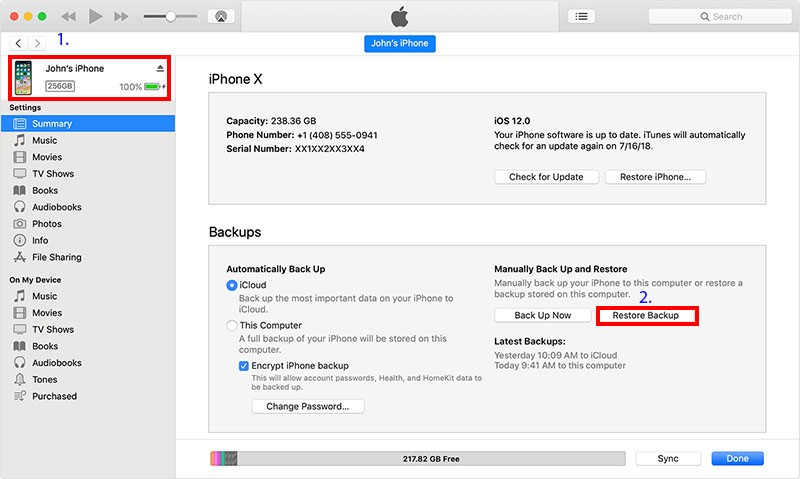
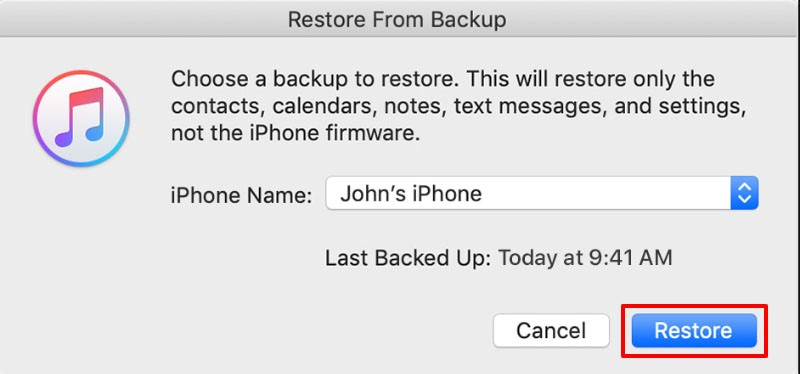
- Step 5. The “Restore from Backup” window will prompt up, select the desired backup file from the drop-down menu and hit “Restore” afterward.
Part 4. How to Selectively Recover Photo from iPhone with Dr.Fone – Data Recovery
We saw the organic means of restoring the recently deleted photo album is missing. But, that recovers all the backup or even demands for the complete deletion of data. However, with Dr.Fone - Data Recovery, you can enjoy the liberty of selectively.

Dr.Fone - Data Recovery (iOS)
Provides You with Three Ways to Recover Deleted iPhone Data After iOS Upgrade
- Retrieve data directly from iPhone, iTunes backup, and iCloud backup.
- Download and extract the iCloud backup and iTunes backup to retrieve data from it.
- Supports the newest iPhone and iOS.
- Preview and selectively recover data in original quality.
- Read-only and risk-free.
Follow this step-by-step tutorial to understand how to recover lost photos on iPhone via Dr.Fone - Data Recovery.
Step 1: Launch the program and draw the connection of iOS Device with PC
Just begin with installing and running the application on your working PC/laptop. Using an authenticated USB cable, connect your iPhone to a computer or Mac. Load Dr.Fone- Data Recovery (iOS) and tap on “Data Recovery”.

Step 2: Scan the file
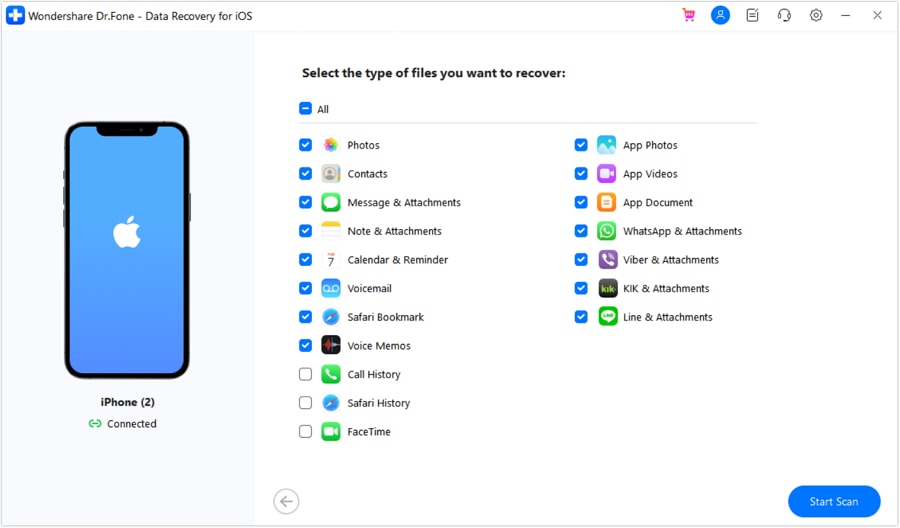
After the program automatically detects your device, the data folders enlisted in your iPhone will appear. Select the desired data type that you wish to recover. Then, tap on the “Start Scan” button to allow the program to scan out the deleted or data lost from your iPhone.
Step 3: Gain insights of Photos/Photo albums from the Preview
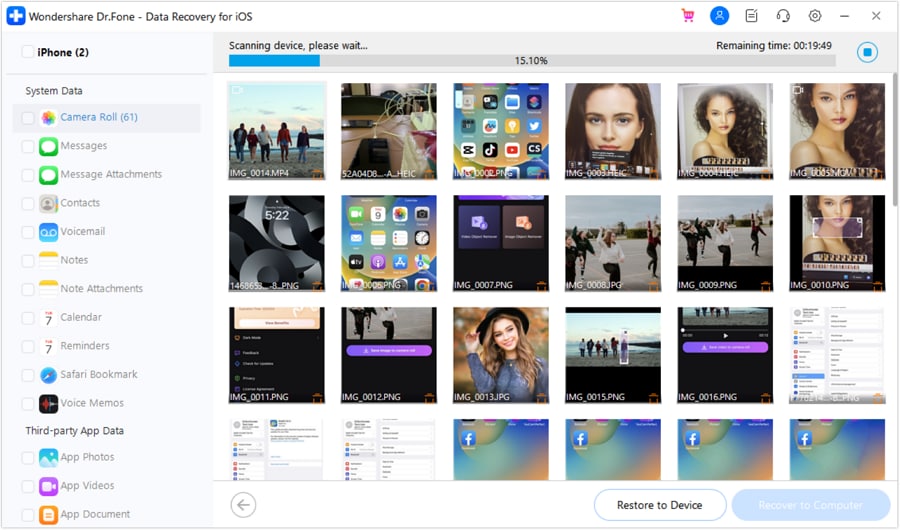
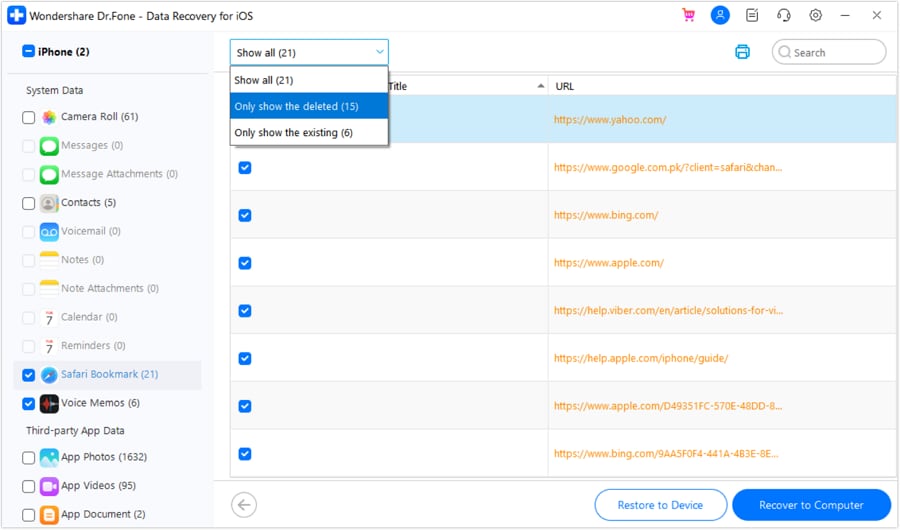
Now, the scanning will accomplish. Scrutinize the photo album or the photos that went missing from your iPhone. For a much more comprehensive view, click the “Only display the deleted items” to switch it on.
Step 4. Recover Photos on iPhone
At last, tap on “Recover” button placed on the bottom right section. There you go, enjoy your photos and albums! All the data is saved on your computer or device.
Conclusion
Losing the 'Recently Deleted Photos' album on your iPhone can be distressing, but there are effective ways to recover it. Whether you choose to restore from iCloud, iTunes backup, or use a tool like Dr.Fone for selective recovery, the key is to act promptly and avoid further data overwriting. Always make sure to maintain regular backups to prevent such situations in the future. With the right approach, you can regain your cherished memories and keep them safe.
iPhone Apps Problems
- iPhone Apps Problems
- 1. iMessage Not Working
- 2. Apps Disappeared From iPhone
- 3. Apps Keep Crashing on iPhone
- 4. Google Calendar Not Syncing
- 5. iPhone Calendar Not Syncing
- 6. iPhone Calendar Problems
- 7. Find My iPhone Problems
- 8. Apple CarPlay Not Working
- 9. Safari Cannot Connect to Server
- 10. Safari Not Working
- 11. iPhone Notes Icon Missing or Hidden
- 12. iPhone Apps Crashing
- 13. Health App Not Tracking Steps
- 14. Health App Not Working
- 15. iPhone App Not Updating
- 16. iPhone Alarm Not Working!
- iPhone Mail Problems
- 1. AOL Mail Not Working
- 2. Mail Not Connect to Server
- 3. Email Disappeared from iPhone
- 4. Gmail Not Working on iPhone
- 5. iPhone Email Won't Update
- 6. iPhone Voicemail Not Working
- 7. Reset Voicemail Password
- 8. Yahoo Mail Not Working
- 9. iPhone Asking for Email Password
- 10. iPhone Hotmail Not Working
- Social Apps Problems
- 1. Whatsapp Not Working on iPhone
- 2. YouTube Not Working on iPhone
- 3. Youtube Search Not Working
- 4. WhatsApp Calls Won't Ring on iPhone
- 5. Facebook App Problems on iPhone
- TinyUmbrella for iPhone
- Other iPhone Problems
- 1. iPhone Couldn't Be Activated
- 2. Ghost Touch on iPhone 13/12/11
- 3. Save A Water Damaged iPhone
- 4. iPhone Got Bricked
- 5. Identify Refurbished iPhones
- 6. iPhone Attempting Data Recovery
- 7. iPhone Boot Loop
- 8. Resurrect Dead iPhone
- 9. iPhone Says Searching
- 10. iPhone Won't Reset
- 11. Recently Deleted Photos Album Miss
- 12. iPhone 13 Stuck On White Screen
- 13. iTunes Unknown Error 1100
- 14. iPhone 13 Camera Black
- 15. iPhone/iTunes Error 4013
- 16. iTunes Error 11
- iPhone Repair Tools
- ● Manage/transfer/recover data
- ● Unlock screen/activate/FRP lock
- ● Fix most iOS and Android issues
- Repair Now Repair Now Repair Now



Alice MJ
staff Editor