5 Best Android Backup Extractors: Recover Lost Data Now!
Samsung Backup
Mar 18, 2025 • Filed to: Backup & Restore Data • Proven solutions

It is one of the industry's most challenging scenarios when you lose data from Android; accidental deletion, bugs, or other unforeseen hardware problems make it even worse. You'll think your cherished photos, contacts, messages, or other important things are now lost forever. Do not panic! Countless Android backup extractor tools are available to safeguard your data.
This article presents 5 Android backup extractor tools, their features, advantages, and disadvantages.
So, let’s get straight to it!
Method 1. Top Pick: Wondershare Dr.Fone
Wondershare Dr.Fone ranks first in the list of the best Android backup extractors for Windows users. It can easily get back deleted files from any Android phone.Dr. Fone comes with extremely compatible features, making the recovery process fast and easy in seconds. The interface's navigation is made so simple that one can easily extract contacts, messages, pictures, videos, calling logs, and even documents.
So whatever the case might be, be it an accidental deletion or a system crash or failure, Dr. Fone is always there to bring back your most precious files.
How to Use Dr. Fone Android Backup Extractor for Windows:
Step 1 Connect your Android device to your PC and start Dr. Fone. Now, from the left panel, select "My Backup > Backup Now."

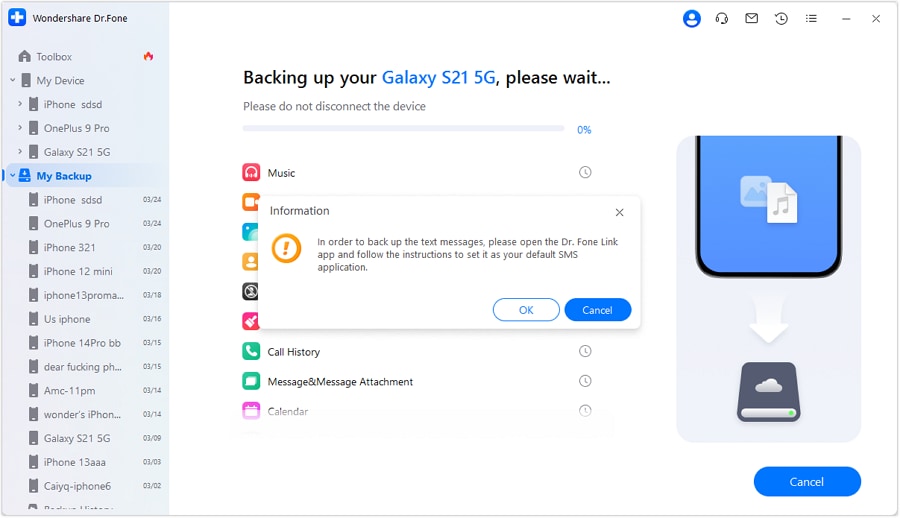
Step 2 Install the Dr. Fone Link app and make it your default SMS app. Once set, click “Ok” to continue with the backup process.

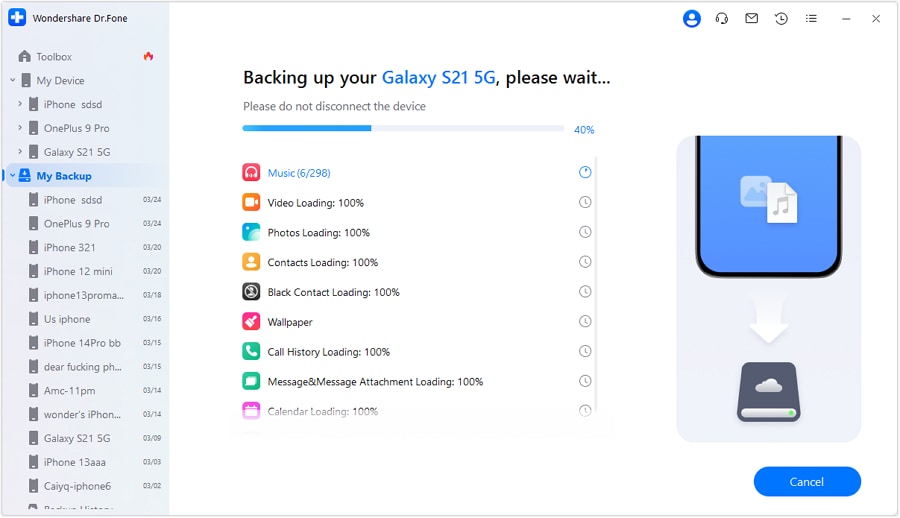
Step 3 This will initiate the backup process. You can see the progress via a progress bar at the top.

Step 4 Just before your backup completes, another prompt will come up asking you to set a default SMS app. This time, you can set the SMS app that you used to send and receive messages initially. Press “Ok” to continue.

Step 5 After the backup is done, you can click on "Open in Folder" or "View Backups" to view all data that has been successfully backed up in a folder.

That’s how you can use Dr.Fone - an Android backup extractor- to back up your data.
Method 2. Android SDK Software

The Android SDK is a software development kit built by Google to develop applications. However, it is not a set mainly for app developers! Regular users can also use it to extract data from their Android backups.
By exploring the tools and commands in the SDK, you can access backup files and find specific data you might need. But, this tool is a little technical and might be a bit tough for people with little or no technical knowledge.
2-1. Key Features of Android SDK Software
- Command-Line Interface (CLI) Access
The SDK has a powerful command-line interface (CLI) that works wonders in helping perform actions concerning the Android system. An example of operations performed through the use of a command or a few commands is accessing backup files and managing them.
- ADB (Android Debug Bridge)
ADB is a command-line tool included in the SDK. It helps you communicate with your Android device. You can use it to run different commands, including those for backing up and restoring data.
- Access to Backup Files
The SDK helps you find and access Android backup files. These files are usually stored in specific folders on your device or on connected storage.
- Flexibility and Customization
You can use the tools and libraries in the SDK to customize how you extract backups. This lets you choose specific types of data to extract or filter the data based on your criteria.
2-2. Pros&Cons of Android SDK:
|
Pros |
Cons |
| It is a free tool by Google. | It requires you to have some extent of technical expertise to be able to use it. |
| It has tools that help with debugging and development. | It has a steep learning curve. |
| It is highly customizable and supports third-party tools and plugins. |
Method 3. Sixo Android Backup Tool

Sixo Android Backup File Extractor is a tool for Android devices that helps users extract content from Android ADB backup files. You can also use it to select parts of the backup to create new backup files. This tool makes managing and accessing the data stored in Android backup files easier.
3-1. Features of Sixo Android Backup Tool
- Data Extraction
The Android Sixo Backup Tool enables one to extract contacts, messages (SMS, MMS), call logs, photos, videos, and much more from Android backup files.
- Data Filtering
You can filter the extracted data based on certain criteria, like date range, contact names, or message content. This helps you get only the information you need and reduces unnecessary data.
- Customization
Sixo allows you to customize how you extract data. You can choose specific types of data to extract and select the format for the output.
- Command-Line Interface
It allows advanced users to get better control and flexibility in their extraction processes.
3-2. Pros&Cons of Sixo Android Backup Tool
|
Pros |
Cons |
| It offers more control and customization options compared to graphical user interfaces. | Sixo Android Backup Tool requires some technical knowledge and understanding of command syntax. |
| It is a free, open-source software that provides backup solutions for individuals and organizations. | It has a steep learning curve, making it not the best choice for beginners. |
| It is an Android backup extractor Linux, Windows, and macOS, offering greater flexibility and compatibility. |
Method 4. Disk Drill

Disk Drill Data Recovery is the ultimate app for getting any type of file back after it has been lost from different storage devices, whether it is on Windows, Mac, Android, or iOS phones. Disk Drill has it all for you!
If you just want to check out the basic features, you can use the free version. But then, there is also the pro version, which comes with all the stronger options for usage in case users want more help. It is user-friendly and makes it very easy to retrieve precious files that are otherwise lost.
4-1. Features of Disk Drill
- Data Recovery from Multiple Sources
Disk Drill can recover data from a variety of storage devices. This includes internal hard drives, external hard drives, USB flash drives, SD cards, and mobile devices.
- Deep Scanning and Recovery
It uses deep scanning methods to search for lost or deleted data, even if other files have overwritten it.
- Supports Various File Formats
Disk Drill can recover a wide variety of files, from pictures, videos, documents, audio files, emails, and several other formats.
- Preview Before Recovery
Users can preview the files they can recover before starting the recovery process. This enables them to select the files to recover, thereby helping to save both time and storage space.
- User-Friendly Interface
Disk Drill has an easy-to-use interface. This makes it simple for people with different levels of technical skills to use.
4-2. Pros&Cons of Disk Drill
|
Pros |
Cons |
| Disk Drill has a user-friendly interface, making it a good choice for beginners. | You need the pro version to extract backups from mobile devices. |
| It can recover a wide range of media files in various formats. | The pro version is expensive, and the free version has limited features. |
| You can preview recoverable files. | You can only extract 500MB of data with the free version. |
| It is compatible with Windows and Mac. |
Method 5. Google Drive WhatsApp Backup Extractor
You can also use Google Drive as a WhatsApp backup extractor Android. But this method will only work if you have already enabled Google Drive as your backup option in WhatsApp
With Google Drive WhatsApp backup extractor, you can restore your WhatsApp backup directly to the app. All you need is the same phone number and Google account you used when creating a backup, and by clicking on “Restore,” you can get all your conversations back from where you left them. How convenient is that?
5-1. Features of Google Drive WhatsApp Backup
- Cloud Storage
WhatsApp backups are safely stored in Google Drive. This gives you off-device storage and protects your data from device loss or damage.
- Automatic Backups
You can set up automatic backups to Google Drive on a schedule you prefer (daily, weekly, or monthly). This keeps your WhatsApp data updated and safe.
- Easy Restoration
Quickly and easily restore your WhatsApp chats and media to a new device by simply logging in with the same Google account.
- End-to-End Encryption
While the backups are stored in Google Drive, the content still remains encrypted so that your privacy and security are not compromised.
- Data Types Backed Up
You can backup your WhatsApp chat history and media files, like photos, videos, and voice notes.
5-2. Pros&Cons of Google Drive WhatsApp Backup
|
Pros |
Cons |
| It backs up your WhatsApp conversations automatically. | It may take up a lot of storage space. |
| You can access your backup from any device with the same Google account. | |
| You can restore your conversations directly to the app on any device by simply logging in. |
Conclusion
It is exhausting to get your important data lost from your Android mobile because of a failure or system crash. But if you create a backup, you can save yourself from all this torture.
In this handy guide, we have introduced some of the best tools for Android backup extractors, and here's a glance over 5 of them. However, if you want a sure and smooth way out, go for Dr. Fone.
With a click, you can get all your data back with high success rates and ease of use. All that without asking a lot from your pockets.
So, say goodbye to losing data and hello to Dr.Fone!
FAQs
- If you want to recover deleted or lost files from your Android.
- To transfer any data from one Android phone to another.
- To browse and obtain certain information from your backups without restoration to your device


Daisy Raines
staff Editor