What Do You Know About Samsung Auto Backup? Find the Best Solutions!
Samsung Issue
- Samsung Phone Issues
- 1. Fix Samsung Camera Failed
- 2. Fix Samsung Phone Hang
- 3. Samsung Phone Not Displaying Incoming Calls
- 4.Fix a Bricked Samsung
- 5. Downloading Do Not Turn Off Target
- 6. Fix Samsung Stuck in Download Mode
- 7. Fix Samsung S5 Won't Turn On
- 8. Fix Samsung Pay Not Working
- 9. Samsung ROM Download & Install
- 10. Samsung Firmware Download
- 11. Fix Samsung Sudden Death
- 12. Fix Samsung Stuck on Boot Screen
- 13. Fix Samsung Frozen on Startup
- 14. Full Guide to Fix 'Samsung Galaxy Phone Keeps Restarting'
- 15. Fix Samsung S3 Won't Turn On
- 16. Fix Samsung J7 Problems
- 17. Fix Samsung S10 Gone Dead
- 18. Fix Samsung S10 Won't Turn On
- 19. Fix Samsung Galaxy S7
- Samsung Screen Issues
- 1. Fix Unresponsive Touchscreen
- 2. Fix Black Screen After Dropping
- 3. Resolve Screen Stuck on Boot Issue
- 4. Fix Samsung Fold Screen Issues
- 5. Fix Samsung Black Screen
- 6. Fix Samsung Screen Not Working
- 7. Fix Half of Screen Not Working
- 8. Fix Samsung Stuck on Bootloop
- 9. Fix Samsung Screen Blacked Out
- 10. Fix Screen Blacked During a Call
- 11. Fix Samsung Stuck on the Screen
- 12. Solve Samsung TV Blackout
- 13. Fix Samsung Flip Screen Not Working
- 14. Fix Screen Won't Respond
- Samsung Tablet Issues
- 1. Fix Samsung Tablet Problems
- 2. Fix Samsung Stuck on Logo
- 3. Fix Samsung Tablet Won't Turn On
- 4. Fix Touch Screen Not Working
- Samsung Update
- 1. Flash a Samsung phone
- 2. Samsung Mobile Software Update
- 3. Update Samsung Kies for Mac
- 4. Update Samsung to Android Oreo
- 5. Update Samsung Kies on PC
- 6. Update Android 6.0 for Samsung
- Samsung Useful Tricks
- 1. Remove Google Account Bypass
- 2. Hard/Factory Reset Samsung
- 3. Samsung Root Software
- 4. Transfer Files from Samsung to PC
- 5. Top 5 Samsung Kies Alternatives
- 6. Bypass Samsung Lock Screen Pin
- 7. SIM Network Unlock PIN
- 8. Transfer Whatsapp to iPhone
- 9. Samsung Auto Backup
- 10. Recover File on Samsung
Oct 30, 2025 • Filed to: Backup & Restore Solutions • Proven solutions
Dr.Fone Basic:
Better Control for Your Phone
Manage, transfer, back up, restore, and mirror your device
The data stored on our smartphones have become increasingly important nowadays. It encompasses our precious memories, important documents, and other valuable information. With this much reliance on data, it is crucial to find measures to safeguard it. For its users, Samsung offers an auto-backup feature using Samsung Cloud. By enabling Samsung auto backup, you can be tension-free and relax your mind.
In this article, we will discuss how to enable Samsung auto backup on your Samsung device. It will also explain top fixes if Samsung backup isn't working. Moreover, it will discuss a great tool for creating unlimited backups of your device.
Part 1: Why Is It Necessary To Backup Data on Samsung Smartphones?
Backing up your essential data on Samsung devices, whether it is Samsung auto or manual backup, is important for so many reasons. There are a lot of things that can go wrong with your Samsung device, resulting in data loss. Given below are some reasons why it is necessary to back up data on Samsung smartphones:
Data Loss Prevention
Data stored on smartphones is susceptible to various risks. These risks include accidental deletion, hardware failure, software glitches, or malware attacks. Sometimes you can even lose your Samsung device to theft or an accident. Regularly backing up your data ensures you have a copy of your important data. It protects your contacts, messages, photos, and other valuable data from permanent loss.
Seamless Device Transition
A backup simplifies the transition process when upgrading to a new Samsung smartphone. By restoring your backup onto the new device, you can quickly regain access to your data. It means there is no need for manual transfer of apps, settings, and other content. Having a backup saves you from a long and hectic phone transfer process.
Security and Privacy
Data security is a significant concern in today's digital world. By backing up your data, you create an extra layer of protection. It helps in case your device gets compromised or you need to perform a factory reset. Having a backup means you can restore your data from a trusted source. That minimizes the risk of data breaches or unauthorized access to your data.
Device Maintenance and Updates
Sometimes, your device can crash during routine device maintenance or software updates. In these situations, performing a factory reset or wiping your device is necessary. When you have a backup, you can restore your data and settings quickly after such procedures. Moreover, it saves you time and effort in reconfiguring your device from scratch.
Part 2: How To Turn On Auto-Backup on Samsung Devices?
To turn on auto-backup on Samsung devices, you can utilize Samsung Cloud. It is a built-in cloud storage and backup solution provided by Samsung. Samsung Cloud makes managing data easier by allowing you to store, sync and restore your data. Your data will be securely stored in the cloud by enabling Samsung auto-backup. Explained below is the detailed guide to enabling Samsung auto backup:
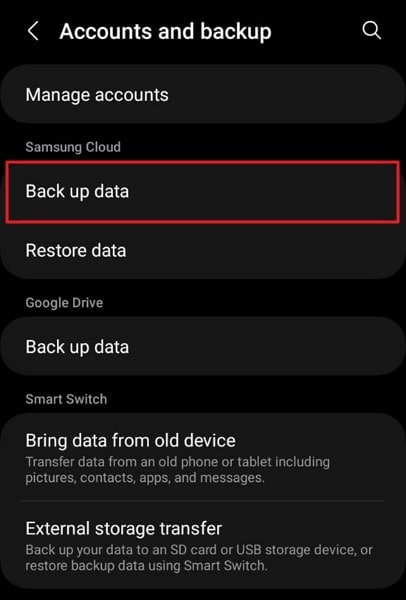
- Step 1: Locate and launch the Settings app and access the "Accounts and Backup" settings. Here, tap "Back Up Data," located under Samsung Cloud.
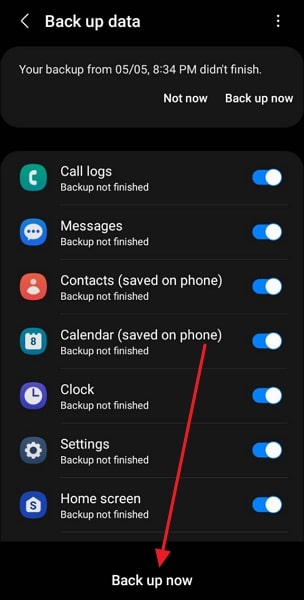
- Step 2: On the next screen, toggle on all the apps you want to back up to Samsung Cloud. You can tap “Back up now” to back up all the selected apps.
Part 3: Why Is My Samsung Backup Not Working? Some Fixes To Keep in Mind
There are multiple reasons that can cause your Samsung auto backup to stop working. It can happen due to insufficient storage on your device or network connectivity issues. Outdated software or incorrect backup setting can also result in this issue. However, there is no need to worry as many solutions are available to resolve such problems. Below we have listed 4 easy and quick fixes to resolve this problem:
Fix 1: Review and Update the Network Connection
By default, Samsung Cloud will only back up your data using Wi-Fi after you have enabled Samsung auto backup. If you mainly use mobile data, you will need to change the settings to allow Samsung Cloud to back up through mobile data. The steps needed to review and update the network settings for Samsung Cloud backup are these:
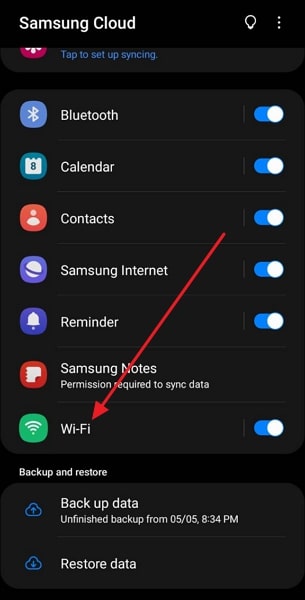
- Step 1: In your Samsung device's Settings, tap the Samsung Account ID. Now, you will need to tap “Samsung Cloud” and choose “Wi-Fi” to proceed.
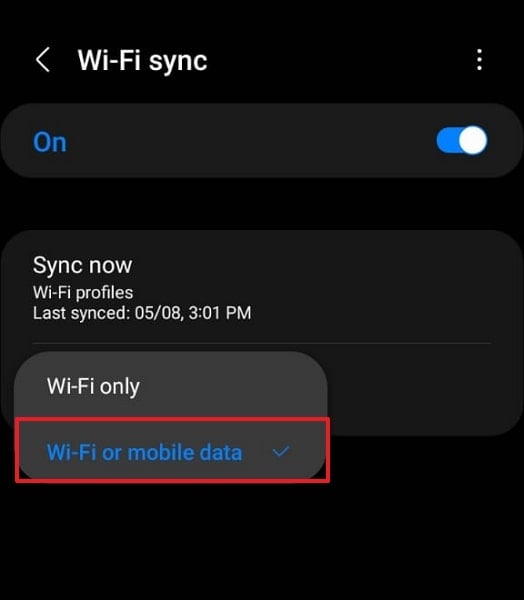
- Step 2: Further, enable "Wi-Fi" sync if it was turned off. Here, change the "Sync Using" settings to "Wi-Fi or Mobile Data."
Fix 2: Erase Cache and Data of Samsung Cloud
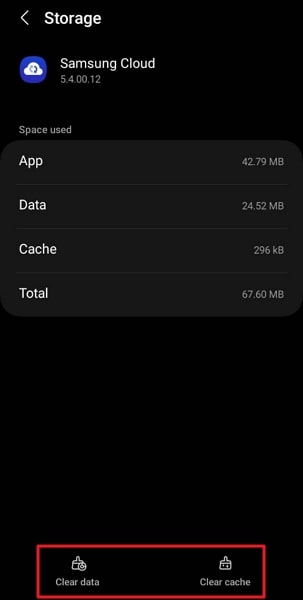
Sometimes, issues with Samsung Cloud can be resolved by clearing its cache. The cache is the temporary files and data associated with the app. Along with the cache, erase the app data too. Doing this essentially resets the Samsung Cloud app. That, as a result, removes any temporary files or corrupted data that may be causing the problem. Following are the detailed steps for clearing the app cache and data:
- Step 1: Access your device's Settings and navigate to and select “Apps.” Here, tap the Samsung Cloud App to open the app information.
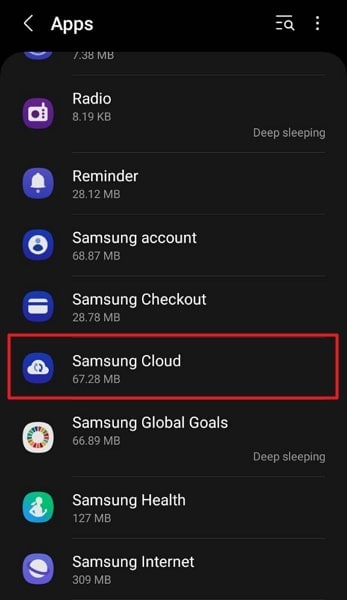
- Step 2: In the app information, press “Storage” to view the cache and data size of the app. Here use “Clear Cache” or “Clear Data” to clean the app's cache and data.
Fix 3: Sign Out and Re-Sign In Using Your Samsung Account
If clearing the cache and app data hasn't helped, try removing your Samsung Account. Afterward, sign in again using your account to check if the issue is resolved. Signing out and then signing back in can resolve synchronization issues. It helps restore proper functionality to Samsung Cloud. Here is the step-by-step process to sign out and re-sign into your Samsung Account:
- Step 1: Launch Settings on your Samsung phone and scroll down to choose “Accounts and Backup.” Now, tap “Manage Accounts” and choose your Samsung Account.
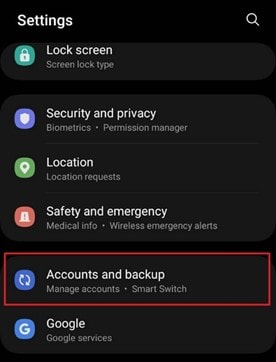
- Step 2: Afterward, tap “Remove Account” and confirm the action by again tapping “Remove Account.” Next, press “Sign Out” to log out of the Samsung Account.
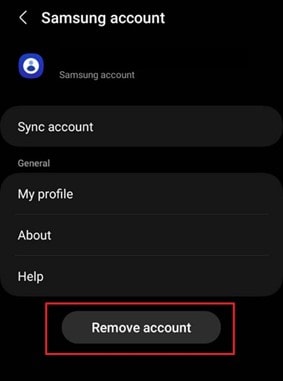
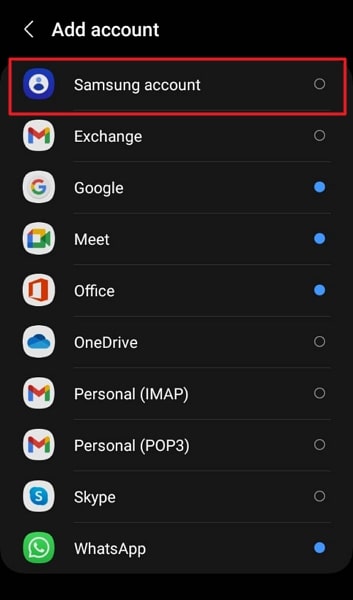
- Step 3: After removing the account, access “Manage Account” again. Following this, access the "Add Account" option and choose “Samsung Cloud” to sign in again using your account and see if the issue is solved.
Fix 4: Restart Your Samsung Device
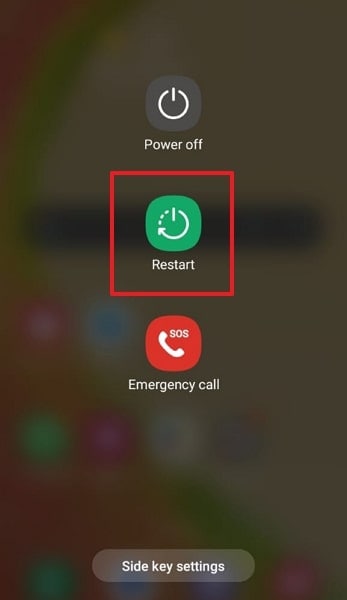
A simple but effective fix for many software-related issues is to restart your Samsung device. This action can help clear temporary glitches and refresh the system. It resolves any problems with Samsung Cloud caused due to temporary system bugs. Use this simplified guide to reboot your Samsung phone:
- Step: Long press the “Power” button on your Samsung device to access the power menu. Here tap the “Restart” option to reboot your Samsung phone.
Part 4: How To Perform Samsung Auto Backup on Computer Using Proper Means?
While Samsung auto backup using Samsung Cloud is a great way to secure your data, it has one limitation. The free storage of Samsung Cloud is limited to 15GB, which can be inadequate to store all your data. To remedy this, we recommend you use the specialized backup and restore tool Wondershare Dr.Fone. It provides a secure and easy way to create complete Android backups without any storage restrictions.
This tool enables you to back up over 10 types of data from your Samsung device. Moreover, when you want to restore your backed-up data, it allows you to be selective and preview the files.
Main Features of Wondershare Dr.Fone
- Its advanced algorithms ensure that you don't lose data during data backup and restore.
- Wondershare Dr.Fone enables you to restore Android or iOS backup from one device to any other Android device.
- The backups created through Dr.Fone are incremental in nature, meaning they are fast and don't overwrite older backups.
Steps To Perform Samsung Backup on Computer Using Proper Means
With Wondershare Dr.Fone, backing up your Samsung device becomes a hassle-free task. Follow the detailed guide below to back up your Samsung phone using Wondershare Dr.Fone:
- Step 1: Connect Your Samsung Device to Wondershare Dr.Fone
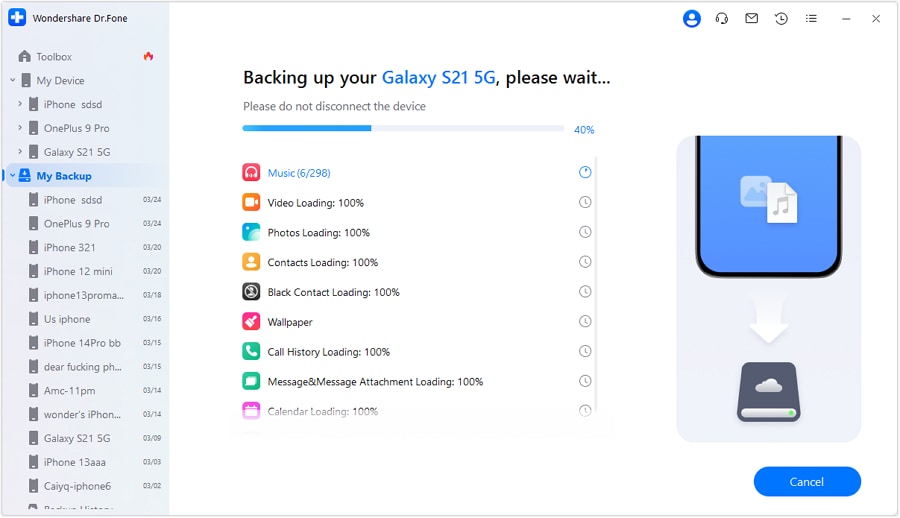
Start by connecting your Samsung device to your computer using a USB cable. Once connected, launch Wondershare Dr.Fone on your computer. Locate and click on "My Backup" from the left panel to proceed.

- Step 2: Perform the Samsung Backup Process
Within the "My Backup" tab, you can check the items that you can back up with Wondershare Dr.Fone. Following this, install the Dr.Fone Link app and activate the feature of text messages if you want to back up your Samsung messages. Afterward, press the “Back Up Now” button and wait for the process to get completed.
Conclusion
To summarize, Samsung auto backup plays a crucial role in safeguarding your valuable data. Throughout this article, we have explored the significance of backup solutions. It also highlighted the need for reliable software to streamline this process. Among the various options available, one standout choice is Wondershare Dr.Fone.
Wondershare Dr.Fone offers comprehensive backup functionality. It also boasts a range of extra features, making it an ideal choice for Samsung users. Furthermore, Dr.Fone allows effortless data backup, restoration, and management. Whether you want to safeguard important documents or cherished photos, it ensures that your data remains secure.
Dr.Fone Basic:
Better Control for Your Phone
Manage, transfer, back up, restore, and mirror your device


Alice MJ
staff Editor