Samsung Kies 3: Everything You Need to Know About
Samsung Backup
- Data Backup
- 1. Back Up Samsung to Google Drive
- 2. Backup Contacts on Samsung
- 3. Backup Text Messages on Samsung
- 4. Backup Photos on Galaxy
- 5. Backup Samsung Galaxy to PC
- 6. Samsung Cloud Backup Services
- 7. Backup Samsung Contacts Solutions
- 8. Samsung Message Backup Solutions
- 9. Samsung Photo Backup Solutions
- Device Backup
- 1. Backup Android to Mac
- 2. Backup and Restore Samsung
- 3. Backup Everything on Samsung
- 4. Samsung Backup Solutions
- 5. Backup Samsung S10 to PC
- WhatsApp Backup
- 1. Backup WhatsApp Business
- 2. Top 8 WhatsApp Backup Solutions
- 3. 2 Ways to Backup WhatsApp to Mac
- 4. Backup WhatsApp to PC
- 5. Recover WhatsApp Messages
- 6. WhatsApp Backup Extractor
- Samsung Kies
- 1. Samsung Kies 3
- 2. Alternatives to Samsung Kies
- 3. Best Samsung Kies Alternatives
- 4. Samsung Kies Download
- 5. Samsung Kies Driver
- Samsung Tricks
- 1. Fix Samsung Brick
- 2. Recover Data from Dead Samsung
- 3. Flash Samsung with Odin
- 4. Remove Google Account Bypass
- 5. Factory Reset Samsung Galaxy
- 6. Samsung Root Software
- 7. Transfer Files from Samsung to PC
- 9. Samsung Smart Switch Solutions
- 10. Bypass Lock Screen Pattern
- 11. 2 Ways to Unlock Samsung
- 12. Transfer Whatsapp Messages
- Backup Tips
- ● Manage/transfer/recover data
- ● Unlock screen/activate/FRP lock
- ● Fix most iOS and Android issues
- Back Up Now Back Up Now Back Up Now

Oct 24, 2025 • Filed to: Backup & Restore Solutions • Proven solutions
Dr.Fone Basic:
Better Control for Your Phone
Manage, transfer, back up, restore, and mirror your device
Samsung Kies 3 is the latest version of the tool, developed by Samsung, which is used to backup and restore Samsung devices and other supported Android devices. The name Kies is an acronym for the full name, “Key Intuitive Easy System”. With Kies 3 Samsung, you can now transfer photos, contacts messages, music, videos, podcasts, and a lot more, from your mobile device to your computer and vice versa.
Part 1: The Main Features Of Samsung Kies 3
You can use the Samsung Kies tool to backup your data on your computer; this will prove useful should your phone crash and you have to restore it to factory default, thereby erasing all data. The backup on your computer will help restore the phone to the way it was.
The main features of Samsung Kies
• Can be used to backup Samsung devices and other supported Android devices
• Can be used to restore the phone to the state of the latest backup
• It is fast and has an easy user interface which makes it easy to understand and use
• Connects easily via USB cable, although for some devices WiFi can be used.
What are the supported devices?
Samsung Kies works with all mobile phones from version2.3 to 4.2; Kies 3 works with version 4.3 onwards. If you connect devices that are below 4.2 with kies 3, then there will be an error. You also cannot connect devices with Android 4.3 upwards, with the kies version.
Part 2: How to use Samsung Kies 3
Samsung Kies 3 can be used to carry out several functions such as exporting and importing files, backing up the phone, and finally syncing it with your online accounts. Here are these three functions explained in detail.
Importing and exporting files using Samsung Kies 3
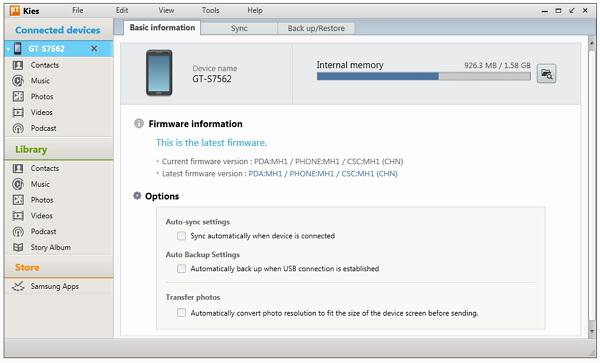
Step 1 – Install and Run Samsung Kies 3
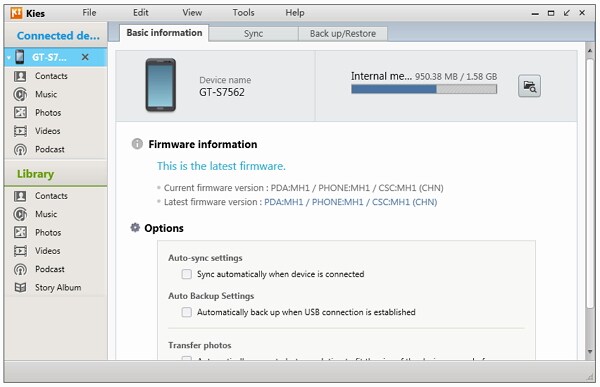
Using the appropriate download link, download this tool and install on your computer. When you connect the device to your computer via USB cable, it will be recognized and all data that is on the phone will be displayed on the home screen.
Step 2 – Select what you want to transfer
You can now choose which files you want to transfer. You click on contacts, Photos, Music, Podcasts, Videos, etc. They will then be shown on the Window on the right. After that, you can import or export them to your computer.
How to backup and restore using Samsung Kies 3
It is important that you back up the data on your mobile device regularly. If it gets stolen or ruined, then you can restore the data to a new phone and continue as you normally did.
Step 1) Start Samsung Kies and then connect the phone to the computer using a USB cable. The phone will soon be listed in the software.
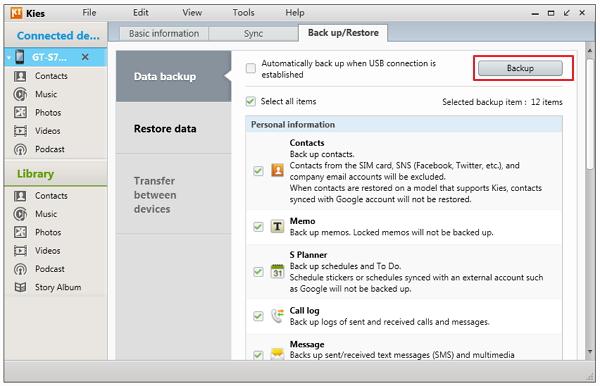
Step 2) Choose Backup/Restore and then choose the data that you want to backup. You can also simply allow the tool to backup your phone whenever it is connected to the computer via the USB cable.
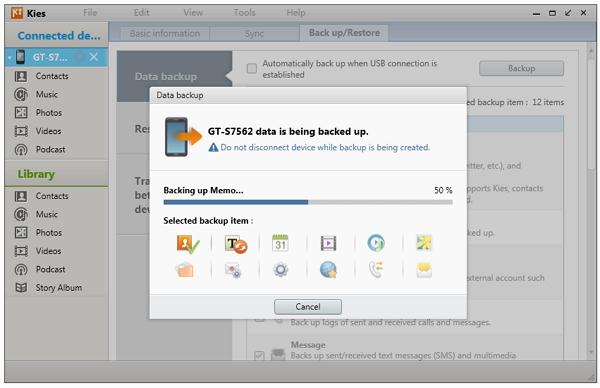
Step 3) once the selection is done, simply click on the backup button and then wait for the process to be completed.
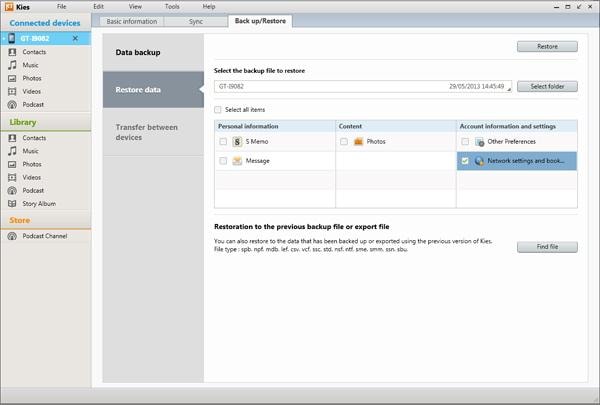
Step 4) Should you ever need to restore the data, go to Backup/Restore, click on the folder that you need, and find the latest backup file. Once selected, click on restore and the data will be sent back to your phone.
How to Sync your Samsung using Samsung Kies 3
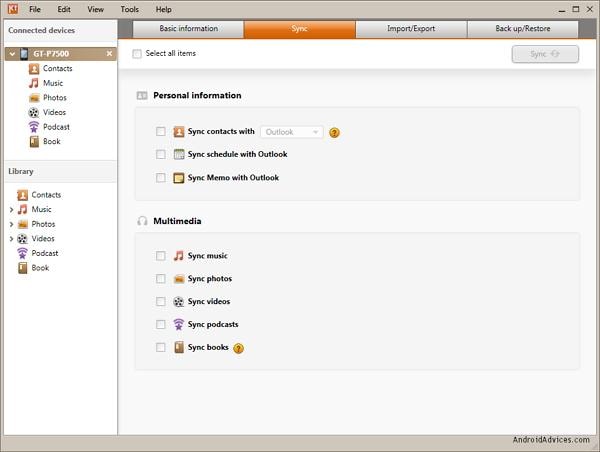
You can now sync your online accounts to your mobile devices using Samsung Kies. Connect the phone to your computer and then click on Sync. You will be sent to the Sync Window, where you can select the items and accounts that you would like to sync. Finally, Click Sync and let the process be completed.
Part 3: The main issues about Samsung Kies 3
As with all software, there are issues that do arise from users all over the world. With Samsung Kies, the main issues revolve around:
Connectivity – When you connect the device to your computer, it is immediately recognized by Samsung Kies. However, with Mac computers, users have said that the software tends to disconnect and become unresponsive. To solve this problem, you have to disconnect and reconnect the USB cable from the computer. This is a frustrating way of dealing with this issue, but it is the only one for now.
Slow Speed – When it comes to speed, some users say that the tool takes too long to sync or move data from the phone to the computer and vice versa. The tool may take a lot of resources, especially when you are syncing and storing huge files. People take HD videos on Samsung devices and these may take longer to transfer. You should install Samsung Kies 3 on a powerful laptop or computer so it can work well.
Bugs – There are users who have complained about the proliferation of bugs in their computers and phones after using Samsung Kies 3. They claim that it duplicates the outlook contacts and basically messes with the organization of their computers. There is no solution put forward for this, and it only happens to a few. Most users are happy with the Kies 3 Samsung tool.
Lack of proper instructions – when Samsung users get an error message, they are simply asked to reconnect the device by unplugging the USB cable. However, there are other functions that are necessary for this error to be removed. You have to turn off USB debugging, and close applications on the phone. Samsung should include these in their instructions.
Resource Hungry – Samsung Kies 3 is resource hungry and may make your computer crash several times.
Poor User experience – Samsung did not put a lot of thought into the user's experience when they came up with Samsung Kies. They would have freely distributed any updates and drivers, instead of tying them up into a particular USB or installation. They should have allowed for standard media sharing and syncing protocols, which make it easy to use backup tools.
Part 4: Samsung Kies 3 Alterative: Dr. Fone Android Backup & Restore
It is evident that Samsung Kies is a poor tool when it comes to creating backups of your android device and transferring data and files to the computer. The company has failed many of its users, who expected a superior product, just like their mobile devices. Now there is a new tool that works better than Samsung Kies, and it is truly amazing; it is Dr.Fone - Phone Backup (Android).
With this tool, you can select the files that you want to backup, and then move them to your computer using a single click of a button. You can also preview all the data before you restore it. This helps you in keeping your phone organized, wince you can restore only the files that are most important to you.
Dr.Fone - Phone Backup (Android)
Flexibly Backup and Restore Android Data
- Selectively backup Android data to the computer with one click.
- Preview and restore the backup to any Android device.
- Supports 8000+ Android devices.
- There is no data lost during backup, export, or restore.


How to use Dr. Fone Android Data Backup and Restore
Dr.Fone - Phone Backup (Android) makes it easy to backup and restore your phone. You create a backup on your computer and then you can selectively restore the files in the backup. Here is how to go about it.
Backup Android data
Step1) Start Dr. Fone and then choose “Phone Backup”.

Now connect your phone to your computer using the USB cable and wait for your device to be recognized. Make sure that any other Android Management tool is disabled to avoid conflicts.
Step 2) Choose the files that you want to back up

When your phone has been detected by Dr. Fone, hit the “Backup” button so that you can select which data to include in the file. Dr. Fone is compatible with up to 9 different file types used to store call history, video, audio, messages, and a lot more. You must have your android device rooted so this process can go on without any errors.
Step 3) Once selected, you can now click on the Backup button in order to start the backup process. This will take a few minutes and you must ensure that you do not disconnect the phone from the computer; this may cause data corruption.

Step 4) When the backup process is done you can now go to the “View Backup History” options at the lower left of the screen so you can preview the full contents of the backup file. This preview feature is very important in the next section, where you will see how to selectively restore certain files.

Restore files from backup
Step 1) Restore data

Start off by clicking on the “Restore” button. When you do this, you will be presented with the option of selecting which backup file you want to use. They can be backups from Android phones or iOS devices.
Step 2) Select the files that you want to be restored
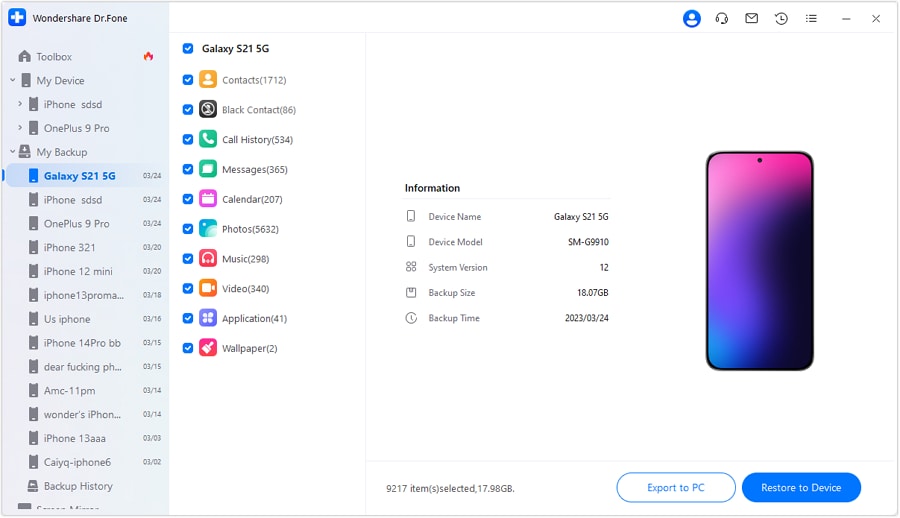
You will see the categories which are in the backup file; click on one and see the preview of the files on the right screen. Now choose your files and then click on “restore”.
Dr. Fone will ask you to authorize the restoration, so you should click on “OK” and then wait for the process to be completed. Once done, Dr. Fone will give you a detailed report on the files which have been successfully restored and which ones have not.

In today’s mobile world, a lot of business and personal data is stored on your mobile phone. It is important that you store a copy on your computer for safety. You can always restore the data at any time in the future. You should also sync your online accounts with mobile accounts so no important information gets lost in between using these different devices.
In order to do all this, you need a good tool, such as Samsung Kies 3, to backup your data from your phone to your computer. At any time in the future, you can always restore the data should you need it. When you need a tool that works with a multitude of mobile devices, you should choose Dr. Fone Data Backup & Restore. Its versatility is one of the best features since it works with a whole host of Android mobile devices. It is also easy to use and works much faster than Samsung Kies.
Dr.Fone Basic:
Better Control for Your Phone
Manage, transfer, back up, restore, and mirror your device


Alice MJ
staff Editor