
Photos Not Saving to Camera Roll? Best Fixes and Solutions! [iPhone 17 Supported]

Jun 30, 2026 • Filed to: Device Data Management • Proven solutions
 TL;DR:
To fix photos or videos failing to save to your iPhone camera roll, free up device capacity in Storage settings, restart the hardware, update your iOS, or reset all system settings to clear configuration errors without deleting personal data.
● For immediate hardware troubleshooting on an iPhone X through the latest iPhone 17, clear temporary software glitches by pressing and holding the side and volume buttons to trigger a device restart.
● Prevent data loss before performing system resets by backing up your media to a Windows or Mac computer using Dr.Fone Phone Manager, which bypasses iTunes to allow selective, original-quality transfers.
● Stop third-party messaging apps from depleting your local storage capacity by turning off the "Save to Camera Roll" toggle located directly within WhatsApp chat settings.
Ask AI for a summary
 ChatGPT
 Perplexity
 Gemini
 Claude
 Grok
Grok
Dr.Fone Basic:
Better Control for Your Phone
Manage, transfer, back up, restore, and mirror your device
Are your photos not saving to camera roll on iPhone, or do your videos fail to appear after recording? You’re not alone—this is a common issue that frustrates many users, especially with the latest iPhone 17. In today’s digital age, photos and videos are more than files; they capture our most precious memories, from quick snapshots of daily life to milestones shared with family and friends. That’s why finding your iPhone camera roll not saving media can be so bothersome and calls for quick fixes.
In this detailed guide, we'll look closely at how iPhone stores photos, find out why this issue happens, and give you a set of solutions to make sure your important memories are always kept safely. We'll cover both quick fixes and long-term plans to help you out.
For those who want extra security and peace of mind, we'll also tell you about Dr.Fone – a collection of useful tools that can simplify your digital life, including options to easily back up and manage your iPhone photos.
- Part 1: Photos Not Saving to Camera Roll? Here's Why
- Part 2: Quickly Backup iPhone Camera Roll Photos to PC: Dr.Fone Phone Manager Feature

- Part 3: How to Fix the Photos Not Saving to Camera Roll Problem
- Method 1: Restart iPhone
- Method 2: Review and Free Up Storage Space
- Method 3: Update iOS
- Method 4: Reset iPhone Settings
- Part 4: Tips to Keep Your iPhone Photos and Videos Intact
Part 1: Photos Not Saving to Camera Roll? Here's Why
It can be really frustrating when your iPhone doesn't save your photos. Let's break down the most common reasons why this might be happening:
- Your iPhone is Full: Just like a physical photo album, your iPhone has limited space. If it's too full, there's no room for new photos.
- Settings Mix-Up: Sometimes, your iPhone's settings can get jumbled up. This might stop photos from saving properly.
- Software Hiccups: Occasionally, your iPhone's software might have a small glitch. It's like when your computer acts up and needs a restart.
- Old iOS Version: If your iPhone's operating system (iOS) is outdated, it might not work correctly with newer apps or features.
- Camera Problems: Though rare, sometimes the camera itself might be having issues.
- App Troubles: If you're using a specific app to take photos (like WhatsApp), the problem might be with that app, not your iPhone.

Understanding these common causes is the first step to fixing the problem. Most of the time, it's something simple like needing more space or updating your phone. In the next parts, we'll show you how to fix these issues step by step.
Part 2: Quickly Backup iPhone Camera Roll Photos to PC: Dr.Fone Phone Manager Feature
Before we address how to fix the problem of photos not being saved to your camera roll, let's discuss how to prevent this issue. The best way to avoid the worry and sadness of possibly losing your important photos is to have a dependable backup system. Dr.Fone – Phone Manager (iOS) can help with this.
Using Dr.Fone for regular backups can save you from the stress and annoyance of losing crucial photos. This effective tool provides a complete solution for handling your iPhone data, including a strong feature that allows you to back up your camera roll photos to your computer quickly and easily.
Here's why Dr.Fone – Phone Manager is a game-changer for iPhone users:
- User-Friendly Design: Dr.Fone is made to be simple for everyone to use. Even if you're not good with technology, you'll find it easy to move around and use the program.
- Quick Data Transfer: Forget about slow backups. Dr.Fone uses modern technology to quickly move your pictures from your iPhone to your computer.
- Choose What to Backup: If you don't want to back up all your photos, that's okay. Dr.Fone lets you pick specific photos or albums to back up, giving you full control over your data.
- Keeps Photo Quality: Unlike some methods that might reduce the quality of your photos, Dr.Fone makes sure your images are transferred without losing any quality.
- Handles Different Media Types: Whether it's regular photos, Live Photos, or videos, Dr.Fone can manage all the different types of media on your phone.
- Works with All iPhones: Dr.Fone is compatible with every iPhone model and iOS version, so you don't have to worry about your device.
- Not Just for Photos: While we're talking about photos, Dr.Fone can also do more than just backup pictures.
Dr.Fone - Phone Manager (iOS)
Transfer Photos from Computer to iPod/iPhone/iPad without iTunes
- Transfer, manage, export/import your music, photos, videos, contacts, SMS, Apps, etc.
- Back up your music, photos, videos, contacts, SMS, Apps, etc., to the computer and restore them easily.
- Transfer music, photos, videos, contacts, messages, etc., from one smartphone to another.
- Transfer media files between iOS devices and iTunes.
- Fully compatible with the newest iOS system.


How to Use Dr.Fone to Backup Your iPhone Photos:
Step 1: Install Dr.Fone on your PC from the official website. Open Dr.Fone on your computer and connect your iPhone with a USB cable. Wait for Dr.Fone to detect your phone, then click the "Quick Transfer" button at the bottom of the screen.

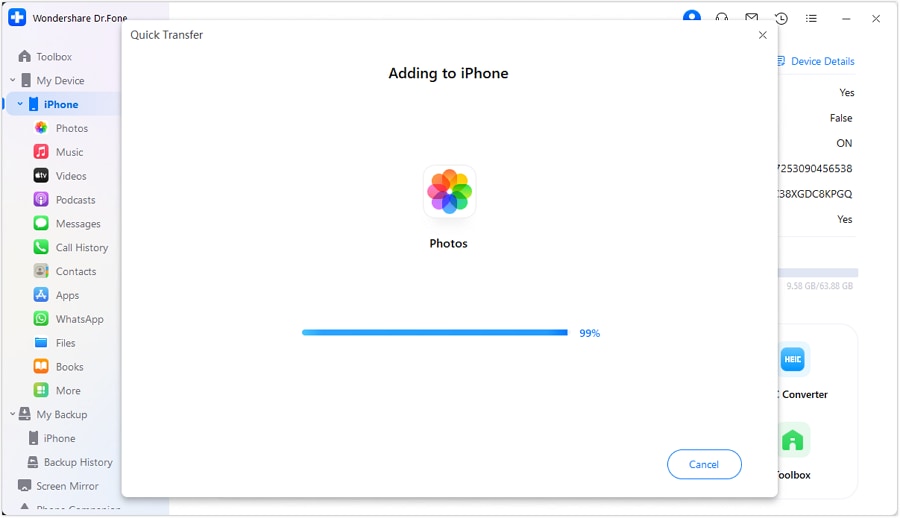
Step 2: In the new window, click "Select Files" to pick what you want to transfer. Dr.Fone might ask you to choose which app to save your files in. Select the app you want. You can back up and transfer Photos, Contacts, Music, and more.

Step 3: You'll see a progress bar showing how the transfer is going. If you need to stop, just click "Cancel".
Step 4: When it's finished, you'll see a message. To see where your files are saved, click the "i" icon for more info.

Regularly using Dr.Fone to back up your photos ensures that your memories are protected. This way, even if you run into problems where photos don't save to your camera roll, you can relax knowing your earlier photos are safely stored on your computer.
Keep in mind, as we look at different solutions for the problem of photos not saving, it's always smarter to prevent issues rather than fix them later. Make it a routine to back up your photos regularly, and you won't have to stress about losing those unforgettable moments.
Part 3: How to Fix the Photos Not Saving to Camera Roll Problem
Now that we understand the potential causes and have discussed the importance of regular backups, let's dive into specific solutions for the "photos not saving to camera roll" problem.
We'll start with simple fixes and progress to more advanced methods.
Method 1: Restart iPhone
Sometimes, the simplest solution is the most effective. Restarting your iPhone can often resolve minor software glitches that might be preventing photos from saving correctly.
Here are the simple steps to fix the photos not saving to camera roll issue:

- For iPhone X or later: Press and hold the side button and either volume button until the power off slider appears.
- For iPhone SE (2nd generation), 8, or earlier: Press and hold the side (or top) button until the power off slider appears. Drag the slider to turn off your device. Wait about 30 seconds, then press and hold the side (or top) button again until you see the Apple logo.
After your iPhone restarts, try taking a photo to see if it saves to your camera roll. If the “photos not saving to camera roll ios” problem persists, move on to the next method.
Method 2: Review and Free Up Storage Space
As mentioned earlier, insufficient storage is a common cause of photos not saving. Here's how to check and free up space on your iPhone:
Steps:
Step 1: Go to Settings > General > iPhone Storage. Review your storage usage.

Step 2: If you're running low, consider these options:
- Delete unused apps
- Offload unused apps (keeps documents and data)
- Clear app caches (especially for social media and browser apps)
- Delete old messages and attachments
- Remove downloaded music or videos you no longer need
- If you use iCloud Photos, ensure it's properly set up to optimize iPhone storage.
Once you've freed up some space, try taking and saving a photo again.
Method 3: Update iOS
Running an outdated iOS version can sometimes cause issues with saving photos. Updating to the latest version can often resolve these problems and provide additional features and security improvements.
Follow these steps to fix the photos not saving to camera roll issue on iPhone:
Step 1: Connect your iPhone to Wi-Fi and a power source. Go to Settings > General > Software Update.

Step 2: If an update is available, tap "Download and Install". Follow the on-screen instructions to complete the update.
After updating, test your camera to see if photos are now saving correctly.
Method 4: Reset iPhone Settings
If the above methods don't work, you might need to reset your iPhone settings. This won't erase your data but will reset all settings to their defaults.
Here’s how to fix the photos not saving to camera roll iOS issue:
Step 1: Go to Settings > General > Reset.

Step 2: Tap "Reset All Settings". Enter your passcode if prompted. Confirm that you want to reset all settings.
Your iPhone will restart. After it comes back on, test your camera again.
By working through these methods systematically, you should be able to resolve most instances of photos not saving to your camera roll. In the next section, we'll discuss some preventative measures to help you avoid this issue in the future.
Part 4: Tips to Keep Your iPhone Photos and Videos Intact
Now that we've fixed the problem of photos not being saved to your phone, let's talk about how to keep your pictures and videos safe and easy to find later on.
- Regular Backups: It's really important to regularly save copies of your photos – this is the best way to protect them from being lost. You can use iCloud, iTunes, or other tools like Dr.Fone to regularly save your photos.
- Manage Your Storage Proactively: Don't let your iPhone get completely full. Check and clean up your storage often so there's always room for new photos and videos.
- Keep Your iOS Updated: Make sure you regularly update your iPhone's software. These updates often fix bugs and make improvements that can stop problems like photos not being saved.
- Use iCloud Photos Wisely: If you use iCloud Photos, make sure you know how it works. The "Optimize iPhone Storage" option can help you manage space, but make sure you have enough iCloud storage to save all your photos.
- Be Cautious with Third-Party Camera Apps: While many third-party camera apps offer great features, some may have issues saving to your main camera roll. Always test new apps thoroughly.
- Consider Using Google Photos: As an extra layer of protection, you might want to use Google Photos alongside iCloud. It offers free, unlimited storage for "high quality" (slightly compressed) photos.
- Organize Your Photos: Use albums and the "Favorites" feature to organize your photos. This makes it easier to spot if recent photos haven't saved properly.
By following these tips, you'll not only minimize the chances of encountering the "photos not saving to camera roll" issue but also ensure that your precious memories are always safe and accessible.
Conclusion
In today's world of technology, the pictures we take are not just simple images. They represent our cherished memories, the tales of our lives, and the bonds we share with significant people and special occasions. It's extremely important to make sure these digital keepsakes are always secure and easy to reach.
For those who want additional security and convenience, we've created Dr.Fone – a set of effective tools that make it easier to save and handle your iPhone photos. Keep in mind, your photos are unique. They record moments that cannot be repeated, feelings that diminish over time, and relationships that bridge gaps.
By using the right methods and tools such as Dr.Fone, you can guarantee that your digital memories remain safe, available, and ready to be enjoyed whenever you wish.
FAQs
Dr.Fone Basic:
Better Control for Your Phone
Manage, transfer, back up, restore, and mirror your device


iPhone 17 Series
- iPhone 17 Backup
- iPhone 17 Erase
- iPhone 17 Problems
- iPhone 17 Recover
- iPhone 17 Reset
- iPhone 17 Tips
- iPhone 17 Transfer
- iPhone 17 Unlock
- ● Manage/transfer/recover data
- ● Unlock screen/activate/FRP lock
- ● Fix most iOS and Android issues
- Free Download Free Download Free Download


Julia Becker
chief Editor