
Easy Guide How To Check Last Backup on iPhone in Different Methods [iPhone 17 Supported]
iPhone Backup
- iPhone Data Backup
- 1. Back up iPhone in Recovery Mode
- 2. Back Up iPhone With/Without iTunes
- 3. Back up iPhone to Mac
- 4. Back up iPhone/iPad to Computer
- 5. Back up iPhone to Mac Catalina
- 6. Back up Jailbreak Apps And Restore
- 7. iPhone Backup Software
- 8. Back up iPhone/iPad Easily
- 9. Back up iPhone/iPad in DFU Mode
- 10. Back up iPhone Apps and App Data
- 11. Back up Notes on iPhone and iPad
- 12. Back up iOS to External Hard Drive
- 13. Export Notes from iPhone to PC/Mac
- 14.Back up iPhone Photos to Google Photos
- 15. Back Up Your iPhone Voicemails
- 16. Back Up to External Drive
- 17.How to Back Up to NAS
- 18.Back Up iPhone With Broken Screen
- 19.Back Up iPhone to Google Drive
- 20.Buy Used iPhones
- 21.Sell Used Phone for Cash
- 22.Sell Used iPhone for Dollar
- 23.How Much is My iPhone Worth
- iPhone Data Recovery
- 1. Recover iPhone Data Without Backup
- 2. Restore Calendar on iPhone
- 3. Recover Call History on iPhone
- 4. Recover iPhone Lost Data
- 5. Restore iPhone in Recovery Mode
- 6. Undelete iPhone Backup Files
- 7. Recover Deleted iPhone Messages
- iPhone Data Restore
- 1. Restore iPhone from iTunes Backup
- 2. Restore iPhone after Downgrade
- 3. Restore iPhone from Backup
- 4. Restore iPhone from iPad Backup
- 5. Restore iPhone from DFU Mode
- 6. Restore iPhone Deleted Text Message
- iPhone Backup Problems
- 1. Find iPhone Backup Location on Mac
- 2. iPhone Backup Password Never Set
- 3. iPhone Backup Password Forget
- 4. iCloud Backup Taking Forever
- 5. iPhone Won't Backup to iCloud
- 6. iTunes Won't Backup iPhone
- iPhone Restore Problems
- 1. iTunes Stuck on Verifying iPhone
- 2. Not Space to Restore iPhone Backup
- 3. iTunes Backup Not Restoring
- 4. iPhone Won't Restore
- WhatsApp Backup & Restore
- 1. WhatsApp from Google Drive to iOS
- 2. Restore Old WhatsApp Backup
- 3. Restore WhatsApp Chat on iPhone
- 4. Retrieve WhatsApp Chat History
- 5. See Deleted Messages on WhatsApp
- 6. Restore WhatsApp Stuck on iPhone
- 7. iPhone WhatsApp to Google Drive
- 8. Back Up WhatsApp on iPhone
- 9. Backup WhatsApp Data before Changing Number
- iPhone Backup Tips
- 1. Extract Data From iPhone
- 2. Encrypt iPhone Backup
- 3. Reset iPhone Backup Password
- 4. Extract iPhone Backup in Win 10
- 5. How Long take iPhone to Backup
- 6. Find iPhone Backup Location
- 7. iPhone Backup Password
- 8. View iPhone Backup on Computer
- 9. iPhone Backup with iTunes/iCloud
- 10.Check Last Backup on iPhone
- 11. How To Backup Foldable iPhone
- 12. Best Backup Chargers for iPhone
- 13. Speed Up Your iPhone Backups
- 14. Save Data When iPhone Disabled
- ● Manage/transfer/recover data
- ● Unlock screen/activate/FRP lock
- ● Fix most iOS and Android issues
- Free Download Free Download Free Download

Jun 11, 2026 • Filed to: Backup & Restore Solutions • Proven solutions
 TL;DR:
To verify your last iPhone backup timestamp, navigate to your Apple ID's iCloud Backup settings directly on your device, check the Summary screen in iTunes on Windows, or view the General tab in Finder for macOS Catalina and later.
● Automatic iCloud backups will only execute when your iPhone is actively connected to a Wi-Fi network, plugged into a power source, and has sufficient cloud storage space available.
● Utilizing iTunes or Finder provides offline data redundancy against network disruptions or account lockouts, but requires a physical connection using an original or MFi-certified USB cable.
● Wondershare Dr.Fone acts as an alternative local storage solution that allows for selective data backups, specific file previews before restoration, and wireless automatic computer backups.
Ask AI for a summary
 ChatGPT
 Perplexity
 Gemini
 Claude
 Grok
Grok
Dr.Fone Basic:
Better Control for Your Phone
Manage, transfer, back up, restore, and mirror your device
Regularly backing up your iPhone is essential to keep your data safe from accidental deletion, system crashes, or device malfunctions. Apple offers built‑in solutions like iCloud and iTunes that make it easy to protect and restore your information at any time. However, it’s just as important to check iPhone backup regularly to ensure your files are stored correctly and up to date. Whether you’re using an older iPhone or the latest iPhone 17, verifying the status of your backup guarantees that your photos, contacts, and important files can be restored effortlessly when needed.
This article presents a straightforward guide to checking the iPhone backup. With its help, you will gain a clear understanding of how to access your iPhone's latest backup.
Part 1: How To Check Last Backup on iPhone in Different Ways
Learning how to access iPhone backup is important for many reasons. It allows you to verify that your data is securely backed up and readily accessible when needed. The method to check the backup differs depending on the tool or service you used for backup. Given below are three methods that you can use to check the latest backup on iCloud and iTunes/Finder:
Method 1: Checking the Last Backup Using iCloud
When it comes to backing up your iPhone, iCloud provides a convenient solution. It allows you to safeguard your data effortlessly. Using it, you can ensure your important information is securely stored in the cloud. Checking the last iCloud backup on your iPhone is a crucial step.
It will help you verify the status of your backups and ensure the availability of your data. Described below is the detailed step-by-step guide on how to check backup on iPhone.
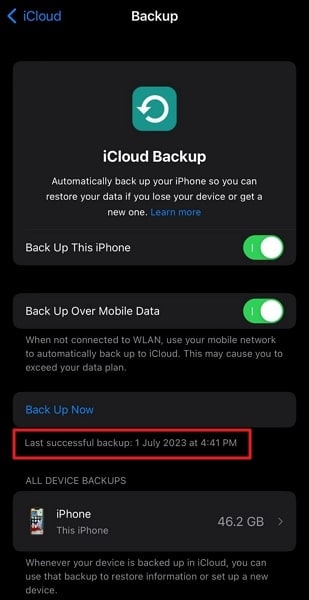
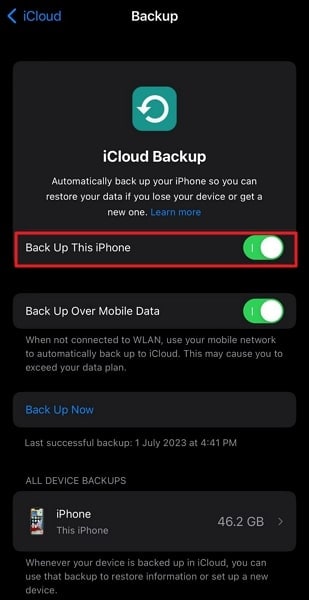
- Step 1: Navigate to the "Settings" app on your iPhone and tap on your Apple ID profile at the top of the screen. From the list of options, select "iCloud" and scroll down to find "iCloud Backup."
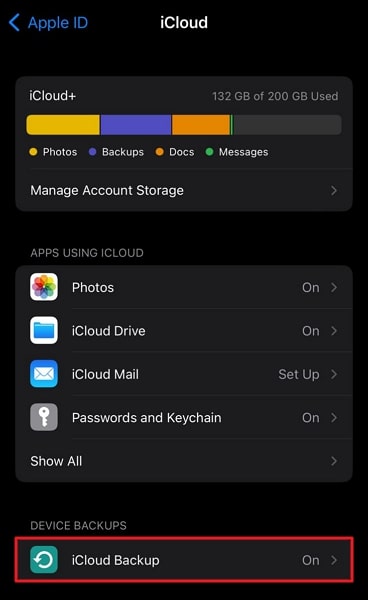
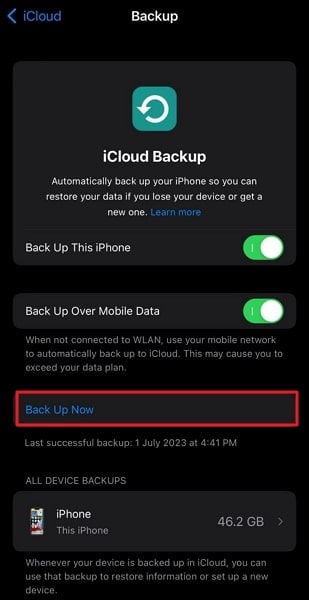
- Step 2: After accessing the iCloud Backup setting, find the "Back Up Now" option. Located under it is the timestamp of the last iCloud backup. To make it clearer, this feature will be mentioned as the "Last successful backup."
Method 2: Checking the Last Backup Using iTunes
If you prefer local backups on your computer, iTunes provides a reliable method. With it, you can back up and manage your iPhone data. Checking the last backup using iTunes is crucial. It will ensure that your information is securely stored and readily accessible. Described below is the detailed guide on how to check the last backup on iPhone using iTunes:
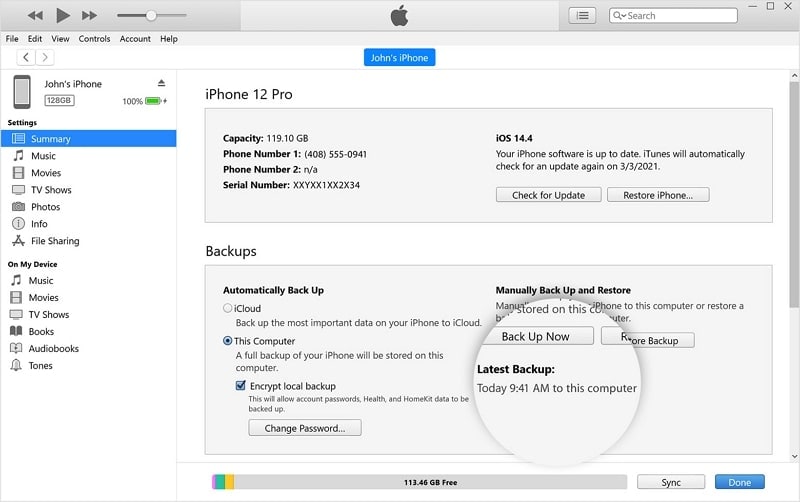
- Step 1: Install and launch the latest version of iTunes on your Windows PC and connect your iPhone. When connecting, ensure to use the original or MFi-certified cable. In iTunes, click the device icon to access your iPhone.
- Step 2: On the "Summary" screen of your iPhone, move to the "Backups" section. Here located under "Manually Back Up and Restore," is "Latest Backup." It describes the time and date of the latest iTunes backup.
Method 3: Checking Last Backup Using Finder (for macOS Catalina and Later)
From macOS Catalina or later, Apple has replaced iTunes with Finder for Mac users. Thus, checking the last backup of your iPhone can be easily done using Finder on Mac. With this method, you can conveniently view the backup details directly from your Mac.
It provides you with a seamless way to ensure the safety of your data. Use the following guidelines for how to see the last backup on iPhone:
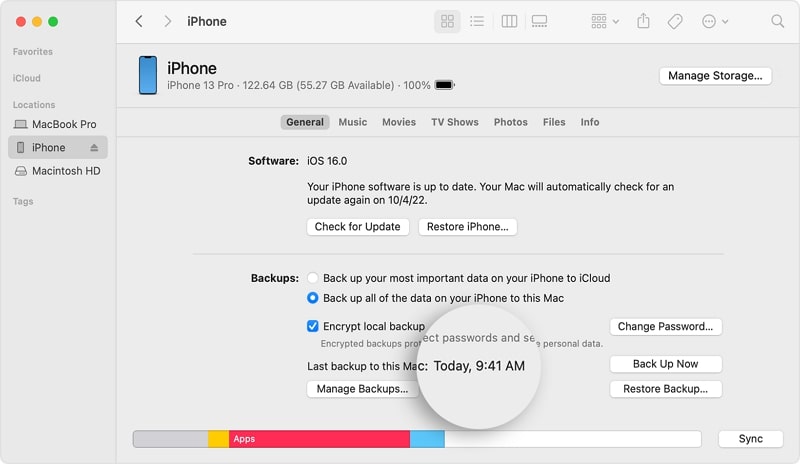
Detailed Instructions: Connect your iPhone to the MacBook and launch Finder. Choose your device from the left sidebar and move to the "General" tab. In this tab, move to the "Backups" section. Here you will be able to see the details of the most recent backup.
Part 2: Additional Tips and Troubleshooting
Ensuring that your iPhone backups are up to date is crucial. Doing this will keep your valuable data protected. This section will provide you with some more tips and guidance on backups. It will help you maintain up-to-date backups and resolve any potential issues.
How To Ensure Your Backups Are Up to Date
Regularly updating your backups ensures that your most recent data is protected. Thus, the data is available for restoration in case of any misfortune. Here are some tips to help you keep your iPhone backups up to date:
1. Enable Automatic iCloud Backups
To enable automatic iCloud backups, go to the "Settings" app on your iPhone. Here tap on your Apple ID, select "iCloud," and ensure that "iCloud Backup" is turned on. With this setting enabled, your iPhone will automatically back up to iCloud. It happens when connected to Wi-Fi and charging.
2. Connect to Wi-Fi and Power Source
For iCloud backups, it's essential to connect your iPhone to a Wi-Fi network and power source. Connecting to a power source to ensure a smooth and uninterrupted backup process. This way, your backups can occur without interruptions, and your data remains protected.
3. Check Backup Settings and Available Storage
Regularly review your backup settings to ensure the desired data is included in your backups. Make sure you have enough available storage in iCloud to accommodate your backups. If needed, consider upgrading your iCloud storage plan.
4. Perform Daily Manual Backups
In addition to automatic backups, you can manually initiate backups. It will ensure that your most recent data is saved. For iCloud backups, go to the "Settings" app, tap on your Apple ID, select "iCloud," and then tap on "Back Up Now" from the "iCloud Backup" settings. For iTunes/Finder backups, connect your iPhone to your computer. Afterward, start a backup manually within iTunes or Finder.
5. Regularly Check Backup Timestamps
Whether you're using iCloud or iTunes backups, periodically check the timestamps of your backups to ensure they are up to date. Follow the methods outlined in earlier sections to verify the last backup time.
Troubleshooting Common Backup Issues
Backing up your iPhone is generally a seamless process. However, you may encounter occasional issues that prevent successful backups. Understanding and troubleshooting these common backup issues is essential. It can help ensure that your data remains protected. Here are some troubleshooting steps to address common backup issues:
1. Insufficient iCloud Storage
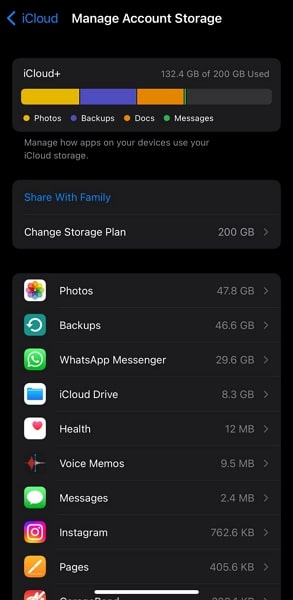
If you receive an error message indicating insufficient iCloud storage, you may need to upgrade it. Otherwise, you can manage your storage by deleting unnecessary data. To manage your iCloud storage, go to the "Settings" app on your iPhone, and tap on your Apple ID.
Here, select "iCloud," and then "Manage Account Storage." From here, you can review and delete unwanted backups or manage your data storage.
2. Poor Network Connection
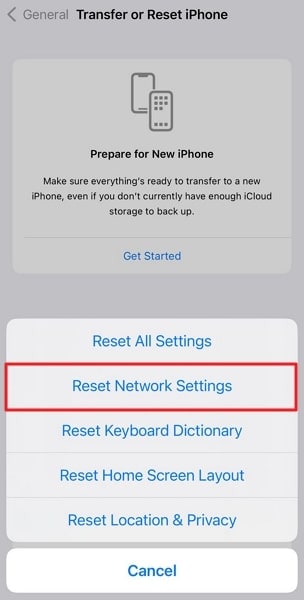
A stable and reliable network connection is essential for successful backups. It is especially true for iCloud backups. Ensure that your iPhone is connected to a strong Wi-Fi network during the backup process. In case you are still facing connectivity issues, try resetting your network settings.
You can do it by going to "Settings," selecting "General," and choosing "Transfer or Reset iPhone." Now tap "Reset," followed by "Reset Network Settings."
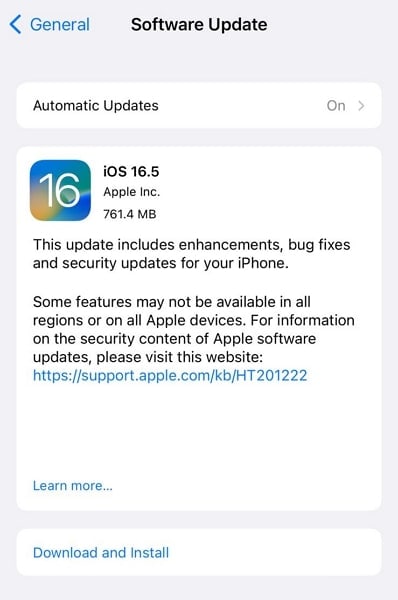
3. Software Updates
To optimize your iPhone's performance and security, keeping the software up to date is crucial. Regular software updates bring important bug fixes and improvements, ensuring a smoother user experience.
Moreover, these updates also enhance the backup process, providing additional reliability. To update your iPhone to the latest version, open "Settings" and move to the "General" tab. Here, press "Software Update," and on the following screen, use "Download and Install" to start the updating process.
4. USB Connection Issues (for iTunes and Finder backups)
Ensure that you use an original or MFi-Certified cable when connecting your device. Use a different USB cable or port to connect your iPhone to your computer if there are issues. Further remedies include restarting your iPhone and computer. You can also try updating iTunes or Finder to the latest version.
The Importance of Multiple Backup Methods
When it comes to safeguarding your iPhone data, relying on a single backup method may not provide sufficient protection. It is crucial to adopt multiple backup methods. This will ensure the integrity and availability of your valuable information. Here are the reasons why having multiple backup methods is essential:
1. Redundancy and Data Preservation
Utilizing multiple backup methods offers redundancy. It means you have many copies of your data stored in different locations. In the event of a backup failure or data loss, having redundant backups prove helpful. It ensures that you have alternative copies of your data available for recovery.
2. Diverse Storage Options
Different backup methods provide various storage options tailored to your needs. iCloud offers cloud-based storage with seamless automatic backups, providing convenience and accessibility. iTunes and Finder backups allow you to store your data locally on your computer. It provides added control and security. By utilizing both iCloud and local backups, you can enjoy the advantages of each method.
3. Protection Against Network or Service Disruptions
iCloud backups rely on a stable internet connection. Local backups through iTunes or Finder offer a reliable alternative. It helps in situations where network access may be limited or unavailable. Having a local backup ensures that you can still back up and restore your data.
4. Protection Against Account-Related Issues
In some cases, you may encounter account-related issues. These include iCloud account lockout or data synchronization problems. Having alternative backups through iTunes or Finder provides you with a safety net. They allow you to access and restore your data without relying solely on iCloud services.
Part 3: Should We Back Up the iPhone Regularly?
Absolutely, backing up your iPhone regularly is crucial. It ensures the safety and availability of your data. Regular backups protect your valuable photos, videos, contacts, messages, and other important information. They protect your data from loss or damage caused by various factors. These include device malfunctions, accidents, or software issues. By maintaining a regular backup routine, you can reduce the risk of permanent data loss.
When it comes to the best software for iPhone backup, Wondershare Dr.Fone stands out as a highly recommended option. Dr.Fone for iOS provides a comprehensive solution for backing up your iPhone data. It allows you to back up all types of data on your iPhone. This includes photos, videos, contacts, messages, call logs, notes, and more.
Dr.Fone - Phone Backup (iOS)
Selectively backup your iPhone contacts in 3 minutes!
- One-click to backup the whole iOS device to your computer.
- Allow previewing and selectively export contacts from iPhone to your computer.
- No data loss on devices during the restoration.
- Works for all iOS devices. Compatible with the latest iOS version.


Moreover, it allows you to back up your iPhone data automatically in your computer wirelessly. Here is how you can create a backup of your iPhone using Wondershare Dr.Fone:
- Step 1: Launch Wondershare Dr.Fone and Select My Backup
On your computer, launch Wondershare Dr.Fone after installing it. Now connect your iPhone to the computer and let the platform detect the device. Once it is detected, click “My Backup” from the left side panel.

- Step 2: Create a Local Backup of Your Device
Here you will see all the data types that can be backed up. To start the backing-up process, click "Back Up Now." Wait for the process to complete, and once it does, use “View Backup” to verify it.

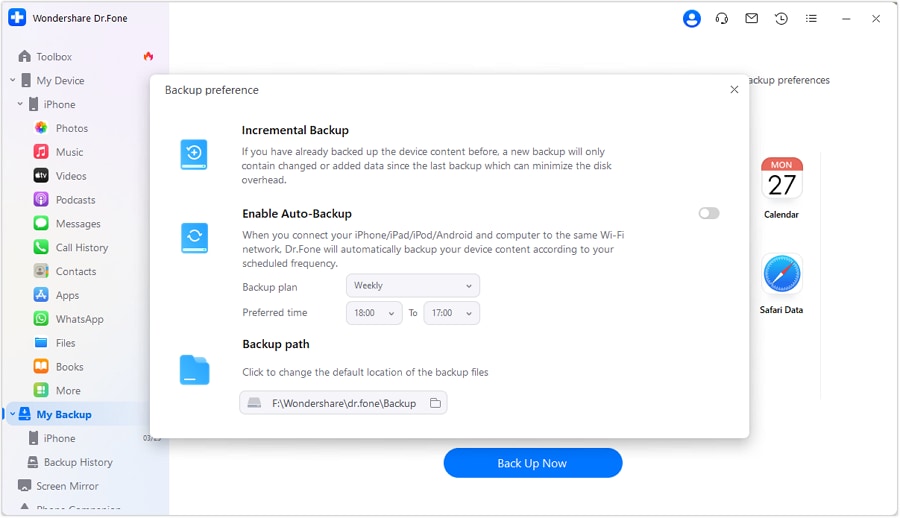
- Step 3: Set Up Automatic Backup for Your iPhone
Apart from creating manual backups, you can set up automatic backups with Wondershare Dr.Fone. All you need to do is go to “My Backup” and click “Backup preferences." Here set up the "Backup Plan," "Preferred Time," and "Backup Path."
Conclusion
To summarize, we have explored different methods to check iPhone backup. These will empower you to ensure the safety and accessibility of your valuable data. By utilizing iCloud, iTunes, or Finder, you can verify the date and time of your most recent backup. It provides you with peace of mind knowing that your information is securely stored.
Additionally, we have highlighted the importance of adopting multiple backup methods. This will enhance data redundancy and protection. One such method is using Wondershare Dr.Fone for creating backups. It supports both manual and automatic backups for iOS devices. With it, you can also create automatic backups wirelessly.
Dr.Fone Basic:
Better Control for Your Phone
Manage, transfer, back up, restore, and mirror your device


Daisy Raines
staff Editor