How to Fix iMessage Not Syncing Between iPhone and Mac [2026]

May 18, 2026 • Filed to: Phone Repair Solutions • Proven solutions
 TL;DR:
To resolve iMessage synchronization failures between your iPhone and Mac, ensure both devices are logged into the exact same Apple ID and verify that the "Messages in iCloud" setting is actively enabled on both systems.
● If a specific device is delayed in updating threads, sending a new message directly from that unsynced iPhone or Mac will force the background connection to refresh and pull the missing data.
● Syncing will fail if your contact details are unlisted on either device, requiring you to manually add your phone number or email under the "Sign-in and Security" menu at appleid.apple.com.
● If native iCloud troubleshooting fails, you can bypass cloud synchronization entirely by connecting your iPhone to your Mac via USB and manually exporting message threads and attachments using Wondershare Dr.Fone.
Ask AI for a summary
 ChatGPT
 Perplexity
 Gemini
 Claude
 Grok
Grok
Dr.Fone Basic:
Better Control for Your Phone
Manage, transfer, back up, restore, and mirror your device
Are you facing trouble in receiving iMessage messages on your Mac? Do you want to fix this frustrating issue? If yes, then this guide is for you!

Apple ecosystem is well-known for its synchronization over iCloud. You can easily access your photos, videos, messages, etc on any iOS device with your Apple ID. However, sometimes it can also be a trouble, especially when you can't sync your messages.
But don't worry! In this article, we are going to explore some common reasons for messages on Mac not syncing with iPhone. We will also walk you through the solutions to fix this issue. Let's get started!
- Part 1. How to Fix iMessage Not Syncing Between iPhone and Mac

- Method 1. Enable and Disable iMessage
- Method 2: Enable Messages in iCloud
- Method 3: Check Your Apple ID on Both Devices
- Method 4: Check Details on Apple’s Website
- Method 5: Send A Message from a Device That is Not Syncing
- Method 6: Force Restart Your iPhone
- Method 7: Update Your Devices
- Part 2. Fix iPhone-Related Issues With Dr.Fone [Best Method]
- Part 3. FAQs Related to iMessage Not Syncing
Part 1. How to Fix iMessage Not Syncing Between iPhone and Mac
In this section, we will explore various methods to fix iMessage not syncing between iPhone and Mac. You can follow the step-by-step guides given with each method and fix this issue.
Method 1. Enable and Disable iMessage
Before getting to any other methods, let's start from the basics. First, you need to turn off the iMessage on your iPhone and Mac and then turn it on. Doing so will refresh the connection between your devices. It might fix the iMessage not syncing issue. Here is how you can turn off and on iMessage:
Steps for iPhone:
Step 1: Open "Settings" on your iPhone.
Step 2: Scroll down and click the "Messages" option.
Step 3: Tap the switch right next to iMessage to turn it off, wait a few seconds, then turn it back on.

Steps for Mac:
Step 1: Open the "Messages" app on your Mac. Click "Messages" in the top menu.
Step 2: Now, click the ""Settings"" button and select "iMessage".

Step 3: Click " "Sign Out"" right next to your Apple ID. Wait a few seconds, then sign back in.

After trying this method, if you are still facing the iMessages not syncing issue, you can try the next method.
Method 2: Enable Messages in iCloud
The second method that you can try is to enable messages on your iCloud. As discussed earlier, iCloud allows you to sync messages across iOS devices. It also keeps all of your messages updated. So make sure that the message feature is enabled here.
You can follow the instructions given below to enable messages in iCloud:
Steps for iPhone:
Step 1: Open "Settings" on your iPhone and tap on your name.
Step 2: Select "iCloud" and find the "Messages" option.
Step 3: Click the Messages option and see if the "Use on this iPhone" option is enabled.

Steps for Mac:
Step 1: Open the "Messages" app on your Mac. Click "Messages" in the top menu.
Step 2: Now, click the "Settings" button and select "iMessage".
Step 3: Check if the box of "Enable Messages in iCloud" is ticked.
Trying this method might fix the iMessage not syncing between Mac and iPhone issue. However, if it doesn’t, then there are more methods below. You can give them a try!
Method 3: Check Your Apple ID on Both Devices
You activate iMessage on your iPhone using your email or phone number. However, in some cases, the Apple ID logged in on your iPhone is not the same as you use on your Mac. Therefore, issues like iMessage on Mac not syncing with iPhone happens.
You can follow the steps given below to ensure that both devices use the same Apple ID.
Steps for iPhone:
Step 1: Open "Settings" on your iPhone.
Step 2: Scroll down and click the "Messages" option.
Step 3: Click the "Send & Receive" option.

Step 4: Here, check which email and phone number is active.
Steps for Mac:
Step 1: Open the "Messages" app on your Mac. Click "Messages" in the top menu.
Step 2: Now, click the "Settings" button and select "iMessage".
Step 3: Right below the "You can be reached for messages at" section, you will see your phone number or email address. Ensure it matches the one you have on your iPhone.
However, if you don’t find your phone number in the relevant settings, you need to add it. Let’s see how!
Method 4: Check Details on Apple’s Website
For different reasons, your email address or phone number can be removed from the listed numbers. In this case, you need to add it again to avoid iMessage not syncing issue. You can check these details on Apple's official website.
Just follow the instructions given below:
Step 1: Open the web browser on your Mac. Then, search for appleid.apple.com and sign in with your Apple ID credentials.
Step 2: After signing in, you will see this interface. In the ""Sign-in and Security"" menu, click ""Email & Phone Number." " A new window will pop up.

Step 3: Click the " +" icon to add a new phone number or email address.

This method should fix the iMessage not syncing between Mac and iPhone. However, if it doesn’t, you can try some other fixes that are discussed ahead.
Method 5: Send A Message from a Device That is Not Syncing
If you are facing iMessage not syncing between iPhone and Mac, there must be one device that is not updating. In simple words, one of your devices is delayed in sending or receiving messages. In that case, you can follow the below steps to fix this issue.
Step 1: Open the "Messages" app on both devices and determine which one is not updated.
Step 2: If it's your Mac, try sending a message from your Mac. If it's your iPhone, send messages from your iPhone.
Step 3: Once the message is sent, the delayed device will normally begin updating the messages.
This way, you will have a proper syncing of your iMessage across all devices. If not, you can try other solutions.
Method 6: Force Restart Your iPhone
Your iPhone might be facing technical issues that are preventing the syncing of iMessage. In that case, force restarting your iPhone can be a quick solution. It will address the temporary glitches and fix them. Here is how you can hard restart your iPhone.
On iPhone 8 or later versions:
- Press and release the "Volume Up" button.
- Press and release the "Volume Down" button.
- Press and hold the "Power" button for several seconds until the Apple logo displays on the screen.

On iPhone 7/7 Plus:
- Keep pressing the "Power" + "Volume Down" buttons simultaneously until you see the Apple logo on the screen.
On iPhone 6 and earlier versions:
- Keep pressing the "Power" + "Home" buttons together until you see an Apple logo on the screen.
However, if a force restart couldn’t fix iMessage not syncing between iPhone and Mac, you can try the next method.
Method 7: Update Your Devices
Having an old iOS/MacOS version on your devices may lead to iMessage not syncing issues. So, make sure that you have the latest iOS/MacOS version installed on both of your devices. When a new update launches, it not only comes with new features but also helps fix bugs and other errors.
To update your iPhone/Mac, you can follow the instructions given below:
Steps for iPhone:
Step 1: Open "Settings" > "General" on your iPhone.
Step 2: Click the"Software Update" option in the menu.

Step 3: Install the latest Update (If there is any).
Steps for Mac:
Step 1: Open the Apple menu from the corner of your screen.
Step 2: Click "System Settings" > ""General"" in the sidebar.
Step 3: Then click "Software Update" on the right and check if there is any update available.

Part 2. Fix iPhone-Related Issues With Dr.Fone [Best Method]
If you can't fix the iMessage not syncing issue by following the above methods, there is one more solution - Wondershare Dr.Fone. It is a reliable and hassle-free way to fix many of your smartphone issues.
With Dr.Fone, you can easily manage your data between your iOS, Android, Windows and Mac OS. If you are not successful in syncing your iMessage threads, you can transfer them to your PC using Dr.Fone's app.
Moreover, this tool comes with a user-friendly interface. So, no matter if you are a tech expert or not, Dr.Fone has got you covered!
Dr.Fone - Phone Manager (iOS)
Manage Your Data between iOS Devices
- Transfer, manage, export/import your music, photos, videos, contacts, SMS, Apps, etc.
- Back up your music, photos, videos, contacts, SMS, Apps, etc., to the computer and restore them easily.
- Transfer music, photos, videos, contacts, messages, etc., from one smartphone to another.
- Transfer media files between iOS devices and iTunes.
- Fully compatible with the newest iOS system.


Before starting, make sure to download and install Wondershare Dr.Fone on your Mac. Then, follow the instructions given below:
Step 1: Launch the Dr.Fone app on your Mac. Then, connect your iPhone to your Mac via a USB cable and wait until the app recognizes the device.

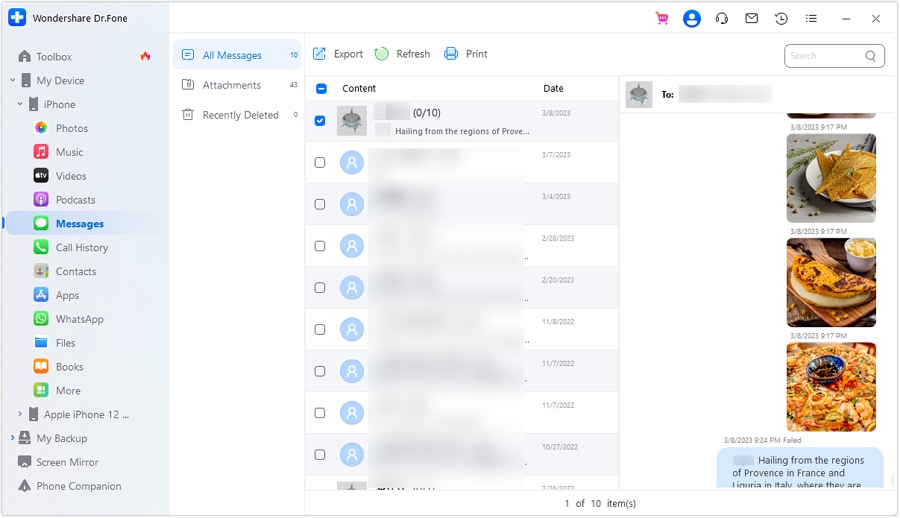
Step 2: On the left pane of the Dr.Fone screen, click "My Device" > "iPhone" > "Messages" Here, you will find all the threads of your iMessage and Message. You can select and export them to your Mac.
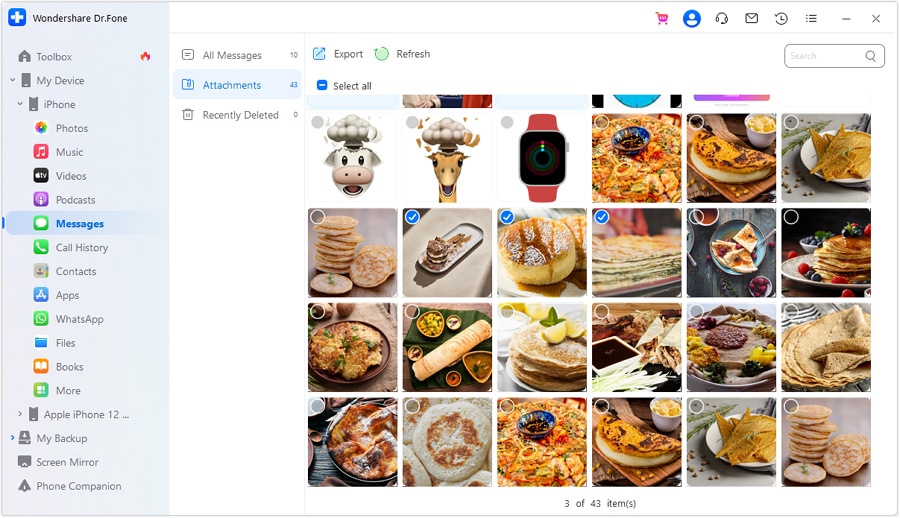
Step 3: You can also export specific attachments of your iMessage or Message threads. Just click "Attachments" select the ones that you want to export or select all. Then, click "Export" and you are done.
Did you see how easy it is to resolve the iPhone and Mac messages not syncing issue? You can just export them and have them on your Mac. Similarly, you can also export other data from your iPhone, such as videos, podcasts, books, files and more.
Part 3. FAQs Related to iMessage Not Syncing
FAQs
Conclusion
So, here we are ending our discussion. Fixing iMessage not syncing issues doesn't have to be complicated. This article has explained various solutions so you can get your messages back in sync. You can follow the step-by-step guides with each method to get it done.
Additionally, if you're looking for an easy-to-use solution, you might consider trying Dr.Fone. It can help you manage all your data between your digital devices. It also comes with a lot of useful features. Now, you don't have to visit phone operators; Dr Fone is here for the rescue!
Dr.Fone Basic:
Better Control for Your Phone
Manage, transfer, back up, restore, and mirror your device


iPhone Messages
- Back Up iPhone Messages
- 1. Back up Messages on iPhone
- 2. Save Text Messages on iPhone
- 3. Back up Viber messages
- 4. Back up WhatsApp Data to Computer
- 5. Export WhatsApp Message from iOS
- Delete iPhone Messages
- 1. Delete iMessages on iPhone and iPad
- 2. Delete Snapchat Messages on iPhone
- 3. Delete WA for Everyone
- 4. Delete WA Message Permanently
- 5. Delete Text Messages from iPhone
- 6. Tips about WhatsApp Delete Message
- 7. Undelete Messages on iPhone
- 8. View Deleted iMessage History on PC
- Recover iPhone Messages
- 1. Recover iPhone Deleted Text Messages
- 2. Recover Deleted Viber Messages
- 3. Recover Messages on iPhone 13
- 4. Recover Deleted Message on iPhone 8
- 5. Recover Deleted Message iPhone 6
- 6. Transfer from iPhone to iPhone
- 7. Recover WhatsApp Messages Online
- 8. Restore 1-Year-Old WhatsApp Chats
- Restore iPhone Messages
- 1. Restore Kik Messages from iPhone
- 2. Restore Text Messages on iPhone
- 3. Restore Viber Messages Selectively
- 4. Restore Kik Messages to iPhone
- Transfer iPhone Messages
- 1. Transfer from Android to iPhone
- 2. Transfer from iPhone to iPhone
- 3. Transfer from iPhone to Computer
- 4. Transfer from Android to iPhone XS
- 5. WhatsApp from Android to iOS
- 6. Transfer from Android to iPhone 13
- 7. WhatsApp from iPhone to PC
- 8. Download Text Messages from iPhone
- 9. Sync iMessage between iPhone and Mac
- iPhone Messages Problems
- 1. iMessage Not Working
- 2. iMessage Keeps Crashing
- 3. iMessage Not Syncing on a Mac
- 4.iPhone won't send or receive texts
- 5. Message Blocking Is Active
- 6. Why Are My iPhone Messages Green
- iPhone Message Tricks
- 1. Export Messages from iPhone to PDF
- 2. Read Others WA Messages
- 3. iPhone Message Tips and Tricks
- 4. Access iMessage Online
- 5. Extract Text Messages from iPhone
- 6. Forward Text on iPhone and Android
- 7. Print Text Messages from iPhone
- 8. View iPhone Messages on PC/Mac
- 9. Tell If You Are Blocked on iMessage
- ● Manage/transfer/recover data
- ● Unlock screen/activate/FRP lock
- ● Fix most iOS and Android issues
- Free Download Free Download Free Download


Daisy Raines
staff Editor