How To Extract Text Messages From an iPhone?
Aug 27, 2025 • Filed to: Device Data Management • Proven solutions
You might want to extract messages from your iPhone to a computer for a few reasons.
One reason could be that you have important information in your messages that you want to keep safe on your PC. Another reason might be to have a backup copy of your messages on your computer, so you can recover them if data loss scenarios happen to your phone. Alternatively, you might want to free up space on your phone while still keeping your messages safe on your PC.
No matter the reason, there are several ways to do this. To simplify things for you, we've compiled a list of the best methods for this task. Let’s get started.
Part 1. Can You Extract Messages From an iPhone?
Extracting messages from an iPhone is not straightforward with a one-button solution. Apple prioritizes user privacy and security, which makes extracting messages from the device challenging. However, there are still ways to achieve this, depending on your needs.
Before attempting to extract and save messages elsewhere, taking some precautions is important, especially if the text messages contain confidential or sensitive information.
Here are some essential guidelines to follow:
- Share Only with Trusted Individuals: If you need to share the extracted messages with others, ensure that you only do so with people you trust. Sharing sensitive information with unknown or untrustworthy individuals could lead to privacy breaches or misuse.
- Protect Your Mobile Number: Text messages often contain personal mobile numbers, which can be valuable information for identity theft or spamming. Keep your mobile number private and avoid sharing it publicly or with unknown parties.
- Enable Face or Touch ID and Passcode:To add extra protection to your iPhone, enable Face ID, Touch ID, and a strong passcode. This can prevent unauthorized access to your phone and extracted messages.
Remember, handling extracted messages containing sensitive data requires responsible and secure practices. Following the above mentioned precautions can help protect your privacy and prevent any potential risks of sharing or storing confidential information.
Now, let's explore the different methods to extract messages from an iPhone.
Part 2. Easy Tricks to Extract Messages From iPhone
While there's no direct built-in feature to extract messages from an iPhone, you can use some easy tricks and methods to achieve this. Below, we'll introduce and provide a guide for each method.
Method 1: Forward the Text Message to the Email
This first method allows you to send a text message to your email address, effectively saving it as an email message. Here's how to do it:
- Step 1: Open the Messages app on your iPhone. Locate the text message you want to extract and view it in the conversation.

- Step 2: Press and hold any text message(s) in the conversation until options appear, then choose More (you can select multiple messages).

- Step 3: Tap the arrow icon, or the forward icon, at the bottom-right corner.

- Step 4: Enter your email address in the To field, and click Send to download the text messages to another device via a message or email.

Method 2: Copy the Text Message and Paste it Somewhere
This method involves copying and pasting the text message into another application or document. Here's how to do it:
- Step 1: Open the Messages app on your iPhone. Navigate to the text message you want to extract and view it in the conversation. Press and hold the message bubble until the More option appears.

- Step 2: Tap Copy to copy the text message to the clipboard.

- Step 3: Open the application or document where you want to save the message. Tap and hold in the text field or document and select Paste to paste the message.

Method 3: Take a Screenshot of the Text Message
If you want to save the entire conversation as an image, taking a screenshot is a quick and simple way. Here's how to do it:
- Step 1: Open Messages on your iPhone. Find the message you want to save.
Take a screenshot:
- Step 2: On Face ID iPhone: Press "Side" + "Volume Up."
- Step 3: On Touch ID iPhone: Press "Side" + "Home" together.
- Step 4: Your messages are now saved in the Photos app. Export, print, or transfer as needed. For transferring to a computer, check the guide on transferring photos from iPhone to PC without iTunes.
Method 4: Extract Messages From iPhone Using Wondershare Dr.Fone
Wondershare Dr.Fone is a third-party software tool that offers more comprehensive and advanced message extraction features. It allows you to selectively extract specific messages, even from iTunes and iCloud backups. Here's a basic guide on how to use Wondershare Dr.Fone.
- Step 1: Download Wondershare Dr.Fone from its official website. Install it on your computer.
- Step 2: Launch the newly installed Wondershare Dr.Fone on your desktop.
- Step 3: Once it fully loads, head over to the left panel and then click Toolbox. On the main dashboard, click Data Recovery afterward.

- Step 4: Since you’re trying to extract messages from your iPhone, click iOS.
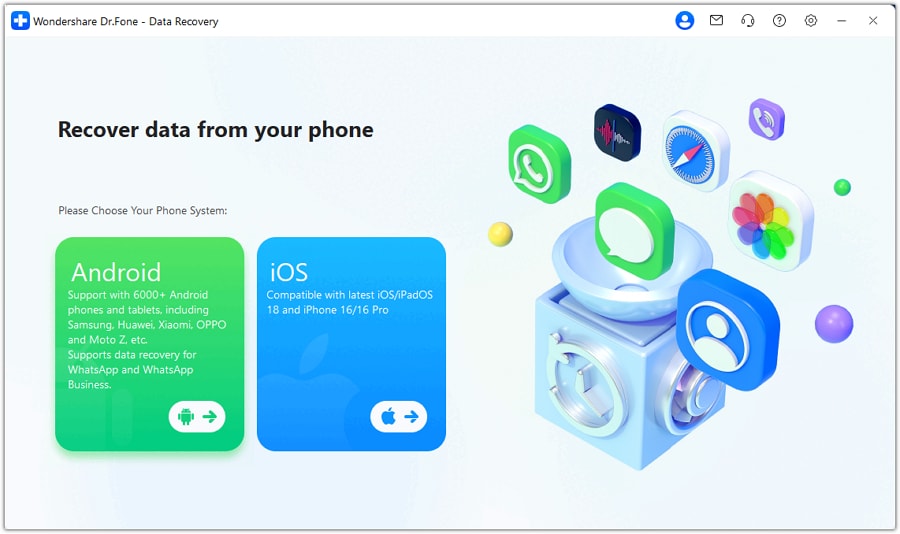
- Step 5: Click Recover Data From iOS Device.
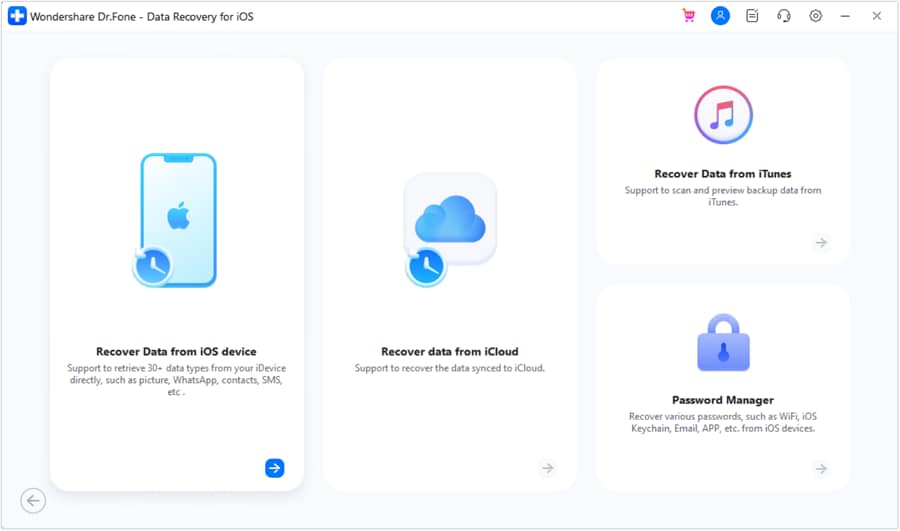
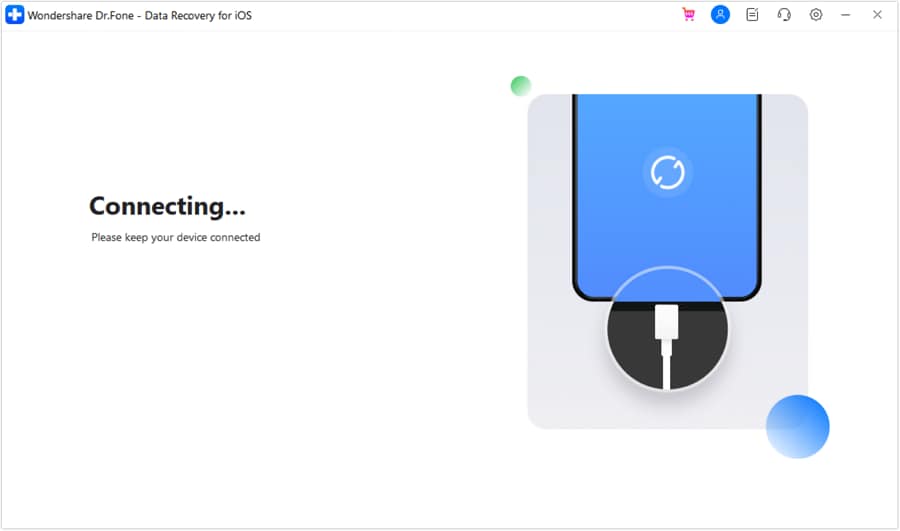
- Step 6: At this juncture, connect your iPhone to your computer using a data cable.
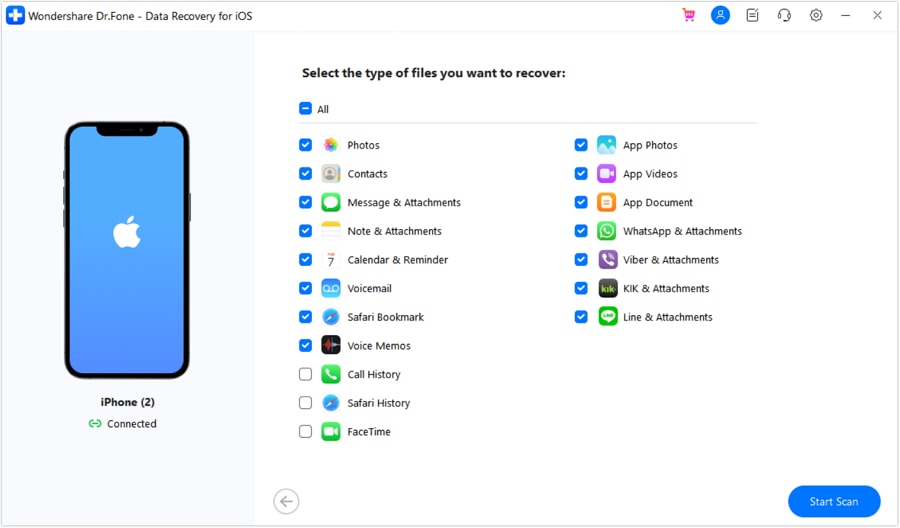
- Step 7: Wondershare Dr.Fone will then display the file types that you can recover from your device. Put a checkmark on the tickbox next to Message & Attachments. After that, click Start Scan.
- Step 8: After scanning your iPhone, Wondershare Dr.Fone will show you the available text messages that can be recovered from your device. Check the tickbox for Messages and Message Attachments if you want to select them all. Alternatively, choose them individually on the main dashboard. Afterward, click Recover to Computer.
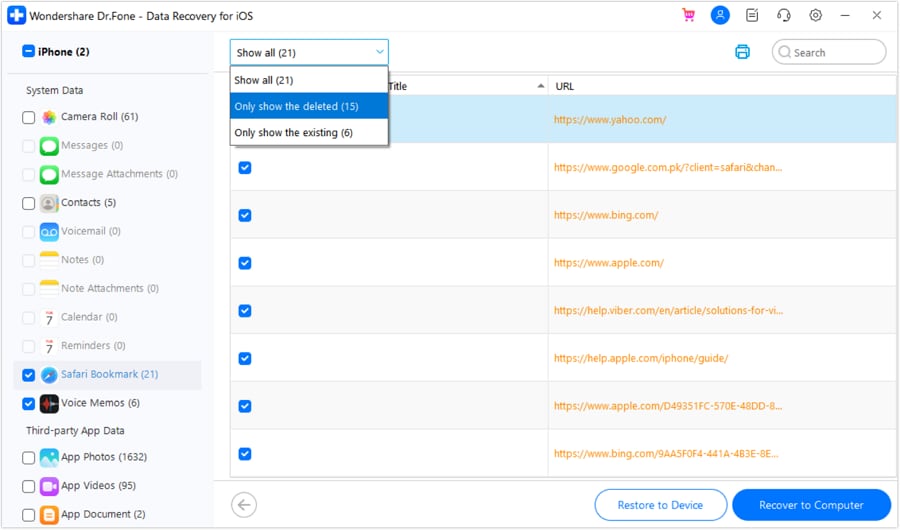
- Step 9: Confirm the specific location where you wish to restore the text messages. And then, click Recover.
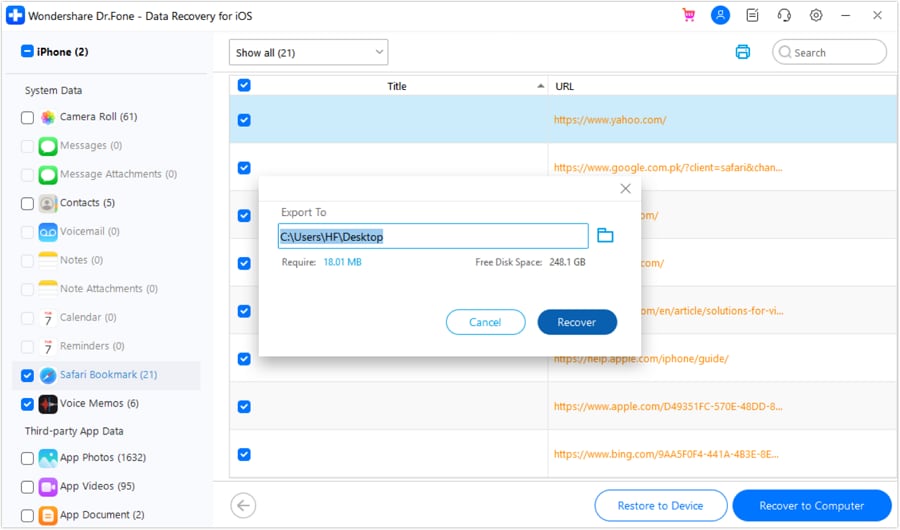
- Step 10: Once done, check the designated folder and review the text messages that have been extracted from your iPhone.
BONUS TIP: Back Up Your Text Messages to a Safe Place
Text messages have become essential to our daily communication. They store valuable information and critical data. Whether it's sentimental conversations with loved ones or important business-related messages, these files hold immense significance in our lives. As such, it is crucial to safeguard them, especially when moving them around or switching devices.
Below are some important benefits of syncing your iPhone to safe and secure storage.
iPhone Upgrades or Transfers
Let’s say you switch to a new iPhone or other smartphone. Transferring all the files from your old device will be so much easier if you have their backups. You’ll surely get the work done in a snap.
Data Loss Protection
Although Apple is inarguably a reputable smartphone brand with potent security, safeguarding our important files is still a must. We don’t know what’s waiting ahead. So to be sure, always create a backup.
Easy Data Extraction
Having file backups from accessible storage will help you extract them easily whenever you need them. So don't hesitate to create a copy and secure them to safe storage. You never know. It might be so helpful for you in the future.
To help you out, here is a short guide on how to back up your iPhone using Wondershare Dr.Fone.
- Step 1: Launch Wondershare Dr.Fone on your desktop. Connect your iPhone to your computer using a data cable.
- Step 2: Access the left panel and then click My Backup. Afterward, go to the main dashboard and click Back Up Now.

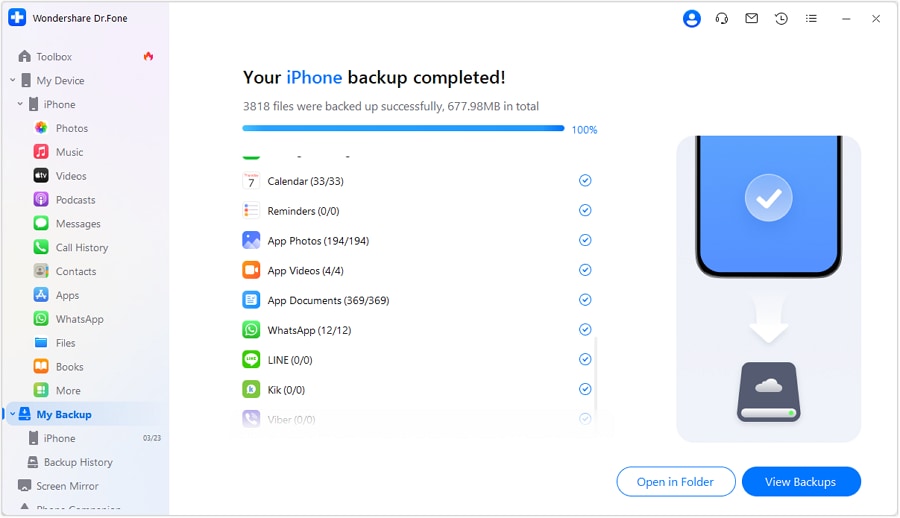
- Step 3: Wait while Wondershare Dr.Fone is backing up your iPhone. Refrain from using your device or your computer while the process is ongoing.

- Step 4: Once done, click Open in Folder or View Backups to review your files.
Conclusion
It’s not a common procedure to extract messages from our iPhones. Such data often contains sensitive and confidential details. Thus, we always tend to keep them to ourselves. But if it’s necessary under authorized circumstances, we can easily do it with the help of the abovementioned techniques. Download Wondershare Dr.Fone on your computer. It’s a useful mobile solution that can help you with data recovery and backup.
iPhone Messages
- Back Up iPhone Messages
- 1. Back up Messages on iPhone
- 2. Save Text Messages on iPhone
- 3. Back up Viber messages
- 4. Back up WhatsApp Data to Computer
- 5. Export WhatsApp Message from iOS
- Delete iPhone Messages
- 1. Delete iMessages on iPhone and iPad
- 2. Delete Snapchat Messages on iPhone
- 3. Delete WA for Everyone
- 4. Delete WA Message Permanently
- 5. Delete Text Messages from iPhone
- 6. Tips about WhatsApp Delete Message
- 7. Undelete Messages on iPhone
- 8. View Deleted iMessage History on PC
- Recover iPhone Messages
- 1. Recover iPhone Deleted Text Messages
- 2. Recover Deleted Viber Messages
- 3. Recover Messages on iPhone 13
- 4. Recover Deleted Message on iPhone 8
- 5. Recover Deleted Message iPhone 6
- 6. Transfer from iPhone to iPhone
- 7. Recover WhatsApp Messages Online
- 8. Restore 1-Year-Old WhatsApp Chats
- Restore iPhone Messages
- 1. Restore Kik Messages from iPhone
- 2. Restore Text Messages on iPhone
- 3. Restore Viber Messages Selectively
- 4. Restore Kik Messages to iPhone
- Transfer iPhone Messages
- 1. Transfer from Android to iPhone
- 2. Transfer from iPhone to iPhone
- 3. Transfer from iPhone to Computer
- 4. Transfer from Android to iPhone XS
- 5. WhatsApp from Android to iOS
- 6. Transfer from Android to iPhone 13
- 7. WhatsApp from iPhone to PC
- 8. Download Text Messages from iPhone
- 9. Sync iMessage between iPhone and Mac
- iPhone Messages Problems
- 1. iMessage Not Working
- 2. iMessage Keeps Crashing
- 3. iMessage Not Syncing on a Mac
- 4.iPhone won't send or receive texts
- 5. Message Blocking Is Active
- 6. Why Are My iPhone Messages Green
- iPhone Message Tricks
- 1. Export Messages from iPhone to PDF
- 2. Read Others WA Messages
- 3. iPhone Message Tips and Tricks
- 4. Access iMessage Online
- 5. Extract Text Messages from iPhone
- 6. Forward Text on iPhone and Android
- 7. Print Text Messages from iPhone
- 8. View iPhone Messages on PC/Mac
- 9. Tell If You Are Blocked on iMessage



Selena Lee
chief Editor