3 Ways to Access iMessage Online

Jun 11, 2026 • Filed to: Mobile Tips & Tactics • Proven solutions
 TL;DR:
Access your iMessage online by extracting an iCloud backup using Wondershare Dr.Fone - Data Recovery (iOS), remotely connecting to a Mac, or logging into a secondary Apple device.
● The Wondershare Dr.Fone - Data Recovery (iOS) method requires your iCloud credentials and a two-factor authentication code to preview and restore messages to a Windows or Mac computer.
● Remotely checking iMessage via Chrome Remote Desktop requires an accessible Mac already signed into your Apple ID to generate the necessary connection access code.
● Accessing messages directly on another iPhone requires that the original device had the iCloud Messages sync toggle enabled prior to signing into the new device.
Ask AI for a summary
 ChatGPT
 Perplexity
 Gemini
 Claude
 Grok
Grok
Losing your iPhone can be stressful, especially if you lose access to your iMessage. But don't worry—you can easily access iMessage from another iPhone. If you're wondering, "How to check iMessage online?" we have the answers for you.
Regain access to your messages effortlessly by following these clear and practical steps. This guide will show you exactly how to check iMessage online so you never miss an important chat, even if you don’t have your original Apple device. Whether you’re troubleshooting connectivity issues or simply need an alternative way to stay synced, our step-by-step instructions will walk you through a smooth iMessage login process.
Part 1: How to View iMessage Online on PC from iCloud Backup?
You can access your messages in iMessage online by restoring iCloud Backup. To view your messages in iMessage, you can log into iMessage online.
1. Restore from iCloud Backup via Data Recovery
You can easily access your iMessage by restoring your iCloud Backup with Wondershare Dr.Fone - Data Recovery (iOS). This exceptional software is renowned as one of the best iPhone data recovery tools out there.
No matter which iOS version you have, Dr.Fone is always compatible. It's user-friendly and designed to help you recover your iCloud data effortlessly. You can recover your data in any scenario, such as:
- Device damage
- Stolen device
- Inability to synchronize backup
- System crash
- Accidental data deletion
- Water damage
- Forgotten password
Dr.Fone - Data Recovery (iOS)
World's 1st iPhone and iPad data recovery software
- Supports recovering View Once messages from WhatsApp.
- Scan iOS devices to recover photos, videos, contacts, messages, notes, etc.
- Extract and preview all content in iCloud/iTunes backup files.
- Selectively restore what you want from iCloud/iTunes backup to your device or computer.
- Compatible with the latest iOS versions and iPhone models.


With Wondershare Dr.Fone - Data Recovery (iOS), you can effortlessly recover data like photos, videos, contacts, app documents, voice memos, voicemails, call history, Safari bookmarks, messages, calendar entries, reminders, and more. Furthermore, you can recover any data in your iPhone following these efficient and straightforward steps:
- Step 1. Launch the Dr.Fone software. As the software opens, click on the “Data Recovery” option.
- Step 2. Connect your iOS device to your computer using the provided lightning cable. The software will automatically detect your device within a few seconds. Select the “iOS” option to continue.
- Step 3. Choose “Recover data from iCloud.” You will be prompted to enter your iCloud credentials on the next screen. Enter them to proceed.

- Step 4. If your account requires two-factor authentication, enter the verification code sent to your device. Rest assured, Dr.Fone never tracks your data.

- Step 5. After logging in to iCloud, you'll see all synced files. Select the ones you want to recover and click “Next” to download them.
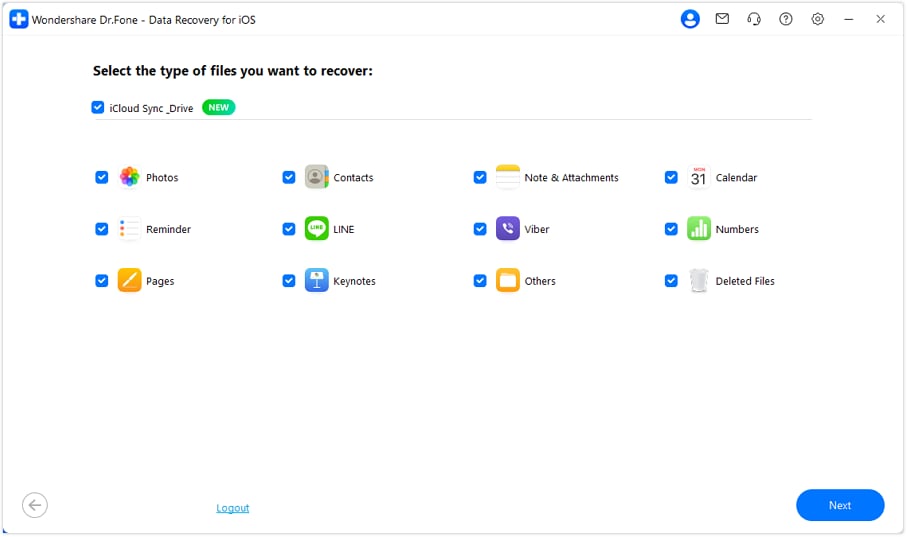
- Step 6. When the scanning gets completed, you can preview your data and click on “Recover to Device” or “Recover to Computer”, depending on what you want.
How To Recover Data From iCloud With Dr.Fone?
2. Then Check iMessage
You can easily access and read your messages directly in the iMessage app on your iPhone. To view or manage your chats through imessage login, follow these quick steps for seamless connectivity and instant access to your conversations.
- Step 1. Tap on the “iMessage” icon and open the app.
- Step 2. After you open the “iMessage” app, log in to the iCloud account you restored to your phone.
Part 2: How to Check iMessage online Via Mac Remotely?
You can remotely get access to your messages in iMessage through Mac. To use this process, you need a Mac. You need to log into iMessage online, and then you can send and receive messages from that account. To check your messages in iMessage through Mac, follow these simple steps:
- Step 1. First, need to download Chrome Remote Desktop and then install it on your Mac.
- Step 2. Run the application.
- Step 3. You will have to agree to the disclaimers in the app.
- Step 4. Follow the instructions to set up Chrome Remote Desktop in your Mac.
- Step 5. To attain the needed access code to secure the connection, you need to go to the remote extension that has been installed in your Mac.
- Step 6. Then you need to select the mode of connecting the Mac to other devices via an extension.

- Step 7. Now you need to enter the code that has been provided to you to establish a connection.
- Step 8. A new window will pop up on your screen, which will give you a prompt to send, receive and manage messages in your iMessage from your Mac online.
You can watch the video below to find out more iMessage tips, tricks, hacks & hidden features
Part 3: FAQs
1. How to Login Into iMessage Account?
To login into iMessage Account, you need to follow these steps:
- Step 1. Open “Settings” by tapping its icon.
- Step 2. After the settings menu opens, click on the “Sign in to your device” option.
- Step 3. A prompt will appear on your screen asking for your Apple ID and Password.
- Step 4. Enter your Apple ID and Password.
- Step 5. Then a prompt will appear on your screen where you need to enter the six-digit verification code that you have been provided within your trusted device phone number. Then the sign-in process will be complete.
2. How to sync messages to iCloud on iOS devices?
To sync messages to iCloud on iOS devices, follow these steps:
- Step 1. Click on the “Settings” icon and open the application.
- Step 2. Click on your Apple ID in which you want to sync your messages.
- Step 3. Select the “iCloud” option.
- Step 4. Scroll down in the iCloud option to find the “Messages” option.
- Step 5. Swipe the button beside the “Messages” option to the right to turn the button green.
All your messages will automatically be synced into the iCloud account.
3. Can I Check My iMessages From Another Phone?
If your messages are synced with iCloud, you can easily access them from another device. Simply sign in with your Apple ID and complete the imessage login on the new phone to manage, send, and receive messages seamlessly across devices.
You can watch the video below to find out more iMessage tips, tricks, hacks & hidden features
Conclusion
There are several ways to access imessage online, but the methods above remain the most reliable and effective options. These solutions simplify the process and help you resolve connection or access issues in just a few steps. Tools like Dr.Fone - Data Recovery (iOS) are also highly trusted for their efficiency, user-friendly interface, and powerful features. Try these proven methods to quickly regain access to your messages and stay connected without interruption.


iPhone Messages
- Back Up iPhone Messages
- 1. Back up Messages on iPhone
- 2. Save Text Messages on iPhone
- 3. Back up Viber messages
- 4. Back up WhatsApp Data to Computer
- 5. Export WhatsApp Message from iOS
- Delete iPhone Messages
- 1. Delete iMessages on iPhone and iPad
- 2. Delete Snapchat Messages on iPhone
- 3. Delete WA for Everyone
- 4. Delete WA Message Permanently
- 5. Delete Text Messages from iPhone
- 6. Tips about WhatsApp Delete Message
- 7. Undelete Messages on iPhone
- 8. View Deleted iMessage History on PC
- Recover iPhone Messages
- 1. Recover iPhone Deleted Text Messages
- 2. Recover Deleted Viber Messages
- 3. Recover Messages on iPhone 13
- 4. Recover Deleted Message on iPhone 8
- 5. Recover Deleted Message iPhone 6
- 6. Transfer from iPhone to iPhone
- 7. Recover WhatsApp Messages Online
- 8. Restore 1-Year-Old WhatsApp Chats
- Restore iPhone Messages
- 1. Restore Kik Messages from iPhone
- 2. Restore Text Messages on iPhone
- 3. Restore Viber Messages Selectively
- 4. Restore Kik Messages to iPhone
- Transfer iPhone Messages
- 1. Transfer from Android to iPhone
- 2. Transfer from iPhone to iPhone
- 3. Transfer from iPhone to Computer
- 4. Transfer from Android to iPhone XS
- 5. WhatsApp from Android to iOS
- 6. Transfer from Android to iPhone 13
- 7. WhatsApp from iPhone to PC
- 8. Download Text Messages from iPhone
- 9. Sync iMessage between iPhone and Mac
- iPhone Messages Problems
- 1. iMessage Not Working
- 2. iMessage Keeps Crashing
- 3. iMessage Not Syncing on a Mac
- 4.iPhone won't send or receive texts
- 5. Message Blocking Is Active
- 6. Why Are My iPhone Messages Green
- iPhone Message Tricks
- 1. Export Messages from iPhone to PDF
- 2. Read Others WA Messages
- 3. iPhone Message Tips and Tricks
- 4. Access iMessage Online
- 5. Extract Text Messages from iPhone
- 6. Forward Text on iPhone and Android
- 7. Print Text Messages from iPhone
- 8. View iPhone Messages on PC/Mac
- 9. Tell If You Are Blocked on iMessage
- ● Manage/transfer/recover data
- ● Unlock screen/activate/FRP lock
- ● Fix most iOS and Android issues
- Free Download Free Download Free Download

Selena Lee
chief Editor