Recover photos, messages, WhatsApp, and more — no backup
needed.
Recover photos, messages, WhatsApp, and more — no backup
needed.

 100% Security Verified | No Subscription Required | No Malware

 :
: 
 ChatGPT
 Perplexity
 Gemini
 Claude
 Grok
Grok
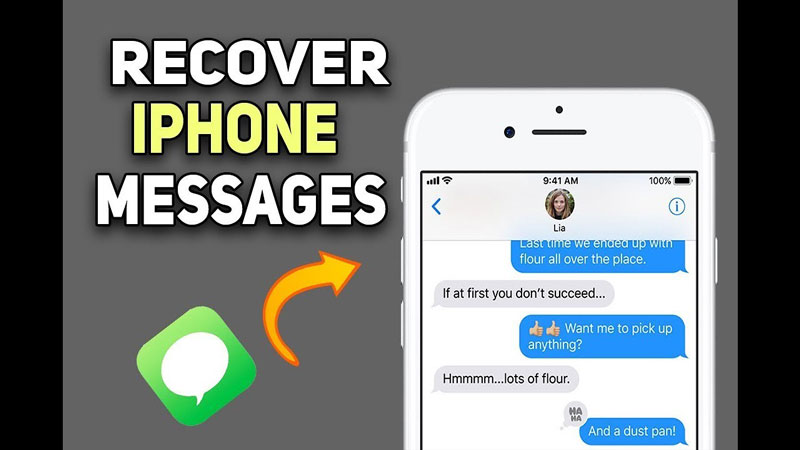
Smartphones have essentially become the ultimate digital vaults for our personal and professional lives. They actively store essential communication, sentimental conversations, and crucial information that we might need at a moment's notice. Unfortunately, whether to free up internal storage space or due to an accidental finger swipe, people often delete text messages they later desperately need to retrieve. If you are currently dealing with this highly stressful situation, knowing exactly how to recover deleted messages from iPhone 13 or other iOS devices is a critical skill for 2026.
The iPhone 13 consistently remains one of the most reliable and highly recommended devices in the entire iOS ecosystem, featuring a top-tier user interface, appealing design aesthetics, and advanced security protocols. However, even the most advanced iOS mechanisms cannot completely prevent human error. Fortunately, you can utilize the powerful Dr.Fone - Data Recovery features on your iPhone 13 gadget to seamlessly overcome data loss anxiety and perfectly restore your lost text threads without requiring extensive technical knowledge. Read on for our comprehensive guide outlining the easiest recovery methods.
In this article
Part 1. Recover Deleted Messages on iPhone 13 in a Few Clicks
The ability to execute a quick and effective restoration of your lost pictures, crucial file attachments, and unexpectedly deleted SMS messages makes digital life significantly easier. With professional recovery tools like Dr.Fone, you can easily recover deleted messages from iPhone with just a few clicks. The highly intuitive Dr.Fone - Data Recovery mechanism not only retrieves lost threads but also gives you robust options to manage, migrate, and securely export data to your computer or another device very quickly.
This advanced recovery application can be utilized to salvage a wide variety of iOS file types. You can retrieve files directly from the device's internal memory, extract synced files securely from your iCloud account, or pull data safely out of an iTunes backup. Accidentally or intentionally clearing out essential texts is no longer a permanent disaster. By utilizing the highly capable Dr.Fone - Data Recovery (iOS) toolkit, your messages can be retrieved seamlessly. This exceptional toolkit is explicitly designed with the technology of recovering files from iTunes, iCloud, or directly from the phone itself.
 Recovers data after deletion, crashes, or device damage.
- Supports photos, messages, contacts, WhatsApp, and more.
- Supports all major iPhone, iPad, and iPod models.
- Preview and recover only what you need.

Follow the precise steps detailed below to actively scan your hardware and successfully recover your deleted messages safely.
-
Step 1 Install the Software
Begin by downloading and successfully installing the advanced Dr.Fone application on your Windows or Mac laptop or computer. Launch the program once the installation procedure concludes.
-
Step 2 Connect the Device and Select Mode
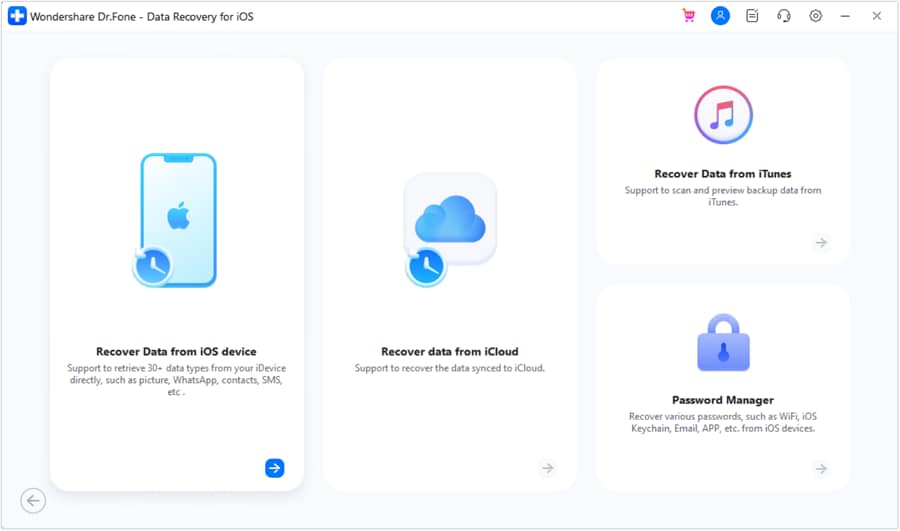
Using a reliable lightning cable, closely connect your iPhone 13 gadget to the system. From the main software interface, carefully choose "Data Recovery," then selectively tap "iOS," and finally click on "Recover Data from iOS Device."
-
Step 3 Scan Your iPhone
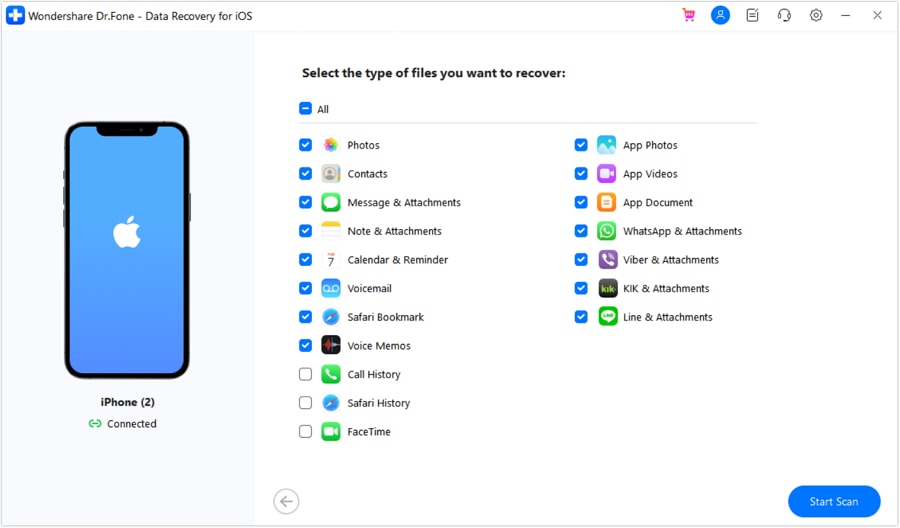
The computer screen will display various data formats. Select the specific type of files you desperately want to recover (such as text formats), then deliberately click the "Start Scan" button to initiate the deep scanning process.
-
Step 4 Preview the Recovered Data
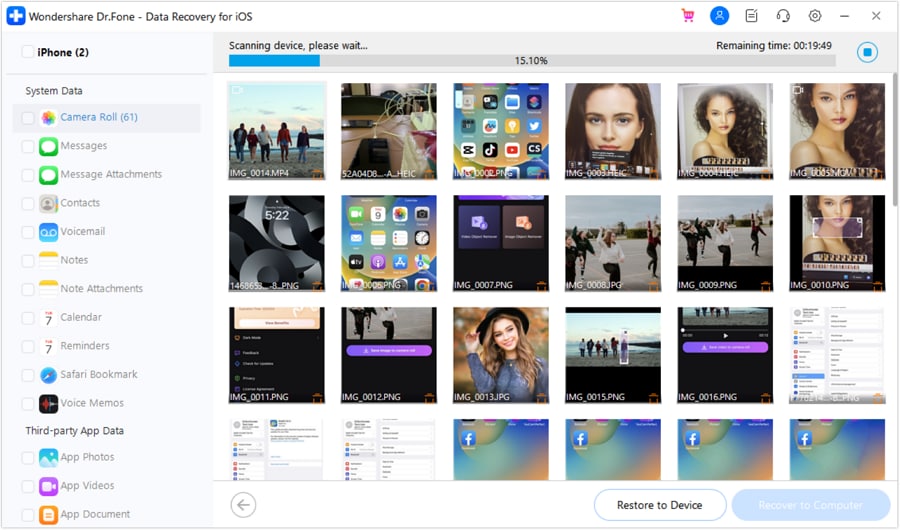
After a few minutes of thorough diagnostic scanning, the deleted messages and SMS conversations will distinctly appear on your system interface. You can clearly read through them to meticulously verify their contents.
-
Step 5 Restore the Messages
Select the specific communication threads you wish to securely keep, and prominently press "Recover to Computer" to save them locally, or choose "Restore to Device" to directly push the deleted messages back to your actively connected iPhone.
Part 2. Recover Deleted Messages on iPhone 13 from iCloud Account
The modern iPhone 13 naturally comes equipped with a vast variety of native security options and synchronization features. These powerful built-in features are dramatically enhanced when you strategically install Dr.Fone software solutions alongside them. If you continually have iCloud sync effectively enabled, you can safely pull your randomly deleted messages straight from the cloud without recklessly resetting your entire device. Here are the structured operational steps to precisely recover deleted messages from your iCloud account safely.
-
Step 1 Launch Dr.Fone and Connect
Professionally install the Dr.Fone software toolkit and securely connect your iPhone 13 to your desktop laptop or computer using an authorized USB cable.
-
Step 2 Choose iCloud Recovery
Navigate the clean interface and selectively click on the specific icon reading "Recover from iCloud synced files."
-
Step 3 Sign Into iCloud
Carefully sign in to your secure Apple iCloud account using your strict credentials to immediately view a detailed, comprehensive list of all the synced files currently available on the server.
-
Step 4 Download Synced Data
Selectively choose the relevant backup items you strongly want to retrieve and instruct the program to download them smoothly back to your local machine.
-
Step 5 Scan the Synced File
After fully completing the secure local download, utilize Dr.Fone to deeply scan the downloaded synced file to successfully locate hidden or deleted message fragments.
-
Step 6 Preview and Select
Take your time to meticulously preview the extracted deleted messages and intentionally choose the exact conversational threads or text SMS elements you truly want to recover.
-
Step 7 Export and Transfer
Simply export the finally recovered messages directly to your designated computer storage folder. You can seamlessly transfer those critical messages back to your iPhone whenever inherently needed.
Part 3. Recover Deleted Messages on iPhone 13 from iTunes
If you regularly back up your expensive device locally via a dedicated computer, another highly effective way to retrieve back your inexplicably lost iPhone messages is by actively extracting them via an iTunes backup. Unlike the restrictive official Apple method which brutally forces a complete overwrite of your current data, Dr.Fone actively allows for safe selective extraction. The entire process is fairly simple and straightforward. Here are the exact actionable steps to do so in 2026.
-
Step 1 Run the App and Connect
Start by making absolutely sure you properly download and cleanly install the Wondershare Dr.Fone app directly on your reliable PC or Mac. Next, smoothly connect your operating iPhone to the computer system.
-
Step 2 Select iTunes Backup Mode
From the designated side recovery menu, purposely choose "Recover from iTunes Backup" to accurately instruct the software to heavily scan all iTunes backup files currently stored on the computer's hard drive.
-
Step 3 Extract the Backup
Click "Start Scan" to thoroughly extract your profoundly deleted messages and other incredibly important file types directly from the targeted iTunes backup file without damaging any current active data.
-
Step 4 Locate Messages
Once the rapid extraction completely concludes, quickly navigate to the clear sidebar and purposefully click "Messages" to enthusiastically start viewing all the previously deleted texts, iMessages, and SMS attachments.
-
Step 5 Finalize Recovery
Carefully mark the selective ones you genuinely need to retrieve and confidently click the main prompt to recover. Within mere moments, the messages are now safely fully restored to your devices.
Conclusion
Smart modern applications and advanced smartphones constantly create a highly formidable digital combination. Dr.Fone consistently stands out as one such immensely high-quality and all-encompassing software solution that remains fully reliably compatible with the most advanced iOS and Android devices dynamically operating in 2026. It truly functions dependably as a one-stop solution to almost all your complex iPhone problems, effortlessly ranging from password recovery to complex screen-lock retrieving and meticulous data recovery to rapidly get back your emotionally lost messages.
So if you extensively plan to heavily upgrade your iPhone hardware experience or securely protect your digital footprint on the very latest iOS versions, rigorously make sure to install Dr.Fone to swiftly get all your undeniably valuable data back in a few minutes without any immense technical frustration. The application is highly cost-attractive, remarkably trustworthy, and perfectly designed to securely save you from severe data loss anxiety.




FAQs
-
1. Are deleted messages gone permanently?
No, if you intentionally or accidentally delete messages on your iPhone or other smartphones, they are usually not fundamentally gone permanently and can still be practically recovered. Advanced diagnostic apps like Dr.Fone, utilizing exceptionally easy recovery algorithms, meticulously help you to deeply retrieve deleted messages on iPhone via direct device scanning, iTunes backups, iCloud synchronization, and other highly practical ways. You simply need to diligently follow the straightforward simple steps listed above to securely scan and perfectly recover all importantly vital messages that were accidentally deleted earlier. The overall process is remarkably easy, highly convenient, and exceptionally quick. -
2. Can I get deleted messages from my iPhone carrier?
Yes, in several specific jurisdictions and under certain rigid circumstances, you can formally get back the unexpectedly deleted messages directly through your cellular carrier. Ordinarily, the deleted messages on any iPhone can be seamlessly recovered incredibly fast via iTunes or iCloud backup. If that is strictly not possible for some underlying technical reason, you must rapidly reach out to your cellular carrier to recover heavily deleted messages. Your contracted cell phone carrier temporarily stores brief text messages for a designated time frame on their strict internal servers, even exactly after they have been manually deleted locally. They can potentially be contacted to formally retrieve those text messages in the severe case of a legal dispute or personal emergency. -
3. Can I get back deleted messages on Viber?
Getting back your previously deleted communication messages on Viber isn't a very extraordinarily difficult ordeal. Just completely carefully reinstall the official messaging app and re-connect your primary phone to the exact same Google account or Apple ID system. Viber chat logs are by strict default linked directly to your primary Google account or Apple iCloud ecosystem, thus robustly creating a highly effective cloud backup mechanism. You will receive the automatic immediate restore option while initially safely setting up the fresh account. Just safely press the restore button and watch it cleanly recover your lost Viber messages in moments. -
4. Can I recover deleted messages from iPhone 13 without a backup?
Yes, it is practically entirely possible to functionally recover completely deleted messages from an iPhone 13 even if you unfortunately do not have a previously existing iCloud or iTunes backup. When you officially delete a message, the core iOS system merely virtually marks that specific data storage space as instantly available, but the core data often remains totally intact until strictly overwritten by incoming new files. By using a widely specialized data recovery tool exactly like Dr.Fone - Data Recovery (iOS), you can intricately scan your iPhone's core internal memory directly to actively locate and precisely extract these critically hidden message fragments well before they are unfortunately permanently wiped out.
 Add Wondershare Dr.Fone as a preferred source on Google