Recover photos, messages, WhatsApp, and more — no backup
needed.
Recover photos, messages, WhatsApp, and more — no backup
needed.

 100% Security Verified | No Subscription Required | No Malware

 :
: 
 ChatGPT
 Perplexity
 Gemini
 Claude
 Grok
Grok
Losing crucial text conversations can cause immense stress, but the good news is that you can often restore messages on iPhone quite easily. Whether an accidental deletion cleared out your inbox or an unexpected software glitch caused data loss, modern iOS systems and dedicated recovery tools offer multiple lifelines. This comprehensive 2026 guide is designed to help you navigate through various recovery techniques, ensuring compatibility with all devices, including the latest iPhone 17.
We will walk you through four distinct methods to restore deleted text messages on iPhone. From utilizing Apple's built-in 'Recently Deleted' feature to extracting specific texts from iTunes and iCloud backups, you will find a solution that fits your exact scenario. Furthermore, we will explore advanced third-party options that allow for direct message recovery even when no prior backup exists.
In this article
- Part 1. How to Restore Deleted Messages via 'Recently Deleted' Folder (Easiest Method)
- Part 2. How to Retrieve Deleted Messages on iPhone Using an iTunes Backup
- Part 3. How to Restore Deleted Text Messages on iPhone from an iCloud Backup
- Part 4. How to Find Deleted Messages on iPhone Without a Backup
Part 1. How to Restore Deleted Messages via 'Recently Deleted' Folder (Easiest Method)
For individuals running iOS 16 or newer versions (including the default iOS on the iPhone 17), Apple has integrated a highly requested 'Recently Deleted' section directly within the Messages app. This feature operates much like the trash bin on a computer, making it the most straightforward approach to restore messages on iPhone. If the deletion occurred within the past 30 to 40 days, the texts remain safely stored on your device, requiring no external hardware or backup files to retrieve.
To restore deleted text messages on an iPhone (iOS 16+), launch the Messages application, tap on 'Edit' or 'Filters' located in the upper-left corner, and select 'Show Recently Deleted.' Highlight the threads you wish to bring back, then press the 'Recover' button.
Here is a detailed breakdown of the steps required to recover your texts directly from the app:
-
Step 1 Access the Messages App
Unlock your device and tap to open the Messages app on your iPhone's home screen.
-
Step 2 Navigate to Filters or Edit
Look at the top-left corner of the display. Depending on your settings, tap either Filters or Edit to reveal a dropdown menu.
-
Step 3 Open the Recently Deleted Section
From the available options, tap on Show Recently Deleted to view the hidden folder containing your discarded conversations.
-
Step 4 Select the Target Conversations
You will now see a list of message threads deleted over the last 30 to 40 days. Check the circles next to the messages you intend to restore deleted text messages on iPhone.
-
Step 5 Recover to Inbox
Finally, tap the Recover button located at the bottom right. The selected texts will immediately reappear in your primary message inbox.
Part 2. How to Retrieve Deleted Messages on iPhone Using an iTunes Backup
If the 'Recently Deleted' window has expired or you are utilizing an older iOS version, relying on an iTunes (or Finder) backup is a robust alternative. This technique restores your iPhone to the exact state it was in when the backup was logged. While this is an excellent way to restore messages on iPhone securely, users must be aware that any new data accumulated after the backup date will be completely overwritten.
- Utilizes Apple's free, official desktop software.
- Effectively restores all backed-up content alongside text messages.
- Erases and overwrites current data entirely.
- Lacks the ability to selectively restore specific messages.
- Strictly requires a pre-existing local backup file.
Method 2.1: Restore All Messages from an iTunes Backup
If an accidental mass deletion occurred, iTunes (or Finder) provides a full restoration route. This built-in utility bypasses the need for third-party programs to initiate the core recovery. However, this bulk process reinstates photos, videos, system settings, and apps tied to that specific backup date. Consequently, you must ensure your device holds sufficient storage capacity to accept the incoming load of recovered data.
Should you decide to proceed with a full device overwrite, follow these instructions:
-
Step 1 Connect and Launch
Use a certified USB or Lightning cable to connect your iPhone to a computer. Launch the iTunes application (or Finder on newer macOS versions).

-
Step 2 Locate Your Device
In Finder, click your device's name listed under Locations. In iTunes, select the small phone icon near the top left, then click on the Summary tab.
-
Step 3 Initiate the Restore
Click on Restore Backup. You may be prompted to enter your device password or disable 'Find My' to finalize the comprehensive restoration.
Method 2.2: Retrieve Deleted Text Messages Selectively
For users who wish to recover deleted messages on iPhone without enduring an entire system rollback, employing specialized software is the most logical route. Since native iOS environments do not support extracting single text threads from a locked iTunes backup file, third-party innovators fill this essential gap.
One of the most trusted applications to handle this precise task is Wondershare Dr.Fone - Data Recovery (iOS). Recognized globally for its pioneering data retrieval technology, this software can parse through iTunes backups and extract specific messages, attachments, and contacts. Fully compatible with modern models like the iPhone 17 running iOS 2026 updates, it protects your current device data from being wiped out.
 Recovers data after deletion, crashes, or device damage.
- Supports photos, messages, contacts, WhatsApp, and more.
- Supports all major iPhone, iPad, and iPod models.
- Preview and recover only what you need.

By extracting details directly from your existing iTunes backup file, Wondershare Dr.Fone bypasses the restrictive overwrite protocol. Here is the step-by-step workflow to extract texts selectively:
-
Step 1 Launch Dr.Fone Interface
Download and install Wondershare Dr.Fone. Connect your device via USB and open the software to view the main dashboard.





-
Step 2 Access Data Recovery Tool
Navigate to the Toolbox tab and click on the Data Recovery module.
-
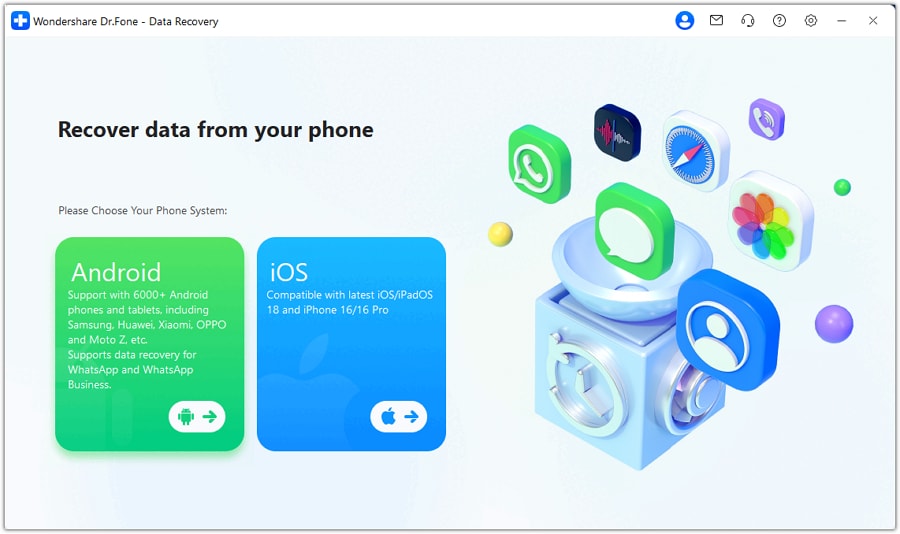
Step 3 Designate the OS
When prompted to select a system, click on iOS to load the appropriate recovery tools.
-
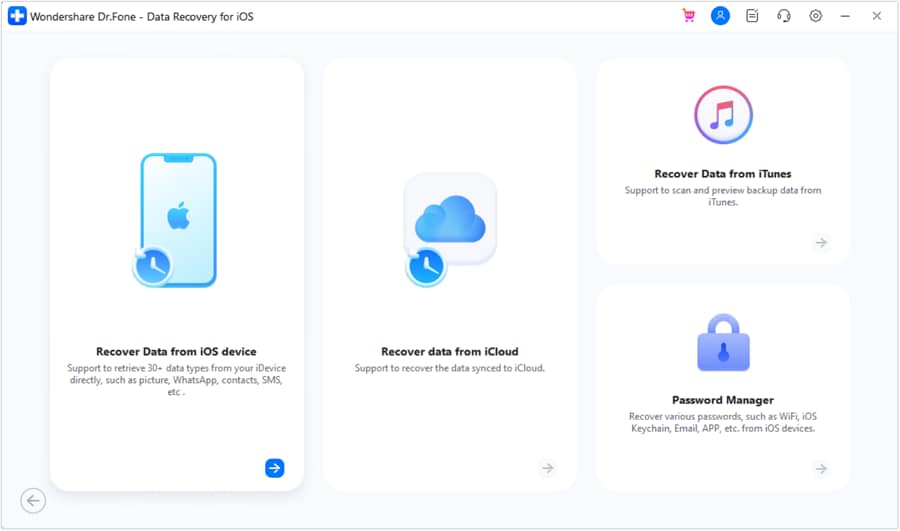
Step 4 Select the iTunes Source
From the left sidebar, choose Recover Data from iTunes to instruct the software to read your local backup directory.
-
Step 5 Begin the Scan
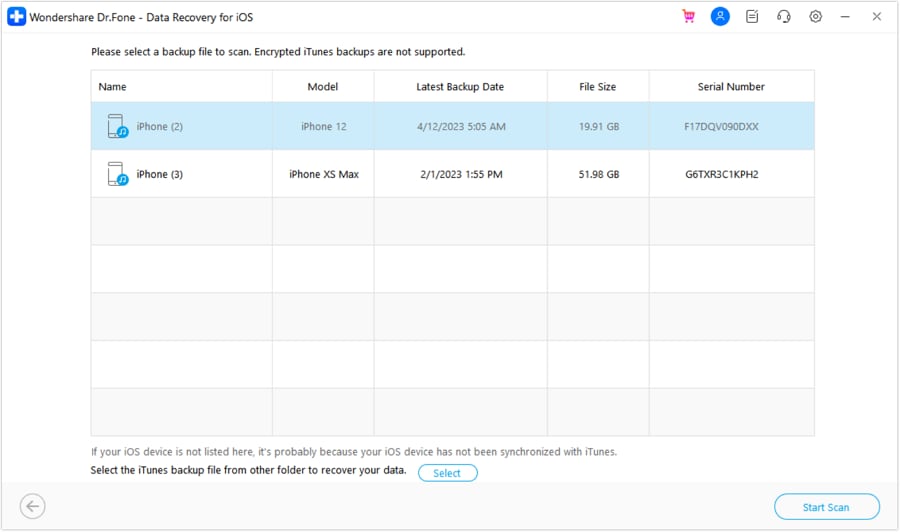
Highlight the specific backup file associated with your device and hit Start Scan.
-
Step 6 Filter the File Types
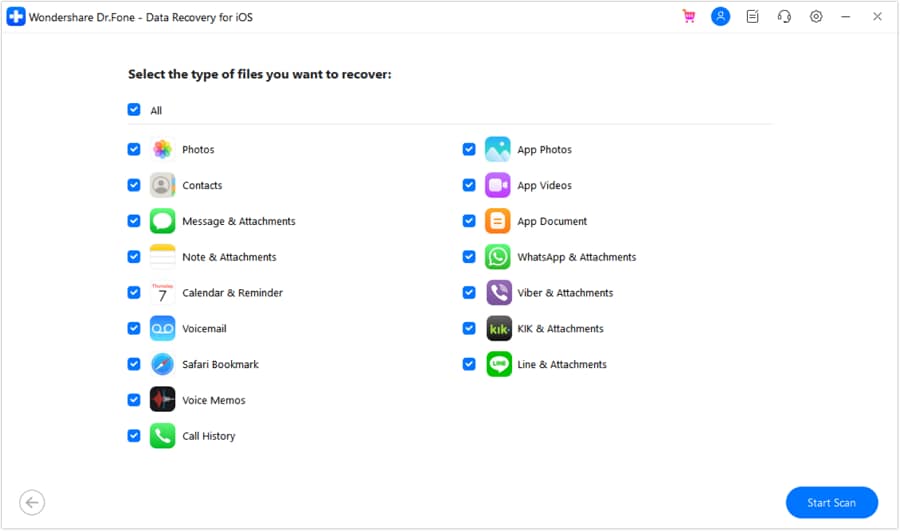
To speed up the extraction process, uncheck unnecessary boxes and leave only Message and Attachments selected.
-
Step 7 Review and Restore
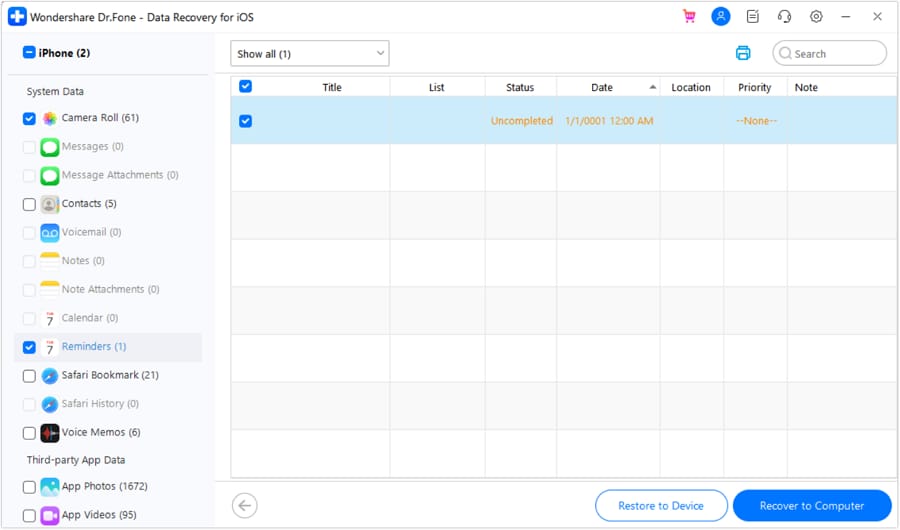
Once the scan finalizes, preview the individual messages. Check the items you want back and click Restore to Device.
-
Step 8 Confirm Transfer Destination
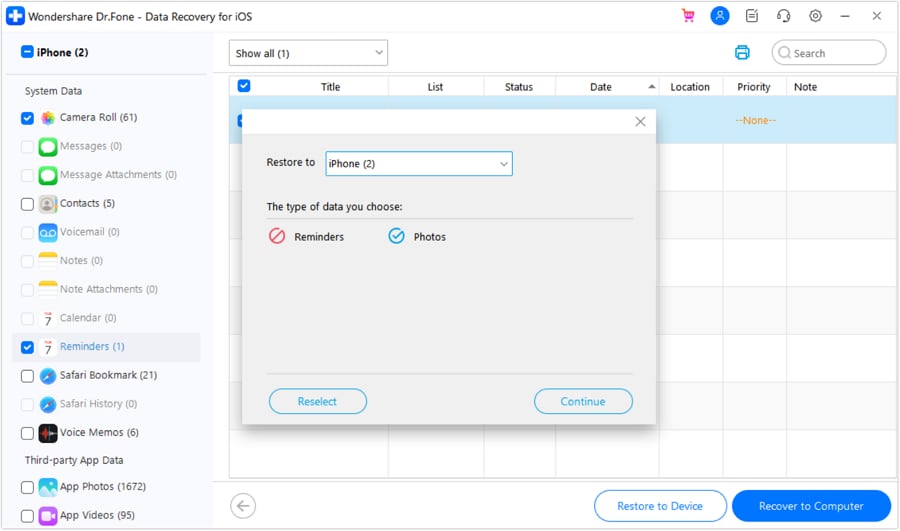
Select your currently connected iPhone in the dialog box and click Continue to proceed.
-
Step 9 Authorize the Action
Input your device password if requested to authenticate and finalize the seamless transfer of your recovered messages.

Within a few short moments, those critical textual memories will populate back into your iPhone's messaging app seamlessly.
Part 3. How to Restore Deleted Text Messages on iPhone from an iCloud Backup
If you prefer a wireless method without relying on a computer, retrieving your texts from an iCloud backup serves as Apple's official cloud solution. Similar to the iTunes approach, this recovery path requires an existing backup and involves a complete factory reset. Consequently, you will have to restore deleted text messages on iPhone by overriding all current system data with the archived version saved on Apple's servers.
- Operates entirely wirelessly; no computer required.
- Maintained automatically in the background by Apple.
- Mandates an immediate erasure of all content and settings.
- Erases new photos and data generated after the backup.
- Lacks a preview function to verify message existence before wiping.
Method 3.1: Retrieve Deleted Text Messages in Bulk
If you prefer using the built-in iOS framework, iCloud provides a straightforward pathway to bulk restore. Keep in mind that iCloud generally offers a standard 5GB limit on free accounts, meaning extensive data libraries might not be fully backed up unless you subscribe to iCloud+. If you are confident the missing messages reside safely within a recent cloud snapshot, you must wipe your device clean first to initiate the download.
Here is how to execute a factory reset and full iCloud retrieval:
-
Step 1 Initiate Factory Reset
Open the Settings menu, navigate to General, scroll to the bottom, and select Transfer or Reset iPhone (or Reset), then choose Erase all Content and Settings.
-
Step 2 Reboot and Configure
Once the device restarts and displays the Hello screen, proceed through the standard initial setup until you reach the Apps & Data screen.
-
Step 3 Select iCloud Backup
Tap on Restore from iCloud Backup.
-
Step 4 Sign In and Download
Enter your Apple ID credentials to access your iCloud storage, then select the most relevant backup timestamp to begin importing your older texts.

Depending on internet speeds, it could take a considerable amount of time to restore the entire operating footprint. Given the high risk of erasing recent, unbacked-up data, proceeding with caution—or utilizing a more precise tool—is strongly recommended.
Method 3.2: Retrieve Deleted Text Messages Selectively via iCloud
Although iCloud is structurally excellent for creating safety nets, it severely limits your ability to inspect or parse its contents independently. You cannot simply view a single text thread stored in the cloud; Apple forces you to overwrite everything to get it back.
This is where Wondershare Dr.Fone - Data Recovery (iOS) proves invaluable once again. It bypasses Apple's rigid ecosystem rules by connecting directly to your iCloud account, allowing you to selectively pull down messages without executing a perilous factory reset on your iPhone 17 or any preceding model.
Here is how to extract texts selectively from an iCloud archive:
-
Step 1 Load the Recovery Program
Launch Wondershare Dr.Fone on your computer and establish a secure connection with your iPhone via a USB cable.
-
Step 2 Enter the Recovery Module
From the main interface toolbox, select the Data Recovery icon, then choose iOS on the subsequent screen.
-
Step 3 Designate iCloud Recovery
Click on Recover Data from iCloud from the available side menu options.
-
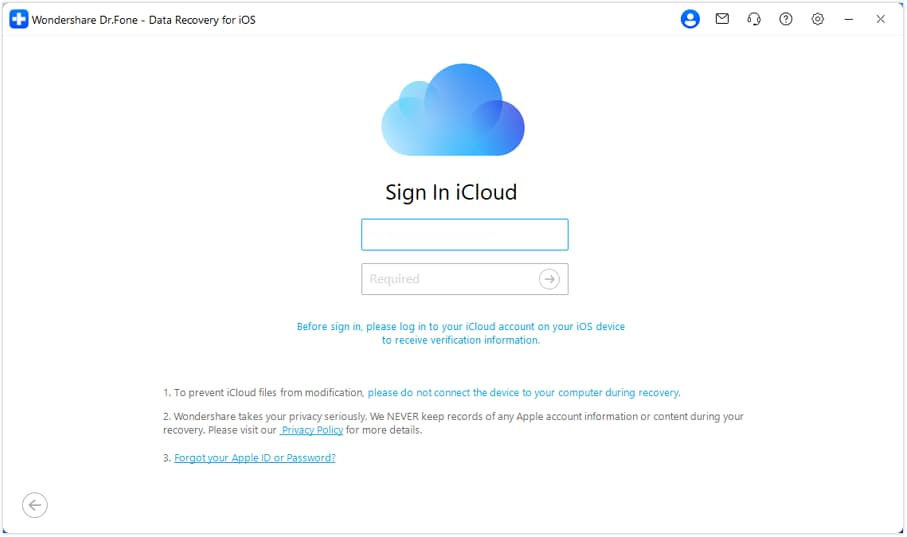
Step 4 Authenticate the Account
Input your Apple ID credentials to allow the software to connect securely to your iCloud storage.
-
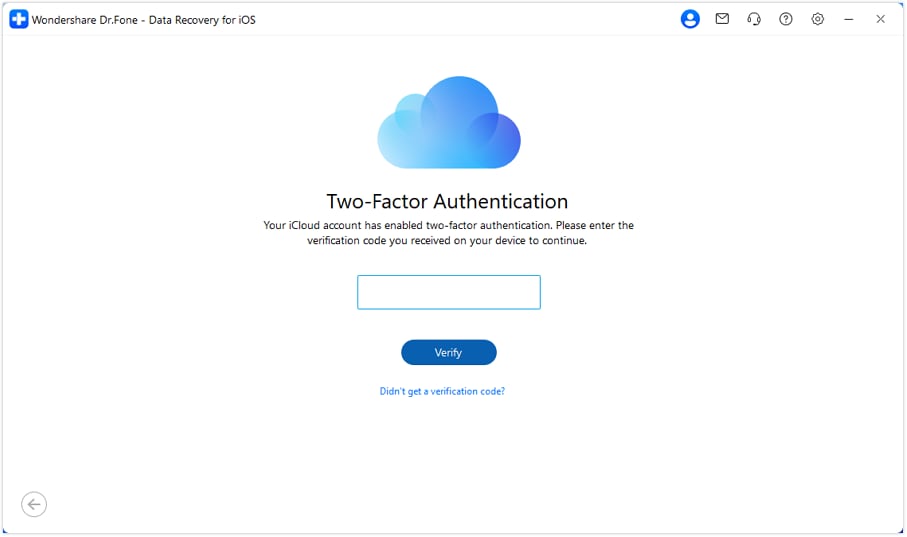
Step 5 Pass 2FA Verification
Since Apple enforces two-factor authentication, check your trusted devices for the login code and enter it to proceed.
-
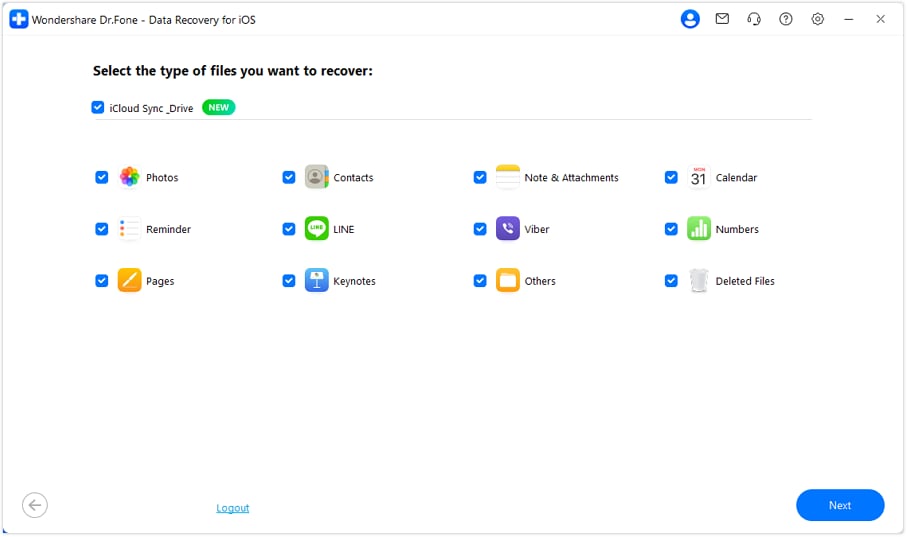
Step 6 Target Message Data
Check the box specifically labeled Messages and Attachments, then press Next to start downloading that category.
-
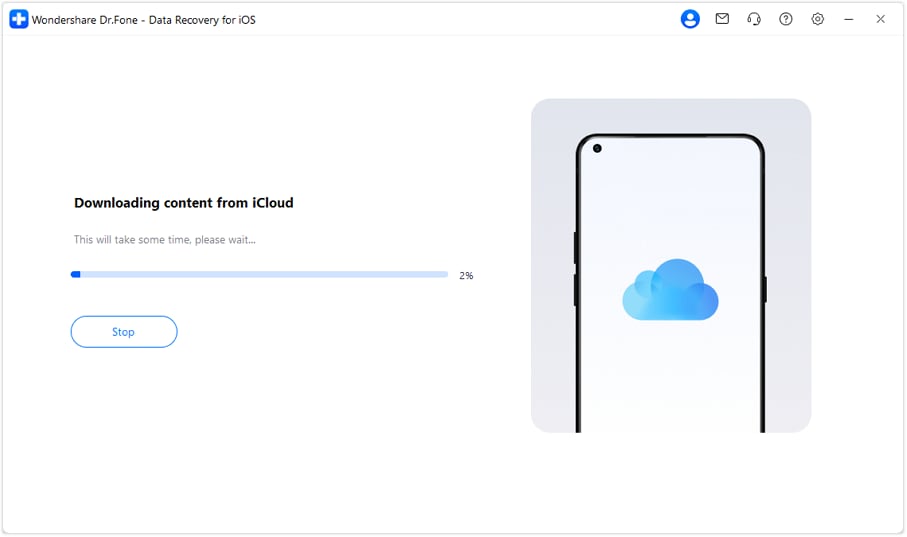
Step 7 Monitor the Progress
The system will compile the found data. You can halt the scan early if your desired messages appear immediately.
-
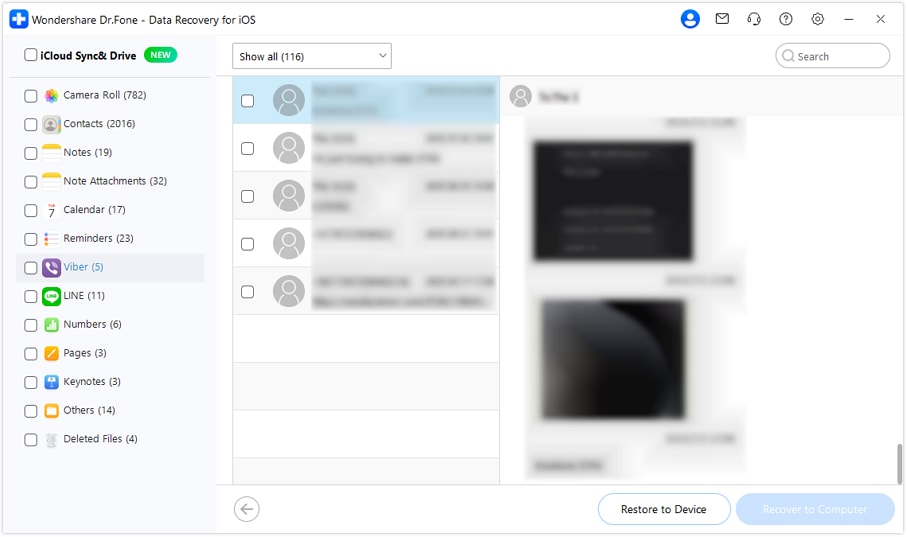
Step 8 Restore Handpicked Texts
Review the compiled list, check off the distinct threads you require, and click Restore to Device.
-
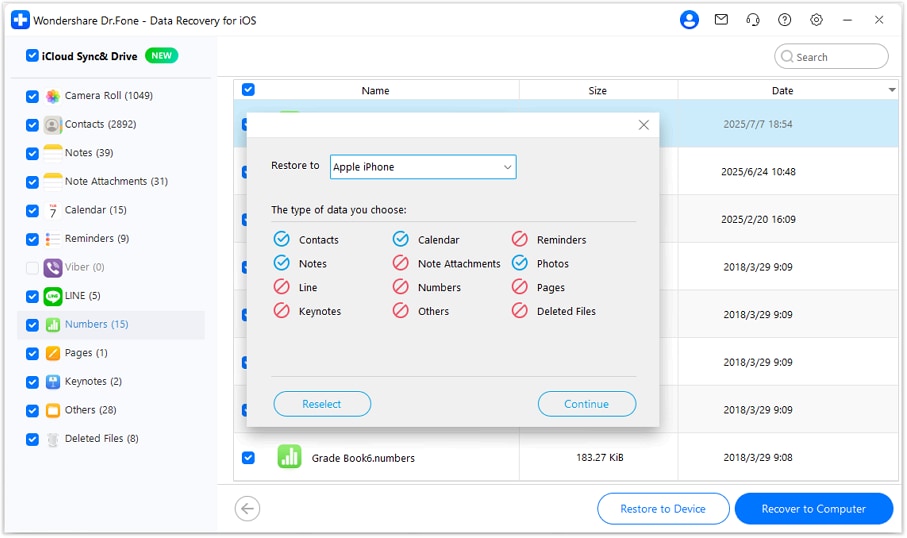
Step 9 Finalize Destination Mapping
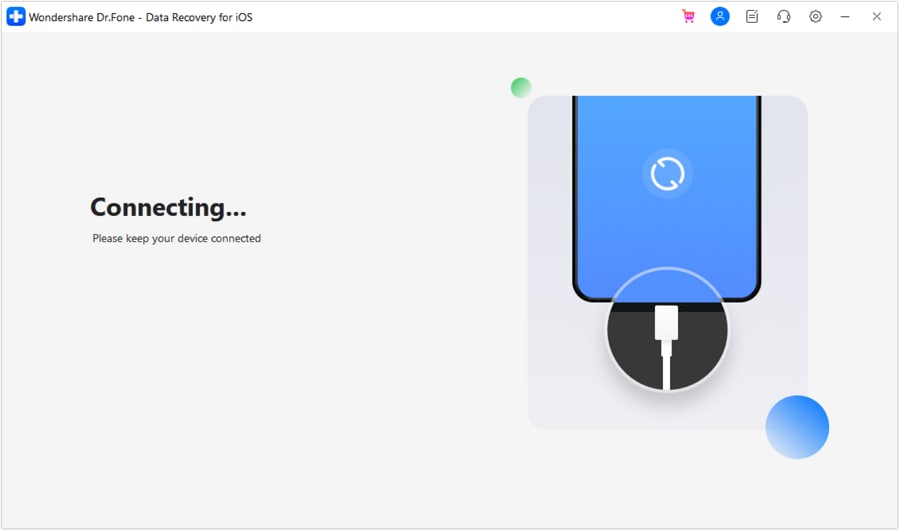
In the prompt, select your connected iPhone and hit Continue. Ensure the cable remains connected while the software pushes the texts back onto your phone.
-
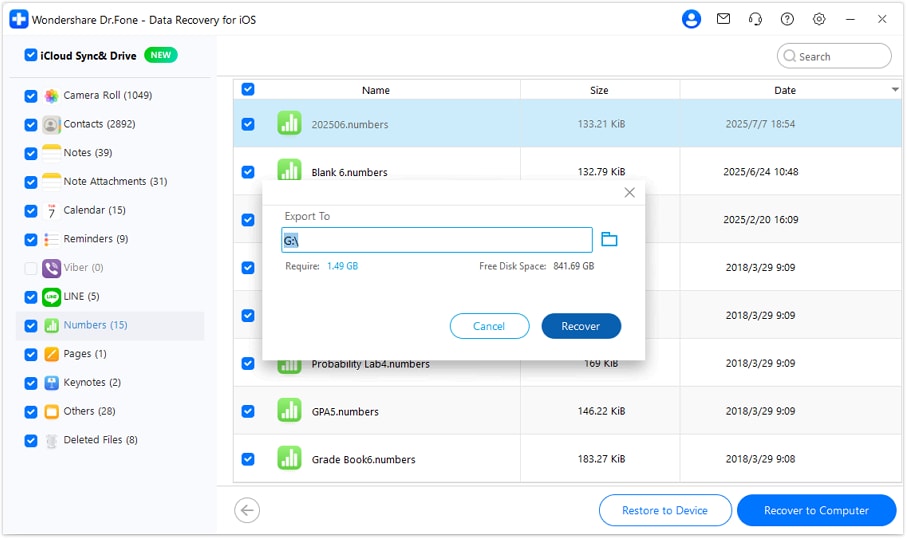
Step 10 Optional PC Save
If you prefer an offline desktop copy for legal or personal records, you can also select Recover to Computer.
Part 4. How to Find Deleted Messages on iPhone Without a Backup
A staggering number of users face data loss without having maintained an active iCloud or iTunes backup. You might logically conclude that attempting to restore deleted text messages on iPhone under these circumstances is a lost cause.
However, owing to the way iOS manages flash storage memory, deleted messages aren't instantly wiped; their database sectors are simply unindexed and marked as available space. Until new incoming data overwrites those exact memory blocks, professional tools can unearth them.
To capitalize on this window of opportunity, we highly recommend utilizing Wondershare Dr.Fone - Data Recovery (iOS). Recognized for possessing one of the highest recovery success rates in the industry, this desktop application plunges deep into the iPhone's SQL database structure to retrieve stranded texts. It performs impeccably on all modern architectures, including the A-series chips housed in the iPhone 17.

For those lacking a backup, follow this precise walkthrough to excavate your messages directly from the device’s internal drive:
-
Step 1 Install the Recovery Suite
Download Wondershare Dr.Fone, run the setup on your Mac or PC, and launch the primary application dashboard.
-
Step 2 Choose iOS Integration
Select the iOS option in the device selection menu to load Apple-specific recovery scripts.
-
Step 3 Select Direct Device Recovery
Rather than picking a cloud or backup source, click on Recover Data from iOS device.
-
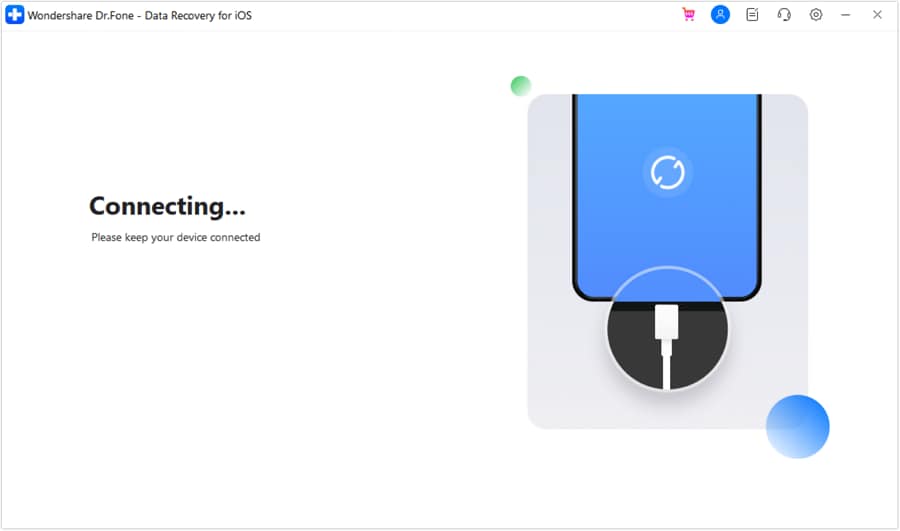
Step 4 Establish the Physical Connection
Plug your iPhone into the computer's USB port. Ensure you tap 'Trust This Computer' on your phone screen if prompted.
-
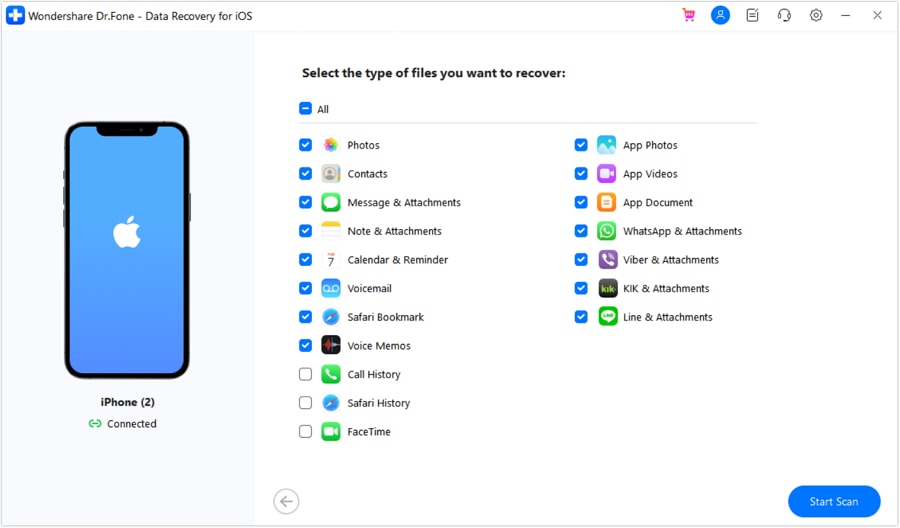
Step 5 Isolate the File Parameters
On the scan settings page, select Messages and Attachments to speed up the scanning duration, then click Start Scan.
-
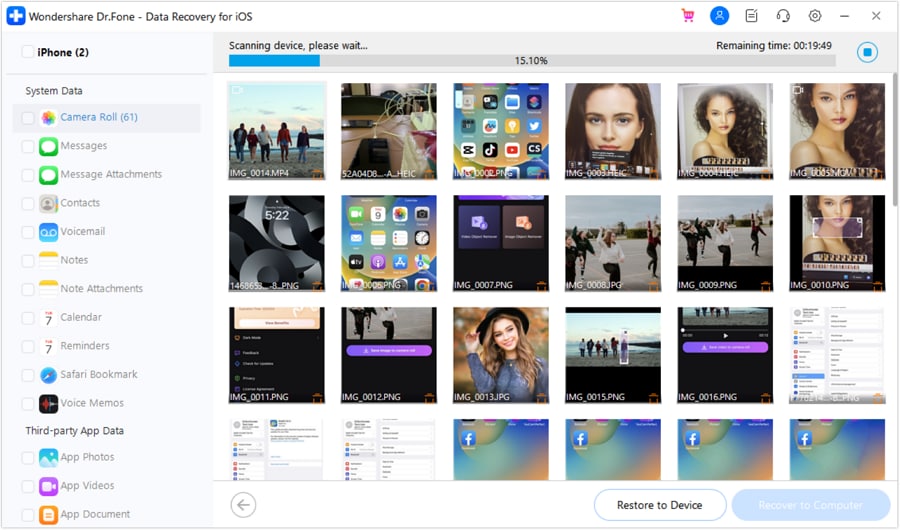
Step 6 Wait for the Deep Scan
The program will rigorously scan the unallocated sectors of your iPhone's flash drive. This phase may take several minutes depending on storage size.
-
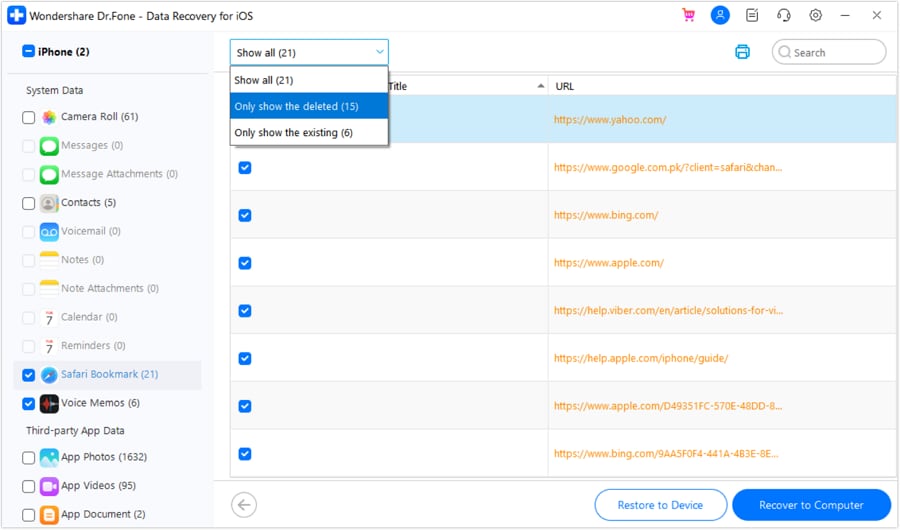
Step 7 Preview the Uncovered Data
Once populated, look through the preview panel. Select the critical texts you require, then press Restore to Device.
-
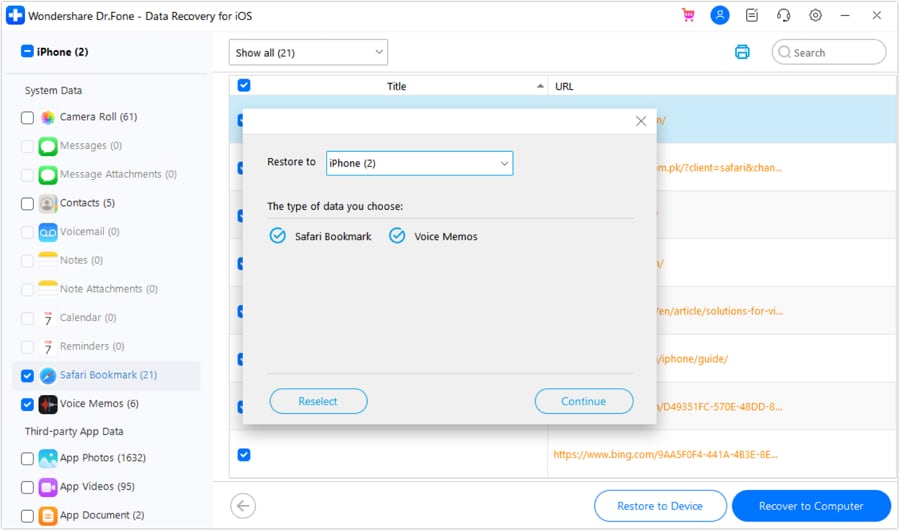
Step 8 Confirm the Transfer
Ensure your connected iPhone is selected as the designated save point in the pop-up window, and click Continue.
-
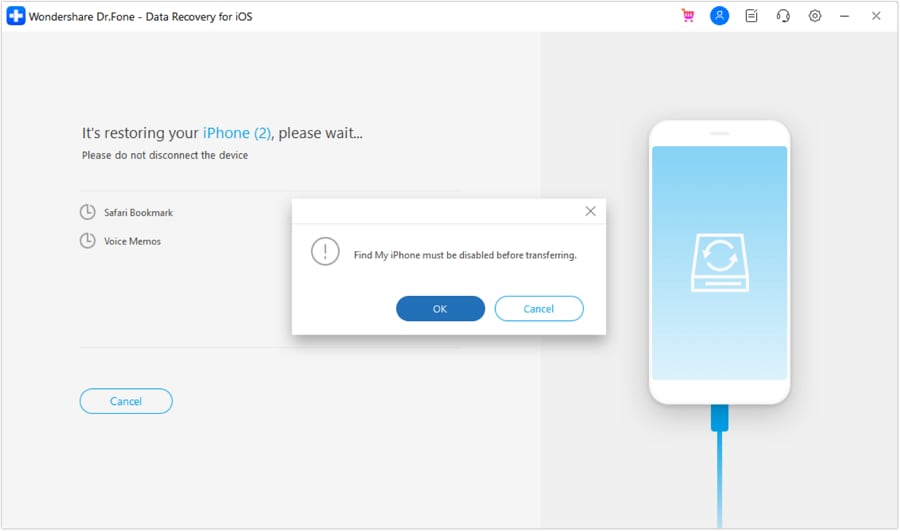
Step 9 Disable Tracking Protections
For the software to modify system files and inject the messages back in, you must temporarily disable the 'Find My' feature within your iCloud settings.
-
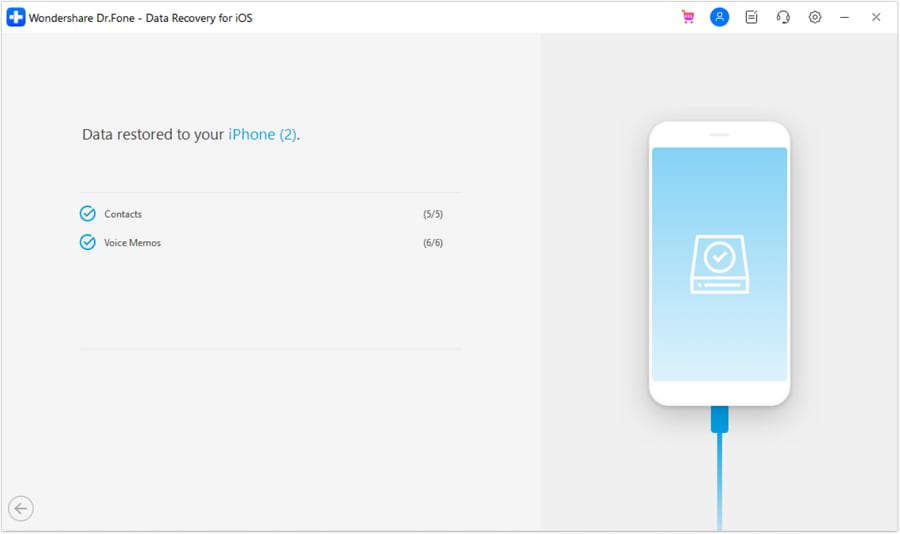
Step 10 Finalize Recovery
Immediately after turning 'Find My' off, the software completes the push, successfully repopulating your inbox.
-
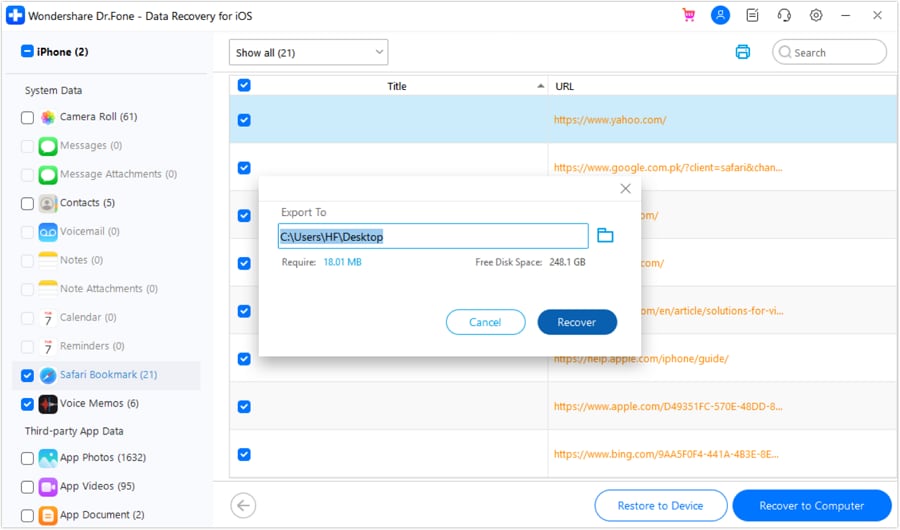
Step 11 Extract to PC (Alternative)
If preferred, click Recover to Computer to render the texts in an easily readable HTML or CSV format on your desktop.
Conclusion
Your text threads carry essential daily updates, vital business communication, and irreplaceable personal memories. When data disaster strikes, knowing exactly how to recover deleted messages on iPhone drastically limits the fallout. Whether you pull recent conversations from the built-in trash bin, execute a full iTunes restore, or leverage cloud backups, Apple provides decent rudimentary safety nets.
However, when standard protocols fail—or when you refuse to overwrite your existing device footprint—third-party intervention is necessary. We strongly advise utilizing Dr.Fone - Data Recovery (iOS). Engineered to safely unearth and selectively restore SMS, iMessage data, and media attachments across all Apple ecosystems including the iPhone 17, it serves as the ultimate insurance policy for your digital life.
FAQ
-
1. Why can't I see the 'Recently Deleted' folder in my Messages app?
The 'Recently Deleted' filtering system is strictly native to iPhones running iOS 16, iOS 17, or newer builds. If your device utilizes an older iOS architecture, this recovery bin simply does not exist. Additionally, the folder operates on an automated purge cycle; messages deleted beyond the 30 to 40-day window are permanently scrubbed from this interface. -
2. Can I recover text messages that were deleted years ago?
Attempting to retrieve messages eradicated several years ago via internal device scanning is practically impossible, as normal daily phone usage will have thoroughly overwritten those old SQL database fragments. Your sole remaining option is to track down and restore an archaic iTunes desktop backup or an obsolete iCloud save file originally generated during that specific era. -
3. Is it safe to use third-party data recovery software like Dr.Fone?
Yes, engaging professional and commercially verified software such as Dr.Fone - Data Recovery is entirely secure. The software engages with your internal iPhone memory in a strict read-only state during the scanning phase, meaning it will not corrupt, alter, or infect your existing operational data. Always secure the installation file directly from the certified Wondershare homepage to avoid malicious clones. -
4. Will restoring an iCloud backup delete my current photos?
Yes. Executing a standard Apple iCloud restore necessitates an absolute factory reset, meaning your device is wiped clean. It will then revert to the exact data arrangement captured on the date of that specific backup. Consequently, any newly captured photos, acquired applications, or saved documents produced after that backup timestamp will be permanently erased during the transition.
 Add Wondershare Dr.Fone as a preferred source on Google